1. บทนำ
The OTOFIX D1 Max is a new generation, high-end diagnostic scan tool designed for comprehensive vehicle diagnostics and maintenance. It combines powerful hardware with advanced software capabilities to provide efficient and accurate solutions for automotive professionals and enthusiasts. This manual provides detailed instructions on setting up, operating, maintaining, and troubleshooting your OTOFIX D1 Max scanner.

Image 1.1: OTOFIX D1 Max Scanner highlighting key features like 40+ HOT Services, 3X Faster AutoScan 2.0, All System Diagnostics, Guided Functions, Blu. Wireless VCI, Wide Coverage, CAN-FD & DoIP, 2015+ Renault SGW, and 2 Years Update.
2. สินค้าหมดview
The OTOFIX D1 Max is engineered for superior performance and user experience. It features a robust design and advanced functionalities to meet the demands of modern vehicle diagnostics.
2.1 คุณสมบัติหลัก
- ECU Coding & Offline ECU Programming: Advanced capabilities for vehicle personalization and module replacement.
- ฟังก์ชันการบริการมากกว่า 40 รายการ: Comprehensive maintenance solutions including Oil Reset, TPMS Reset, Injector Coding, Suspension, and Throttle Matching.
- Active Test (Bi-directional Control): Perform component tests by sending commands to vehicle modules.
- OE-level Full-System Diagnostics: Access all available vehicle systems for reading/clearing codes, live data, and ECU information.
- ครอบคลุมยานพาหนะหลากหลายประเภท: Supports over 80 brands and 10,000+ vehicle models (1996-2025).
- โปรโตคอลขั้นสูง: Supports DoIP & CAN FD for faster data transfer and diagnostics.
- การเข้าถึงเกตเวย์ที่ปลอดภัย: Compatible with FCA (2018+) and Renault (2015+) SGW-equipped vehicles.
- Auto VIN 2.0: Faster and more accurate automatic vehicle identification.
- การพิมพ์ผ่าน Wi-Fi: Wirelessly print diagnostic reports.
- 2-Years Free Software Updates: Ensures continuous functionality and compatibility.
2.2 ข้อมูลจำเพาะฮาร์ดแวร์
| ส่วนประกอบ | ข้อมูลจำเพาะ |
|---|---|
| ระบบปฏิบัติการ | แอนดรอยด์ 11.0 |
| โปรเซสเซอร์ | Qualcomm CPU (4-Core, 1.8GHz) |
| หน่วยความจำ | แรม 4GB + พื้นที่เก็บข้อมูล 128GB |
| ขนาดหน้าจอ | 10.4 นิ้ว |
| ความละเอียดหน้าจอ | 2000*1200 |
| ความจุของแบตเตอรี่ | ลิเธียมไอออน 7250mAh |
| กล้องถ่ายรูป | Front: 5MP; Rear: 8MP |
| Lower Computer (VCI) | V1 |
| ขนาด | 10.8 x 7.1 x 0.7 นิ้ว |
| น้ำหนักสินค้า | 9.79 ปอนด์ |

Image 2.1: Visual representation of OTOFIX D1 Max hardware specifications including Android 11.0, 4-Core CPU, 10.4" screen, 4+128G memory, 7250mAh battery, and 5MP/8MP cameras.
3. การตั้งค่า
3.1 การแกะกล่องและการตรวจสอบเบื้องต้น
Upon receiving your OTOFIX D1 Max, carefully open the packaging and inspect all components for any signs of damage. Ensure all items listed in the package contents are present.
3.2 เนื้อหาบรรจุภัณฑ์
The OTOFIX D1 Max package typically includes the following items:
- 1x OTOFIX D1 MAX Diagnostic Tool (Tablet)
- 1x OTOFIX V1 (Vehicle Communication Interface)
- 1x สาย USB-C
- 1x AC/DC Power Adapter (12V)
- 1x กระเป๋าใส่ของพกพา
- 1x Packing List
- 1x คู่มืออ้างอิงฉบับย่อ
- 1x Soft Cloth
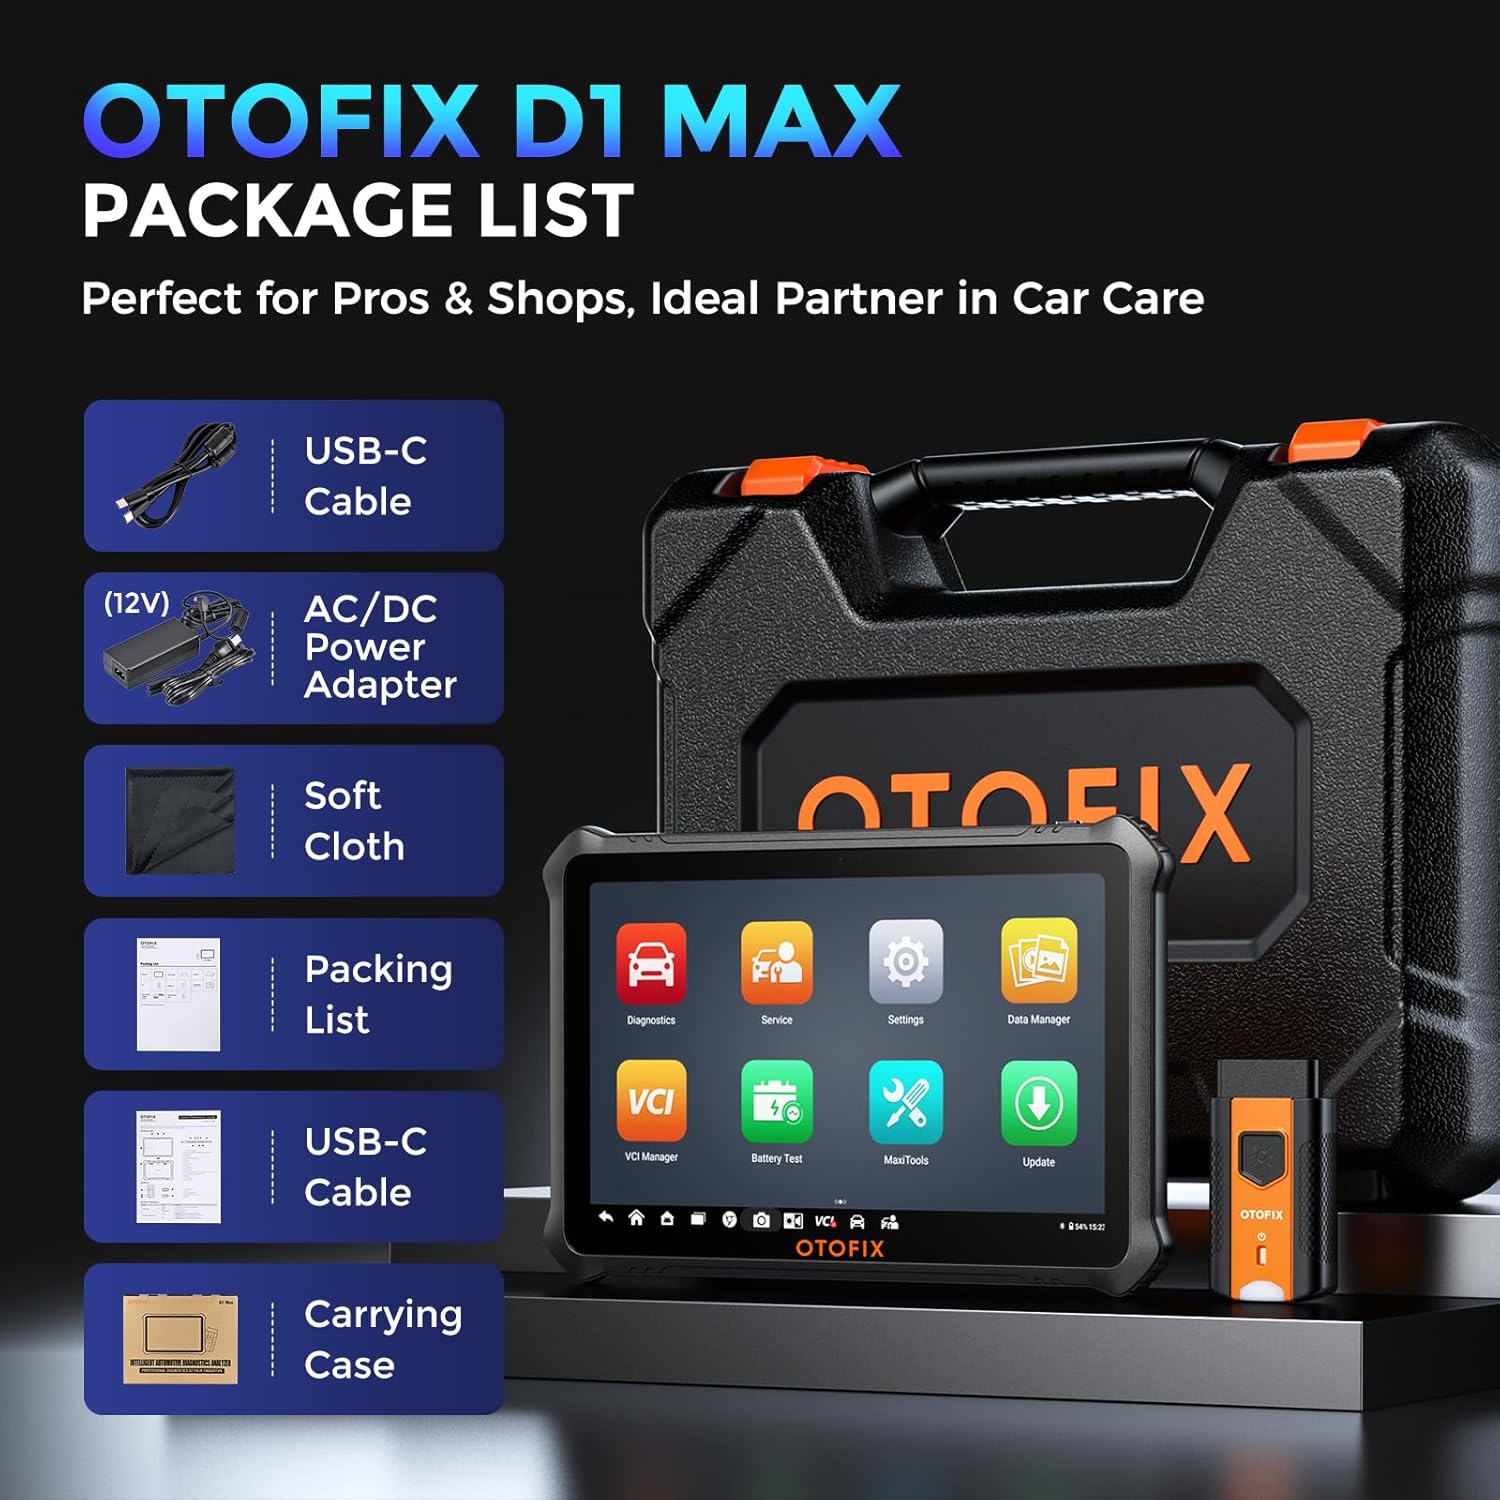
Image 3.1: Contents of the OTOFIX D1 Max package, including the tablet, VCI, cables, power adapter, carrying case, and documentation.
3.3 การเปิดเครื่องและการกำหนดค่าเริ่มต้น
- Connect the AC/DC Power Adapter to the OTOFIX D1 Max tablet and a power outlet to ensure the device is charged.
- Press and hold the Power button until the OTOFIX logo appears on the screen.
- ทำตามคำแนะนำบนหน้าจอเพื่อทำการตั้งค่าเริ่มต้นให้เสร็จสมบูรณ์ ซึ่งรวมถึงการเลือกภาษา การเชื่อมต่อ Wi-Fi และการตั้งค่าเขตเวลา
- Register your device and activate the software updates as prompted. A stable internet connection is required for this step.
4. การดำเนินการ
4.1 การเชื่อมต่อกับยานพาหนะ
- ค้นหาพอร์ต OBDII ของรถยนต์ ซึ่งโดยทั่วไปจะอยู่ใต้แผงหน้าปัดด้านคนขับ
- Plug the OTOFIX V1 (VCI) into the vehicle's OBDII port. The VCI's indicator light should illuminate.
- On the OTOFIX D1 Max tablet, ensure Bluetooth is enabled and the VCI is paired. The VCI Manager application can be used to manage the connection.
- หมุนกุญแจรถไปที่ตำแหน่งเปิด (เครื่องยนต์ดับ)
4.2 การวินิจฉัยระบบทั้งหมดระดับ OE
The OTOFIX D1 Max can access all available vehicle systems to perform comprehensive diagnostics.
- อ่านรหัส: Retrieve Diagnostic Trouble Codes (DTCs) from all control modules.
- รหัสที่ชัดเจน: Erase DTCs after repairs are completed.
- ข้อมูลสด: View ข้อมูลแบบเรียลไทม์จากเซ็นเซอร์และส่วนประกอบต่างๆ
- ตรึงข้อมูลเฟรม: บันทึกภาพสภาพรถขณะที่รหัสข้อผิดพลาด (DTC) ปรากฏขึ้น
- ข้อมูล ECU: เรียกดูข้อมูลโดยละเอียดเกี่ยวกับหน่วยควบคุมอิเล็กทรอนิกส์

Image 4.1: Illustration of OE-level all system diagnostics, showing the scanner connected to a car and accessing various systems like Engine, ABS, EPB, and BMS.
4.3 ECU Coding & Advanced Functions
This function allows for advanced vehicle customization and module adaptation.
- การเขียนโค้ดออนไลน์: Automatically retrieves coding values from the server for quick and precise operations. Compatible with brands like Volkswagen, Audi, Skoda, Peugeot, Citroen, DS, Porsche, BMW, Mini, Nissan, Infiniti, Nissan GT-R, Renault.
- Offline Coding: Allows manual input of coding values, suitable for experts and a wider range of car builds. Compatible with Ford, Ford AU, Ford EU, Subaru, Land Rover, Jaguar, Peugeot, Citroen, DS, Volkswagen, Volkswagen Brazil, Audi, Skoda, Volkswagen CV.
- Offline ECU Programming: Replace or update ECU software, program new blank ECUs, and fix software-controlled issues. Compatible with Ford, Ford AU, Ford EU, Land Rover, Jaguar, Opel, Vauxhall.
- การปรับแต่ง: Customize vehicle settings such as disabling auto start-stop, activating daytime running lights, and other comfort functions.
- ฟังก์ชันแนะนำของ VAG: Provides step-by-step procedures for complex diagnostics on Volkswagen, Audi, Skoda, and VW vehicles, skipping channel numbers and security codes.

ภาพที่ 4.2: รายละเอียด view of ECU Programming & Coding capabilities, including open/close functions, module matching, personalization, parameter reset, and fixing complex issues.
5. ฟังก์ชั่นการบริการ
The OTOFIX D1 Max offers over 40 maintenance and service functions to address common vehicle issues.
- รีเซ็ตน้ำมัน: รีเซ็ตระบบอายุการใช้งานน้ำมันเครื่องหลังจากเปลี่ยนถ่ายน้ำมันเครื่องแล้ว
- รีเซ็ต TPMS: รีเซ็ตระบบตรวจสอบแรงดันลมยาง
- รีเซ็ต SAS: ปรับเทียบเซ็นเซอร์มุมพวงมาลัย
- รีเซ็ต EPB: Reset the electronic parking brake pads after replacement.
- การปรับคันเร่งให้เหมาะสม: เรียนรู้ตำแหน่งของลิ้นปีกผีเสื้ออีกครั้ง
- รีเซ็ต BMS: ลงทะเบียนแบตเตอรี่ใหม่หลังจากเปลี่ยนเสร็จแล้ว
- เลือดออกบริเวณ ABS: Perform ABS brake bleeding to get a firm brake pad.
- การระงับ: Adjust the vehicle height sensor for suspension calibration.
- Clutch Learning: Perform clutch adaptation.

ภาพที่ 5.1: จบแล้วview of 40+ service functions, including Oil Reset, SAS Reset, EPB Reset, Injector Coding, Throttle, BMS Reset, and Clutch Learning.
6. การควบคุมแบบสองทิศทาง (การทดสอบเชิงรุก)
The bi-directional control feature allows the scanner to send commands to vehicle modules to perform specific tests, narrowing down diagnostic scope and quickly pinpointing problems.
- Activate components like windows, headlights, wipers, sunroof, radiator fans, fuel pump, A/C clutch, etc.
- Test the functionality of various actuators without disassembling the vehicle.

Image 6.1: Demonstration of bi-directional control, showing the scanner sending commands to vehicle components like lights, fuel pump, A/C clutch, and window wipers.
7. การบำรุงรักษา
Proper maintenance ensures the longevity and optimal performance of your OTOFIX D1 Max scanner.
- การอัปเดตซอฟต์แวร์: Regularly update the software to ensure compatibility with new vehicle models and access to the latest features. The device includes 2 years of free updates.
- การทำความสะอาด: ใช้แบบนุ่มๆamp ใช้ผ้าเช็ดทำความสะอาดหน้าจอและตัวเครื่องแท็บเล็ต หลีกเลี่ยงการใช้สารทำความสะอาดที่มีฤทธิ์กัดกร่อนหรือตัวทำละลาย
- พื้นที่จัดเก็บ: เมื่อไม่ใช้งาน ควรเก็บอุปกรณ์ไว้ในกล่องพกพาในที่แห้งและเย็น หลีกเลี่ยงอุณหภูมิที่สูงหรือต่ำเกินไป
- การดูแลแบตเตอรี่ ควรชาร์จแบตเตอรี่เป็นประจำ แม้ว่าจะไม่ได้ใช้งานอุปกรณ์บ่อยนัก เพื่อรักษาอายุการใช้งานของแบตเตอรี่
- VCI Care: Keep the VCI clean and free from debris. Ensure the OBDII connector pins are not bent or damaged.

Image 7.1: Information regarding the included 2 years of free software updates, emphasizing cost savings.
8 การแก้ไขปัญหา
This section provides solutions to common issues you might encounter with your OTOFIX D1 Max scanner.
8.1 ปัญหาทั่วไปและแนวทางแก้ไข
- อุปกรณ์ไม่เปิดเครื่อง: ตรวจสอบให้แน่ใจว่าแบตเตอรี่ชาร์จเต็มแล้ว เสียบอะแดปเตอร์แปลงไฟแล้วลองใหม่อีกครั้ง หากปัญหายังคงอยู่ โปรดติดต่อฝ่ายสนับสนุน
- VCI เชื่อมต่อไม่ได้: Check if the VCI is securely plugged into the vehicle's OBDII port. Ensure Bluetooth is enabled on the tablet and the VCI is paired. Restart both the tablet and the VCI.
- ไม่สามารถสื่อสารกับยานพาหนะได้: Verify the vehicle's ignition is ON. Check the OBDII port for power. Ensure the vehicle model and year are correctly selected in the software. Try a different vehicle to rule out vehicle-specific issues.
- ซอฟต์แวร์ค้าง/ทำงานช้า: Close unnecessary applications. Clear cache if available in settings. Ensure sufficient storage space. Perform a software update if available.
- ฟังก์ชันการวินิจฉัยไม่ทำงาน: Ensure the vehicle supports the specific function. Some advanced functions may require specific vehicle conditions or procedures. Refer to the on-screen guided functions or vehicle service manual.
8.2 การติดต่อฝ่ายสนับสนุน
If you encounter issues that cannot be resolved using the troubleshooting steps above, please contact OTOFIX customer support. Provide detailed information about the problem, including any error messages, vehicle details, and steps taken to troubleshoot.
อีเมล: otofixaftersales-amz@outlook.com
Support is available Monday-Friday 9:00 AM - 6:00 PM EST, with 24/7 support available via email.
9. ข้อมูลจำเพาะ
Detailed technical specifications for the OTOFIX D1 Max scanner.
| คุณลักษณะ | ค่า |
|---|---|
| ยี่ห้อ | โอโตฟิกซ์ |
| แบบอย่าง | OTOFIX D1 MAX Scanner |
| ระบบปฏิบัติการ | แอนดรอยด์ 11.0 |
| โปรเซสเซอร์ | 4-Core, 1.8GHz |
| หน่วยความจำ | แรม 4GB, พื้นที่เก็บข้อมูล 128GB |
| ขนาดหน้าจอ | 10.4 นิ้ว |
| ความละเอียดหน้าจอ | 2000 x 1200 |
| แบตเตอรี่ | ลิเธียมไออน 7250mAh (รวมอยู่ด้วย) |
| กล้องถ่ายรูป | Front: 5MP; Rear: 8MP |
| การเชื่อมต่อ | ไวไฟ, บลูทูธ |
| โปรโตคอลที่รองรับ | DoIP, CAN FD, J2534 (with VCI) |
| ขนาด (กว้าง x ยาว x สูง) | 10.8 x 7.1 x 0.7 นิ้ว |
| น้ำหนักสินค้า | 9.79 ปอนด์ |
| หมายเลขชิ้นส่วนของผู้ผลิต | OTOFIX D1 MAX Scanner |
| ยูพีซี | 850051166305 |
10. การรับประกันและการสนับสนุน
OTOFIX provides comprehensive support and warranty for the D1 Max scanner.
- การรับประกัน: 1-year quality undertaking.
- การอัปเดตซอฟต์แวร์: 2 years of free software updates included.
- ความช่วยเหลือด้านเทคนิค: Lifetime technical assistance is available.
- นโยบายการคืนสินค้า: Hassle-free return policy within 30 days.
- บริการลูกค้า: 24/7 support via email.
For any inquiries or support needs, please contact OTOFIX at otofixaftersales-amz@outlook.com.


