1. บทนำ
The Veise Smart Deadbolt VE33A offers advanced security and convenience for your home. This 6-in-1 keyless entry door lock features app control, multiple user PIN codes, auto-lock functionality, and a durable, waterproof design. This manual provides detailed instructions for installation, operation, maintenance, and troubleshooting to ensure optimal performance of your smart deadbolt.

Image: The Veise Smart Deadbolt VE33A shown alongside a smartphone displaying its control application. The lock features a circular keypad with numbers 0-9 and a central button, all in a matte black finish.
2. รายการชิ้นส่วน
ก่อนเริ่มการติดตั้ง โปรดตรวจสอบให้แน่ใจว่ามีส่วนประกอบทั้งหมดอยู่ในกล่องบรรจุภัณฑ์ของคุณ:
- การประกอบภายนอก
- การประกอบภายใน
- แผ่นยึด
- สลัก
- จานตี
- Reinforcement Plate (optional)
- Drive-In Collar (optional)
- กุญแจสำรอง 2 ดอก
- สกรูยึดแผ่น
- สกรูประกอบภายใน
- Exterior Assembly Screw (optional)
- สลักสกรู
- สกรูแผ่นตี
- เครื่องมือรีเซ็ต

Image: An illustration detailing the various components included with the Veise Smart Deadbolt VE33A, such as the exterior and interior assemblies, mounting plate, latch, strike plate, backup keys, and various screws.
3. การติดตั้ง
The Veise Smart Deadbolt is designed for easy installation, typically requiring only a screwdriver. Follow these steps carefully.
Video: Official installation guide for the Veise Smart Deadbolt VE33A. This video demonstrates the step-by-step process of installing the lock on a door, including preparing the door, installing the latch, and assembling the interior and exterior components.
3.1 Prepare the Door and Check Dimensions
Ensure your door meets the following specifications for proper installation:
- ความหนาของประตู: 1-3/8" ถึง 2" (35 มม. - 50 มม.)
- เส้นผ่านศูนย์กลางรู: 1-1/2" (38 มม.) หรือ 2-1/8" (54 มม.)
- เจาะตลับกุญแจ: 2-3/8" หรือ 2-3/4" (60 มม. หรือ 70 มม.)
- รูล็อค: Compatible with both chiseled and not chiseled latch holes.
- ความเข้ากันได้ของประตู: Suitable for single cylinder deadbolts. Not compatible with mortise/integrated locks.
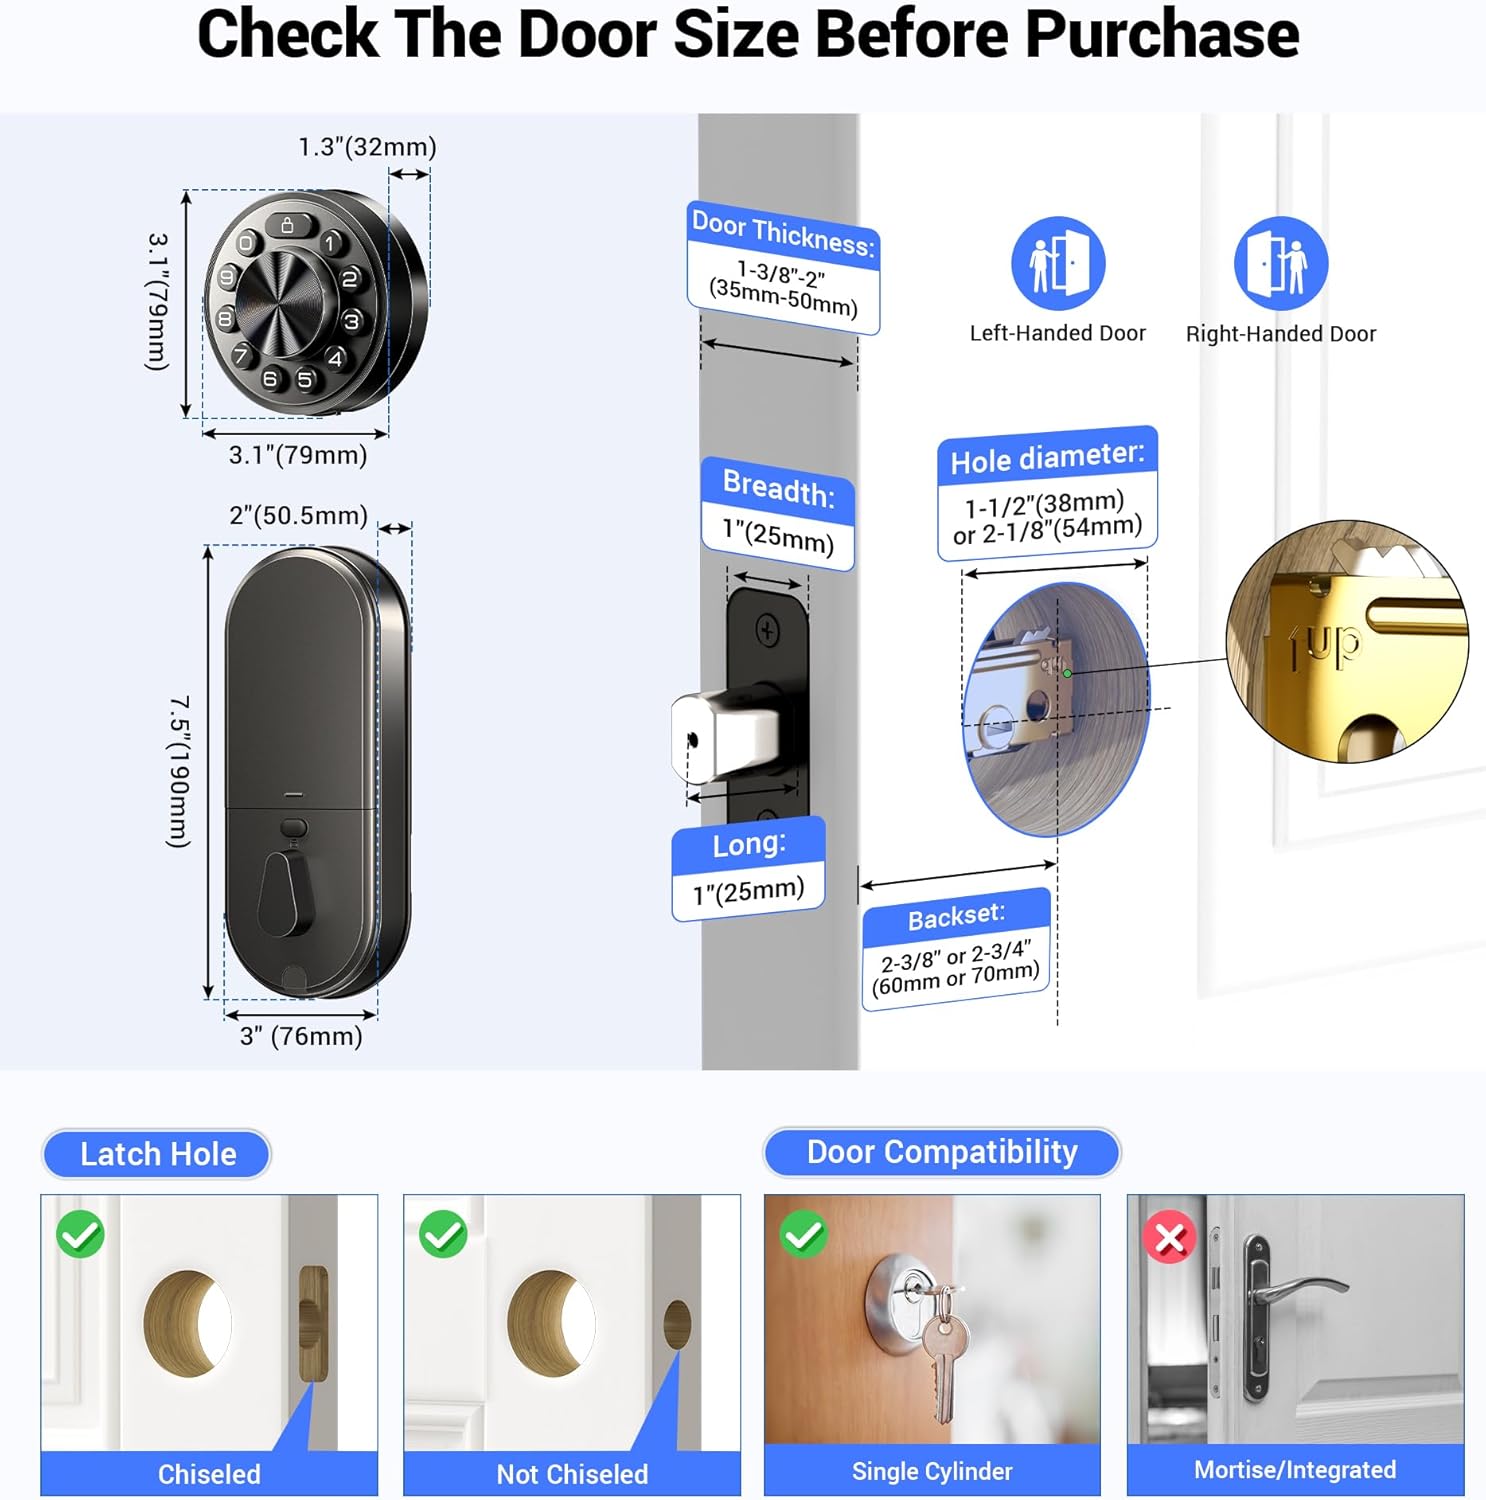
Image: A detailed diagram illustrating the required door dimensions, including thickness, hole diameter, and backset. It also shows compatibility with different latch hole types (chiseled and not chiseled) and clarifies that the lock is for single cylinder deadbolts.
3.2 Install the Latch and Strike
Install the latch into the door edge. Ensure the latch face is flush with the edge of the door. Secure it with the provided latch screws. Install the strike plate on the door frame, aligning it with the latch bolt.
3.3 ติดตั้งชุดประกอบภายนอก
Route the cable from the exterior assembly through the door hole, ensuring the latch is fully retracted. Secure the mounting plate to the door, making sure it is perpendicular to the floor and parallel to the door. Do not overtighten the screws.
3.4 ติดตั้งชุดประกอบภายใน
Keep the thumb turn in the vertical position. Connect the cable from the exterior assembly to the socket on the interior assembly. Carefully tuck the cable into the designated channel. Attach the interior assembly to the mounting plate and tighten the three screws.
3.5 Door Handing
After installing the interior assembly, install four new AA alkaline batteries. Use the Reset Tool to press and hold the Reset Button for more than 5 seconds until you hear a long "BEEP". If the reset is successful, the latch bolt will extend on its own to learn the handing orientation of the door (left-handed or right-handed).
4. คู่มือการใช้งาน
4.1 App Control (KK Home App)
Manage your Veise Smart Deadbolt effortlessly using the KK Home App. Download the app, create an account, and pair your lock via Bluetooth. Keep your phone within 2 meters of the lock during pairing.
Video: This video demonstrates the process of pairing the Veise Smart Deadbolt VE33A with the KK Home App. It covers downloading the app, creating an account, turning on Bluetooth, and connecting the device.
ด้วยแอปนี้คุณสามารถ:
- Set and send passcodes.
- Manage access rights and view access logs in real-time.
- Share access with family, visitors, or tenants.
- รับการแจ้งเตือนแบตเตอรี่ต่ำ
- Control the lock remotely when paired with a G1 WiFi gateway (sold separately).
- Integrate with Alexa and Google Assistant for voice control (G1 Gateway required).

Image: A smartphone screen displaying the KK Home App interface, highlighting features such as sharing access, managing users, local event history, low battery alerts, compatibility with Alexa, and the ability to grant access without an internet connection.
4.2 Multiple User PIN Codes
The keyless entry system supports up to 20 users with four types of PIN codes:
- รหัส PIN ถาวร: For long-term access.
- รหัส PIN ระยะเวลา: Valid for a specific time period.
- รหัส PIN แบบครั้งเดียว: For single use by visitors.
- รหัส PIN ที่ใช้ซ้ำ: For regular access, e.g., cleaners.
Unwanted passcodes can be deleted via the app with a single tap.
4.3 Auto Lock & One-Tap Lock
The deadbolt offers an auto-lock feature with an adjustable time delay from 10 to 180 seconds via the app. For immediate locking, press any button on the keypad for 2 seconds to activate the one-tap lock function.

Image: The Veise Smart Deadbolt installed on a door, with an arrow indicating the automatic locking mechanism engaging. This illustrates the auto-lock feature of the deadbolt.
4.4 Physical Key Usage
The lock includes two backup physical keys for emergency access, such as when batteries are depleted or in case of technical failure. The keyhole is discreetly hidden within the exterior assembly.
Video: This video demonstrates how to use the physical backup key for the Veise Smart Deadbolt VE33A. It shows how to access the hidden keyhole and manually unlock the deadbolt.
5. การบำรุงรักษา
5.1 การเปลี่ยนแบตเตอรี่
The Veise Smart Deadbolt requires four AA alkaline batteries (not included). The app will provide low battery alerts. To replace batteries, remove the interior assembly cover, replace the old batteries with new ones, and reattach the cover.
5.2 การดูแลทั่วไป
ทำความสะอาดภายนอกล็อคด้วยผ้านุ่มๆamp cloth. Avoid using abrasive cleaners or solvents that could damage the finish or electronic components. Ensure the keypad remains free of debris for optimal performance.
6 การแก้ไขปัญหา
โปรดดูตารางต่อไปนี้เพื่อดูปัญหาทั่วไปและวิธีแก้ไข:
| ปัญหา | สารละลาย |
|---|---|
| สลักทำงานไม่ถูกต้องหลังการติดตั้ง |
|
| การล็อคการล็อคหรือปลดล็อคไม่ราบรื่นในขณะที่ใช้การหมุนนิ้วหัวแม่มือ | ยืนยันว่าได้ติดตั้งสกรูยึดที่ถูกต้องแล้ว |
| การตั้งค่าล็อคไม่สำเร็จ |
|
| ปุ่มกดไม่ตอบสนอง |
|
| รหัส PIN หลักไม่สามารถเปลี่ยนแปลงได้ | ดูคู่มือเริ่มต้นใช้งานฉบับย่อเพื่อรีเซ็ตการล็อคและตั้งโปรแกรมรหัส PIN ใหม่ทั้งหมด |
| ฉันลืมรหัส PIN หลักของฉัน | ทำการรีเซ็ตเป็นค่าเริ่มต้นจากโรงงานเพื่อล้างรหัส PIN ทั้งหมด เมื่อการรีเซ็ตเสร็จสมบูรณ์ รหัส PIN ทั้งหมดจะถูกลบ และรหัส PIN หลักจะถูกรีเซ็ตเป็นรหัส PIN หลักเริ่มต้นที่ 12345678 |
| ล็อคอัตโนมัติไม่ทำงาน | หากไฟแสดงสถานะแบตเตอรี่กะพริบอย่างต่อเนื่อง แสดงว่าแบตเตอรี่อ่อน เปลี่ยนแบตเตอรี่ใหม่สี่ก้อนเพื่อให้ได้ประสิทธิภาพสูงสุด (แบตเตอรี่อัลคาไลน์เท่านั้น) โปรดดูการตั้งค่าด่วนเพื่อเปิดใช้งานฟังก์ชันล็อคอัตโนมัติ |
Video: This video provides instructions on how to reset the Veise Smart Deadbolt VE33A. It details the steps to perform a factory reset, which can resolve various operational issues.
7. ข้อมูลจำเพาะ
- ยี่ห้อ: เวเซ่
- ชื่อรุ่น : Veise Smart Deadbolt (VE33A)
- ชนิดล็อค : กลอนประตู, แป้นกดรหัส
- วัสดุ: อลูมิเนียม, โลหะ
- สี: สีดำด้าน
- ขนาดสินค้า : 9 x 2.2 x 3.8 นิ้ว
- น้ำหนักสินค้า: 2.86 ปอนด์
- โปรโตคอลการเชื่อมต่อ: บลูทูธ, Wi-Fi (ต้องใช้ Veise G1 WiFi Gateway)
- ประเภทตัวควบคุม: การควบคุมแอพ
- แหล่งพลังงาน: แบตเตอรี่ AA 4 ก้อน (ไม่รวม)
- คุณสมบัติพิเศษ: APP Remote Control, Easy to Install, Keyless Entry Smart Lock, Multiple Passwords, Work with Alexa and Google (G1 Gateway Required)
- การใช้ที่แนะนำ: Front Door, Back Door, Side Door, Bedroom Door, Inside, Short-term Rental Room, Apartment, Garage Door, Laundry Door, Outside

Image: The Veise Smart Deadbolt with a blue shield graphic, emphasizing its triple robust protection features: Data Encryption (Bank-level 128-bit AES encryption), Subzero Survivors (withstands temperatures from -31°F to 158°F), and ANSI/BHMA Grade 3 (aluminum & alloy body, strength up to 4000N).
8. การรับประกันและการสนับสนุน
Veise offers a minimum 1-year warranty for the Smart Deadbolt VE33A. For any product issues or questions, please contact Veise customer support:
- บริการช่วยเหลือทางโทรศัพท์ออนไลน์: Monday to Friday, 9 AM to 5 PM PST (Lifetime support)
- After-Sales Email Service: 24/7
It is recommended to contact customer support first if you encounter any issues not covered in this manual.


