1. บทนำ
This manual provides comprehensive instructions for the setup, operation, maintenance, and troubleshooting of your Boxlight P8 WX31NXT DLP Projector. Please read this manual thoroughly before using the projector to ensure proper functionality and to prevent damage.
2. ข้อมูลด้านความปลอดภัย
- อย่าปิดกั้นช่องระบายอากาศ
- อย่ามองตรงเข้าไปในเลนส์โปรเจ็กเตอร์เมื่อลamp อยู่บนแล้ว
- ใช้เฉพาะสายไฟที่มาพร้อมกับโปรเจคเตอร์เท่านั้น
- ส่งต่อการบริการทั้งหมดไปยังบุคลากรบริการที่มีคุณสมบัติเหมาะสม
- เก็บโปรเจคเตอร์ให้ห่างจากน้ำและความชื้น
3. เนื้อหาบรรจุภัณฑ์
ตรวจสอบว่ามีรายการทั้งหมดอยู่ในแพ็คเกจของคุณ:
- โปรเจ็กเตอร์ Boxlight P8 WX31NXT DLP
- รีโมทคอนโทรล
- สายไฟ
- สาย HDMI
- คู่มือการใช้งาน (เอกสารนี้)
4. สินค้าหมดview
Familiarize yourself with the various parts and connections of your projector.
4.1 ด้านบน View และแผงควบคุม
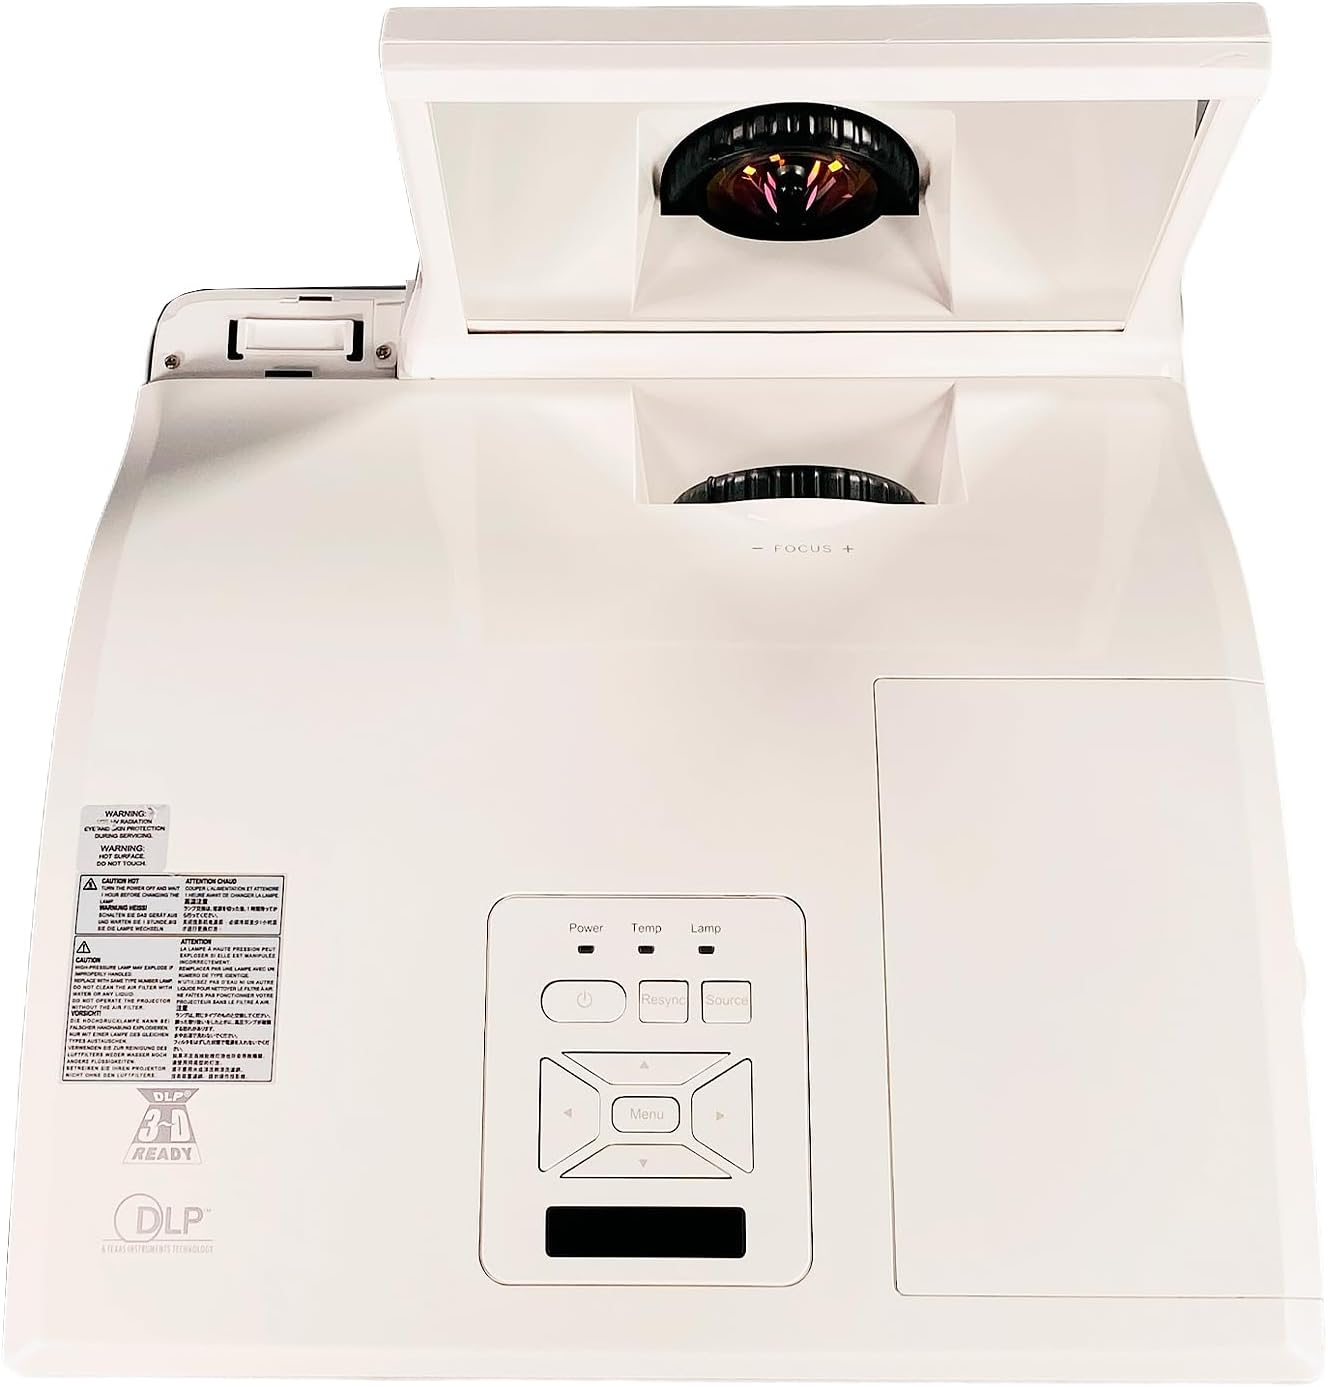
รูปที่ 4.1: สูงสุด view of the projector, showing the control panel with Power, Temp, Lamp indicators, and navigation buttons. The ultra-short throw lens assembly is visible at the front.
The top of the projector features the main control panel, allowing direct access to power, source selection, and menu navigation. The ultra-short throw lens is located at the front, protected by a movable cover.
4.2 การเชื่อมต่อแผงด้านหลัง

รูปที่ 4.2: Rear panel of the projector, displaying various connectivity options including HDMI, VGA, S-Video, Composite, Audio In/Out, Mini USB, RS232, and LAN ports.
The rear panel provides a comprehensive array of input and output ports for connecting various devices:
- ช่องต่อ HDMI: อินพุตวิดีโอและเสียงดิจิทัล
- VGA In 1 & 2: Analog video inputs for computers.
- ช่องต่อ VGA ออก: ช่องต่อสัญญาณวิดีโอแบบอนาล็อกสำหรับจอภาพ
- เอส-วิดีโอ: อินพุตวิดีโอแบบอะนาล็อก
- Video (Composite): อินพุตวิดีโอแบบอะนาล็อก
- Audio In (L/R), Audio In 1 & 2, Microphone: Various audio inputs.
- เสียงออก: เอาท์พุตเสียง
- มินิยูเอสบี: For service or control.
- อาร์เอส232: พอร์ตควบคุมแบบอนุกรม
- LAN: Network connectivity.
- DC Out 12V: กำลังไฟฟ้าขาออก
4.3 ด้านข้าง View และการระบายอากาศ

รูปที่ 4.3: ด้านข้าง view of the projector, highlighting the ventilation grilles essential for heat dissipation. The ultra-short throw lens assembly is also visible.
The sides of the projector feature ventilation grilles to ensure proper airflow and prevent overheating. Do not obstruct these grilles during operation.
4.4 ฉลากสินค้า

รูปที่ 4.4: Product label located on the bottom of the projector, displaying model number P8 WX31NXT, serial number (e.g., 330900834210132), input power requirements, and regulatory compliance marks.
The product label contains important information such as the model number, serial number, and electrical specifications. This information is crucial for support and warranty purposes. For technical support, you can contact Boxlight at +1-360-464-2119 (นานาชาติ)หรือ +1-866-972-1649 (USA and Canada), or visit www.boxlight.com.
5. การตั้งค่า
5.1 การจัดวางโปรเจ็กเตอร์
As an ultra-short throw projector, the P8 WX31NXT is designed to be placed very close to the projection surface. Position the projector on a stable, flat surface directly in front of the screen or wall. Ensure there is adequate space around the ventilation grilles for airflow.
5.2 การต่อสายไฟ
- Connect the supplied power cable to the AC inlet on the projector's rear panel.
- เสียบปลายสายไฟอีกด้านหนึ่งเข้ากับเต้ารับไฟฟ้าที่มีสายดิน
5.3 การเชื่อมต่อแหล่งอินพุต
Choose the appropriate cable for your source device and connect it to the corresponding port on the projector's rear panel (refer to Figure 4.2).
- ช่องต่อ HDMI: For digital video and audio from devices like laptops, Blu-ray players, or streaming boxes.
- VGA: For analog video from computers. Use VGA In 1 or VGA In 2.
- S-Video/Composite Video: For older video sources.
- เสียง: Connect external audio sources to the Audio In ports if not using HDMI for audio.
6. การใช้งานโปรเจ็กเตอร์
6.1 การเปิด/ปิดเครื่อง
- การเปิดเครื่อง: กดปุ่ม พลัง กดปุ่มบนแผงควบคุมหรือรีโมทคอนโทรล ไฟแสดงสถานะพลังงานจะสว่างขึ้น
- วิธีปิดเครื่อง: กดปุ่ม พลัง button twice. The projector will initiate a shutdown sequence.
6.2 การเลือกแหล่งข้อมูลอินพุต
กดปุ่ม แหล่งที่มา button on the control panel or remote control repeatedly to cycle through available input sources (HDMI, VGA 1, VGA 2, S-Video, Video, etc.) until your desired source is displayed.
6.3 การปรับโฟกัส
The projector features a manual focus adjustment. Rotate the focus ring near the lens assembly until the projected image is clear and sharp.
6.4 การนำทางเมนู
กดปุ่ม เมนู button on the control panel or remote to access the On-Screen Display (OSD) menu. Use the arrow buttons to navigate through options and the เข้า กดปุ่มเพื่อเลือก เมนู อีกครั้งเพื่อออก
Common menu settings include:
- การตั้งค่าภาพ: ความสว่าง, ความคมชัด, สี, อัตราส่วนภาพ
- การตั้งค่าการแสดงผล: Keystone correction, Position.
- การตั้งค่าระบบ: Language, Timer, Lamp การตั้งค่า.
7. การบำรุงรักษา
7.1 การทำความสะอาดเลนส์
Gently wipe the projector lens with a soft, lint-free cloth specifically designed for optical surfaces. Do not use abrasive cleaners or excessive force, as this can scratch the lens.
7.2 การทำความสะอาดตัวกรองอากาศ
Regularly clean the air filters to maintain optimal performance and prevent overheating. Refer to the projector's specific filter location (usually on the side or bottom) and cleaning instructions. Typically, filters can be cleaned with a soft brush or vacuum cleaner.
7.3 ลิตรamp การทดแทน
โปรเจ็กเตอร์ lamp มีอายุการใช้งานที่จำกัด เมื่อ lamp indicator illuminates or the image brightness significantly decreases, the lamp may need replacement. Consult a qualified technician or refer to the detailed lamp replacement guide for your specific model. Always use genuine Boxlight replacement lamps.
8 การแก้ไขปัญหา
| ปัญหา | สาเหตุที่เป็นไปได้ | สารละลาย |
|---|---|---|
| ไม่มีภาพแสดง | สายไฟถูกถอดออก; เลือกแหล่งสัญญาณเข้าไม่ถูกต้อง; อุปกรณ์ต้นทางไม่ได้เปิดใช้งาน | Check power connections; Select correct input source; Ensure source device is on. |
| ภาพเบลอ | ไม่ได้ปรับโฟกัส โปรเจ็กเตอร์อยู่ใกล้/ไกลจากหน้าจอมากเกินไป | ปรับวงแหวนปรับโฟกัส; จัดตำแหน่งโปรเจคเตอร์ใหม่ |
| โปรเจ็กเตอร์ร้อนเกินไปและปิดเครื่อง | Ventilation blocked; Dirty air filter. | Ensure clear airflow around projector; Clean air filters. |
| รีโมตคอนโทรลไม่ทำงาน | Batteries depleted; Obstruction between remote and projector. | Replace batteries; Remove obstructions; Point remote directly at IR receiver. |
9. ข้อมูลจำเพาะ
| คุณสมบัติ | รายละเอียด |
|---|---|
| แบบอย่าง | Boxlight P8 WX31NXT |
| เทคโนโลยีการแสดงผล | ดีแอลพี |
| ความสว่าง | 3100 ANSI Lumens |
| ความละเอียดดั้งเดิม | WXGA (1280 x 800) |
| อัตราส่วนภาพ | 16:10 น. |
| อัตราส่วนคอนทราสต์ | 3000:1 น. |
| ประเภทการขว้าง | ระยะการฉายสั้นพิเศษ |
| การเชื่อมต่อ | HDMI, VGA (x2 In, x1 Out), S-Video, Composite Video, Audio In (x3), Audio Out, Microphone, Mini USB, RS232, LAN, DC Out 12V |
| ขนาดสินค้า | 14.45 x 14 x 5.32 นิ้ว |
| กำลังไฟเข้า | ไฟฟ้ากระแสสลับ 100-240V ~ 50/60 Hz 3.6A |
10. การรับประกันและการสนับสนุน
For warranty information and technical support, please refer to the official Boxlight website or contact their customer service directly. Keep your purchase receipt and the projector's serial number (found on the product label, e.g., 330900834210132) readily available when contacting support.
Boxlight Contact Information:
- International Technical Support: +1-360-464-2119
- USA and Canada Technical Support: +1-866-972-1649
- Webเว็บไซต์: www.boxlight.com


