คำแนะนำด้านความปลอดภัยที่สำคัญ
Please read these instructions carefully before operating the unit and retain them for future reference.
- อย่าให้เครื่องนี้โดนน้ำหยดหรือกระเซ็น
- ห้ามวางวัตถุที่บรรจุของเหลว เช่น แจกัน บนเครื่องใช้ไฟฟ้า
- ตรวจสอบให้แน่ใจว่ามีการระบายอากาศที่เหมาะสม อย่าปิดกั้นช่องระบายอากาศใดๆ
- ห้ามติดตั้งใกล้แหล่งความร้อน เช่น หม้อน้ำ เครื่องทำความร้อน เตา หรืออุปกรณ์อื่น ๆ (รวมถึง ampเครื่องให้ความร้อน) ที่ผลิตความร้อน
- ใช้เฉพาะอุปกรณ์เสริม/สิ่งที่แนบตามที่ผู้ผลิตกำหนดเท่านั้น
- ถอดปลั๊กเครื่องนี้ระหว่างที่เกิดพายุฝนฟ้าคะนองหรือเมื่อไม่ได้ใช้งานเป็นเวลานาน
- ส่งต่อการบริการทั้งหมดไปยังช่างบริการที่ผ่านการรับรอง จำเป็นต้องเข้ารับบริการเมื่ออุปกรณ์ได้รับความเสียหายแต่อย่างใด
สินค้าเกินview
The Muse M17CB is a compact dual PLL FM/MW digital alarm clock radio designed for reliable timekeeping and audio playback. It features a clear 0.9-inch white LED display with a dimmer function and a 24-hour time format. Users can set two independent alarms, choosing to wake up to either the radio or a buzzer. The digital tuner allows for 6 preset stations (3 FM and 3 MW) for quick access to your favorite broadcasts. Additional functions include SNAP, SLEEP, and SNOOZE for enhanced user convenience.
ด้านหน้า View

คำอธิบายภาพ: This image displays the front of the Muse M17CB alarm clock radio. It features a prominent 0.9-inch white LED display showing "12:00". Above the display are various control buttons and two rotary knobs. The buttons include P.1, P.2, P.3, DIM., O/SOURCE, and a large SNOOZE button. The left rotary knob is for VOLUME, and the right is for TUNING/SET. A small "muse" logo tag is visible on the left side.
แผงควบคุมด้านบน

คำอธิบายภาพ: ภาพนี้แสดงมุมมองจากบนลงล่าง view of the Muse M17CB alarm clock radio, highlighting the control panel. It shows two large rotary knobs for Volume and Tuning/Set, along with several push buttons: P.1, P.2, P.3 (for radio presets), DIM. (dimmer), O/SOURCE (power/source selection), and a large circular SNOOZE button. The layout is clear and intuitive.
การเชื่อมต่อแผงด้านหลัง

คำอธิบายภาพ: This image shows the rear panel of the Muse M17CB alarm clock radio. It clearly displays the "AC~" power input socket, the "FM ANT." wire antenna, and an "AUX IN" 3.5mm jack for connecting external audio devices. A speaker grille is also visible on the right side.
การตั้งค่า
การเชื่อมต่อไฟฟ้า
- Unpack the Muse M17CB unit and all accessories.
- Connect the AC power cord to the "AC~" input on the rear of the unit.
- เสียบปลายสายไฟอีกด้านหนึ่งเข้ากับเต้ารับไฟฟ้าที่ผนังมาตรฐาน
- The LED display will light up, indicating the unit is receiving power.
การตั้งค่าเสาอากาศ
- For optimal FM reception, fully extend the FM wire antenna located at the back of the unit.
- Adjust the position of the antenna for the best possible signal reception.
คำแนะนำการใช้งาน
การตั้งเวลา
- ตรวจสอบให้แน่ใจว่าเครื่องเปิดอยู่
- กดปุ่มค้างไว้ TUNING/SET knob for approximately 2 seconds until the hour digits flash on the display.
- หมุน TUNING/SET ลูกบิดเพื่อปรับชั่วโมง
- กดปุ่ม TUNING/SET knob once to confirm the hour; the minute digits will flash.
- หมุน TUNING/SET knob to adjust the minutes.
- กดปุ่ม TUNING/SET knob again to confirm the minutes and exit time setting mode.
- เวลาจะแสดงในรูปแบบ 24 ชั่วโมง
Setting the Alarm (Alarm 1 and Alarm 2)
อุปกรณ์นี้มีระบบเตือนภัยอิสระสองระบบ (สัญญาณเตือนที่ 1 และสัญญาณเตือนที่ 2)
- กดปุ่ม P.1 button (for Alarm 1) or P.2 button (for Alarm 2) once. The alarm icon and hour digits will flash.
- หมุน TUNING/SET knob to adjust the alarm hour.
- กดปุ่ม TUNING/SET knob to confirm the hour; the minute digits will flash.
- หมุน TUNING/SET knob to adjust the alarm minutes.
- กดปุ่ม TUNING/SET knob to confirm the minutes. The alarm source (radio or buzzer) will flash.
- หมุน TUNING/SET knob to select either วิทยุ or บัซเซอร์ as the alarm sound.
- กดปุ่ม TUNING/SET knob to confirm the alarm source. The alarm volume will flash (if radio is selected).
- หมุน ปริมาณ knob to set the desired alarm volume (for radio alarm).
- กดปุ่ม TUNING/SET knob to save the alarm settings. The corresponding alarm icon will appear on the display, indicating the alarm is active.
หากต้องการปิดใช้งานสัญญาณเตือน ให้กดปุ่มที่เกี่ยวข้อง P.1 or P.2 กดปุ่มค้างไว้จนกว่าไอคอนนาฬิกาปลุกจะหายไปจากหน้าจอ
Radio Operation (FM/MW)
- กดปุ่ม O/SOURCE button to turn on the radio. Press it repeatedly to cycle between FM, MW, and AUX modes.
- หมุน TUNING/SET knob to manually tune to a desired frequency.
- หากต้องการสแกนสถานีอัตโนมัติ ให้กดปุ่มค้างไว้ TUNING/SET knob for 2 seconds. The radio will scan and stop at the next available station.
Setting and Recalling Presets (P.1, P.2, P.3)
- To Store a Preset: Tune to the desired station. Press and hold one of the preset buttons (P.1, P.2, หรือ P.3) for 2 seconds until the display confirms the preset is saved.
- ในการเรียกคืนพรีเซ็ต: Briefly press the desired preset button (P.1, P.2, หรือ P.3) to tune to the stored station.
ฟังก์ชั่นหรี่แสง
กดปุ่ม DIM button repeatedly to adjust the brightness of the LED display to your preference (e.g., High, Medium, Low, Off).
ฟังก์ชั่นการพักชั่วคราว
เมื่อเสียงสัญญาณเตือนดังขึ้น ให้กดปุ่มขนาดใหญ่ เลื่อน กดปุ่มเพื่อปิดเสียงเตือนชั่วคราว เสียงเตือนจะดังขึ้นอีกครั้งหลังจากประมาณ 9 นาที
ฟังก์ชั่นการนอนหลับ
ฟังก์ชันปิดเครื่องอัตโนมัติช่วยให้คุณนอนหลับไปพร้อมกับฟังวิทยุได้ โดยวิทยุจะปิดเองโดยอัตโนมัติหลังจากช่วงเวลาที่กำหนดไว้
- ขณะที่วิทยุกำลังเล่นอยู่ ให้กดปุ่ม P.3 button (often doubles as SLEEP function) repeatedly to cycle through available sleep timer durations (e.g., 90, 60, 30, 15 minutes, or OFF).
- วิทยุจะปิดเองโดยอัตโนมัติหลังจากครบระยะเวลาที่เลือกไว้
SNAP Function
The specific operation of the SNAP function is not detailed in the provided product description. Please refer to the full printed manual included with your device for instructions on using the SNAP feature.
ช่องต่อสัญญาณอินพุตเสริม (AUX IN)
เชื่อมต่ออุปกรณ์เสียงภายนอก (เช่น เครื่องเล่น MP3, สมาร์ทโฟน) เข้ากับ AUX IN jack on the rear of the unit using a 3.5mm audio cable. Press the O/SOURCE button repeatedly until "AUX" appears on the display to switch to auxiliary input mode. Audio from the connected device will play through the alarm clock's speaker.
การซ่อมบำรุง
- การทำความสะอาด: ใช้ผ้านุ่มและแห้งเช็ดทำความสะอาดภายนอกตัวเครื่อง ห้ามใช้น้ำยาทำความสะอาดที่มีฤทธิ์กัดกร่อน แว็กซ์ หรือตัวทำละลาย
- พื้นที่จัดเก็บ: If the unit is not used for an extended period, unplug it from the power outlet and store it in a cool, dry place.
- หลีกเลี่ยงความชื้น: Keep the unit away from water and high humidity.
การแก้ไขปัญหา
| ปัญหา | สาเหตุที่เป็นไปได้ | สารละลาย |
|---|---|---|
| ไม่มีไฟเลี้ยง / หน้าจอปิด | สายไฟไม่ได้เชื่อมต่ออย่างถูกต้อง | Ensure the AC power cord is securely plugged into the unit and a working wall outlet. |
| การรับสัญญาณวิทยุไม่ดี | FM antenna not extended or positioned correctly. | Fully extend and adjust the position of the FM wire antenna for better reception. Try moving the unit to a different location. |
| นาฬิกาปลุกไม่ส่งเสียง | สัญญาณเตือนภัยไม่ได้เปิดใช้งานหรือตั้งค่าไม่ถูกต้อง | Verify that the alarm icon is displayed. Recheck alarm time and source settings. Ensure alarm volume is not set to minimum if radio alarm is selected. |
| หน้าจอแสดงผลสว่าง/มืดเกินไป | ต้องปรับการตั้งค่าความสว่างของตัวหรี่ไฟ | กดปุ่ม DIM button repeatedly to cycle through brightness levels. |
ข้อมูลจำเพาะ
- แบบอย่าง: เอ็ม17ซีบี
- แสดง: 0.9-inch White LED with Dimmer
- รูปแบบเวลา: 24 ชั่วโมง
- จูนเนอร์: Digital FM/MW PLL
- ค่าที่ตั้งล่วงหน้า: 6 (3 FM + 3 MW)
- สัญญาณเตือนภัย: Dual Alarm (Radio or Buzzer)
- ฟังก์ชั่น: SNAP, SLEEP, SNOOZE
- แหล่งพลังงาน: ไฟฟ้ากระแสสลับ
- ขนาด : 13 ซม. (ยาว) x 11 ซม. (กว้าง) x 6.5 ซม. (สูง)
- สี: สีฟ้าอมเขียว
- วัสดุ: Resin or Plastic
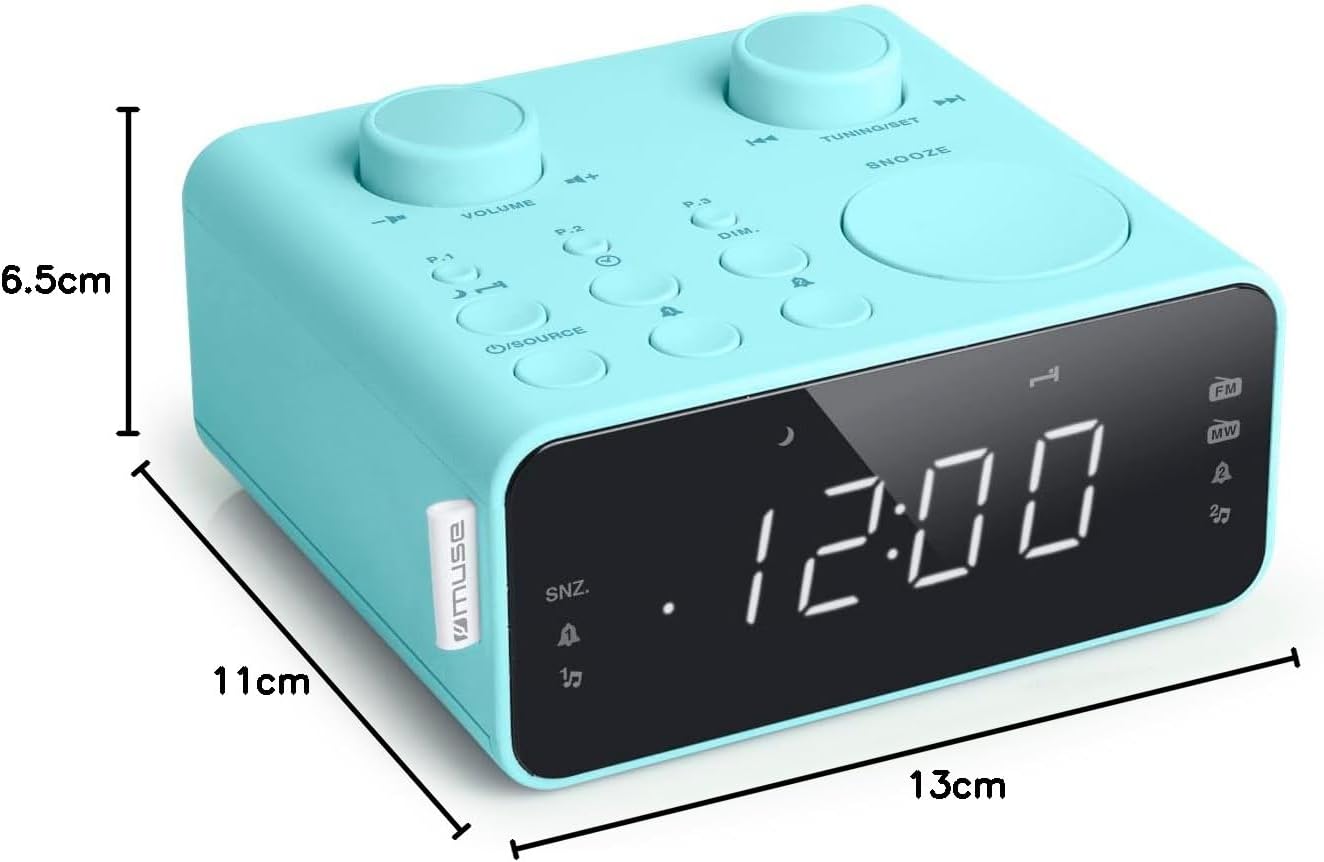
คำอธิบายภาพ: This image illustrates the dimensions of the Muse M17CB alarm clock radio. It shows the unit with measurements indicating a length of 13cm, a width of 11cm, and a height of 6.5cm.
การรับประกันและการสนับสนุน
For warranty information and technical support, please refer to the warranty card included with your product or visit the official Muse webไซต์ โปรดเก็บใบเสร็จรับเงินไว้เป็นหลักฐานการซื้อ
The product includes a user manual (as indicated by "Pièces incluses: Manuel du propriétaire").


