1. บทนำ
This manual provides essential information for the proper installation, operation, and maintenance of your ENDORFY Arx 500 ARGB ATX Computer Case. Please read this manual thoroughly before beginning installation to ensure optimal performance and safety.
The ENDORFY Arx 500 ARGB is a high-performance ATX computer case designed for efficient cooling and spacious component compatibility. Key features include:
- Tempered glass side panel for showcasinส่วนประกอบภายใน g
- Spacious interior for easy component installation and cable management.
- Compatibility with various radiator sizes for advanced cooling solutions.
- Airy and easily accessible front panel for optimal airflow.
- Efficient cooling design to maintain low component temperatures.
- Convenient cable management features for a clean build.
2. ข้อมูลด้านความปลอดภัย
โปรดปฏิบัติตามข้อควรระวังด้านความปลอดภัยต่อไปนี้ เพื่อป้องกันความเสียหายต่อผลิตภัณฑ์หรือการบาดเจ็บต่อตัวคุณเอง
- การตัดการเชื่อมต่อไฟฟ้า: Always disconnect the power supply from the wall outlet before installing or removing any components inside the computer case.
- ไฟฟ้าสถิต: Wear an anti-static wrist strap or frequently touch a grounded metal object to discharge static electricity before handling internal components.
- ขอบที่คมชัด: Be cautious of sharp edges inside the case during installation.
- กระจกนิรภัย: Handle the tempered glass side panel with care. It is fragile and can break if dropped or subjected to impact. Place it on a soft, flat surface when removed.
- การระบายอากาศ : Ensure adequate ventilation around the case to prevent overheating. Do not block air vents.
- การสัมผัสของเหลว: Keep the computer case away from liquids and moisture.
3. เนื้อหาบรรจุภัณฑ์
ตรวจสอบว่าสินค้าทั้งหมดอยู่ในกล่องครบถ้วนหรือไม่ หากมีสินค้าใดขาดหายหรือเสียหาย โปรดติดต่อผู้ค้าปลีก
- ENDORFY Arx 500 ARGB ATX Computer Case
- 4 x 140 mm ARGB Fans (pre-installed)
- Accessory Box (containing screws, cable ties, and other mounting hardware)
- คู่มือการใช้งาน (เอกสารนี้)

รูปที่ 3.1: ระเบิด view showing the computer case, fans, and various panels.
4. การตั้งค่าและการติดตั้ง
Follow these steps to install your components into the ENDORFY Arx 500 ARGB case.
4.1 การเตรียมคดี
- ถอดแผงด้านข้างออก: Carefully remove the tempered glass side panel and the solid metal side panel. Place them on a soft, non-abrasive surface to prevent scratches.
- กล่องอุปกรณ์เสริม: ค้นหากล่องอุปกรณ์เสริมภายในเคส ซึ่งบรรจุสกรูและอุปกรณ์ติดตั้งที่จำเป็นทั้งหมด
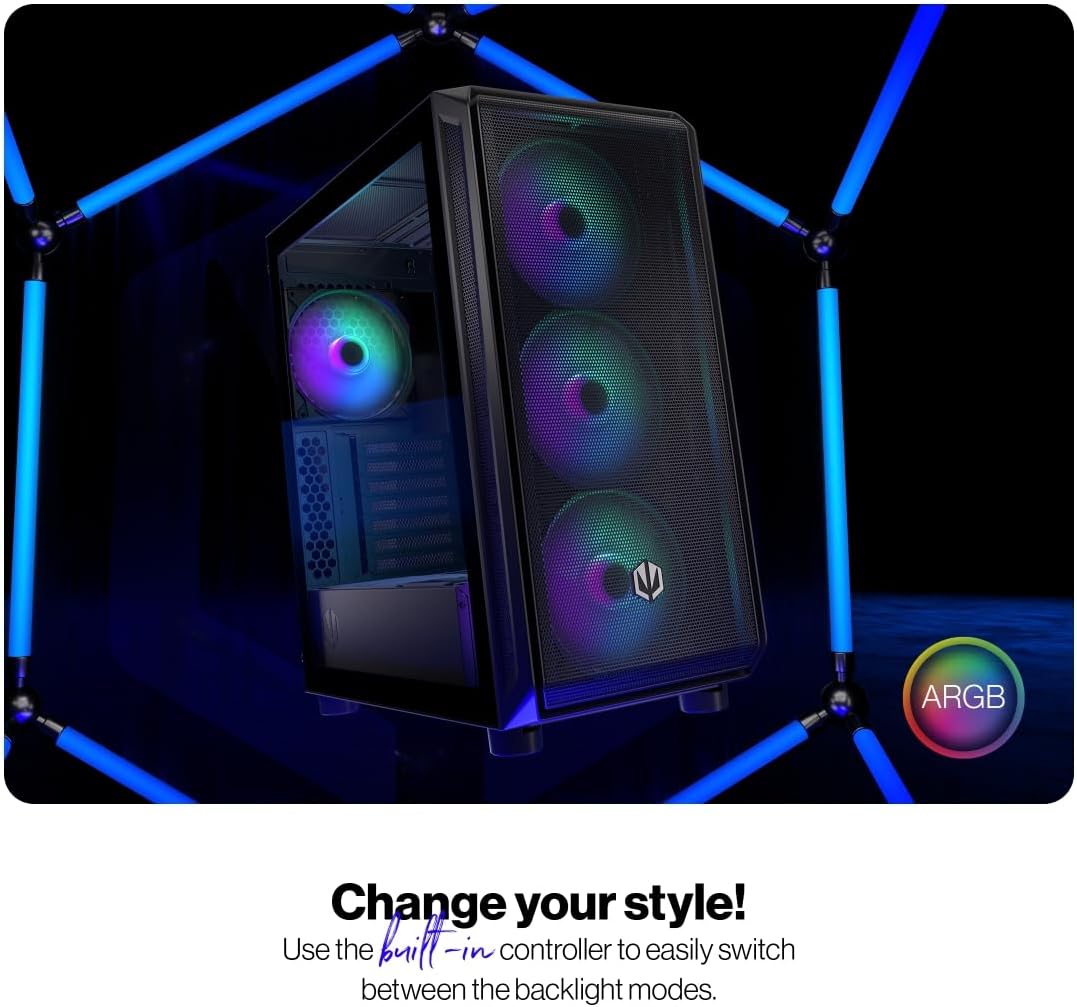
Figure 4.1: The tempered glass side panel allows for a clear view ของส่วนประกอบภายใน
4.2 การติดตั้งเมนบอร์ด
- ติดตั้งสแตนด์ออฟ: Ensure the correct standoffs are installed for your ATX motherboard. The case supports ATX motherboards.
- ติดตั้งเมนบอร์ด: Carefully place your motherboard onto the standoffs and secure it with the provided screws.

Figure 4.2: The spacious interior provides ample room for motherboard and other component installation.
4.3 การติดตั้งแหล่งจ่ายไฟและอุปกรณ์จัดเก็บพลังงาน
- แหล่งจ่ายไฟ: Install your power supply unit (PSU) into the dedicated bottom mount area. Secure it with screws from the rear of the case.
- ไดรฟ์จัดเก็บข้อมูล: Install your 2.5" SSDs or 3.5" HDDs into the designated drive bays. Refer to the case's internal structure for specific mounting points.
4.4 การ์ดกราฟิกและการ์ดเสริม
- ถอดฝาครอบช่อง: ถอดฝาครอบสล็อต PCI-E ที่จำเป็นออกจากด้านหลังของเคส
- ติดตั้งการ์ด: Insert your graphics card and other expansion cards into the motherboard's PCI-E slots and secure them with screws.
4.5 Cooling System (Fans and Radiators)
The case comes with 4 pre-installed 140mm ARGB fans. Additional fans or radiators can be installed for enhanced cooling.
- ความจุพัดลม: The case accommodates up to 7 fans.
- ความเข้ากันได้ของหม้อน้ำ: The design supports various radiator sizes for liquid cooling solutions.

Figure 4.3: The case features pre-installed 140mm ARGB fans for optimal airflow.

Figure 4.4: Perforated front and top panels ensure maximum airflow and dust protection.
4.6 การจัดการสายเคเบิล
Utilize the dedicated cable management space and tie-down points behind the motherboard tray to route and secure cables for a clean build and improved airflow.
4.7 การเชื่อมต่อแผง I/O ด้านหน้า
Connect the front panel cables (USB, audio, power, reset, LEDs) to the corresponding headers on your motherboard. Refer to your motherboard manual for header locations.

Figure 4.5: Front I/O panel with USB-C, USB-A, headphone, microphone, reset, and power buttons/LEDs.
- พอร์ต USB-C: Connects to a USB 3.x Type-C header on your motherboard.
- พอร์ต USB-A: Connects to USB 3.x and USB 2.0 headers on your motherboard.
- Headphones Port: Connects to the audio header on your motherboard.
- พอร์ตไมโครโฟน: Connects to the audio header on your motherboard.
- ปุ่มรีเซ็ต: Connects to the reset header on your motherboard.
- กำลังไฟ LED: Connects to the power LED header on your motherboard.
- Storage Activity LED: Connects to the HDD LED header on your motherboard.
- ปุ่มเปิด/ปิด: Connects to the power switch header on your motherboard.
5. คู่มือการใช้งาน
เมื่อติดตั้งและเชื่อมต่อส่วนประกอบทั้งหมดแล้ว คุณสามารถเปิดระบบได้
- เปิดเครื่อง: Press the Power Button on the front I/O panel to turn on your computer. The Power LED will illuminate.
- การควบคุมพัดลม ARGB: The pre-installed ARGB fans can be controlled via a built-in controller or synchronized with compatible motherboard software. Use the built-in controller to switch between various backlight modes.

Figure 5.1: The ARGB fans offer customizable lighting effects, controlled via the built-in controller.
6. การบำรุงรักษา
การบำรุงรักษาอย่างสม่ำเสมอจะช่วยให้มั่นใจได้ถึงประสิทธิภาพสูงสุดและอายุการใช้งานที่ยาวนานของเคสคอมพิวเตอร์และส่วนประกอบต่างๆ
- ตัวกรองฝุ่น: Periodically remove and clean the dust filters located on the front, top, and bottom of the case. Use compressed air or a soft brush to remove accumulated dust.
- การทำความสะอาดภายนอก: เช็ดพื้นผิวด้านนอกของเคสด้วยผ้าเนื้อนุ่มและแห้งamp ผ้า หลีกเลี่ยงน้ำยาทำความสะอาดหรือตัวทำละลายที่มีฤทธิ์กัดกร่อน
- การทำความสะอาดภายใน: ในขณะที่ระบบปิดอยู่และถอดปลั๊ก ให้ใช้ลมเป่าอัดเบาๆ เพื่อกำจัดฝุ่นออกจากชิ้นส่วนภายในและใบพัดลม
- กระจกนิรภัย: Clean the tempered glass panel with a microfiber cloth and a glass cleaner designed for electronics.
7 การแก้ไขปัญหา
If you encounter issues with your computer case, refer to the following common troubleshooting steps.
- ระบบไม่เปิดเครื่อง:
- ตรวจสอบให้แน่ใจว่าได้เสียบปลั๊กไฟเข้ากับเต้ารับที่ผนังอย่างถูกต้องและเปิดสวิตช์แล้ว
- ตรวจสอบให้แน่ใจว่าสายไฟทั้งหมดจากพาวเวอร์ซัพพลายเชื่อมต่อกับเมนบอร์ดและส่วนประกอบต่างๆ อย่างถูกต้อง
- Check that the front panel power button cable is correctly connected to the motherboard's power header.
- พัดลมไม่หมุน/ไฟ ARGB ไม่ติด:
- Ensure fan power cables are securely connected to the fan hub or motherboard headers.
- Verify ARGB cables are connected to the built-in controller or motherboard ARGB header.
- Check the built-in controller or motherboard software for fan speed and lighting settings.
- Front USB/Audio Ports Not Working:
- Confirm that the front panel USB and audio cables are correctly connected to the corresponding headers on your motherboard.
- Ensure motherboard drivers for USB and audio are installed.
If problems persist, consult your motherboard manual or contact ENDORFY customer support.
8. ข้อมูลจำเพาะ
| คุณสมบัติ | รายละเอียด |
|---|---|
| ยี่ห้อ | รับรอง |
| ชุด | Arx 500 ARGB |
| หมายเลขรุ่น | EY2A011 |
| ประเภทเคส | มิดิทาวเวอร์ |
| ความเข้ากันได้ของเมนบอร์ด | เอทีเอ็กซ์ |
| ขนาด (กxยxส) | 16.89 x 8.98 x 19.13 นิ้ว (429 x 228 x 486 มม.) |
| น้ำหนักสินค้า | 16.5 ปอนด์ |
| วัสดุ | กระจกนิรภัย (แผงด้านข้าง) |
| วิธีการทำความเย็น | อากาศ |
| พัดลมรวม | 4 x 140 mm ARGB fans |
| ขนาดพัดลม | 140 มิลลิเมตร |
| ประเภทการติดตั้งแหล่งจ่ายไฟ | การติดตั้งด้านล่าง |
| พอร์ต I / O ด้านหน้า | 2x USB 2.0, 1x USB-C, 1x Headphone, 1x Microphone, Reset Button, Power Button |

Figure 8.1: Front dimensions (228 mm width).

Figure 8.2: Side dimensions (429 mm depth, 486 mm height).
9. การรับประกันและการสนับสนุน
For warranty information, technical support, or further assistance, please visit the official ENDORFY webไซต์หรือติดต่อผู้ค้าปลีกในพื้นที่ของคุณ


