1. บทนำ
This manual provides detailed instructions for the safe and efficient operation of your Weytoll 4-in-1 MIG/MMA/MAG/TIG 160A Welding Machine. Please read this manual thoroughly before using the equipment to ensure proper setup, operation, and maintenance. Keep this manual for future reference.
2. คำแนะนำด้านความปลอดภัย
คำเตือน: การเชื่อมโลหะเป็นอันตราย โปรดปฏิบัติตามข้อควรระวังด้านความปลอดภัยเสมอเพื่อป้องกันการบาดเจ็บหรือเสียชีวิต
- การปกป้องดวงตา: ควรสวมหมวกนิรภัยสำหรับงานเชื่อมที่มีเลนส์สีที่เหมาะสมเสมอ เพื่อปกป้องดวงตาจากรังสีจากประกายไฟ
- การป้องกันร่างกาย: Wear flame-resistant clothing, gloves, and safety shoes to protect against sparks, heat, and electric shock.
- การระบายอากาศ : ตรวจสอบให้แน่ใจว่ามีการระบายอากาศที่เพียงพอเพื่อกำจัดควันและก๊าซจากการเชื่อม ซึ่งอาจเป็นอันตรายต่อสุขภาพของคุณได้
- การป้องกันอัคคีภัย: เตรียมถังดับเพลิงไว้ใกล้ๆ นำวัสดุไวไฟทั้งหมดออกจากบริเวณเชื่อมโลหะ
- ความปลอดภัยทางไฟฟ้า: Ensure the welding machine is properly grounded. Do not operate in wet conditions. Inspect cables for damage before each use.
- ถังแก๊ส: If using shielding gas, secure cylinders properly and handle them with care.
- เด็กและผู้เห็นเหตุการณ์: ห้ามเด็กและบุคคลที่ไม่ได้รับอนุญาตเข้าใกล้บริเวณงานเชื่อม
3. เนื้อหาบรรจุภัณฑ์
เมื่อแกะกล่องแล้ว โปรดตรวจสอบว่าสินค้าทุกรายการที่ระบุไว้ด้านล่างครบถ้วนและไม่เสียหาย หากมีสินค้าใดขาดหายหรือเสียหาย โปรดติดต่อผู้จำหน่ายของคุณทันที

Figure 3.1: Included accessories with the welding machine.
- 1 x Weytoll Welding Machine
- 1 x Electrode Holder
- 1 x 300A Welding Clamp (กราวด์ Cl)amp)
- 1 x Roll of Welding Wire
- หน้ากากเชื่อม 1 ชิ้น
- 1 x Steel Brush
- 1 x คู่มือผู้ใช้ (คู่มือเล่มนี้)
4. คุณสมบัติของผลิตภัณฑ์
The Weytoll 4-in-1 Welding Machine is designed for versatility and performance, offering multiple welding processes in a compact unit.

รูปที่ 4.1: เกินview of the welding machine's key features.
- Multifunctional Welding: Supports MIG (Gas & Gasless), MMA (Stick), MAG, and TIG welding processes.
- จอแสดงผลดิจิตอล: Large digital screen for clear display of welding current/voltage and convenient operation.
- พารามิเตอร์ที่ปรับได้: ปริมาณการเชื่อมtage and wire feed speed are adjustable to match material thickness.
- การป้องกันหลายระดับ: Equipped with over-temperature, over-current, and over-voltage protection for enhanced safety and reliability.
- เทคโนโลยี IGBT: Utilizes IGBT high-frequency inverter technology for stable electric arc, minimal splashing, and strong welding ability.
- การระบายความร้อนที่มีประสิทธิภาพ: Features multiple exhaust holes and a built-in high-efficiency cooling fan to dissipate heat and extend machine lifespan.
5. การตั้งค่า
5.1 การเชื่อมต่อสายไฟ
- Ensure the power switch on the machine is in the "OFF" position.
- Connect the power cable to a suitable 220V power outlet. The machine requires a stable power supply.
5.2 คลอรีนภาคพื้นดินamp การเชื่อมต่อ
- ต่อสายดิน clamp cable to the appropriate terminal on the front panel of the welding machine.
- ติดกราวด์ clamp ยึดติดกับชิ้นงานหรือโต๊ะเชื่อมอย่างแน่นหนา เพื่อให้มั่นใจได้ว่ามีการสัมผัสทางไฟฟ้าที่ดี
5.3 การติดตั้งลวดเชื่อม (MIG/MAG)
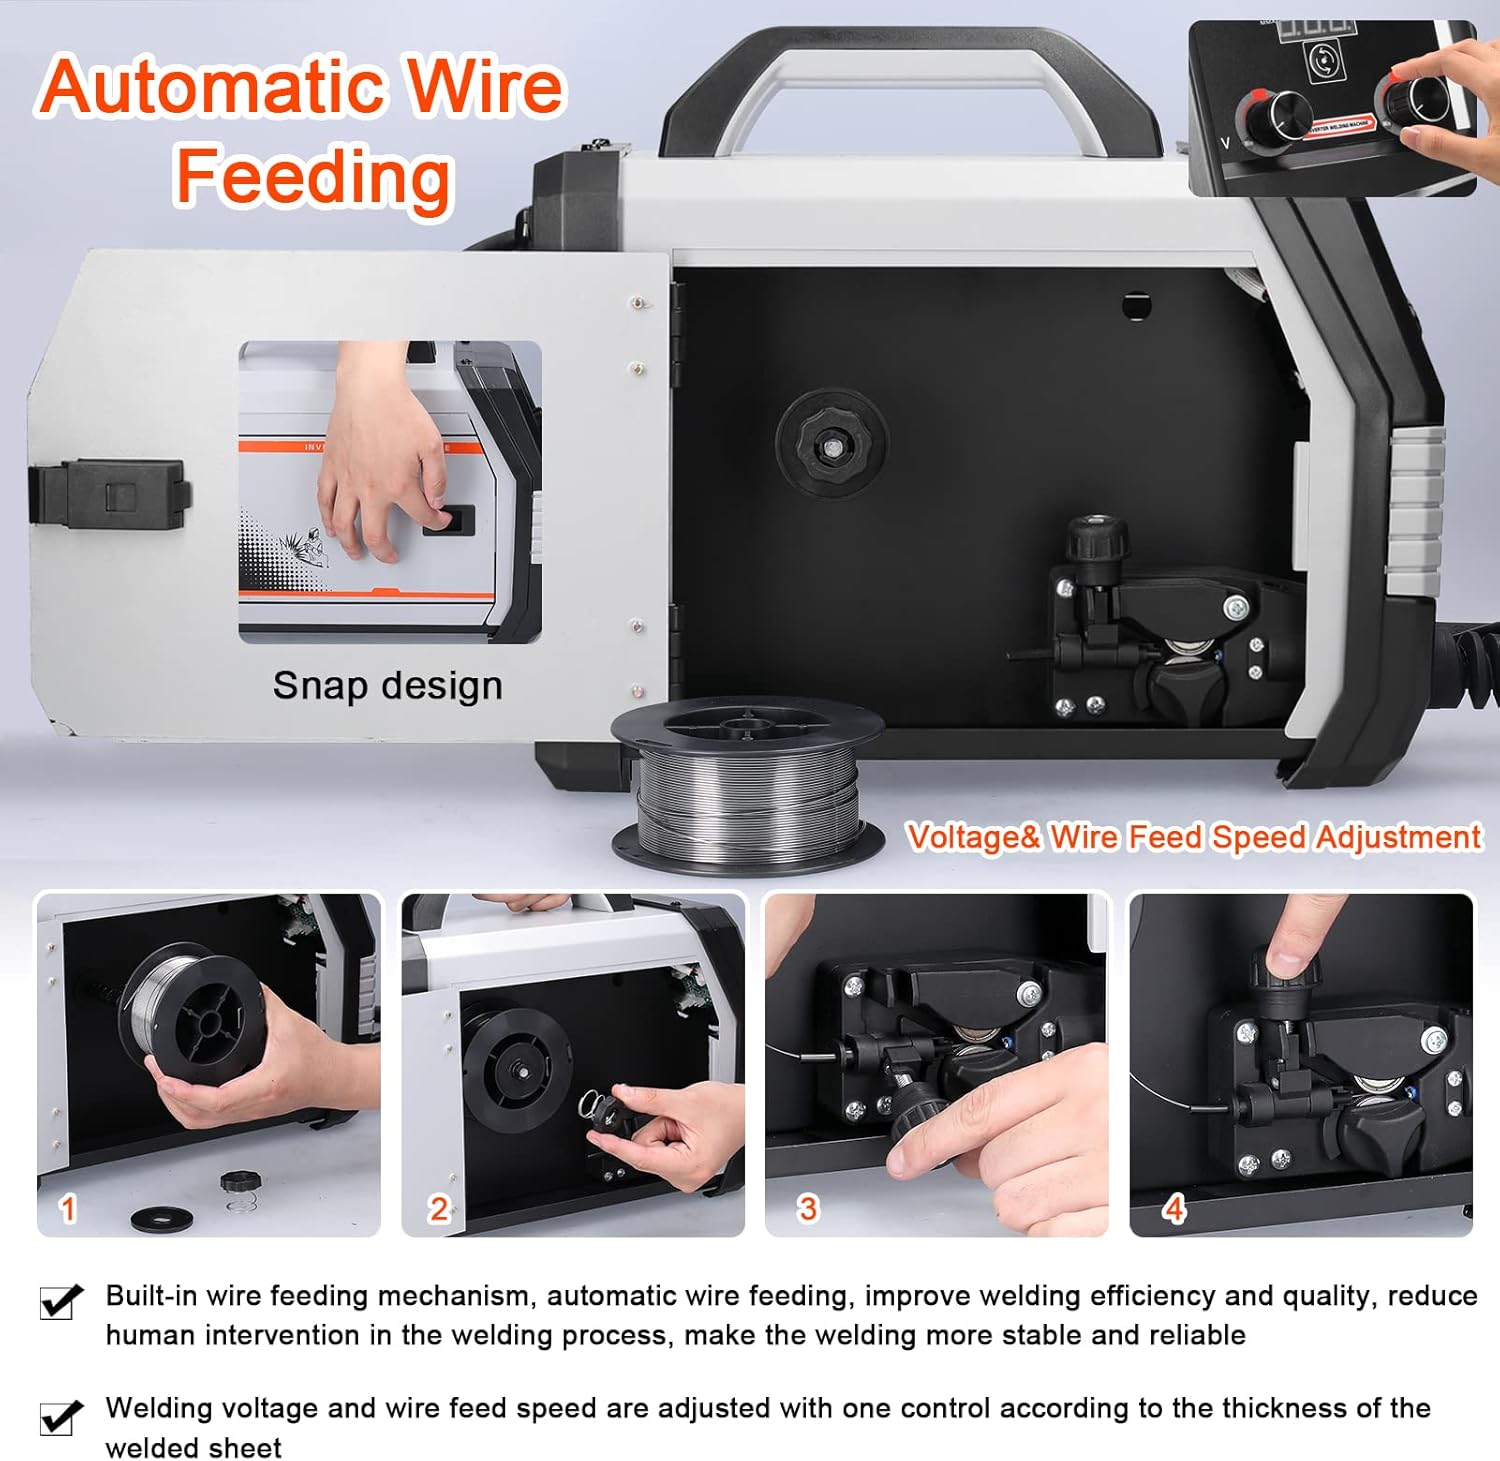
Figure 5.1: Automatic wire feeding mechanism and installation steps.
- Open the side cover of the machine to access the wire feeder compartment.
- Place the welding wire spool onto the spindle, ensuring it rotates freely.
- Thread the welding wire through the wire feeder mechanism, ensuring it passes through the drive rollers and into the liner.
- ปรับความตึงของลูกกลิ้งขับเคลื่อนเพื่อป้องกันไม่ให้ลวดลื่นหรือถูกบีบอัด
- ปิดฝาครอบด้านข้าง
5.4 Gas Connection (MIG/MAG with Gas)
- Connect the gas hose from your shielding gas cylinder (e.g., CO2 for MIG solid wire) to the gas input port on the rear of the welding machine.
- ตรวจสอบให้แน่ใจว่าการเชื่อมต่อทั้งหมดแน่นสนิทเพื่อป้องกันการรั่วไหลของแก๊ส
- Open the gas cylinder valve and adjust the flow rate using a regulator.
6. คู่มือการใช้งาน
6.1 การเปิดเครื่องและการเลือกโหมด

Figure 6.1: Front and rear panel controls.
- Turn the power switch to the "ON" position. The digital display will illuminate.
- Use the mode selection button (often labeled "MMA-TIG one piece switching" or similar) to choose your desired welding process: MIG, MMA, MAG, or TIG.
6.2 การปรับค่าพารามิเตอร์
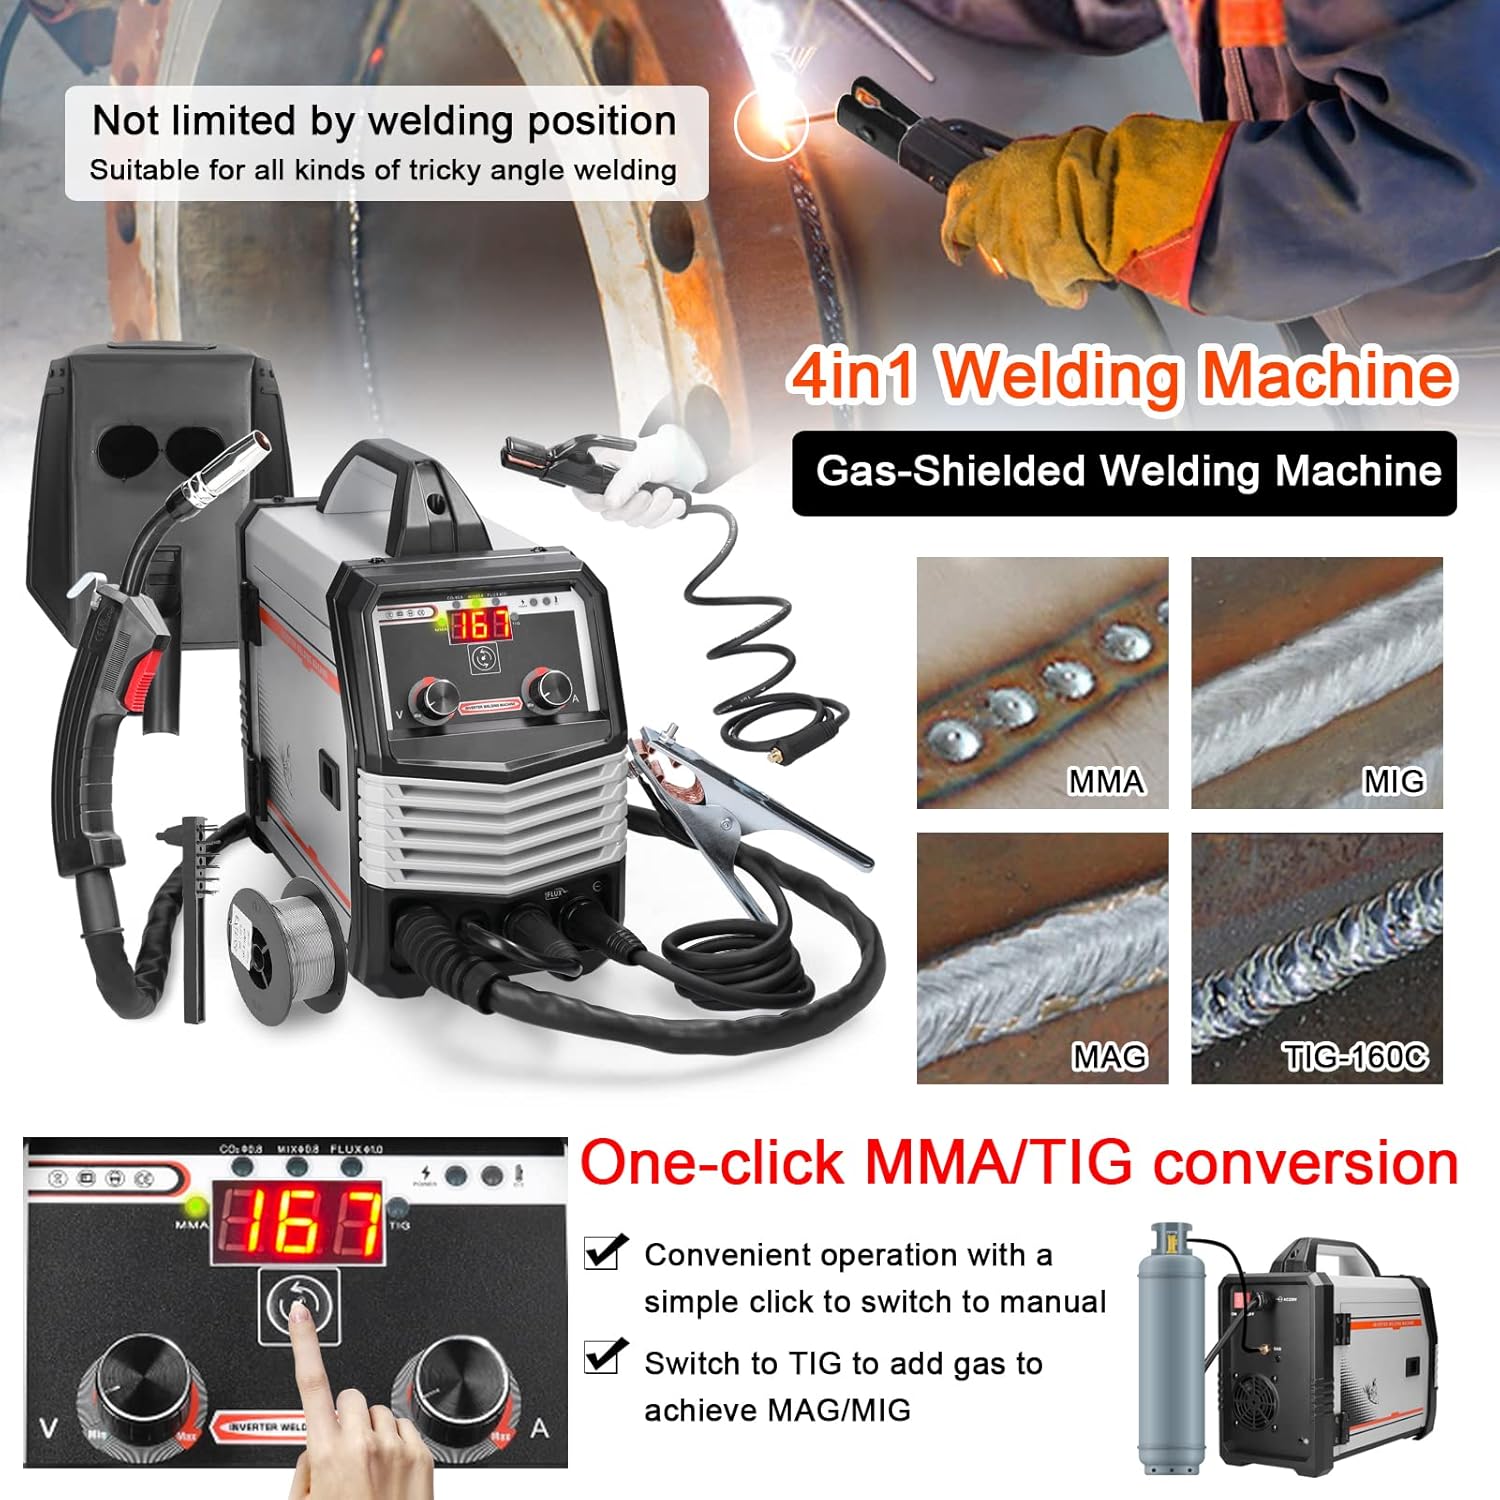
Figure 6.2: One-click mode conversion and weld exampเลส.
- ปัจจุบัน/ฉบับที่tage: Use the control knobs on the front panel to adjust the welding current (A) and voltage (V) according to the material thickness and welding process. The digital display will show the current settings.
- Wire Feed Speed (MIG/MAG): Adjust the wire feed speed knob. This is often linked to voltage for optimal MIG/MAG performance.
6.3 Welding Process Specifics
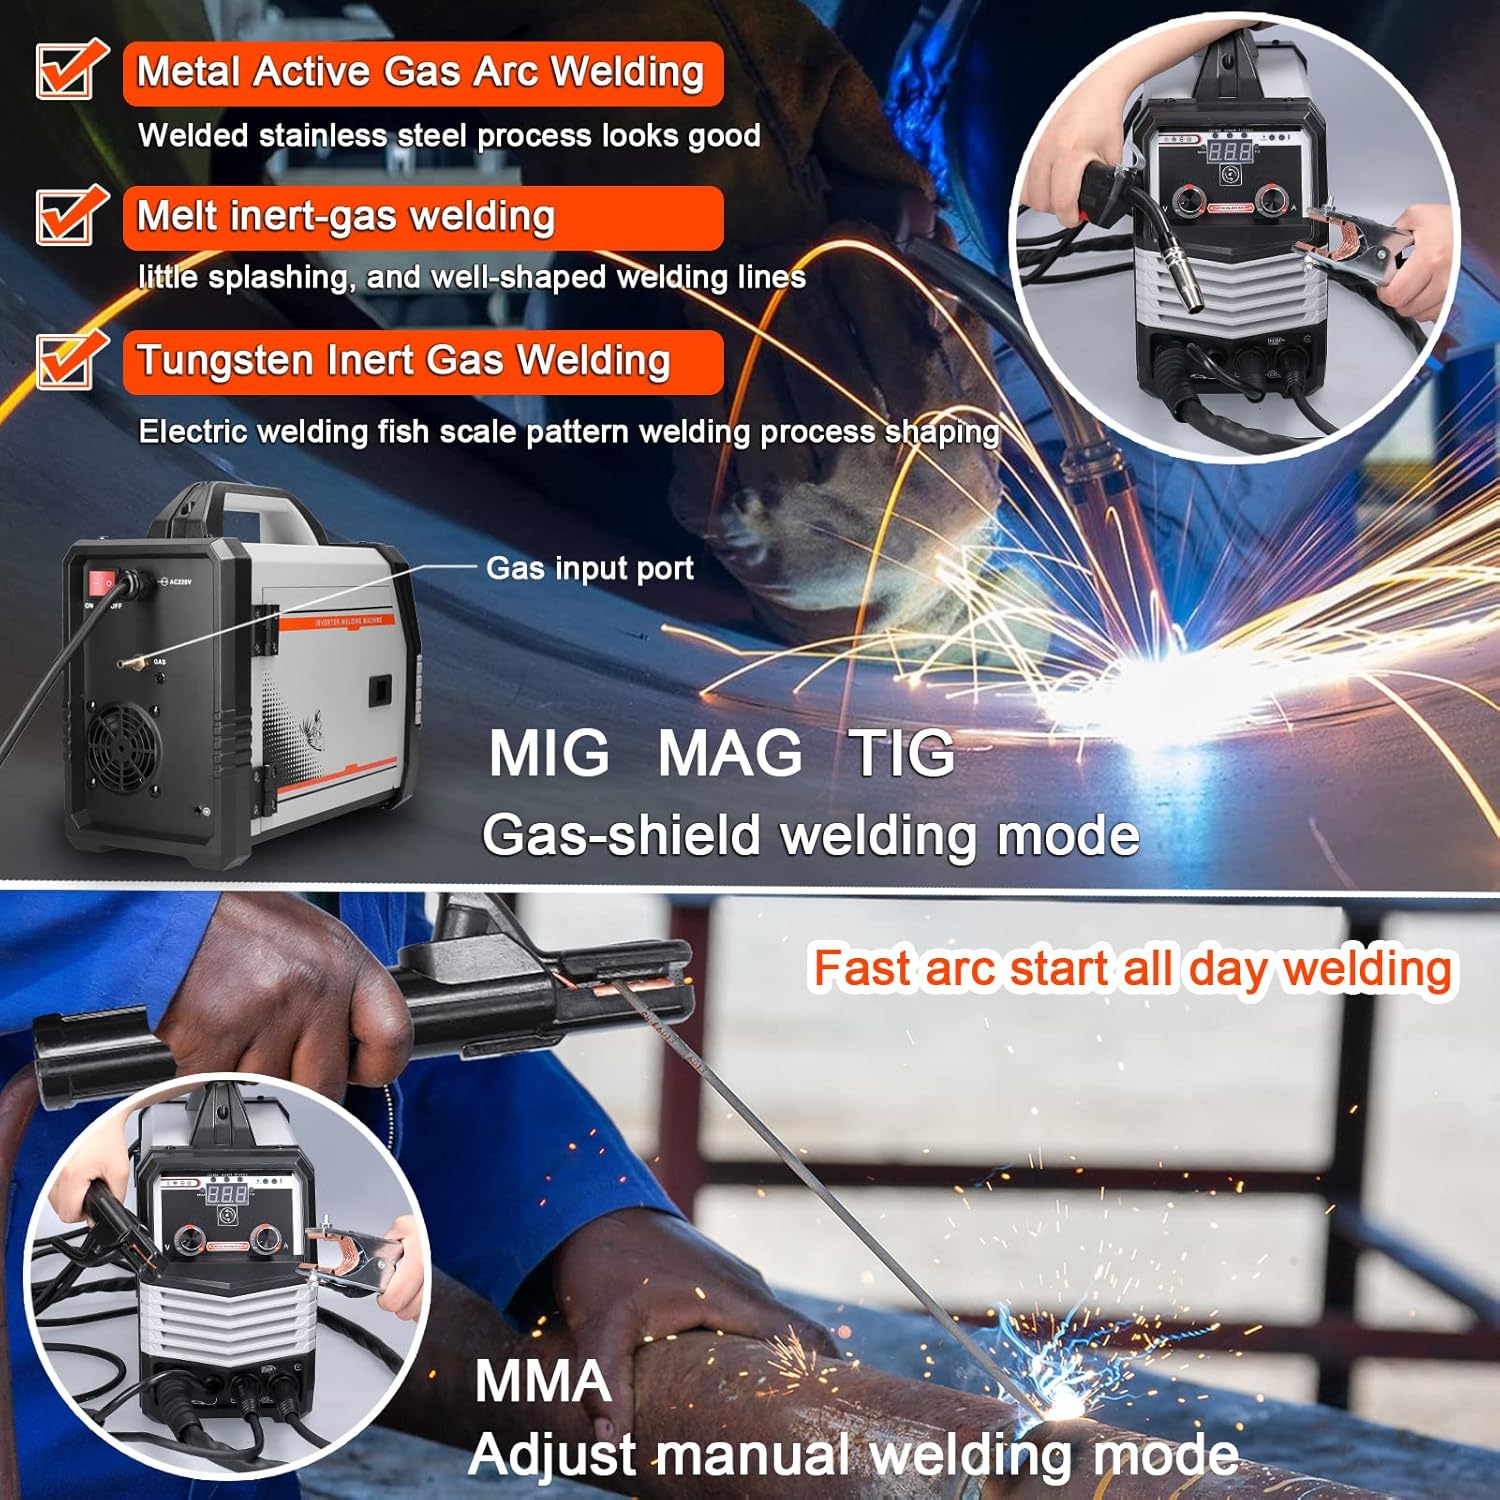
Figure 6.3: MIG/MAG/TIG and MMA welding in action.
6.3.1 MIG/MAG Welding (Gas-Shielded)
- Ensure gas cylinder is connected and gas flow is set.
- Use solid wire (e.g., 0.8mm for CO2 gas).
- Press the trigger on the MIG torch to initiate the arc and wire feed.
6.3.2 Gasless MIG Welding (Flux-Cored)
- No shielding gas required. Use flux-cored wire (e.g., 0.8mm - 1.0mm).
- Ensure polarity is set correctly for flux-cored wire (refer to wire manufacturer's instructions).
- Press the trigger on the MIG torch to initiate the arc and wire feed.
6.3.3 การเชื่อม MMA (แบบแท่ง)
- เชื่อมต่อสายเคเบิลของตัวยึดอิเล็กโทรดเข้ากับขั้วบวก (+) และสายดินamp to the negative (-) terminal (or vice-versa, depending on electrode type).
- Insert the electrode into the holder.
- Strike the arc by lightly touching and quickly lifting the electrode from the workpiece.
- Recommended electrode thickness: 1.6mm - 3.2mm.
6.3.4 การเชื่อม TIG
- Connect the TIG torch (not included in standard package) and gas supply (Argon).
- Ensure the tungsten electrode is properly ground.
- Initiate the arc (lift arc or high-frequency start, depending on machine features).
6.4 Welding Current Setting Reference
Refer to the table below for recommended welding current and voltage settings based on electrode diameter for MMA welding.

Figure 6.4: Reference table for welding current settings.
| อิเล็กโทรดเส้นผ่านศูนย์กลาง (มม.) | กระแสเชื่อมที่แนะนำ (A) | ปริมาณการเชื่อมที่แนะนำtagอี (วี) |
|---|---|---|
| 1.0 | 20~60 | 20.8~22.4 |
| 1.6 | 44~84 | 21.76~23.36 |
| 2.0 | 60~100 | 22.4~24.0 |
| 2.5 | 80~120 | 23.2~24.8 |
| 3.2 | 108~148 | 23.32~24.92 |
| 4.0 | 140~180 | 24.6~27.2 |
| 5.0 | 180~220 | 27.2~28.8 |
7. การบำรุงรักษา
การบำรุงรักษาอย่างสม่ำเสมอจะช่วยให้เครื่องเชื่อมของคุณมีอายุการใช้งานยาวนานและใช้งานได้อย่างปลอดภัย
- การทำความสะอาด: Regularly clean the machine's exterior with a dry cloth. Use compressed air to blow out dust from inside the machine, especially the cooling vents, at least once a month or more frequently in dusty environments. Ensure the machine is unplugged before cleaning.
- การตรวจสอบสายเคเบิล: Inspect all welding cables, power cords, and gas hoses for cuts, abrasions, or loose connections before each use. Replace damaged components immediately.
- ตัวป้อนลวด: Clean the wire feeder rollers and guide tubes regularly to prevent wire feeding issues. Check for wear on the drive rollers.
- Torch/Electrode Holder: Clean the MIG torch nozzle and contact tip. Replace worn contact tips. Ensure the MMA electrode holder jaws are clean and grip electrodes securely.
- พื้นที่จัดเก็บ: Store the welding machine in a clean, dry environment when not in use.
8 การแก้ไขปัญหา
ส่วนนี้จะกล่าวถึงปัญหาทั่วไปที่คุณอาจพบ สำหรับปัญหาที่ไม่ได้ระบุไว้ในที่นี้ โปรดติดต่อฝ่ายสนับสนุนลูกค้า
| ปัญหา | สาเหตุที่เป็นไปได้ | สารละลาย |
|---|---|---|
| เครื่องไม่เปิดเครื่อง | No power supply; Power switch off; Faulty power cable/plug | Check power outlet; Ensure switch is ON; Inspect and replace cable if damaged. |
| No welding arc (MMA) | Poor ground connection; Incorrect current setting; Wet electrode; Faulty electrode holder | Ensure good ground contact; Adjust current; Use dry electrodes; Check electrode holder. |
| Wire not feeding (MIG/MAG) | Wire spool tangled; Drive rollers loose/worn; Contact tip clogged; Liner blocked | Untangle wire; Adjust/replace rollers; Clean/replace contact tip; Clean/replace liner. |
| คุณภาพการเชื่อมไม่ดี | Incorrect settings (current/voltage/wire speed); Improper technique; Contaminated workpiece; Insufficient gas flow (MIG/MAG) | Adjust settings; Practice technique; Clean workpiece; Check gas supply and flow rate. |
| เปิดใช้งานการป้องกันความร้อนสูงเกินไป | Exceeded duty cycle; Insufficient ventilation; Blocked cooling vents | Allow machine to cool down; Ensure proper ventilation; Clean cooling vents. |
9. ข้อมูลจำเพาะ
Technical specifications for the Weytoll 4-in-1 Welding Machine.
| พารามิเตอร์ | ค่า |
|---|---|
| แบบอย่าง | Schweißgerät 4in1 |
| อินพุต Voltage | 220โวลต์ |
| กระแสไฟขาออก (A) | 20A-300A |
| Power Capacity (KVA) | 7.4 |
| ความถี่ (เฮิรตซ์) | 50/60 |
| ปริมาณการส่งออกtagอี (วี) | 16.5-24 |
| รอบการทำงานที่กำหนด (%) | 60 |
| ปัจจัยกำลังงาน | 0.85 |
| ประสิทธิภาพ (%) | 85 |
| Wire Feeding Style | ภายใน |
| Wire Feed Speed (m/min) | 3.6-12 |
| Post-Flux Time (S) | 0.5±1 |
| ระดับฉนวน | F |
| Housing Protection Index | IP21 |
| Max Wire Spool Size | Φ200 |
| อุณหภูมิโดยรอบ | -10℃ ถึง 40℃ |
| ระดับความสูง | ≤ 1000 เมตร |
| Relative Humidity (40°C) | ≤ 50% |
| Relative Humidity (20°C) | ≤ 90% |
| ขนาดรายการ | 375 x 245 x 160 มม. |
| น้ำหนักสินค้า | 6740 กรัม |
| ขนาดแพ็คเกจ | 470 x 225 x 400 มม. |
| น้ำหนักแพ็คเกจ | 7000 กรัม |
10. การรับประกันและการสนับสนุน
สำหรับข้อมูลการรับประกันหรือการสนับสนุนทางเทคนิค โปรดดูเอกสารที่แนบมาพร้อมกับสินค้าที่ซื้อ หรือติดต่อผู้ค้าปลีก/ผู้ผลิตโดยตรง โปรดเก็บหลักฐานการซื้อไว้เพื่อใช้ในการเรียกร้องการรับประกัน
Manufacturer: Weytoll


