1. บทนำ
This manual provides detailed instructions for the Alxum S1222A M.2 NVMe and SATA Dual-Bay Enclosure. Please read this manual thoroughly before using the product to ensure proper operation and to maximize its functionality. This device allows for high-speed data transfer and offline cloning between M.2 NVMe SSDs and 2.5"/3.5" SATA HDDs/SSDs.
1.1 เนื้อหาบรรจุภัณฑ์
- Alxum S1222A M.2 NVMe and SATA Dual-Bay Enclosure
- USB-C to USB-A/USB-C Data Cable
- อะแดปเตอร์ไฟ 12V/2A
- คู่มือการใช้งาน
2. สินค้าหมดview
2.1 คุณสมบัติหลัก
- Efficient Thermal Conductivity: Features an aluminum alloy upper cover for enhanced heat dissipation, ensuring optimal performance and longevity of your M.2 SSD.
- ความเข้ากันได้สูง: Supports M.2 SSDs of sizes 2242, 2260, and 2280, and 2.5"/3.5" SATA hard drives. Compatible with Windows, Unix, Linux, Mac, and Android operating systems.
- การถ่ายโอนข้อมูลที่รวดเร็ว: Achieves data transfer rates of up to 10Gbps using the USB 3.2 interface. Supports PCIe Gen 3x2 NVMe M.2 SSDs, enabling superb performance and accelerated data processing. SSD TRIM and UASP acceleration further enhance system responsiveness.
- Offline Duplicator: Allows for quick data copying between two SSDs without requiring a computer connection. It can also function as a dual-bay docking station to expand storage capacity for NVMe M.2 SSDs and 2.5"/3.5" SATA HDDs. Note: Does not support SATA M.2 SSDs.
- Flexible Cloning: Simple one-button cloning process with real-time progress indication. Ensures the target disk has a larger capacity than the source disk for successful cloning. Includes a 12V/2A power adapter to prevent power-related issues.
2.2 แผนผังผลิตภัณฑ์

Figure 1: Alxum S1222A Enclosure and Accessories
This image displays the Alxum S1222A dual-bay enclosure, an M.2 NVMe SSD, a USB-C to USB-A/USB-C data cable, and a power adapter cable. The enclosure features indicator lights for SATA and M.2 drives, power, and cloning progress.
2.3 Interface and Indicators

Figure 2: Enclosure Indicators and Ports
This image highlights the various indicators and ports on the Alxum S1222A enclosure. It shows the SATA indicator, M.2 indicator, Power indicator, Cloning Progress Indicators, USB-C port, DC 12V 2A power input, Power ON/OFF switch, and Clone Switch Setting (M.2 to SATA or SATA to M.2).
| ส่วนประกอบ | คำอธิบาย |
|---|---|
| SATA Indicator | Indicates activity for the SATA drive slot. |
| M.2 Indicator | Indicates activity for the M.2 NVMe drive slot. |
| ไฟแสดงสถานะพลังงาน | ไฟจะสว่างขึ้นเมื่อเปิดใช้งานอุปกรณ์ |
| Cloning Progress Indicators | Multiple LEDs indicate cloning progress (e.g., 25%, 50%, 75%, 100%). |
| พอร์ต USB-C | Connects the enclosure to your computer for data transfer. |
| อินพุตไฟ DC 12V 2A | Connects to the included 12V/2A power adapter. Essential for stable operation and cloning. |
| สวิตช์เปิด/ปิดเครื่อง | Controls the power supply to the enclosure. |
| Clone Switch Setting | Allows selection of cloning direction (M.2 to SATA or SATA to M.2). |
3. การตั้งค่าและการติดตั้ง
3.1 การติดตั้ง M.2 NVMe SSD
- โปรดตรวจสอบให้แน่ใจว่าได้ปิดเครื่องและถอดสายเชื่อมต่ออุปกรณ์กับคอมพิวเตอร์แล้ว
- Locate the M.2 slot on the enclosure. Gently insert your M.2 NVMe SSD (2242/2260/2280 size) into the slot at an angle.
- Press down the SSD and secure it with the provided retention mechanism (if applicable, usually a rubber stopper or screw).
3.2 2.5"/3.5" SATA HDD/SSD Installation
- โปรดตรวจสอบให้แน่ใจว่าได้ปิดเครื่องและถอดสายเชื่อมต่ออุปกรณ์กับคอมพิวเตอร์แล้ว
- Slide your 2.5" or 3.5" SATA HDD/SSD into the SATA drive bay until it firmly connects with the SATA connector.
3.3 การเชื่อมต่อกับคอมพิวเตอร์
- Connect the included 12V/2A power adapter to the DC 12V 2A input port on the enclosure, then plug it into a power outlet.
- Connect the USB-C data cable to the USB-C port on the enclosure and the other end to an available USB-A or USB-C port on your computer.
- Turn on the enclosure using the Power ON/OFF switch. The power indicator light will illuminate.
- Your computer should automatically detect the connected drives. For new drives, you may need to initialize and format them through your operating system's disk management utility before use.

รูปที่ 3: การเชื่อมต่อแบบ Plug and Play
This image illustrates the plug-and-play nature of the Alxum S1222A enclosure, showing it connected to a laptop. Icons for Mac OS, Windows, Unix, Linux, and Android indicate broad operating system compatibility.
4. คู่มือการใช้งาน
4.1 Data Transfer Mode (External Drive Function)
Once connected to your computer and powered on, the installed M.2 NVMe SSD and/or SATA HDD/SSD will appear as external storage devices. You can drag and drop fileคัดลอก วาง หรือดำเนินการตามมาตรฐานใดๆ file operations as you would with any other external drive.

รูปที่ 4: การถ่ายโอนข้อมูลความเร็วสูง
This image shows the Alxum S1222A enclosure connected to a laptop, illustrating its capability for super-fast data transfer rates of up to 10Gbps, suitable for various media fileและแอปพลิเคชั่น
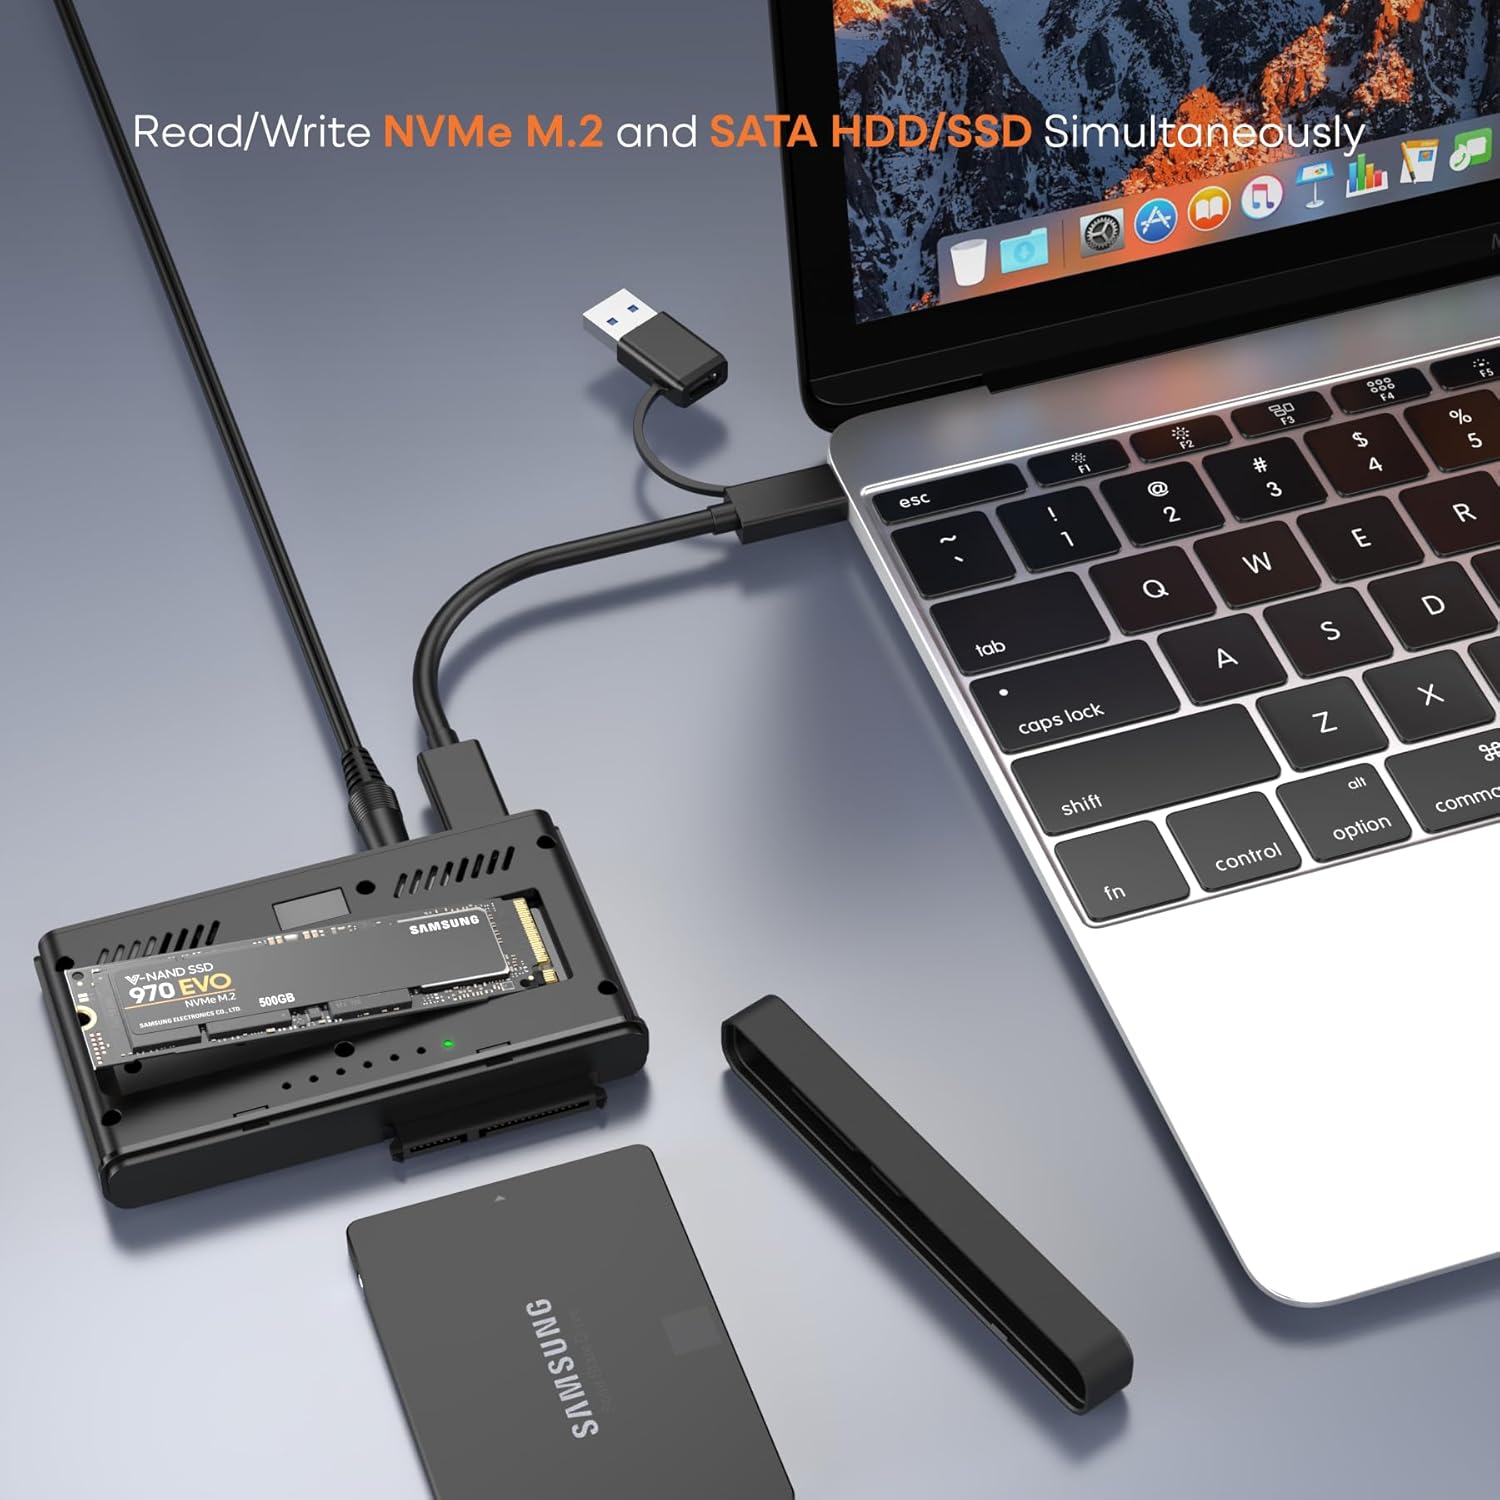
Figure 5: Simultaneous Read/Write Operations
This image depicts the Alxum S1222A enclosure performing simultaneous read/write operations on both an NVMe M.2 SSD and a SATA HDD/SSD, connected to a laptop.
4.2 ฟังก์ชันการโคลนนิ่งแบบออฟไลน์
The offline cloning function allows you to duplicate data from a source drive to a target drive without connecting to a computer. Ensure the target drive has a capacity equal to or larger than the source drive.

Figure 6: Offline Cloning Overview
ภาพนี้ให้ภาพรวมview of the offline cloning feature, showing an M.2 NVMe SSD as the source and a SATA SSD as the target. Progress indicators (25%, 50%, 75%, 100%) are visible, emphasizing the requirement for the destination disk to be equal to or larger than the source disk.
- เตรียมไดรฟ์: Ensure both the source M.2 NVMe SSD and the target 2.5"/3.5" SATA HDD/SSD are properly installed in their respective slots. The enclosure should be powered off and disconnected from any computer.
- Set Clone Direction: Use the "Clone Switch Setting" to select the desired cloning direction (M.2 to SATA or SATA to M.2).
- เชื่อมต่อพลังงาน: Plug in the 12V/2A power adapter to the enclosure and a power outlet.
- เริ่มการโคลน: Press and hold the "Clone" button for 3 seconds until all four blue cloning progress indicator lights illuminate. Release the button, then quickly press it again to start the cloning process.
- ติดตามความคืบหน้า: The blue indicator lights will illuminate sequentially (25%, 50%, 75%, 100%) to show the cloning progress.
- เสร็จสิ้น: Once all indicator lights are solid, the cloning process is complete. Switch off the power, then safely eject the hard disks.

Figure 7: Step-by-Step Offline Cloning
This image provides a visual four-step guide for offline cloning: 1. Insert drives and power supply. 2. Press and hold the clone button for 3 seconds, then press again. 3. Monitor blue progress lights. 4. Power off and eject drives upon completion.
4.3 Important Considerations for Cloning
- The target disk must have a capacity equal to or greater than the source disk.
- All data on the target disk will be overwritten during the cloning process. Back up any important data from the target disk before proceeding.
- Ensure a stable power supply throughout the cloning process to prevent data corruption.
- The enclosure does not support cloning from SATA M.2 SSDs. Only NVMe M.2 SSDs are supported in the M.2 slot.
5. ความเข้ากันได้
5.1 ความเข้ากันได้ของระบบปฏิบัติการ
- หน้าต่าง
- แมคโอเอส
- ลินุกซ์
- ยูนิกซ์
- แอนดรอยด์
5.2 ความเข้ากันได้ของไดรฟ์
- ช่อง M.2: Supports PCIe Gen 3x2 NVMe M.2 SSDs (M-Key and B&M-Key) of sizes 2242, 2260, and 2280. Does NOT support SATA M.2 SSDs.
- SATA Slot: Supports 2.5" and 3.5" SATA HDDs/SSDs. Does NOT support IDE drives.

Figure 8: Drive Interface Compatibility
This diagram visually clarifies the supported M.2 interfaces (B&M-Key, M-Key for 2242/2260/2280 NVMe SSDs) and SATA interface (SATA ✓, IDE X), ensuring users select compatible drives.
6. การบำรุงรักษา
6.1 การดูแลและการเก็บรักษา
- รักษาอุปกรณ์ให้สะอาดและปราศจากฝุ่น ใช้ผ้านุ่มและแห้งทำความสะอาด
- ควรหลีกเลี่ยงการวางตู้เลี้ยงไว้ในที่ที่มีอุณหภูมิ ความชื้น หรือแสงแดดจัดเกินไป
- เก็บอุปกรณ์ไว้ในที่แห้งและเย็นเมื่อไม่ใช้งาน
- ห้ามถอดประกอบหรือซ่อมแซมอุปกรณ์ด้วยตนเอง การกระทำดังกล่าวอาจทำให้การรับประกันเป็นโมฆะ
- Always safely eject drives from your operating system before disconnecting the enclosure to prevent data loss.
7 การแก้ไขปัญหา
7.1 ปัญหาทั่วไปและแนวทางแก้ไข
- ปัญหา: คอมพิวเตอร์ไม่ตรวจพบไดรฟ์
สารละลาย:- Ensure the power adapter is connected and the enclosure is powered on.
- ตรวจสอบการเชื่อมต่อสายเคเบิลทั้งหมด (USB และสายไฟ)
- ลองใช้พอร์ต USB อื่นบนคอมพิวเตอร์ของคุณ
- สำหรับไดรฟ์ใหม่ โปรดตรวจสอบให้แน่ใจว่าไดรฟ์ได้รับการเริ่มต้นระบบและฟอร์แมตในระบบจัดการดิสก์ (Windows) หรือยูทิลิตี้ดิสก์ (macOS) ของระบบปฏิบัติการของคุณแล้ว
- Verify the drive is correctly seated in its slot.
- Confirm the drive type is compatible (NVMe M.2 for M.2 slot, SATA for SATA slot).
- ปัญหา: การโคลนนิ่งล้มเหลวหรือไม่เริ่มต้น
สารละลาย:- ตรวจสอบให้แน่ใจว่าความจุของไดรฟ์เป้าหมายเท่ากับหรือมากกว่าความจุของไดรฟ์ต้นทาง
- Verify both drives are properly inserted.
- Confirm the power adapter is connected and providing sufficient power.
- Ensure the clone button sequence is followed correctly (press and hold for 3s, release, then quick press).
- Check the clone switch setting for correct source/target direction.
- Ensure you are not attempting to clone a SATA M.2 SSD.
- ปัญหา: ความเร็วในการถ่ายโอนข้อมูลช้า
สารละลาย:- Ensure you are connected to a USB 3.2 (or USB 3.0/3.1) port on your computer. Older USB 2.0 ports will result in slower speeds.
- Check the quality of the USB cable.
- The actual speed may vary depending on the SSD/HDD performance and your computer's system configuration.
8. ข้อมูลจำเพาะ
| คุณสมบัติ | รายละเอียด |
|---|---|
| หมายเลขรุ่น | S1222A |
| ยี่ห้อ | อัลซุม |
| ฮาร์ดแวร์อินเตอร์เฟซ | USB 3.1 ประเภท A, USB 3.1 ประเภท C |
| เทคโนโลยีการเชื่อมต่อ | SATA, NVMe (M.2) |
| อัตราการถ่ายโอนข้อมูล | Up to 10 Gigabits Per Second (USB 3.2 Gen2) |
| อุปกรณ์ที่รองรับ | Laptops, Desktops, Tablets (with compatible USB ports) |
| ประเภทไดรฟ์ที่รองรับ | M.2 NVMe SSD (2242/2260/2280), 2.5"/3.5" SATA HDD/SSD |
| จำนวนอุปกรณ์ที่รองรับสูงสุด | 2 (1x M.2 NVMe, 1x SATA) |
| กำลังไฟเข้า | กระแสตรง 12V 2A |
| ขนาดสินค้า | 4.02 x 2.66 x 0.57 นิ้ว |
| น้ำหนักสินค้า | 11.3 ออนซ์ |
| วัสดุ | Plastic, Aluminum Alloy (upper cover) |
| คุณสมบัติ | Offline Cloning, Hot-swapping, UASP, TRIM |
9. การรับประกันและการสนับสนุน
9.1 ข้อมูลการรับประกัน
Alxum products are designed and manufactured to high-quality standards. For specific warranty details regarding your Alxum S1222A enclosure, please refer to the warranty card included in your package or visit the official Alxum webไซต์ โปรดเก็บใบเสร็จรับเงินไว้เป็นหลักฐานการซื้อสำหรับการเรียกร้องการรับประกัน
9.2 การสนับสนุนลูกค้า
If you encounter any issues or have questions about your Alxum S1222A enclosure, please contact Alxum customer support. You can typically find contact information on the product packaging, the official Alxum website, or through the retailer where you purchased the product. Please have your model number (S1222A) and purchase details ready when contacting support.


