1. ข้อมูลด้านความปลอดภัยที่สำคัญ
โปรดอ่านคำแนะนำทั้งหมดอย่างละเอียดก่อนใช้งานเครื่องลดความชื้น เก็บรักษาคู่มือนี้ไว้เพื่อใช้อ้างอิงในอนาคต
- Ensure the unit is placed on a level, stable surface to prevent water spillage.
- Maintain adequate clearance (at least 20 cm) around the unit for proper airflow.
- Do not operate the unit with a damaged power cord. Contact customer support for replacement.
- ถอดปลั๊กเครื่องลดความชื้นก่อนทำความสะอาดหรือดำเนินการบำรุงรักษาใดๆ
- ห้ามสอดวัตถุเข้าไปในช่องลมเข้าหรือช่องลมออก
- เก็บเครื่องให้ห่างจากแหล่งความร้อนและแสงแดดโดยตรง
- เครื่องใช้ไฟฟ้าตัวนี้ไม่ได้มีวัตถุประสงค์เพื่อให้บุคคล (รวมทั้งเด็ก) ที่มีความบกพร่องทางร่างกาย ทางประสาทสัมผัส หรือทางจิตใจ หรือขาดประสบการณ์และความรู้ ใช้งาน เว้นแต่จะมีการดูแลหรือคำแนะนำเกี่ยวกับการใช้เครื่องใช้ไฟฟ้าโดยบุคคลที่รับผิดชอบด้านความปลอดภัยของบุคคลดังกล่าว
2. สินค้าหมดview
The Waykar 80 Pints Dehumidifier is designed to efficiently remove excess moisture from your environment, improving air quality and comfort. It is suitable for spaces up to 5,000 square feet.

รูปที่ 2.1 : ด้านหน้า view of the Waykar 80 Pints Dehumidifier.

Figure 2.2: Dehumidifier operating in a room, illustrating its coverage capability and adjustable humidity range (30-80% RH).
คุณสมบัติที่สำคัญ ได้แก่:
- ความจุ 80 ไพนต์: กำจัดความชื้นได้มากถึง 80 พินต์ต่อวัน
- ได้รับการรับรองจาก Energy Star: Designed for high energy efficiency.
- Wide-Angle Swing: Automatic 30°-90° swing function for improved air circulation.
- การทำงานที่เงียบ: ทำงานได้ที่ระดับเสียงต่ำสุด 42 เดซิเบล
- การควบคุมแบบสัมผัสอัจฉริยะ: Intuitive panel for easy settings adjustment.
- ตัวจับเวลา 24 ชั่วโมง: Schedule operations for convenience.
- Auto Defrost & Memory Restart: Ensures stable performance and resumes settings after power interruption.
- ระบบระบายน้ำแบบยืดหยุ่น: Options for manual tank emptying or continuous drainage.
- ตัวกรองอากาศที่สามารถซักล้างได้: ทำความสะอาดและดูแลรักษาง่าย
- 360° Swivel Wheels & Integrated Handle: เพื่อความสะดวกในการเคลื่อนย้าย
3. การตั้งค่าและการติดตั้ง
3.1 การแกะกล่อง
Carefully remove the dehumidifier from its packaging. Inspect the unit for any signs of damage. If any damage is found, do not operate the unit and contact customer support.
3.2 การจัดวาง
Place the dehumidifier on a firm, level surface in a location where the ambient temperature will not fall below 5°C (41°F). Ensure there is at least 20 cm (8 inches) of space around the unit for proper air circulation. Avoid placing the unit near heat-generating appliances or in direct sunlight.

Figure 3.1: The dehumidifier features 360° swivel wheels and an integrated handle for easy movement, along with tidy cable storage.
3.3 การเชื่อมต่อสายไฟ
เสียบสายไฟเข้ากับเต้ารับไฟฟ้าที่มีสายดิน ตรวจสอบให้แน่ใจว่าระดับเสียงtage and frequency of the power supply match the specifications on the unit's rating label.
4. คู่มือการใช้งาน
แผงควบคุมช่วยให้คุณจัดการฟังก์ชันทั้งหมดของเครื่องลดความชื้นได้
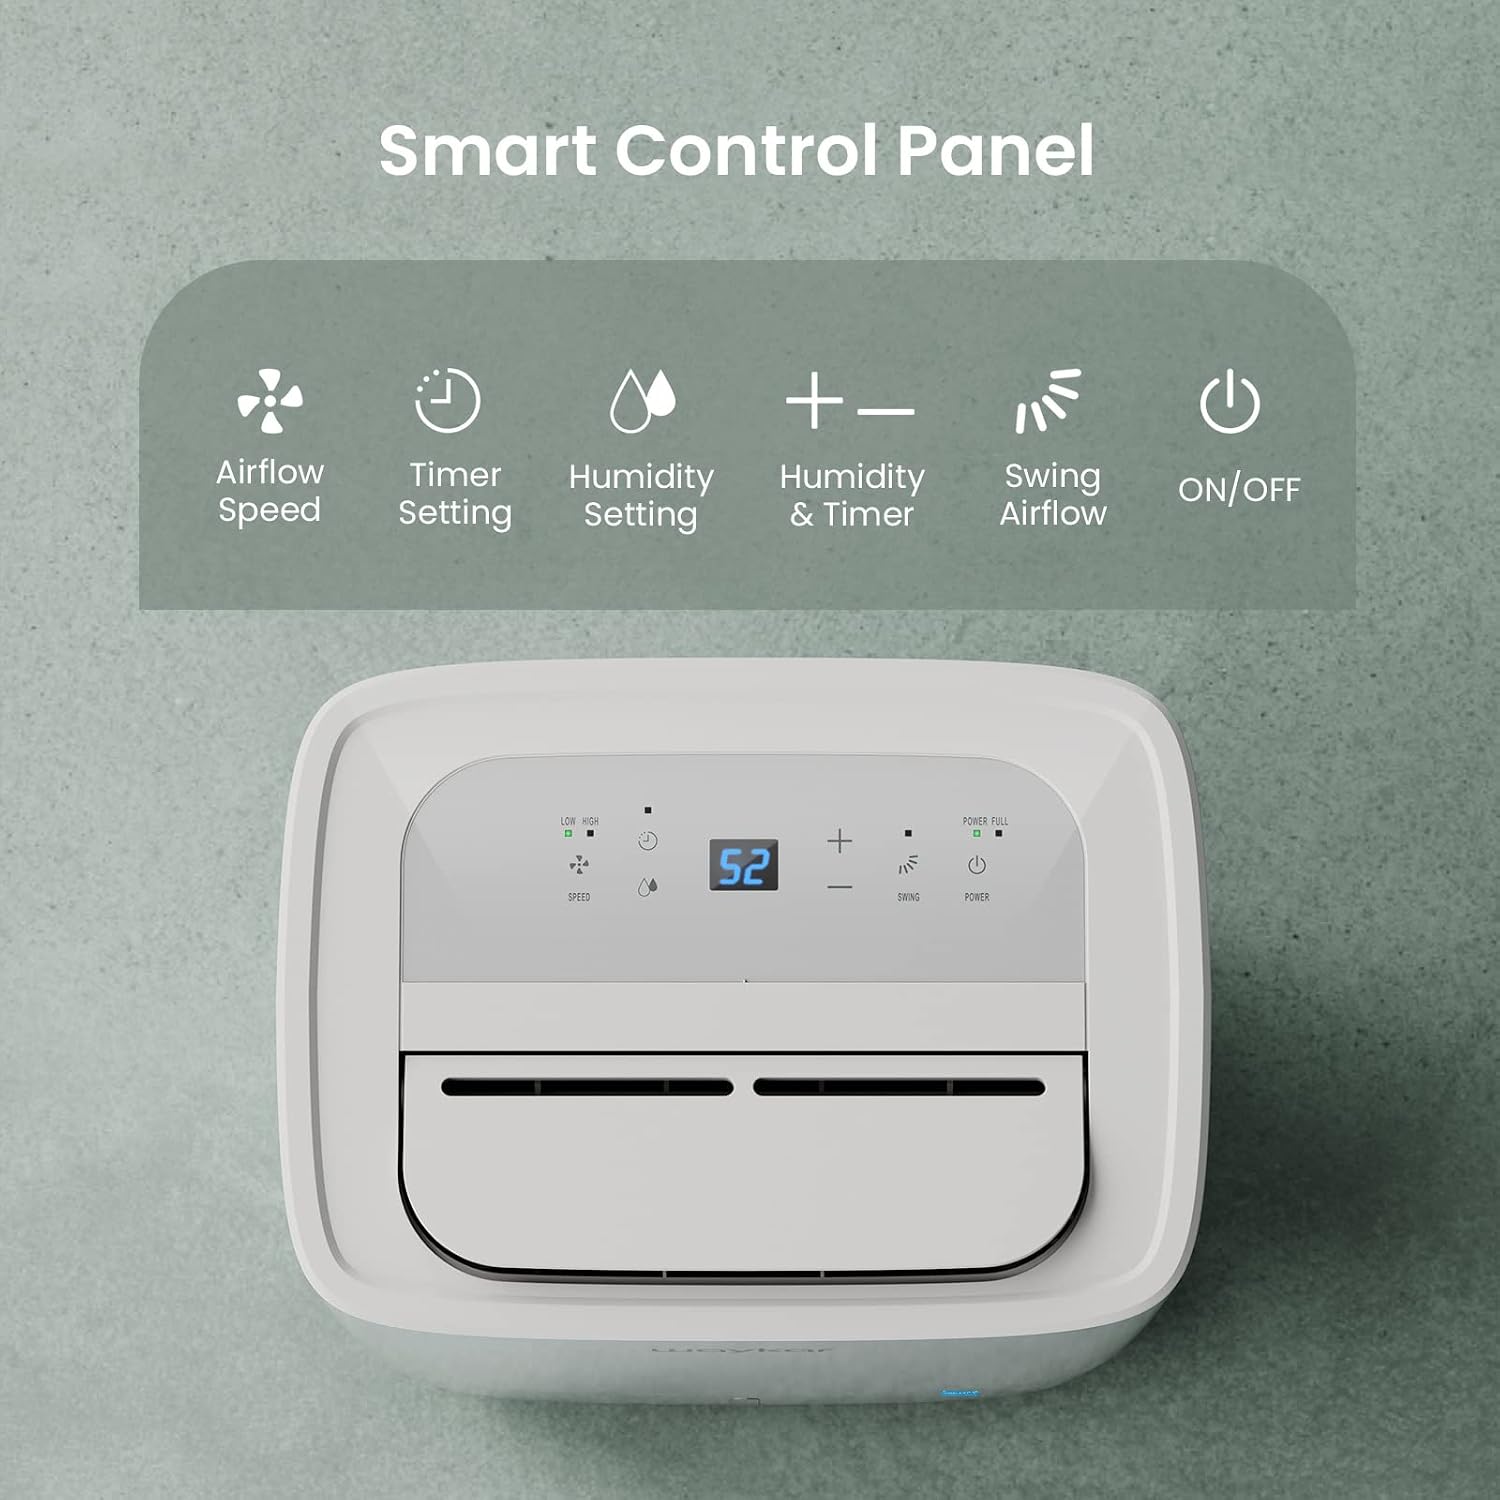
Figure 4.1: Smart Control Panel with buttons for Airflow Speed, Timer Setting, Humidity Setting, Swing Airflow, and ON/OFF.
4.1 การเปิด/ปิดเครื่อง
- กดปุ่ม พลัง ปุ่มเพื่อเปิดหรือปิดเครื่อง
4.2 การตั้งค่าระดับความชื้น
- กดปุ่ม + or - buttons to adjust the desired humidity level between 30% and 80% Relative Humidity (RH). The unit will operate until the set humidity level is reached, then cycle ON/OFF to maintain it.
ความเร็วพัดลม 4.3 ระดับ
- กดปุ่ม ความเร็ว button to toggle between Low and High fan speeds.
4.4 ฟังก์ชั่นจับเวลา
- กดปุ่ม ตัวจับเวลา button to set a delay for the unit to turn ON or OFF. The timer can be set from 0.5 to 24 hours.
4.5 Swing Airflow
- กดปุ่ม แกว่ง button to activate the automatic 30°-90° airflow oscillation. This helps distribute dehumidified air more evenly.
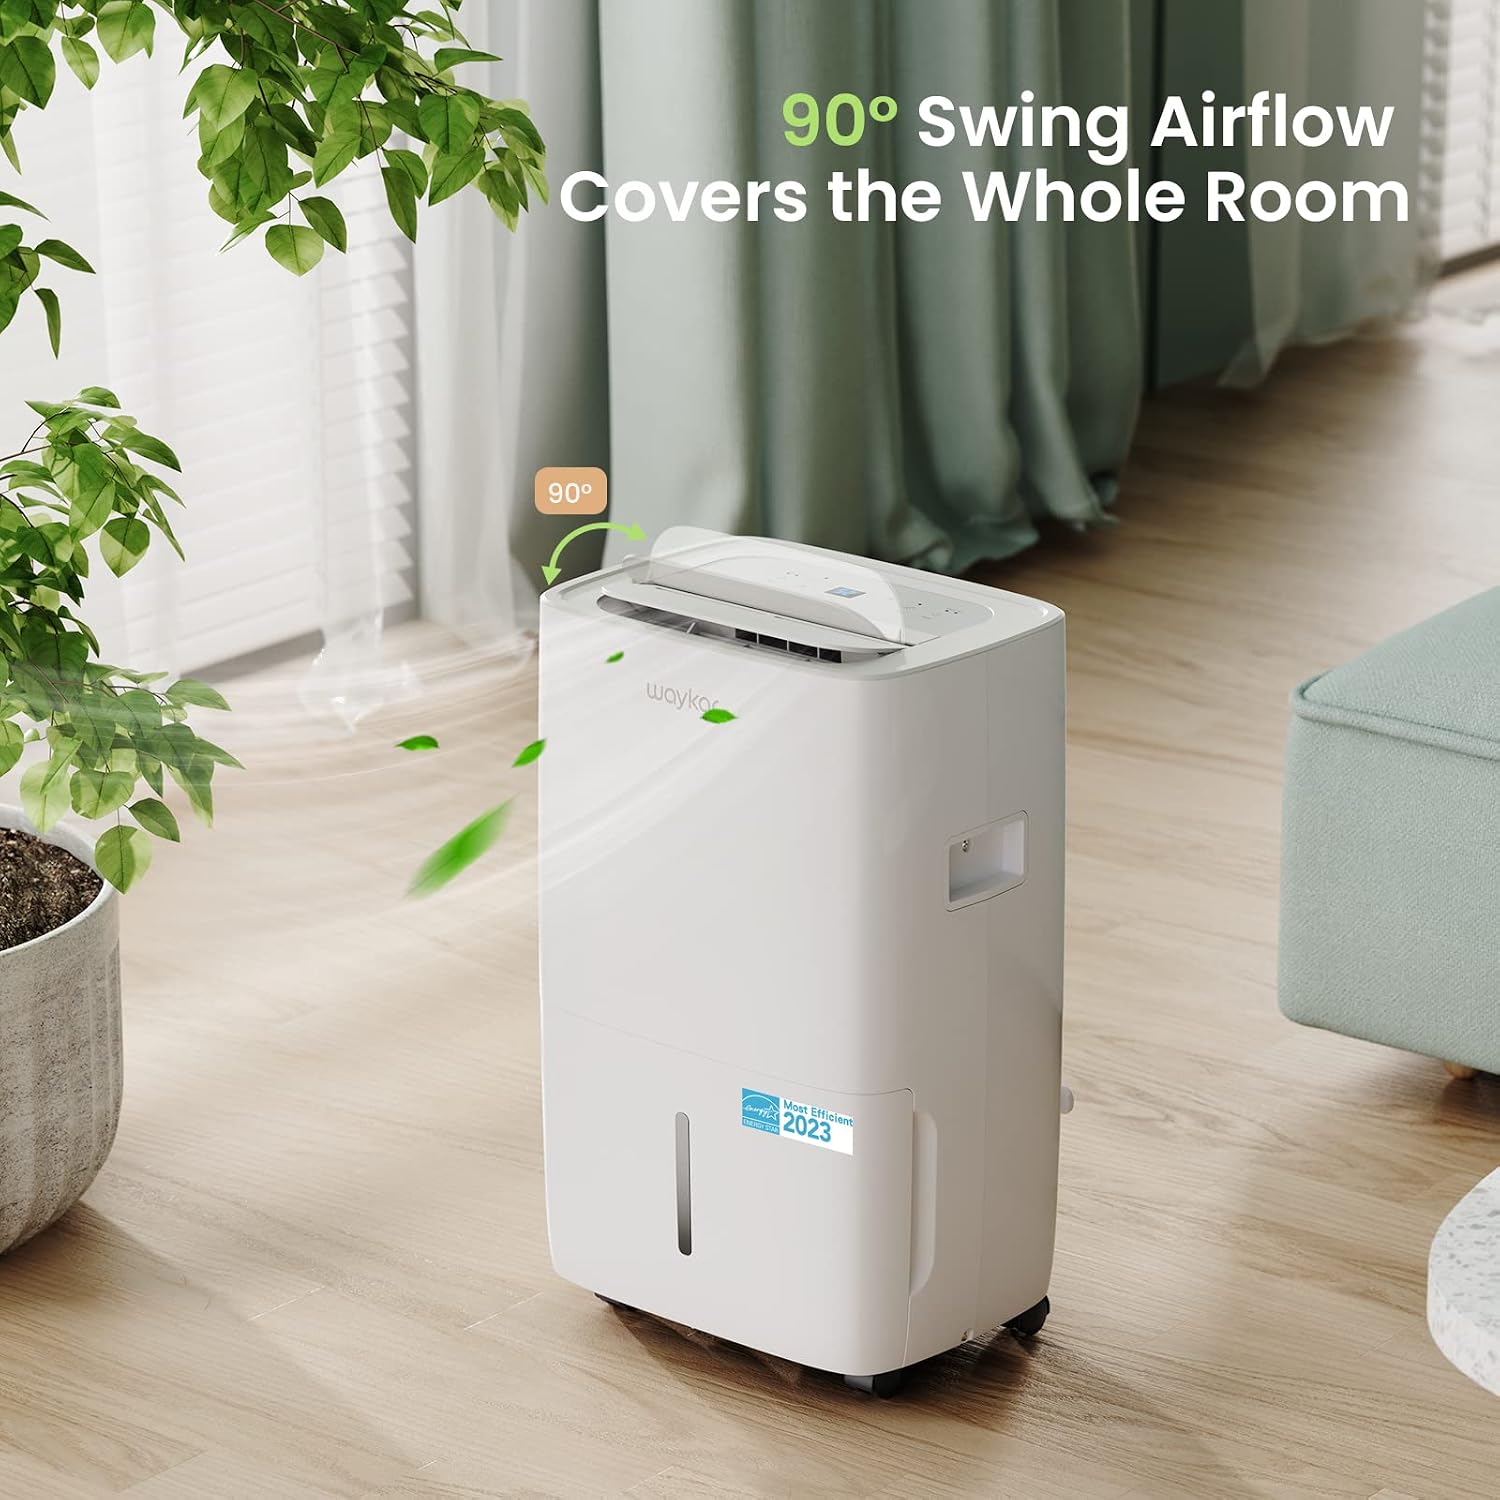
Figure 4.2: The 90° swing airflow feature helps cover the entire room for efficient dehumidification.
4.6 ล็อคป้องกันเด็ก
- ในการเปิดใช้งานระบบล็อกเด็ก ให้กดปุ่มค้างไว้ ตัวจับเวลา button for 3 seconds. The control panel will be locked to prevent accidental changes. Repeat to unlock.
4.7 Auto Defrost and Memory Restart
- The unit features an automatic defrost function that activates when frost builds up on the evaporator coils, ensuring efficient operation in cooler environments.
- กรณีไฟดับtage, the Memory Restart function will automatically resume the previous settings once power is restored.
5. ตัวเลือกการระบายน้ำ
The Waykar dehumidifier offers two convenient drainage methods:
5.1 การระบายน้ำด้วยตนเอง (ถังเก็บน้ำ)
- When the 1.14-gallon (4.3L) water tank is full, the unit will automatically shut off and an indicator light will illuminate on the control panel.
- ดึงถังน้ำออกจากด้านหน้าเครื่องอย่างระมัดระวัง
- เทน้ำที่เก็บกักไว้ออก
- Slide the empty tank back into the unit until it clicks into place. The unit will then resume operation.
5.2 การระบายน้ำอย่างต่อเนื่อง (ท่อระบายน้ำ)
- For continuous operation without needing to empty the tank, attach the included 3.3 ft (1 m) drain hose to the drainage outlet at the back of the unit.
- Ensure the hose is securely tightened to prevent leaks.
- Direct the other end of the hose to a suitable drain (e.g., floor drain, sink). Ensure the hose is sloped downwards to allow gravity drainage.

Figure 5.1: Illustration of both manual drainage (left) and continuous drainage (right) options.
6. การบำรุงรักษา
การบำรุงรักษาตามปกติจะช่วยให้เครื่องลดความชื้นของคุณมีประสิทธิภาพสูงสุดและมีอายุการใช้งานยาวนาน
6.1 การทำความสะอาดแผ่นกรองอากาศ
The washable air filter should be cleaned regularly (approximately every 250 hours of operation or when the filter indicator light illuminates) to maintain efficiency.
- ปิดเครื่องและถอดปลั๊กออกจากเต้าเสียบไฟฟ้า
- ถอดแผ่นกรองอากาศออกจากด้านหลังของเครื่อง
- ล้างตัวกรองด้วยน้ำสบู่อุ่นๆ ล้างออกให้สะอาด
- ปล่อยให้ตัวกรองแห้งสนิทก่อนจะใส่กลับเข้าไปในเครื่อง
- Once the filter is reinstalled, press and hold the กรอง button for 3 seconds to reset the filter indicator.

Figure 6.1: The detachable and washable water tank, featuring a visible water level indicator.
6.2 การทำความสะอาดถังเก็บน้ำ
Clean the water tank periodically to prevent mold and bacteria growth.
- ถอดถังน้ำออกจากเครื่อง
- ล้างถังด้วยน้ำอุ่นและผงซักฟอกอ่อนๆ
- ล้างให้สะอาดและเช็ดให้แห้งก่อนวางกลับเข้าไปในเครื่องลดความชื้น
6.3 การทำความสะอาดภายนอก
- เช็ดด้านนอกของตัวเครื่องด้วยผ้านุ่มdamp ผ้า. อย่าใช้สารเคมีที่รุนแรงหรือน้ำยาทำความสะอาดที่มีฤทธิ์กัดกร่อน
7. คำแนะนำการแก้ไขปัญหา
ก่อนที่จะติดต่อฝ่ายสนับสนุนลูกค้า โปรดดูปัญหาทั่วไปและวิธีแก้ไขต่อไปนี้:
| ปัญหา | สาเหตุที่เป็นไปได้ | สารละลาย | ||||||||||
|---|---|---|---|---|---|---|---|---|---|---|---|---|
| Dehumidifier does not turn ON | ไม่มีแหล่งจ่ายไฟ; สายไฟไม่ได้เสียบปลั๊ก; ถังน้ำเต็มหรือติดตั้งไม่ถูกต้อง | Check power outlet; Plug in power cord securely; Empty and correctly reinstall water tank. | ||||||||||
| เครื่องทำงานอยู่ แต่ไม่สามารถลดความชื้นได้ | ตัวกรองอากาศอุดตัน อุณหภูมิห้องต่ำเกินไป การตั้งค่าความชื้นสูงเกินไป | Clean air filter; Ensure room temperature is above 5°C (41°F); Lower desired humidity setting. | ||||||||||
| หน่วยมีเสียงดัง | เครื่องไม่ได้วางอยู่บนพื้นผิวที่เรียบ; แผ่นกรองอากาศอุดตัน | วางเครื่องบนพื้นผิวที่เรียบและมั่นคง ทำความสะอาดตัวกรองอากาศ | ||||||||||
| น้ำรั่วจากตัวเครื่อง | Water tank incorrectly installed; Drain hose not securely attached (continuous drainage). | Reinstall water tank correctly; Securely tighten drain hose connection. | ||||||||||
รหัสข้อผิดพลาด
เอกสารที่เกี่ยวข้อง - JD025CE-80-CA
|


