การแนะนำ
ขอบคุณสำหรับการซื้อasing the DEERC D11 Mini Drone. This manual provides essential information for safe operation, setup, maintenance, and troubleshooting. Please read it thoroughly before using your drone to ensure optimal performance and longevity.

The DEERC D11 Mini Drone, its remote controller, and two modular batteries.
มีอะไรอยู่ในกล่อง
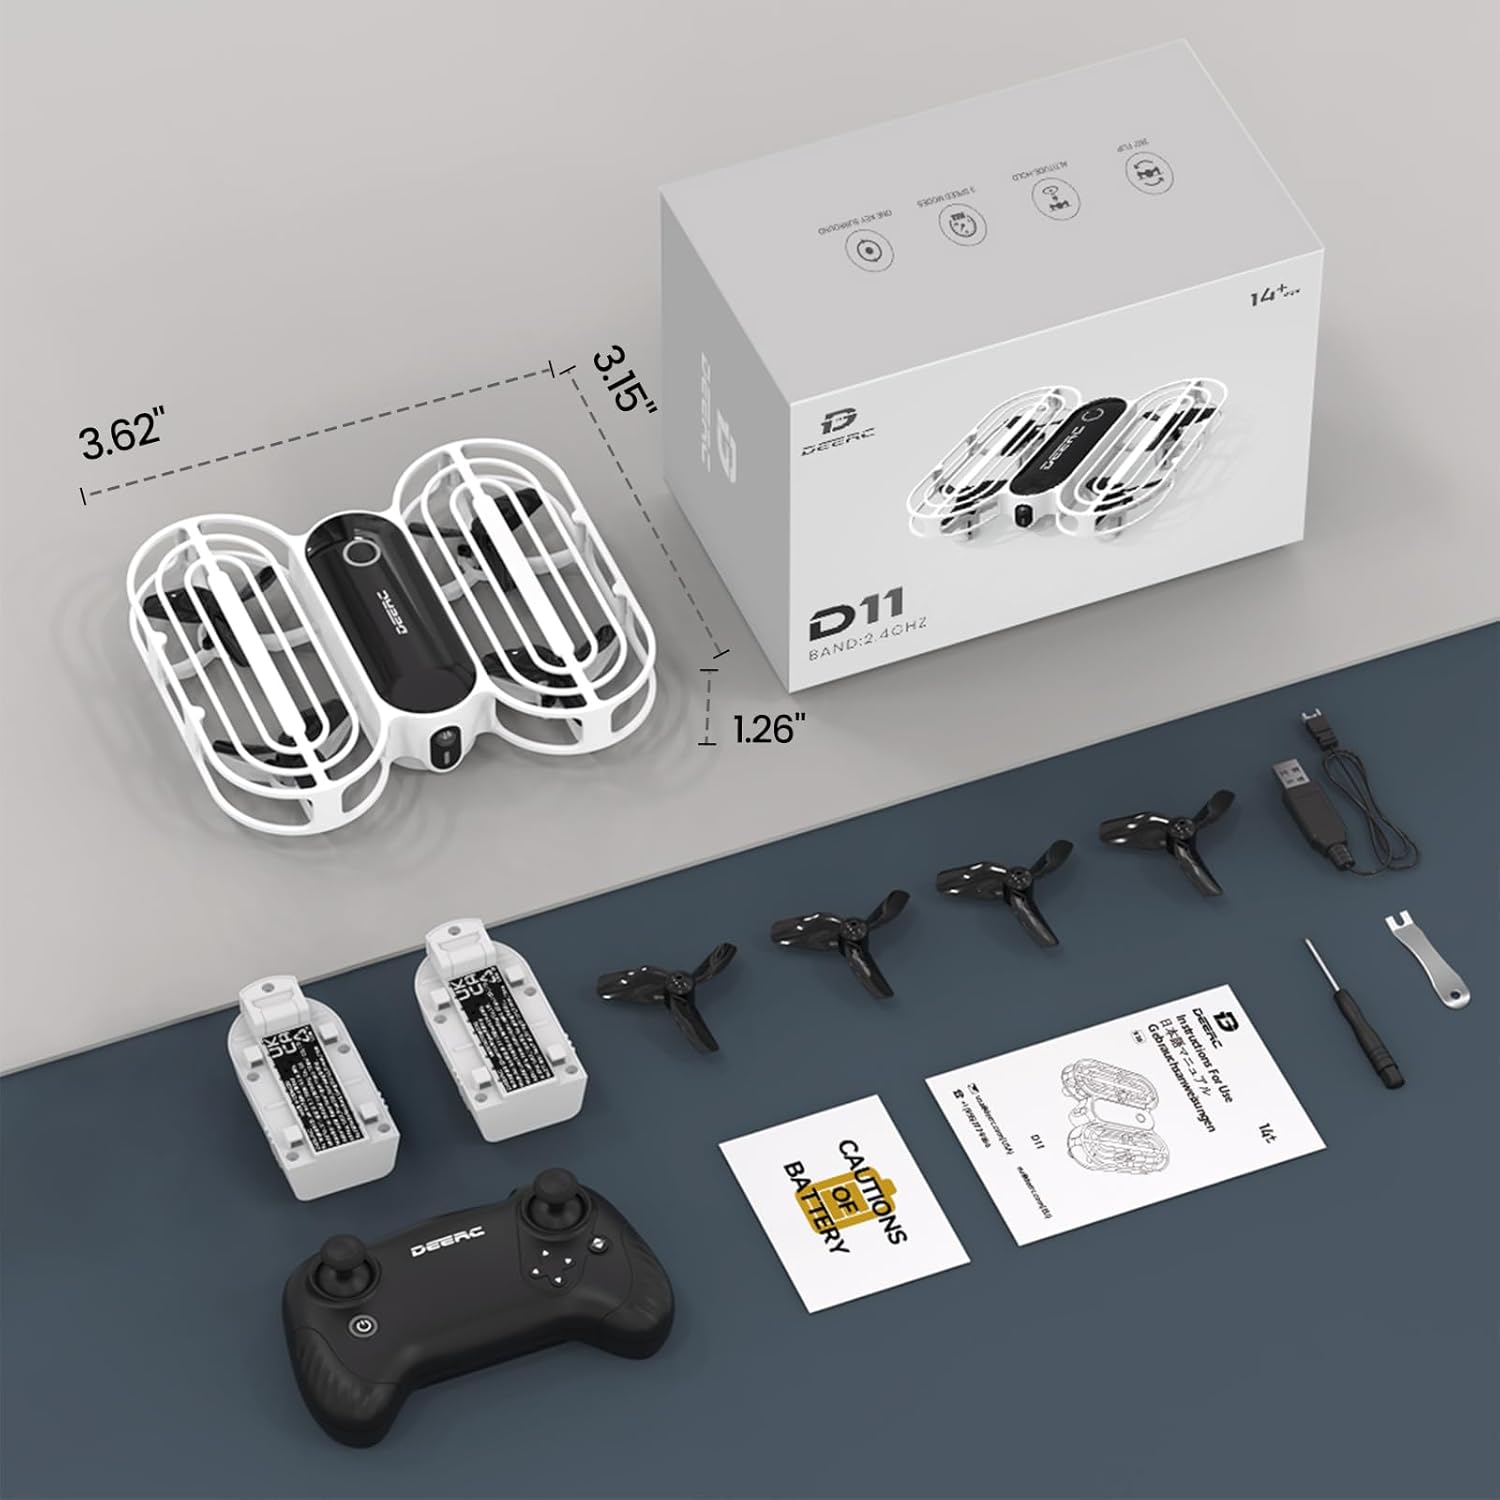
All components included in the DEERC D11 Mini Drone package.
- DEERC D11 Mini Drone
- รีโมทคอนโทรล
- 2 x Rechargeable Drone Batteries
- สายชาร์จ USB
- ใบพัดสำรอง 4 ใบ
- เครื่องมือกำจัดใบพัด
- ไขควง
- คู่มือการใช้งาน
คู่มือการติดตั้ง
1. การติดตั้งแบตเตอรี่รีโมทคอนโทรล
The remote controller requires 3 x AAA batteries (not included). Open the battery compartment on the back of the controller, insert the batteries according to the polarity markings, and close the compartment securely.
2. Drone Battery Charging & Installation
The DEERC D11 comes with 2 modular rechargeable batteries. Each battery provides approximately 8 minutes of flight time.
- การชาร์จ: Connect the drone battery to the USB charging cable. Plug the USB end into a compatible USB power source (e.g., computer USB port, USB wall adapter). The indicator light on the cable will show charging status (e.g., red for charging, green for fully charged).
- การติดตั้ง: Gently slide the charged battery into the battery slot on the drone until it clicks into place.

The modular battery design allows for easy insertion and removal from the drone.
3. การจับคู่และการปรับเทียบ
- Place the drone on a flat, level surface with its head (front) pointing forward.
- Turn on the remote controller by pressing and holding the power button. The remote will beep.
- Press and hold the power button on the drone. The drone's lights will blink, indicating it's searching for the remote.
- Once the drone's lights become solid, it is successfully paired.
- To calibrate the gyroscope, simultaneously push both joysticks on the remote controller towards the outer, lower corners. The drone's lights will blink rapidly and then turn solid, indicating successful calibration.
- To unlock the motors, simultaneously push both joysticks towards the inner bottom corners. The propellers will start spinning slowly.
คำแนะนำการใช้งาน
การควบคุมการบินขั้นพื้นฐาน
- One Key Takeoff/Landing: After unlocking the motors, press the One Key Takeoff/Landing button (usually indicated by an up/down arrow icon) to automatically take off or land.
- คันเร่ง (จอยสติ๊กซ้าย): ดันขึ้นเพื่อขึ้น ดึงลงเพื่อลง
- ทิศทาง (จอยสติ๊กขวา): ดันไปข้างหน้าเพื่อบินไปข้างหน้า ดึงกลับเพื่อบินถอยหลัง ดันไปทางซ้ายเพื่อบินไปทางซ้าย ดันไปทางขวาเพื่อบินไปทางขวา
- การหมุนตัว (จอยสติ๊กซ้าย ซ้าย/ขวา): Push left to rotate counter-clockwise, push right to rotate clockwise.
คุณสมบัติพิเศษ
- Throw to Go: With motors unlocked, gently toss the drone into the air, and it will automatically stabilize and hover.
- วงกลมบิน: Press the Circle Fly button (refer to remote diagram) to make the drone perform circular motions in the air.
- การพลิกภาพ 3 มิติ: Press the 3D Flip button (refer to remote diagram) and then push the right joystick in any direction to perform a 360-degree flip.
- สวิตช์ความเร็ว: The drone has 3 speed modes (low, medium, high). Press the Speed Switch button to cycle through them, offering progressive challenges for pilots.
- การรักษาระดับความสูง: This feature ensures stable hovering at a set altitude, making it easier for beginners to control the drone.
- โหมดไม่มีหัว: In Headless Mode, the drone's direction is always relative to the pilot's orientation, regardless of the drone's actual front. This provides care-free flying for beginners.
- หยุดฉุกเฉิน: In case of emergency, press the Emergency Stop button (refer to remote diagram) to immediately cut power to the motors and stop the drone.

The 'Throw to Go' feature allows for an easy start by simply tossing the drone.

The drone executing a 'Circle Fly' maneuver, adding dynamic movement to playtime.

The drone performing a 360-degree flip, showcasinเช่น ความสามารถในการผาดโผน

The Altitude Hold function keeps the drone stable at a desired height.

The Emergency Stop feature provides immediate shutdown for safety.
วิดีโอผลิตภัณฑ์อย่างเป็นทางการ
Official DEERC D11 Mini Drone for Kids video, demonstrating key features and ease of use.
Official D11 Promotional Video, showcasing various flight modes and the drone's durable design.
การซ่อมบำรุง
- การเปลี่ยนใบพัด: If a propeller is damaged, use the provided propeller removal tool to carefully detach it. Install a new propeller, ensuring it is correctly oriented (refer to the manual for specific markings if any).
- การทำความสะอาด: Use a soft, dry cloth to clean the drone body and propellers. Avoid using water or harsh chemicals.
- การดูแลแบตเตอรี่ Store batteries in a cool, dry place away from direct sunlight. Do not overcharge or over-discharge the batteries. If not used for a long period, charge them to about 50% capacity.
การแก้ไขปัญหา
- Drone not pairing: Ensure both the drone and remote controller are fully charged. Turn on the remote first, then the drone. Make sure they are within range and there is no interference. Repeat the pairing steps.
- การลอยตัวของโดรน: Perform a gyroscope calibration on a flat, level surface. If drifting persists, check for any damaged propellers and replace them if necessary.
- ระยะเวลาบินสั้น: Ensure batteries are fully charged before each flight. Flight time can be affected by aggressive flying, wind conditions, and frequent use of special features.
- ใบพัดไม่หมุน: Ensure motors are unlocked after pairing and calibration. Check for any obstructions around the propellers.
ข้อมูลจำเพาะ
| คุณสมบัติ | รายละเอียด |
|---|---|
| ยี่ห้อ | เดียร์ค |
| ชื่อรุ่น | DEERC-D11 |
| สี | สีขาว |
| เทคโนโลยีการเชื่อมต่อ | รีโมทคอนโทรล |
| ส่วนประกอบที่รวมอยู่ | ใบพัด |
| ระดับทักษะ | เด็กๆ |
| น้ำหนักสินค้า | 31 กรัม (1.09 ออนซ์) |
| ความจุของแบตเตอรี่ | 390 มิลลิวินาทีamp ชั่วโมง |
| รูปแบบการจับภาพวิดีโอ | เอ็มพี 4 |
| ประเภทการควบคุม | รีโมทคอนโทรล |
| วัสดุ | อะคริโลไนไตรล์บิวทาไดอีนสไตรีน |
| ขนาดสินค้า | ยาว 3.62 นิ้ว x กว้าง 3.15 นิ้ว x สูง 1.26 นิ้ว |
| แบตเตอรี่ที่จำเป็น | แบตเตอรี่ลิเธียมโพลิเมอร์ 2 ก้อน (รวมอยู่ด้วย) |
การรับประกันและการสนับสนุน
For warranty information and customer support, please refer to the contact details provided in your product packaging or visit the official DEERC webโปรดเก็บใบเสร็จรับเงินไว้เพื่อใช้ในการเคลมประกันสินค้า


