1. บทนำ
The Manhattan USB-C 7-in-1 Docking Station is a versatile multiport adapter designed to expand the connectivity of your USB Type-C enabled devices. It provides a single solution for connecting to a 4K HDMI display, multiple USB-A peripherals, a wired Gigabit Ethernet network, and reading SD/microSD cards, all while delivering power to your host device.
This manual provides detailed instructions to help you set up, operate, and maintain your docking station effectively.
2. เนื้อหาบรรจุภัณฑ์
- Manhattan USB-C 7-in-1 Docking Station (Model 153928)
- คู่มือการใช้งาน (เอกสารนี้)
3. คุณสมบัติของผลิตภัณฑ์
- USB-C expansion dock with ports for one UHD HDMI display, two SuperSpeed USB-A devices, Power Delivery, Gigabit RJ45 network access, one SD card, and one microSD card.
- Built-in, sturdy 7-inch cable with molded aluminum boot for host connection.
- HDMI interface supports resolutions up to 4K@30Hz.
- USB 3.0 (USB 3.2 Gen 1) interfaces offer data transmission rates up to 5 Gbps.
- USB-C Power Delivery (PD) port supports charging up to 87 W for the host device.
- RJ45 interface supports 10/100/1000 Mbps Ethernet transmission.
- Sturdy, sleek aluminum housing suitable for both desktop and travel use.
- Portable, compact, and lightweight design for easy transport.
- Compatible with mobile phones, tablets, computers, and other devices featuring a USB-C interface that supports DisplayPort Alternate Mode (DP Alt Mode).
4. สินค้าหมดview
Familiarize yourself with the ports and components of your Manhattan USB-C 7-in-1 Docking Station.

ภาพ: ด้านหน้า view of the Manhattan USB-C 7-in-1 Docking Station, highlighting its various ports.
- USB-C PD In Port: Connect a USB-C power adapter here to charge your host device (up to 87W) and power the docking station.
- พอร์ต HDMI: Connect an HDMI cable to an external monitor, TV, or projector for video output up to 4K@30Hz.
- USB 3.2 Gen 1 (USB-A) Ports (x2): Connect USB peripherals such as keyboards, mice, flash drives, or external hard drives. Supports data transfer speeds up to 5 Gbps.
- เครื่องอ่านการ์ด microSD: Insert a microSD card to access its contents.
- เครื่องอ่านการ์ด SD: Insert an SD card to access its contents.
- Gigabit RJ45 Ethernet Port: Connect an Ethernet cable for a stable wired network connection (10/100/1000 Mbps).
- Integrated USB-C Host Cable: Connect this cable directly to your laptop, tablet, or smartphone's USB-C port.
5. คำแนะนำในการตั้งค่า
Follow these steps to connect your docking station to your host device and peripherals.
- เชื่อมต่อกับอุปกรณ์โฮสต์: Plug the integrated USB-C host cable from the docking station into an available USB-C port on your laptop, tablet, or smartphone. Ensure your host device's USB-C port supports DisplayPort Alternate Mode (DP Alt Mode) for video output.
- เชื่อมต่อแหล่งจ่ายไฟ (ไม่จำเป็น): If you wish to charge your host device or require additional power for high-power USB peripherals, connect your original USB-C power adapter to the USB-C PD In port on the docking station.
- เชื่อมต่อจอแสดงผล HDMI: Connect an HDMI cable from your external monitor, TV, or projector to the HDMI port on the docking station.
- Connect USB-A Peripherals: Plug your USB-A devices (e.g., keyboard, mouse, USB flash drive) into the two USB 3.2 Gen 1 ports.
- เชื่อมต่อสายเคเบิลอีเทอร์เน็ต: For a wired network connection, plug an Ethernet cable from your router or modem into the RJ45 port on the docking station.
- ใส่การ์ดหน่วยความจำ: Insert your SD or microSD cards into the corresponding card reader slots as needed.
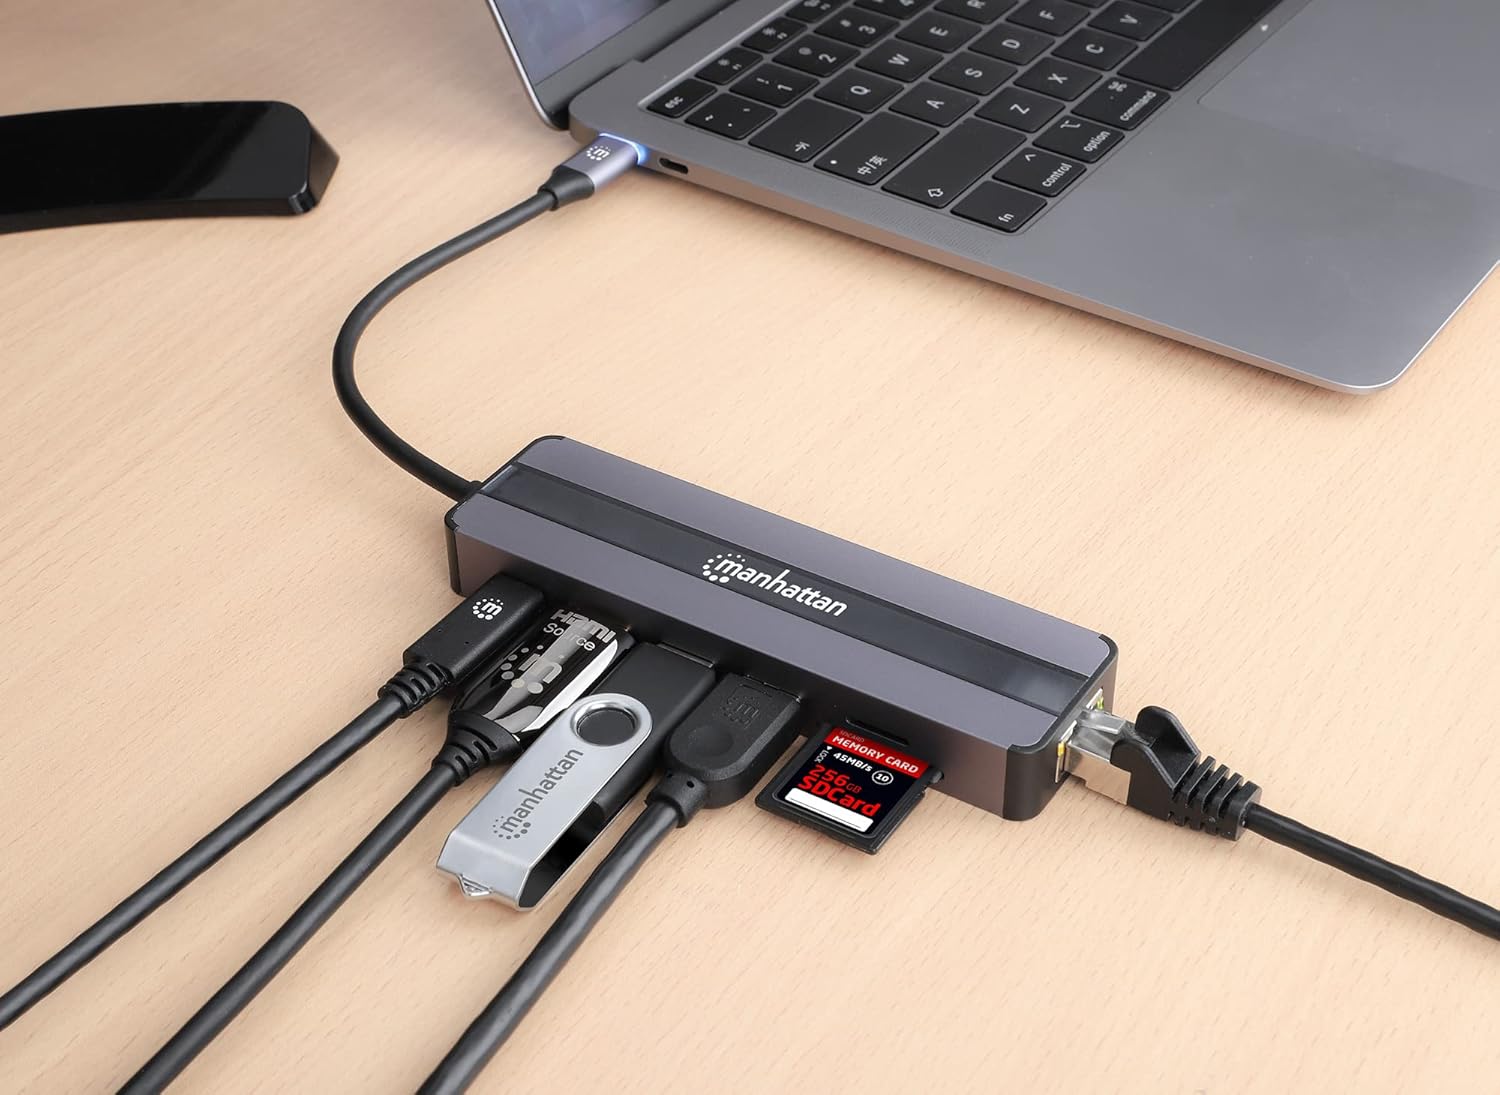
Image: The docking station connected to a laptop, demonstrating connections for various peripherals including USB devices, an Ethernet cable, and memory cards.
6. คู่มือการใช้งาน
6.1. Connecting to a Display (HDMI)
Once connected, your host device should automatically detect the external display. You can configure display settings (mirror or extend display) through your operating system's display settings. The HDMI port supports resolutions up to 4K (3840 x 2160) at 30Hz.

Image: A laptop displaying content on an external monitor, connected through the Manhattan USB-C 7-in-1 Docking Station.
6.2. Using USB-A Ports
The two USB 3.2 Gen 1 (USB-A) ports provide high-speed data transfer for your peripherals. Simply plug in your devices, and they should be recognized by your host system. These ports are ideal for external storage, input devices, and other USB accessories.
6.3. Power Delivery (PD)
The USB-C PD In port allows you to charge your host device while using the docking station. Connect your original USB-C power adapter to this port. The docking station can deliver up to 87W of power to your connected laptop, tablet, or smartphone, ensuring your device remains charged during use.

Image: An illustration demonstrating the 87W Power Delivery feature, showing power flowing from a wall adapter through the docking station to a laptop.
6.4. Gigabit Ethernet Connection
For a more stable and faster internet connection than Wi-Fi, connect an Ethernet cable to the RJ45 port. The docking station supports Gigabit Ethernet speeds (10/100/1000 Mbps), providing reliable network access.
6.5. SD and microSD Card Readers
Insert your SD or microSD cards into the respective slots. The cards will appear as removable storage devices on your host system, allowing you to transfer files to and from them.
7. ข้อมูลจำเพาะทางเทคนิค
| คุณสมบัติ | ข้อมูลจำเพาะ |
|---|---|
| ขนาดสินค้า | 4.96 x 1.42 x 0.63 นิ้ว (12.6 x 3.6 x 1.6 ซม.) |
| น้ำหนักสินค้า | 3.53 ออนซ์ (100 กรัม) |
| ฮาร์ดแวร์อินเตอร์เฟซ | ยูเอสบี ไทป์ ซี |
| อุปกรณ์ที่รองรับ | All USB-C DP-Alt-Mode-supported desktops, notebooks, and tablets (e.g., MacBook, Chromebook, Pixel) |
| พอร์ต USB รวม | 3 (2x USB-A 3.2 Gen 1, 1x USB-C PD In) |
| ความละเอียด HDMI | Up to 4K (3840 x 2160) @ 30Hz |
| USB-A Data Rate | สูงสุดถึง 5 Gbps |
| การจ่ายพลังงานด้วย USB-C | สูงสุดถึง 87W |
| ความเร็วอีเธอร์เน็ต | 10/100/1000 Mbps (กิกะบิต) |
| การรองรับเครื่องอ่านการ์ด | เอสดี, ไมโครเอสดี |
8 การแก้ไขปัญหา
หากคุณพบปัญหาเกี่ยวกับแท่นวางอุปกรณ์ โปรดดูวิธีแก้ไขปัญหาทั่วไปต่อไปนี้:
- ไม่มีการแสดงผล:
- Ensure the USB-C host cable is securely connected to your device.
- Verify your host device's USB-C port supports DisplayPort Alternate Mode (DP Alt Mode).
- Check the HDMI cable connection between the docking station and the display.
- Confirm the external display is set to the correct input source (HDMI).
- ลองใช้สาย HDMI หรือจอแสดงผลอื่นดู ถ้าเป็นไปได้
- Adjust display resolution settings on your host device.
- อุปกรณ์ USB ไม่ได้รับการรู้จัก:
- Ensure the USB device is properly inserted into the USB-A port.
- Try connecting the USB device to a different USB-A port on the docking station.
- If it's a high-power device, ensure a power adapter is connected to the docking station's USB-C PD In port.
- Test the USB device by connecting it directly to your host device (if possible).
- Slow Network Speed or No Connection:
- ตรวจสอบว่าสายเคเบิลอีเทอร์เน็ตเชื่อมต่อกับสถานีเชื่อมต่อและเราเตอร์/โมเด็มของคุณอย่างแน่นหนาแล้ว
- Check the status lights on the RJ45 port (if available) for activity.
- Ensure your network drivers are up to date on your host device.
- ลองใช้สายเคเบิลอีเทอร์เน็ตอื่น
- อุปกรณ์โฮสต์ไม่ชาร์จไฟ:
- Ensure your USB-C power adapter is connected to the docking station's USB-C PD In port.
- ตรวจสอบให้แน่ใจว่าอะแดปเตอร์แปลงไฟของคุณจ่ายไฟได้เพียงพอtage (e.g., 60W or higher for most laptops).
- Check if the power adapter is functioning correctly by connecting it directly to your host device.
9. การดูแลรักษา
- Keep the docking station dry and away from moisture.
- ทำความสะอาดอุปกรณ์ด้วยผ้าแห้งเนื้อนุ่ม หลีกเลี่ยงการใช้สารเคมีที่รุนแรงหรือวัสดุที่มีฤทธิ์กัดกร่อน
- อย่าให้เครื่องสัมผัสกับอุณหภูมิที่สูงหรือต่ำเกินไป
- หลีกเลี่ยงการทำอุปกรณ์หล่นหรือกระแทกอย่างรุนแรง
- Do not attempt to disassemble or repair the docking station yourself. This will void the warranty.
10. การรับประกันและการสนับสนุน
This Manhattan USB-C 7-in-1 Docking Station (Model 153928) is covered by a รับประกันจากผู้ผลิต 3 ปี.
For technical support, warranty claims, or further assistance, please visit the official MANHATTAN website or contact their customer service department. Please retain your proof of purchase for warranty purposes.


