1. สินค้าหมดview
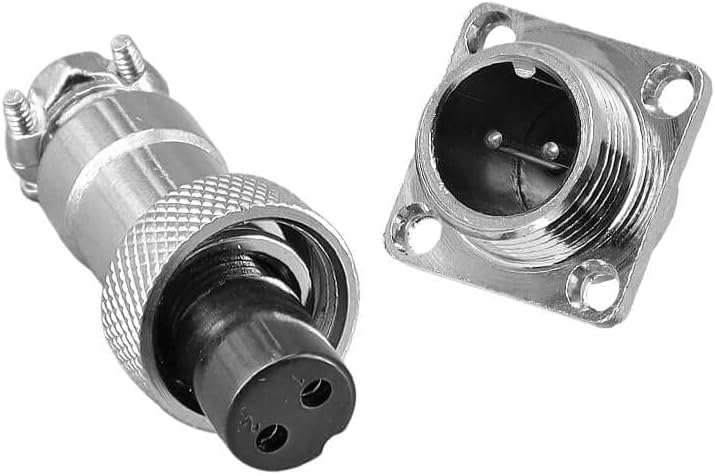
The Elecbee GX12 series aviation connector is a standard type, 2-pin male plug and female socket designed for panel mounting. It features a 3-hole square flange for secure installation and utilizes a solder-type wiring method, ensuring a reliable connection. These connectors are widely used in various applications requiring robust and dependable electrical connections.
วิดีโอผลิตภัณฑ์view
รับชมวิดีโอนี้เพื่อดูภาพรวมโดยทั่วไปview of the GX12 series connectors, highlighting their features and common applications.
วิดีโอ 1: จบแล้วview of the GX12 Male Female Connector series, showcasing its design and potential uses.
2. ข้อมูลจำเพาะ
| คุณสมบัติ | รายละเอียด |
|---|---|
| ประเภทสินค้า | GX12 Aviation Connector |
| การกำหนดค่า Pin | 2 Pin (Female Plug, Male Socket) |
| ประเภทการติดตั้ง | Panel Mount (3 Hole Square Flange) |
| วิธีการเดินสายไฟ | ประเภทบัดกรี |
| ขนาดการติดตั้ง | 12มม. |
| หมายเลขรุ่นสินค้า | EB-403-0169-H |
| น้ำหนักสินค้า | 0.64 ออนซ์ |
| ขนาดแพ็คเกจ | 9.84 x 7.87 x 3.94 นิ้ว |
3. คำแนะนำในการตั้งค่า
This section provides detailed instructions for preparing and assembling the GX12 solder-type aviation connector.
3.1 ส่วนประกอบและเครื่องมือที่จำเป็น
- Elecbee GX12 Male Plug and Female Socket
- Appropriate gauge electrical wires
- หัวแร้งบัดกรี
- ตะกั่วบัดกรี (แนะนำให้ใช้ตะกั่วบัดกรีแบบมีฟลักซ์ในตัว)
- ระบำลวด
- Heat shrink tubing (optional, for insulation)
- Heat gun or lighter (if using heat shrink tubing)
- Small Phillips head screwdriver (for cable clamp on male plug)
3.2 การเตรียมตัว
- ความปลอดภัยเป็นสิ่งสำคัญที่สุด: Ensure all power is disconnected from the circuit you are working on. Wear appropriate safety gear, including eye protection.
- เตรียมสายไฟ: Carefully strip approximately 3-5mm of insulation from the end of each wire that will be connected to the pins. Ensure the stripped wire length is sufficient for soldering without excess bare wire.
- Pre-tin Wires (Optional but Recommended): Apply a small amount of solder to the stripped ends of the wires. This helps ensure a better connection.
- Prepare Connector Parts: If using heat shrink tubing, slide a piece onto each wire before soldering. Ensure it's long enough to cover the soldered joint and provide adequate insulation.

3.3 Assembly (Solder Type)
- Solder Wires to Pins: Carefully solder the prepared wires to the corresponding pins on both the male plug and female socket. Ensure a strong, clean solder joint. Pay attention to polarity if applicable to your application.
- Insulate Joints (Optional): If using heat shrink tubing, slide it over the soldered joints and apply heat with a heat gun or lighter until it shrinks tightly around the connection, providing insulation and strain relief.
- Assemble Male Plug Housing: For the male plug, thread the cable through the rear housing and secure it using the cable clamp screws. Then, screw the main body of the plug onto the pin assembly.
- Mount Female Socket: The female socket is designed for panel mounting. Insert the threaded portion into a 12mm hole on your panel and secure it with the provided nut from the other side. The 3-hole square flange provides additional stability and prevents rotation.
- การตรวจสอบขั้นสุดท้าย: Visually inspect all connections for proper soldering and assembly. Perform continuity tests if necessary to ensure correct wiring.
4. คู่มือการใช้งาน
Using the GX12 aviation connector is straightforward once properly installed.
- การเชื่อมต่อ: Align the keyway (notch) on the male plug with the corresponding slot on the female socket. Push the male plug firmly into the female socket until it seats completely. Then, twist the threaded locking ring on the male plug clockwise until it is hand-tight to secure the connection.
- การตัดการเชื่อมต่อ: Twist the threaded locking ring on the male plug counter-clockwise to loosen it. Once loose, pull the male plug straight out from the female socket. Avoid pulling by the cable itself.
บันทึก: Always ensure the connection is fully seated and the locking ring is tightened to prevent accidental disconnection and ensure optimal electrical contact.
5. การบำรุงรักษา
Regular maintenance helps ensure the longevity and reliable performance of your GX12 connectors.
- การทำความสะอาด: Periodically inspect the connector for dust, dirt, or debris. Use a clean, dry, lint-free cloth to gently wipe the exterior. For internal contacts, use a specialized electrical contact cleaner if necessary, ensuring the connector is completely dry before re-connecting.
- การตรวจสอบ: Check for any signs of physical damage, such as bent pins, cracked housing, or loose connections. Also, inspect for corrosion on the metal parts.
- พื้นที่จัดเก็บ: When not in use, store connectors in a clean, dry, and dust-free environment to prevent contamination and corrosion.
6 การแก้ไขปัญหา
This section addresses common issues you might encounter with your GX12 connector.
| ปัญหา | สาเหตุที่เป็นไปได้ | สารละลาย |
|---|---|---|
| ไม่มีการเชื่อมต่อไฟฟ้า | Poor solder joint, incorrect wiring, bent/damaged pins, not fully connected. | Inspect solder joints and wiring. Straighten bent pins carefully or replace if damaged. Ensure male plug is fully inserted and locking ring is tightened. |
| Loose connection / Intermittent signal | Locking ring not tightened, internal wiring loose, worn contacts. | Ensure locking ring is securely tightened. Re-check internal solder connections. If contacts are worn, replace the connector. |
| ปัญหาในการเชื่อมต่อ/ตัดการเชื่อมต่อ | Misalignment, debris in connector, damaged threads. | Ensure proper alignment of keyway. Clean any debris from inside the connector. If threads are damaged, the connector may need replacement. |
| การกัดกร่อนบนชิ้นส่วนโลหะ | Exposure to moisture or harsh environments. | Clean with a suitable non-abrasive cleaner. Store in a dry environment. Consider protective covers if used in harsh conditions. |
7. การรับประกันและการสนับสนุน
Specific warranty information for the Elecbee GX12 2Pin Metal Aviation Panel Mount Male Female Socket Plug Wire Cable Connector is not provided in this manual. For warranty details, technical support, or further assistance, please contact the manufacturer, Elecbee, or your point of purchase.
Manufacturer: Elecbee
Model Number: EB-403-0169-H


