1. บทนำและเรื่องอื่นๆview
The Flashpoint R2 XPro II is a state-of-the-art 2.4GHz wireless flash trigger designed specifically for Canon cameras. It provides robust and reliable control over your Flashpoint R2 and Godox X-system flashes, enabling precise lighting adjustments for professional photography. This manual details the features, setup, operation, maintenance, and troubleshooting for your R2 XPro II trigger.

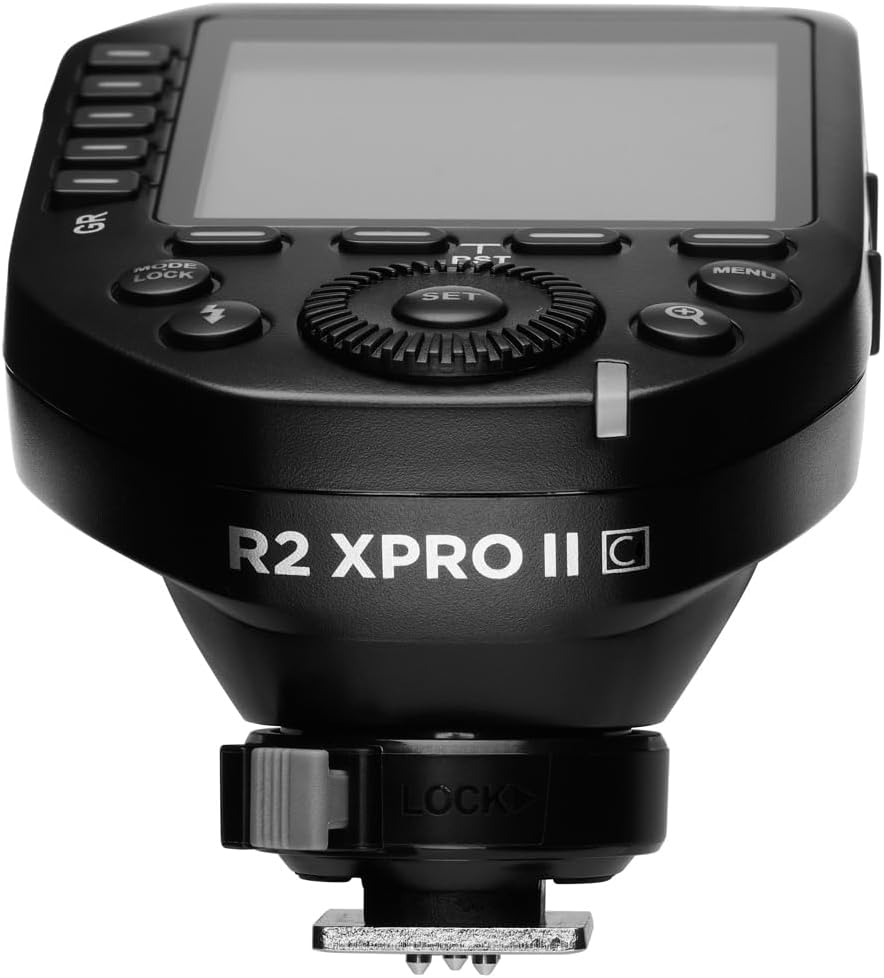
Image 1.1: The Flashpoint R2 XPro II Wireless Flash Trigger, showcasing its compact design and clear LCD display.
2. อะไรอยู่ในกล่อง
เมื่อเปิดบรรจุภัณฑ์ โปรดตรวจสอบว่าประกอบด้วยสิ่งของต่อไปนี้ทั้งหมด:
- Flashpoint R2 XPro II Wireless Flash Trigger for Canon
- คู่มือการใช้งาน (เอกสารนี้)
- USB-C Cable (for firmware updates)
Note: AA batteries are required for operation and are not included.
3. คุณสมบัติของผลิตภัณฑ์
The Flashpoint R2 XPro II offers a comprehensive set of features designed to enhance your flash photography:
- Reliable 2.4GHz Radio System: Ensures consistent flash firing with minimal misfires, offering a robust connection up to 300-400 feet (90-120 meters).
- ระยะการส่งสัญญาณที่ขยายออกไป: Control your flashes from significant distances, ideal for complex studio setups or outdoor shoots.
- Versatile Multi-Channel Control: Features 32 channels and 5 dedicated TTL groups (A-E) plus 16 manual groups (0-9, A-F), providing extensive control and customization for multiple flash units.
- Full TTL Support: Automatically adjusts flash power for perfectly exposed images, adapting to changing light conditions with Canon cameras.
- การซิงค์ความเร็วสูง (HSS): Achieve sync speeds up to 1/8000s, allowing you to freeze fast motion or use wide apertures in bright ambient light.
- Large Dot Matrix LCD Display: Provides clear visibility of settings with adjustable backlight.
- บลูทูธในตัว: Enables smartphone app control for convenient remote adjustments.
- เฟิร์มแวร์ที่สามารถอัปเดตได้: Via USB-C port for future compatibility and feature enhancements.
- Instant Flip Locking Hot Shoe: Securely attaches the trigger to your camera.

Image 3.1: Key features of the Flashpoint R2 XPro II, highlighting its capabilities.
4. การตั้งค่า
4.1. การติดตั้งแบตเตอรี่
The R2 XPro II uses two AA batteries. To install:
- Locate the battery compartment cover on the underside of the trigger.
- เลื่อนฝาเปิดออก
- ใส่แบตเตอรี่ AA สองก้อน โดยตรวจสอบให้แน่ใจว่าขั้ว (+/-) ถูกต้องตามที่ระบุภายในช่อง
- ปิดฝาช่องใส่แบตเตอรี่ให้แน่น

Image 4.1: Battery compartment of the R2 XPro II, ready for AA battery insertion.
4.2. การติดตั้งบนกล้อง
To mount the trigger on your camera's hot shoe:
- Ensure the trigger is powered off.
- Slide the hot shoe foot of the R2 XPro II into your camera's hot shoe.
- Push the locking lever forward to secure the trigger firmly in place.
ภาพที่ 4.2: ด้านล่าง view of the R2 XPro II, highlighting the hot shoe and locking lever.
4.3. การเปิดเครื่องครั้งแรกและการตั้งค่าพื้นฐาน
After mounting, power on the trigger using the ON/OFF switch located on the side. The LCD display will illuminate. You may need to set the channel and group to match your flash units. Refer to Section 5 for detailed operating instructions.
ภาพที่ 4.3: ด้านข้าง view of the R2 XPro II, indicating the location of the power switch.
5. คู่มือการใช้งาน
5.1. การเปิด/ปิดเครื่อง
Use the dedicated ON/OFF switch on the side of the unit to power the trigger on or off.
5.2. Navigating the Display and Controls
The R2 XPro II features a large LCD display and intuitive buttons for easy navigation.

ภาพที่ 5.1: จากบนลงล่าง view of the R2 XPro II display and control layout.
- จอแสดงผล LCD: Shows current channel, group settings, flash mode (TTL/M/Multi), power output, and battery status.
- GR Buttons (Left Side): Used to select and adjust individual groups (A-E).
- ปุ่ม ตลท.: ยืนยันการเลือกและเข้าสู่เมนูย่อย
- กดหมายเลข: Rotates to change values (e.g., power output, channel number).
- MODE/LOCK Button: Cycles through flash modes (TTL, Manual, Multi) and locks/unlocks settings.
- ปุ่มแฟลช: Test fire button.
- ปุ่มเมนู: เข้าถึงการตั้งค่าระบบ
- Magnifying Glass Button: Zoom function for detailed group view.
5.3. Setting Channels and Groups
To ensure proper communication, the trigger and your flash units must be set to the same channel and group.
- กดปุ่ม เมนู button to access system settings.
- Navigate to the Channel (CH) setting using the dial and press ชุด.
- Rotate the dial to select the desired channel (1-32) and press ชุด เพื่อยืนยัน.
- To adjust groups, press the corresponding GR button (A-E) on the left side.
- Use the dial to change the flash mode (TTL/M/Multi) or power output for the selected group.
5.4. TTL Mode Operation
In TTL (Through-The-Lens) mode, the trigger automatically adjusts flash power based on the camera's metering. This is ideal for fast-paced shooting where lighting conditions change frequently.
- Ensure your flash unit is also set to TTL mode.
- On the R2 XPro II, press the โหมด/ล็อค button until "TTL" is displayed for the desired group(s).
- The trigger will communicate with your camera to determine the appropriate flash output.
5.5. การใช้งานโหมดแมนนวล
Manual mode provides precise control over flash power, allowing you to set the output from 1/1 to 1/256 in 1/3 stop increments.
- กดปุ่ม โหมด/ล็อค button until "M" (Manual) is displayed for the desired group(s).
- Use the dial to adjust the power output for each group.
- The display will show the current power setting (e.g., M 1/128).
5.6. การซิงค์ความเร็วสูง (HSS)
HSS allows you to use flash at shutter speeds faster than your camera's native sync speed (e.g., 1/250s), up to 1/8000s. This is useful for overpowering ambient light or using wide apertures in bright conditions.
HSS is typically enabled automatically when your camera's shutter speed exceeds the normal sync speed while the trigger is in TTL or Manual mode. Ensure your flash unit also supports HSS.
5.7. Using the Test Fire Button
กดปุ่มเฉพาะ แฟลช button (lightning bolt icon) to test fire all active flash units. This is useful for checking flash readiness and light output before taking a picture.
5.8. Bluetooth and Smartphone App Control
The R2 XPro II features built-in Bluetooth for remote control via a smartphone application. Download the Flashpoint R2 app (or compatible Godox app) from your device's app store. Follow the app's instructions to pair your trigger and control flash settings remotely.
6. การบำรุงรักษา
6.1. การทำความสะอาด
To clean the trigger, use a soft, dry cloth. For stubborn dirt, a slightly damp สามารถใช้ผ้าได้ แต่ต้องแน่ใจว่าไม่มีความชื้นเข้าไปในอุปกรณ์ ห้ามใช้สารเคมีรุนแรงหรือน้ำยาทำความสะอาดที่มีฤทธิ์กัดกร่อน
6.2. การดูแลแบตเตอรี่
- Remove batteries if the trigger will not be used for an extended period to prevent leakage.
- Use high-quality AA alkaline or NiMH rechargeable batteries.
- ทิ้งแบตเตอรี่ที่ใช้แล้วอย่างรับผิดชอบตามข้อบังคับท้องถิ่น
6.3. การจัดเก็บ
Store the R2 XPro II in a cool, dry place, away from direct sunlight, extreme temperatures, and high humidity. Keep it in its original packaging or a protective case to prevent damage.
6.4. การอัปเดตเฟิร์มแวร์
Flashpoint periodically releases firmware updates to improve performance, add features, or ensure compatibility with new camera models. To update the firmware:
- Visit the official Flashpoint webเว็บไซต์นี้มีเฟิร์มแวร์เวอร์ชั่นล่าสุดและคำแนะนำในการอัปเดต
- Connect the R2 XPro II to your computer using the supplied USB-C cable.
- Follow the instructions provided on the Flashpoint website to complete the update process.

ภาพที่ 6.1: ด้านข้าง view of the R2 XPro II, highlighting the USB-C port for firmware updates.
7 การแก้ไขปัญหา
หากคุณพบปัญหาใดๆ กับ Flashpoint R2 XPro II โปรดดูปัญหาและวิธีแก้ไขที่พบบ่อยต่อไปนี้:
| ปัญหา | สาเหตุที่เป็นไปได้ | สารละลาย |
|---|---|---|
| Trigger not powering on. | แบตเตอรี่เสียหรือติดตั้งไม่ถูกต้อง | Check battery polarity, replace with fresh AA batteries. |
| Flashes not firing. | Incorrect channel/group settings; trigger not securely mounted; flash unit issues. | Ensure trigger and flashes are on the same channel and group. Check trigger is fully seated on camera hot shoe. Verify flash units are powered on and ready. |
| Inconsistent firing or limited range. | Interference; low battery; obstructions. | Change channel. Replace batteries. Reduce distance or clear line of sight between trigger and flashes. |
| TTL exposure issues. | Flash exposure compensation set incorrectly; firmware outdated. | Check flash exposure compensation settings on both camera and trigger. Update firmware. |
| Display not working or frozen. | ความผิดพลาดของซอฟต์แวร์; แบตเตอรี่เหลือน้อย | Remove and reinsert batteries. Replace batteries. If issue persists, contact support. |
8. ข้อมูลจำเพาะ
| คุณลักษณะ | ค่า |
|---|---|
| ขนาดสินค้า | 5.25 x 4 x 2.8 นิ้ว |
| น้ำหนักสินค้า | 9.3 ออนซ์ |
| ASIN | B0BZ7PQ2PB |
| หมายเลขรุ่นสินค้า | อาร์2 เอ็กซ์โปร 2 |
| วันที่พร้อมใช้งานครั้งแรก | 21 มีนาคม 2023 |
| ผู้ผลิต | จุดวาบไฟ |
| ความถี่ไร้สาย | 2.4กิกะเฮิรตซ์ |
| ช่องทางการ | 32 |
| กลุ่ม | 5 TTL Groups (A-E), 16 Manual Groups (0-9, A-F) |
| ความเร็วในการซิงค์ | Up to 1/8000s (High-Speed Sync) |
| แหล่งพลังงาน | แบตเตอรี่ AA 2 ก้อน (ไม่รวม) |
9. การรับประกันและการสนับสนุน
For information regarding warranty coverage and technical support for your Flashpoint R2 XPro II, please refer to the official Flashpoint webหรือติดต่อฝ่ายบริการลูกค้าโดยตรง โปรดเก็บใบเสร็จรับเงินไว้เป็นหลักฐานการซื้อสำหรับการเรียกร้องการรับประกัน
Flashpoint Official Webเว็บไซต์: www.adorama.com/g/flashpoint


