1. บทนำ
This manual provides detailed instructions for the installation, operation, and maintenance of your darkFlash Aquarius Mesh Computer Case. Please read this manual thoroughly before beginning installation to ensure proper setup and safe use of your new computer chassis.
2. ข้อมูลด้านความปลอดภัย
ปฏิบัติตามข้อควรระวังเพื่อความปลอดภัยต่อไปนี้เสมอ:
- Disconnect all power sources before installing or removing any components.
- สวมสายรัดข้อมือป้องกันไฟฟ้าสถิตย์เพื่อป้องกันความเสียหายจากการคายประจุไฟฟ้าสถิตย์ (ESD) ต่อส่วนประกอบต่างๆ
- Handle components carefully to avoid physical damage.
- เก็บชิ้นส่วนและเครื่องมือขนาดเล็กให้ห่างจากเด็ก
- Ensure proper ventilation around the computer case.
3. เนื้อหาบรรจุภัณฑ์
ตรวจสอบว่ามีรายการทั้งหมดอยู่ในแพ็คเกจของคุณ:
- darkFlash Aquarius Mesh Computer Case
- กล่องอุปกรณ์เสริม (สกรู, สแตนด์ออฟ, สายรัด ฯลฯ)
- คู่มือการใช้งาน (เอกสารนี้)
4. การตั้งค่าและการติดตั้ง
Follow these steps for proper component installation.
4.1. การเตรียมคดี
Before installing components, remove the side panels. The Aquarius Mesh case typically features a tempered glass side panel and a solid metal panel.
- Locate the thumbscrews on the rear of the case securing the side panels.
- Unscrew the thumbscrews and carefully slide the panels backward, then lift them off.

รูปที่ 1: ด้านหน้าและด้านข้าง view of the darkFlash Aquarius Mesh case. Note the mesh front panel and tempered glass side panel.

รูปที่ 2: ด้านหลัง view of the darkFlash Aquarius Mesh case, showing expansion slots and rear fan mount.
4.2. การติดตั้งเมนบอร์ด
The Aquarius Mesh supports ATX, Micro-ATX, and Mini-ITX motherboards.
- Install the I/O shield into the cutout at the rear of the case.
- Align your motherboard with the pre-installed standoffs. Ensure the I/O ports align with the I/O shield.
- Secure the motherboard with the appropriate screws from the accessory box.
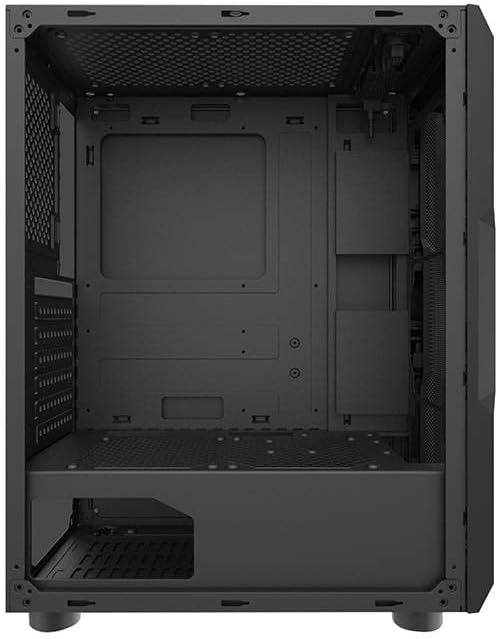
รูปที่ 3 : ภายใน view of the darkFlash Aquarius Mesh case, highlighting the motherboard tray and cable routing options.
4.3. การติดตั้งชุดจ่ายไฟ (PSU)
แหล่งจ่ายไฟ (PSU) ติดตั้งอยู่ที่ด้านล่างด้านหลังของเคส
- Slide the PSU into its designated compartment from the rear of the case.
- Align the screw holes and secure the PSU with screws.
4.4. การติดตั้งไดรฟ์จัดเก็บข้อมูล
The case provides mounting options for 3.5-inch HDDs and 2.5-inch SSDs.
- ฮาร์ดดิสก์ขนาด 3.5 นิ้ว: Locate the drive cage usually beneath the PSU shroud or behind the motherboard tray. Slide the HDD into the bay and secure it with screws.
- SSD ขนาด 2.5 นิ้ว: Mount SSDs to dedicated brackets behind the motherboard tray or on the PSU shroud. Secure with screws.

Figure 4: Rear interior view of the darkFlash Aquarius Mesh case, showing the motherboard cutout and potential SSD mounting points.
4.5. Expansion Card Installation (e.g., GPU)
- ถอดฝาครอบช่องขยายที่จำเป็นออกจากด้านหลังของเคส
- Insert the expansion card into the appropriate PCIe slot on the motherboard.
- Secure the card with the provided screws or retention clips.
4.6. การจัดการสายเคเบิล
ใช้ช่องร้อยสายไฟและจุดผูกด้านหลังถาดเมนบอร์ดเพื่อจัดระเบียบสายไฟ วิธีนี้ช่วยให้อากาศถ่ายเทได้ดีขึ้นและสวยงามยิ่งขึ้น
4.7. Reassembling the Case
Once all components are installed and cables are managed:
- Carefully reattach the side panels, ensuring they slide into place correctly.
- Secure the side panels with the thumbscrews.
5. คู่มือการใช้งาน
After assembly, connect your peripherals and power cable.
- Connect your monitor, keyboard, mouse, and other peripherals to the motherboard's I/O ports.
- Connect the power cable to the PSU and a wall outlet.
- Press the power button located on the top panel of the case to start your computer.

รูปที่ 5: ด้านบน view of the darkFlash Aquarius Mesh case, showing the front I/O panel with power button, reset button, USB ports, and audio jacks.
6. การบำรุงรักษา
การบำรุงรักษาอย่างสม่ำเสมอจะช่วยให้มั่นใจได้ถึงประสิทธิภาพสูงสุดและอายุการใช้งานที่ยาวนานของส่วนประกอบคอมพิวเตอร์ของคุณ
- ตัวกรองฝุ่น: The Aquarius Mesh case features removable dust filters (e.g., on the front, top, and bottom). Regularly remove and clean these filters with water and mild soap, or by vacuuming, to maintain good airflow. Ensure they are completely dry before reinstallation.
- การทำความสะอาดภายใน: Periodically open the case and use compressed air to remove dust buildup from fans, heatsinks, and other components.
- การทำความสะอาดภายนอก: เช็ดพื้นผิวภายนอกด้วยผ้านุ่ม damp ผ้า. หลีกเลี่ยงสารเคมีที่รุนแรง
7 การแก้ไขปัญหา
หากคุณพบปัญหา โปรดพิจารณาวิธีแก้ปัญหาทั่วไปต่อไปนี้:
- ไม่มีไฟฟ้า:
- ตรวจสอบให้แน่ใจว่าสวิตช์ของแหล่งจ่ายไฟ (PSU) อยู่ในตำแหน่ง 'เปิด'
- ตรวจสอบการเชื่อมต่อสายไฟทั้งหมดกับเมนบอร์ดและส่วนประกอบต่างๆ
- Verify the power cable is securely plugged into the wall outlet and PSU.
- พัดลมไม่หมุน:
- Check fan connections to the motherboard or fan controller.
- Ensure fans are not obstructed by cables or dust.
- Front Panel I/O Not Working:
- Verify that the front panel connectors (USB, audio, power/reset switches) are correctly connected to the motherboard headers. Refer to your motherboard manual for header locations.
8. ข้อมูลจำเพาะ
| คุณสมบัติ | รายละเอียด |
|---|---|
| ยี่ห้อ | ดาร์กแฟลช |
| หมายเลขรุ่น | Aquarius Mesh |
| ประเภทเคส | หอคอยกลาง |
| วัสดุ | เหล็กอัลลอยด์ |
| สี | สีดำ |
| วิธีการทำความเย็น | อากาศ |
| ข้อแนะนำการใช้ | คอมพิวเตอร์ |
| ฟอร์มแฟคเตอร์ของฮาร์ดไดรฟ์ | 3.5 นิ้ว |
9. การรับประกันและการสนับสนุน
For warranty information or technical support, please refer to the official darkFlash webหรือติดต่อฝ่ายบริการลูกค้า เก็บหลักฐานการซื้อไว้เพื่อใช้ในการเคลมประกัน
หากต้องการความช่วยเหลือเพิ่มเติม คุณสามารถไปที่ darkFlash official webเว็บไซต์.


