การแนะนำ
This instruction manual provides detailed information on the installation, operation, and maintenance of your SmallRig Camera Cage, Model 4023-AU. This cage is specifically designed for Panasonic LUMIX G9 II, S5 II, and S5 IIX cameras, offering enhanced protection and multiple mounting points for various accessories.
สินค้าเกินview
The SmallRig Camera Cage 4023-AU features a "Black Mamba" bionic design, ensuring full access to all camera controls while providing robust protection. It integrates a quick-release plate for Arca-Swiss compatibility and offers extensive expansion capabilities.
คุณสมบัติหลัก:
- การออกแบบที่เรียบง่าย: The all-in-one form-fitting design ensures full access to all top controls and buttons of the camera.
- Quick Switch for Arca-Swiss: Features a built-in quick-release plate at the bottom, compatible with DJI RS 2 / RSC 2 / RS 3 / RS 3 Pro gimbals and Arca-Swiss tripods. Includes a threaded hole for quick-release plate (riser pad) of RS 2 / RSC 2 and Arca-Type Quick Release Plate [3154].
- Anti-Twist Mechanism: Secures the camera via one bottom 1/4"-20 screw and two side lock adapters, complemented by rubber pads to prevent scratches and ensure stability.
- Multiple Mounting Points: Equipped with various attachment points including 1/4"-20 holes, a front 1/4"-20 locating hole for rod clamps (e.g., 3276), a 3/8"-16 locating hole for ARRI accessories (e.g., Top Handle 3765, Monitor Mount 2903B), a built-in left NATO rail for side handles (e.g., 3847), integrated cold shoe mounts for microphones or LED lights, and a bottom QD socket for shoulder straps.
- เครื่องมือแบบบูรณาการ: Includes a magnetic wrench for convenient disassembly and assembly, always accessible within the cage structure.
- ความเข้ากันได้ของสายนาฬิกา: Features strap holes on both sides and the bottom, compatible with various hand straps (e.g., 3848) and shoulder straps (e.g., PSC2428).

Image: The SmallRig Camera Cage 4023-AU, showcasing its sleek design and how it integrates with a camera body.
การติดตั้งและการตั้งค่า
Follow these steps to properly install the SmallRig Camera Cage onto your Panasonic LUMIX G9 II, S5 II, or S5 IIX camera.
- Step 1: Prepare the Cage
Remove the two side lock adapters from the cage. These are typically secured with screws that can be loosened using the included dual-head wrench.
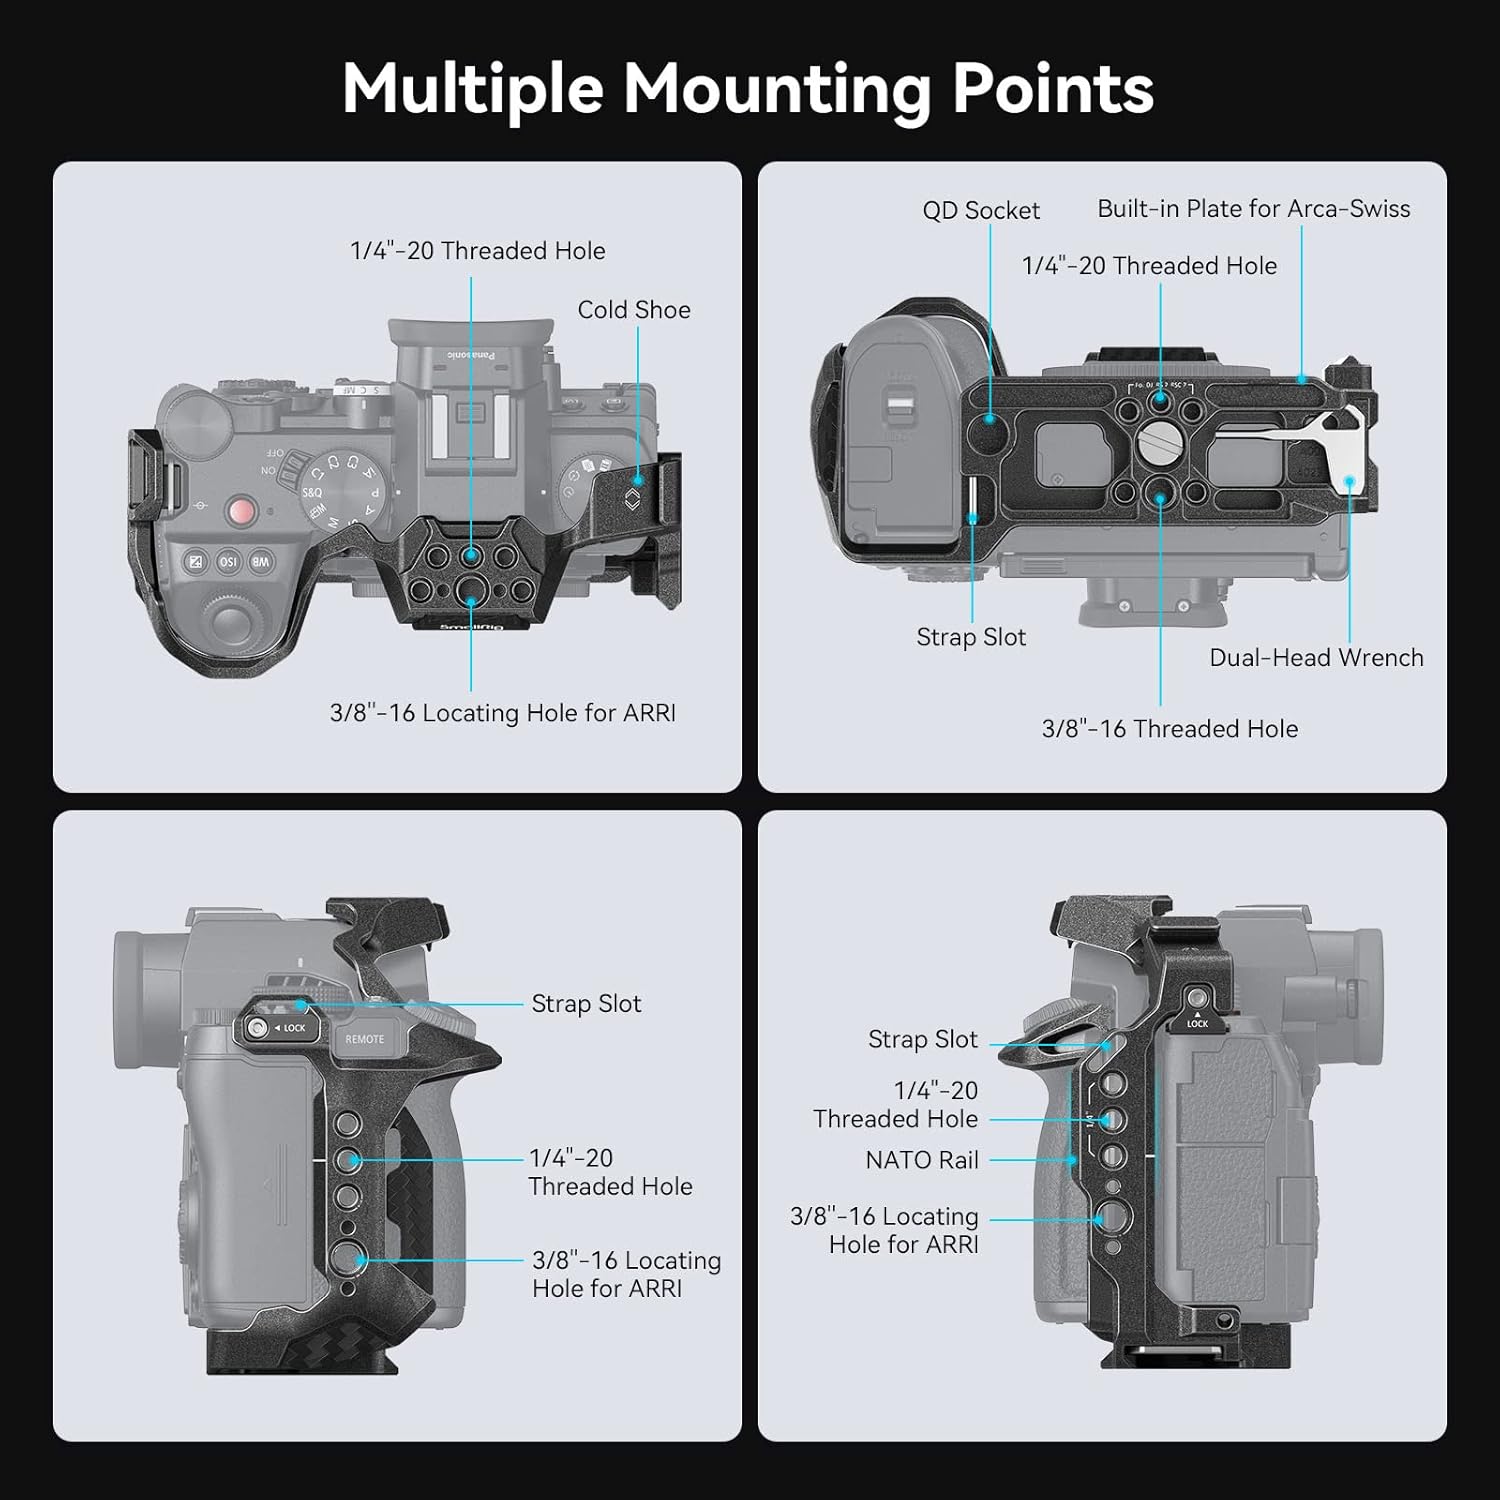
Image: Illustration of removing the side lock adapters from the cage.
- Step 2: Insert the Camera
Carefully slide your Panasonic LUMIX G9 II, S5 II, or S5 IIX camera into the cage. Ensure it is aligned correctly, typically from the back to the front of the cage.
Image: Illustration of inserting the camera into the cage body.
- Step 3: Secure the Bottom Screw
Locate the 1/4"-20 screw at the bottom of the cage. Tighten this screw into the camera's tripod mount to secure the camera firmly to the cage. Use the magnetic wrench for this step.
Image: Illustration of tightening the bottom screw to secure the camera.
- Step 4: Tighten Side Lock Adapters
Re-attach and tighten the side lock adapters on each side of the cage. These adapters engage with the camera's strap slots, providing additional anti-twist security and preventing the camera from rotating within the cage.
Image: Illustration of securing the side lock adapters.
การดำเนินงานและการใช้งาน
The SmallRig Camera Cage 4023-AU is designed to enhance your camera's functionality and versatility. Here's how to utilize its features:
Access to Camera Controls:
The cage's design ensures that all camera buttons, dials, and ports remain fully accessible. This includes the battery compartment, memory card slot, and various control buttons on the top and sides of the camera.

ภาพ: จากบนลงล่าง view illustrating the streamlined design that allows full access to camera controls and buttons.
ภาพ: ด้านล่าง view of the cage, highlighting full access to the battery compartment and the integrated magnetic wrench.
ติดอุปกรณ์เสริม:
Utilize the various mounting points to attach external accessories such as monitors, microphones, LED lights, and handles.
- 1/4"-20 and 3/8"-16 Threaded Holes: For attaching articulating arms, monitor mounts, top handles, and other threaded accessories.
- ฐานยึดแบบ Cold Shoe: Ideal for attaching microphones, small LED lights, or wireless receivers.
- NATO Rail: Provides quick attachment and detachment for NATO-compatible accessories like side handles.
- ซ็อกเก็ต QD: For quick attachment of QD (Quick Detach) shoulder straps.
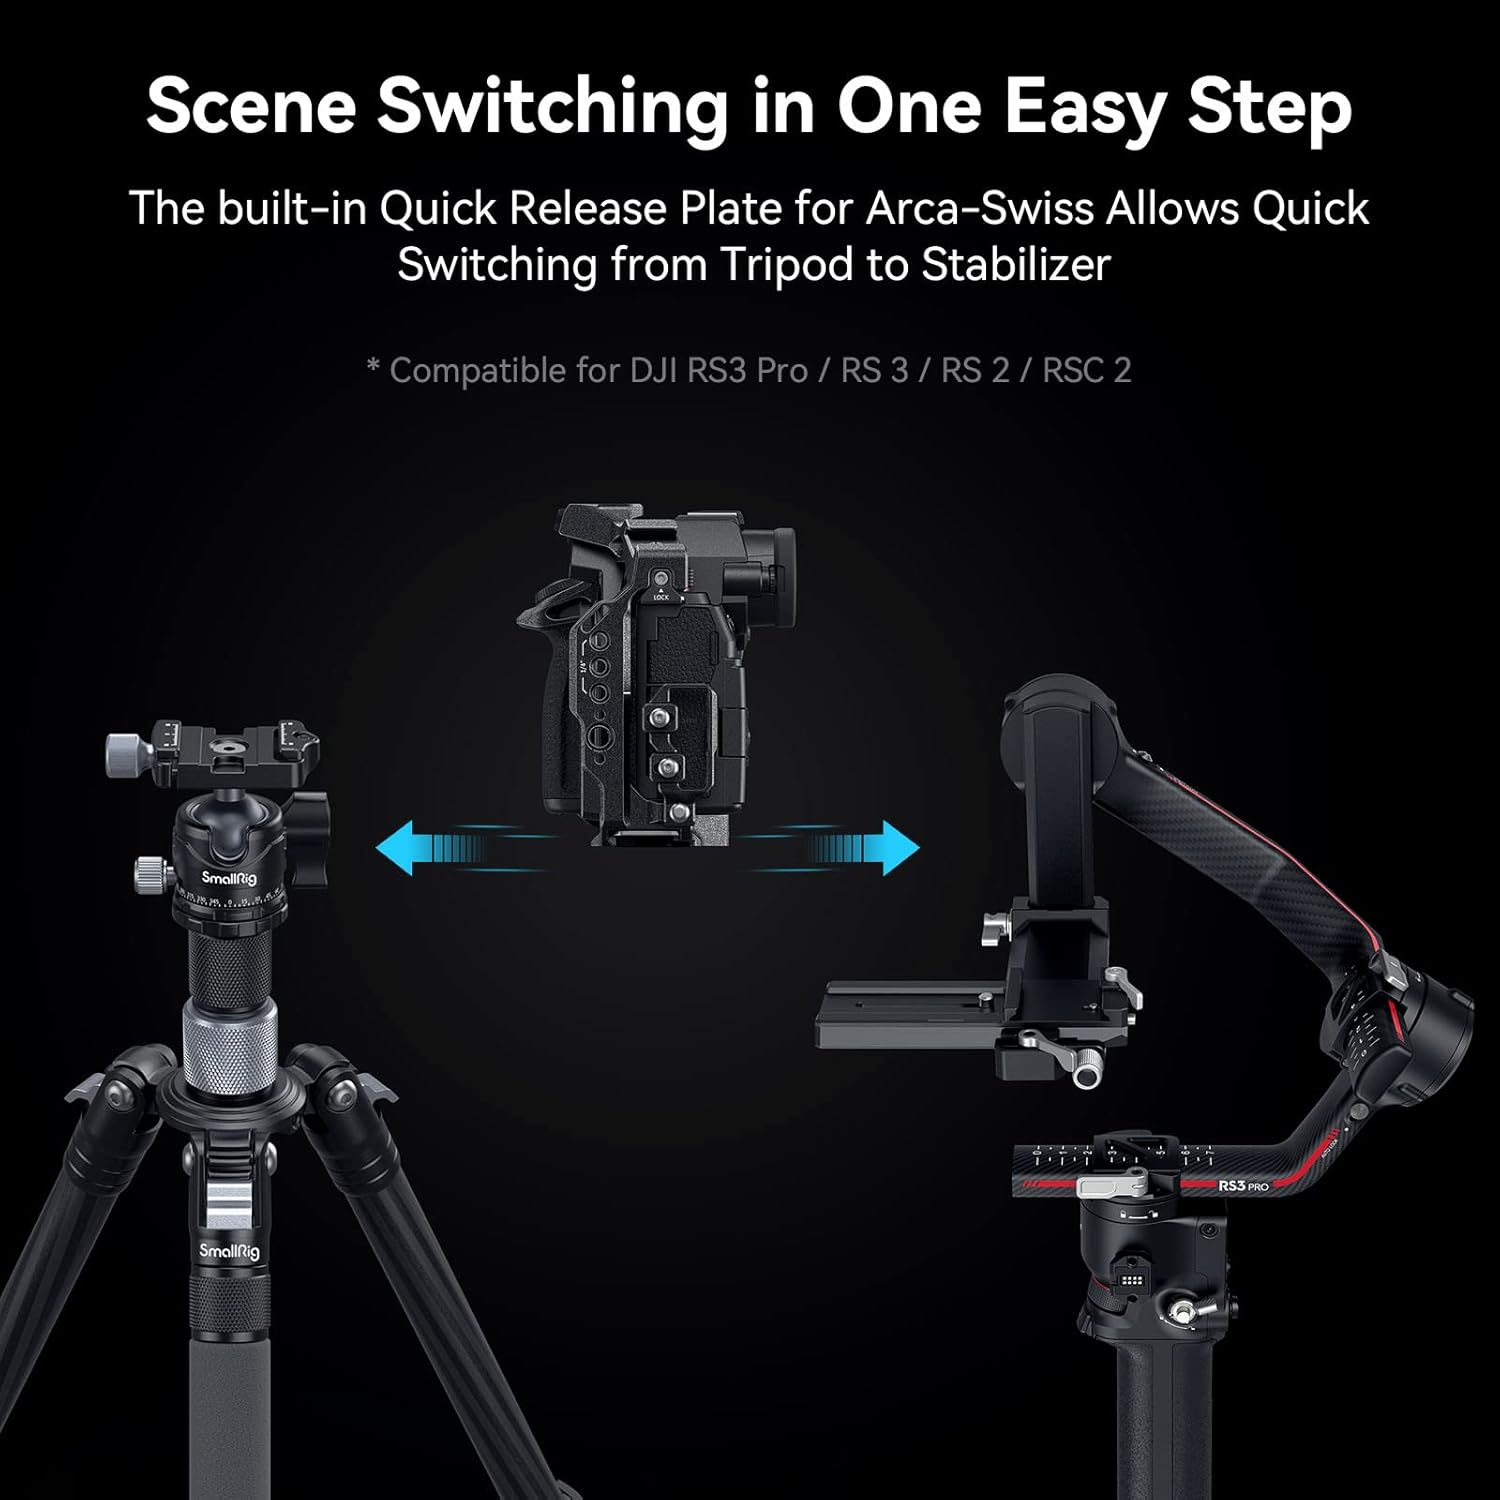
Image: A camera mounted in the SmallRig cage, demonstrating the use of various mounting points for a cold shoe mount, QD socket, quick release plate, NATO rail, 3/8"-16 locating hole for ARRI, wrist strap slot, and 1/4"-20 threaded hole.

Image: Detailed diagram illustrating the location and type of multiple mounting points on the SmallRig cage, including 1/4"-20 threaded holes, cold shoe mounts, 3/8"-16 locating holes for ARRI, QD sockets, built-in Arca-Swiss plate, NATO rail, strap slots, and the dual-head wrench storage.
Quick Switching Between Setups:
The integrated Arca-Swiss quick-release plate allows for rapid transitions between tripods, gimbals, and handheld setups without removing the camera from the cage.

Image: Illustration demonstrating the quick and easy scene switching capability, allowing the camera with the cage to transition from a tripod to a stabilizer (compatible with DJI RS3 Pro / RS 3 / RS 2 / RSC 2) in one step.
การซ่อมบำรุง
Proper maintenance will ensure the longevity and optimal performance of your SmallRig Camera Cage.
- การทำความสะอาด: เช็ดกรงด้วยผ้าแห้งนุ่มๆ เพื่อกำจัดฝุ่นและรอยนิ้วมือ สำหรับคราบสกปรกที่ติดแน่น ให้ใช้ผ้าชุบน้ำหมาดๆ เช็ดเบาๆamp สามารถใช้ผ้าเช็ดทำความสะอาดได้ แล้วเช็ดให้แห้งทันที หลีกเลี่ยงการใช้สารทำความสะอาดที่มีฤทธิ์กัดกร่อนหรือตัวทำละลาย
- พื้นที่จัดเก็บ: Store the cage in a dry, cool place away from direct sunlight and extreme temperatures. If storing for extended periods, ensure it is clean and free of moisture.
- ความแน่นของสกรู: Periodically check all screws, especially the main camera attachment screw and side lock adapters, to ensure they remain tight. The integrated magnetic wrench can be used for this purpose.
การแก้ไขปัญหา
This section addresses common issues you might encounter with your SmallRig Camera Cage.
| ปัญหา | สาเหตุที่เป็นไปได้ | สารละลาย |
|---|---|---|
| Cage does not fit camera properly. | Incorrect camera model or improper installation. | Ensure your camera is a Panasonic LUMIX G9 II, S5 II, or S5 IIX. Re-check installation steps, especially the alignment and tightening of the bottom screw and side lock adapters. |
| Camera feels loose inside the cage. | Bottom screw or side lock adapters are not sufficiently tightened. | Tighten the 1/4"-20 bottom screw and both side lock adapters firmly using the integrated magnetic wrench. Ensure rubber pads are in place. |
| Accessories do not attach securely to mounting points. | Incorrect accessory type or damaged threads. | Verify that the accessory's screw type matches the cage's mounting point (e.g., 1/4"-20, 3/8"-16, NATO). Inspect threads for damage. Do not overtighten. |
| HDMI/USB cable holder is missing. | This specific model (4023-AU) does not include an integrated HDMI/USB cable holder. | An external cable clamp accessory may be purchased separately if needed. Refer to SmallRig's official webไซต์สำหรับอุปกรณ์เสริมที่ใช้ร่วมกันได้ |
ข้อมูลจำเพาะ

Image: A visual representation of the product specifications and package contents.
| คุณลักษณะ | รายละเอียด |
|---|---|
| ยี่ห้อ | สมอลล์ริก |
| หมายเลขรุ่น | 4023-AU |
| ความเข้ากันได้ | Panasonic LUMIX G9 II, S5 II, S5 IIX |
| ขนาดสินค้า (กว้าง x ยาว x สูง) | 5.91 x 2.76 x 4.33 นิ้ว (147.5 x 72.8 x 117.5 มม.) |
| น้ำหนักสินค้า | 5.5 ออนซ์ (157 กรัม) |
| วัสดุ | โลหะผสมอลูมิเนียม |
| สี | สีดำ |
| จุดยึด | 1/4"-20, 3/8"-16 ARRI, Cold Shoe, NATO Rail, QD Socket |
| ระบบปล่อยด่วน | Built-in Arca-Swiss Plate |
มีอะไรอยู่ในกล่อง
- 1 x SmallRig Camera Cage (Model 4023-AU)
Note: Additional accessories shown in product images (e.g., camera, lens, monitor, microphone, handles) are for demonstration purposes only and are not included unless specified.
การรับประกันและการสนับสนุน
For information regarding product warranty, technical support, or service, please refer to the official SmallRig webดูรายละเอียดเพิ่มเติมได้ที่เว็บไซต์หรือติดต่อฝ่ายบริการลูกค้าโดยตรง เงื่อนไขและข้อกำหนดการรับประกันเฉพาะอาจแตกต่างกันไปตามภูมิภาคและสถานที่ซื้อ
SmallRig อย่างเป็นทางการ Webเว็บไซต์: www.smallrig.com
วิดีโอผลิตภัณฑ์อย่างเป็นทางการ
Based on the provided product data, no official product videos from the seller are available for embedding in this manual. Please refer to the manufacturer's official channels for any available video content.


