1. บทนำและเรื่องอื่นๆview
The Calix GigaCenter 844E-1 is a high-performance wireless router and modem designed to provide robust and reliable internet connectivity for home and small office environments. It supports dual-band Wi-Fi (2.4GHz and 5GHz) for optimal wireless performance and includes multiple Ethernet ports for wired connections. This manual provides detailed instructions for setting up, operating, maintaining, and troubleshooting your GigaCenter 844E-1 device.
2. คุณสมบัติของผลิตภัณฑ์
- Wi-Fi ดูอัลแบนด์: Supports 2.4GHz and 5GHz frequencies for flexible and high-speed wireless connections (802.11ac, 802.11n, 802.11a/g/b compatible).
- High LAN Data Rate: Capable of up to 1000 Mbps for fast wired connections.
- หลายพอร์ต: Includes Ethernet (RJ-45) ports (4 LAN ports), USB 2.0, and RJ-11 ports for versatile connectivity.
- Integrated Modem: Functions as both a router and a modem, simplifying network setup.
- การออกแบบที่กะทัดรัด: ออกแบบมาเพื่อการใช้พื้นที่อย่างมีประสิทธิภาพ
3. เนื้อหาบรรจุภัณฑ์
โปรดตรวจสอบว่าสินค้าทั้งหมดมีอยู่ในแพ็คเกจของคุณ:
- Calix GigaCenter 844E-1 Wireless Router Modem
- แหล่งจ่ายไฟอะแดปเตอร์ AC
- (Optional: Ethernet Cable, Phone Cable - may vary by package)
4. คู่มือการติดตั้ง
Follow these steps to set up your Calix GigaCenter 844E-1:
- การวางตำแหน่งอุปกรณ์: Place the GigaCenter 844E-1 in a central location in your home, away from obstructions and sources of interference (e.g., microwaves, cordless phones). Ensure adequate ventilation.
- เชื่อมต่อพลังงาน: Connect the provided AC Adapter Power Supply to the "POWER" port on the back of the GigaCenter 844E-1 and then plug the adapter into a standard electrical outlet. The Power indicator light on the front panel should illuminate.

รูปที่ 4.1 : ด้านหน้า view of the Calix GigaCenter 844E-1 showing indicator lights and the included power adapter.
- เชื่อมต่อแหล่งที่มาทางอินเทอร์เน็ต: Connect your internet service provider's (ISP) cable or fiber optic line to the appropriate WAN/Broadband port on the GigaCenter 844E-1. This port is typically labeled "ETH-WAN" or "Broadband". The Broadband indicator light should turn solid green once a connection is established.

รูปที่ 4.2: ด้านข้าง view of the GigaCenter 844E-1 highlighting the ETH-WAN, Power, and Phone ports.
- เชื่อมต่ออุปกรณ์แบบใช้สาย (ไม่บังคับ): Use standard Ethernet cables to connect computers, gaming consoles, or other network devices to the "ETHERNET 1-4" ports on the back of the GigaCenter 844E-1. The corresponding Ethernet indicator light will illuminate when a device is connected and active.

Figure 4.3: Top/back view of the GigaCenter 844E-1 displaying the USB, Reset, Ethernet (LAN), and Phone ports.
- Connect Phone Devices (Optional): If your service includes voice, connect analog phones to the "PHONE 1" or "PHONE 2" ports using RJ-11 cables.
- การเชื่อมต่อ Wi-Fi เบื้องต้น:
- Locate the Wi-Fi Network Name (SSID) and Password (WPA Key) on the label usually found on the bottom or back of your GigaCenter 844E-1.
- บนอุปกรณ์ไร้สายของคุณ (แล็ปท็อป สมาร์ทโฟน แท็บเล็ต) ค้นหาเครือข่าย Wi-Fi ที่ใช้งานได้
- Select your GigaCenter's SSID and enter the WPA Key when prompted.
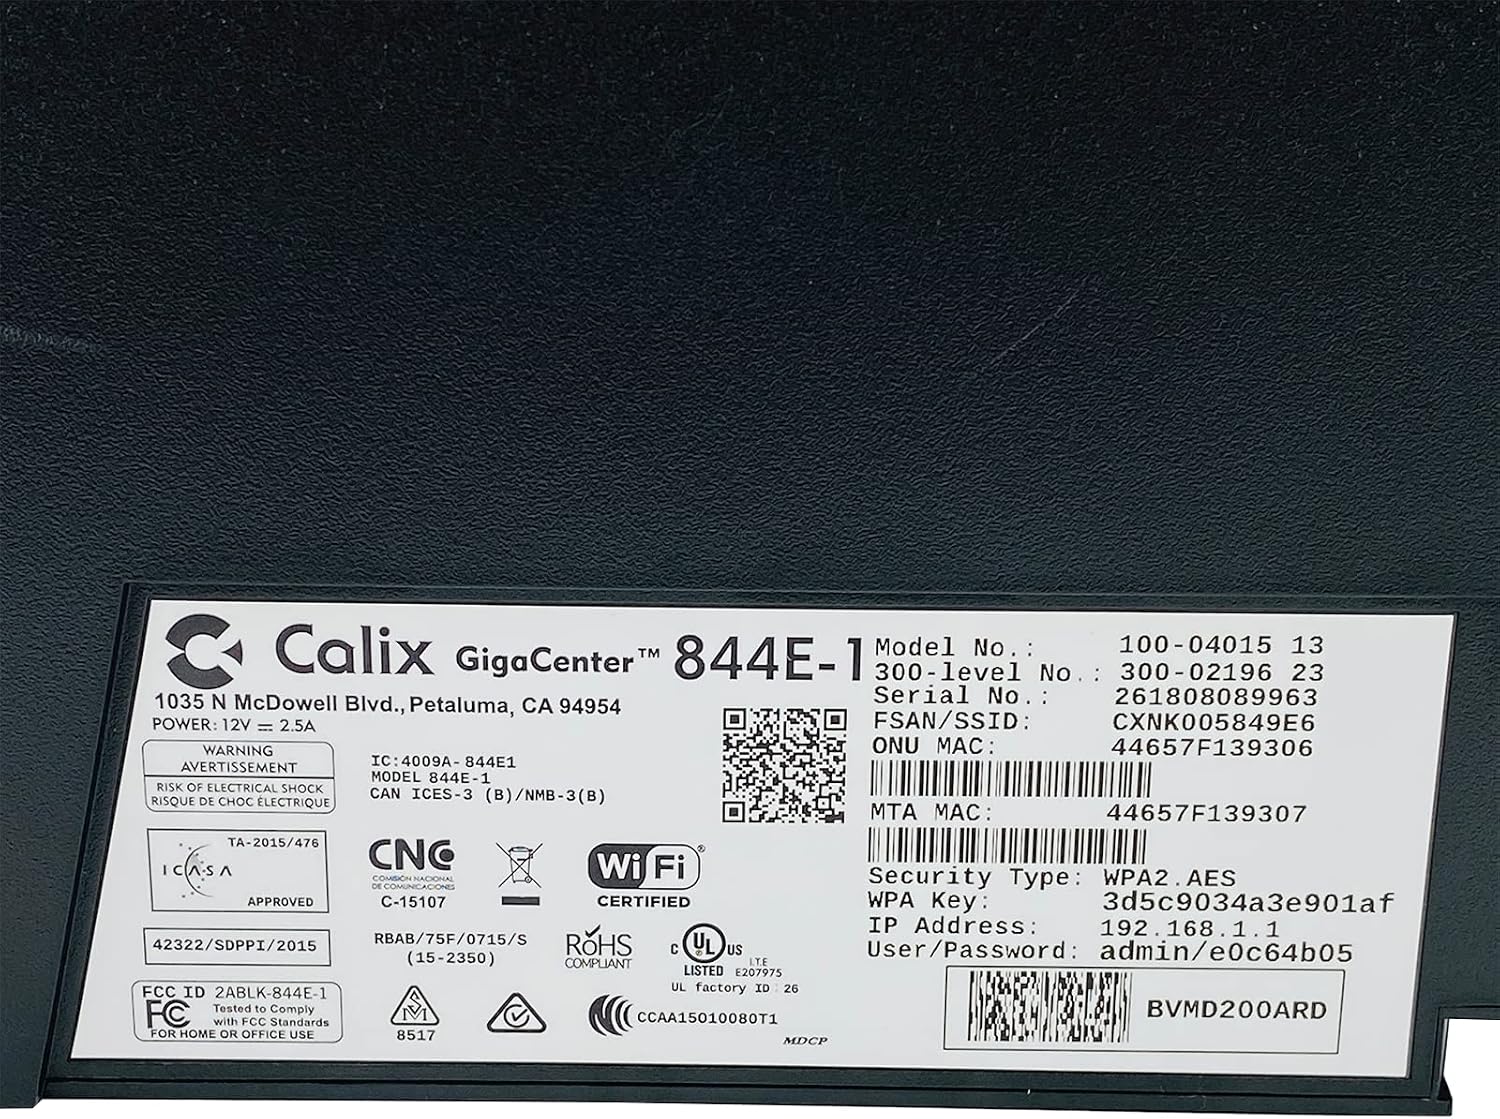
รูปที่ 4.4: รายละเอียด view of the bottom label, providing essential information such as model number, serial number, Wi-Fi SSID, and WPA Key for network access.
- ตรวจสอบการเชื่อมต่อ: เมื่อเชื่อมต่อแล้ว ให้เปิด a web เบราว์เซอร์และลองเข้าถึง webไซต์ (เช่น www.google.com). If successful, your GigaCenter 844E-1 is set up and ready for use.
5. คู่มือการใช้งาน
ไฟแสดงสถานะ 5.1 ดวง
The front panel of the GigaCenter 844E-1 features several indicator lights that provide status information:
| แสงสว่าง | สถานะ | คำอธิบาย |
|---|---|---|
| พลัง | สีเขียวทึบ | อุปกรณ์เปิดอยู่ |
| บรอดแบนด์ | สีเขียวทึบ | Internet connection is active. |
| บริการ | สีเขียวทึบ | Service is active and provisioned. |
| 2.4 GHz WIFI | Solid Green/Flashing | 2.4 GHz Wi-Fi is active/data transfer. |
| 5 GHz WIFI | Solid Green/Flashing | 5 GHz Wi-Fi is active/data transfer. |
| อีเธอร์เน็ต 1-4 | Solid Green/Flashing | Wired connection active/data transfer. |
| PHONE 1-2 | Solid Green/Flashing | Phone service active/in use. |
| ยูเอสบี | Solid Green/Flashing | USB device connected/data transfer. |
| ดับบลิวพีเอส | การกระพริบ | อยู่ระหว่างการจับคู่ WPS |
5.2 การเข้าถึง Web อินเทอร์เฟซ
To configure advanced settings, you can access the GigaCenter's web อินเทอร์เฟซ:
- Ensure your device is connected to the GigaCenter via Wi-Fi or Ethernet.
- เปิด web browser and enter the IP Address (e.g., 192.168.1.1) found on the product label into the address bar.
- Enter the User/Password (e.g., admin/e0c64b05) from the product label when prompted.
- You can now configure settings such as Wi-Fi name, password, port forwarding, and parental controls.
6. การบำรุงรักษา
- การทำความสะอาด: ใช้ผ้านุ่มและแห้งเช็ดทำความสะอาดภายนอกอุปกรณ์ ห้ามใช้น้ำยาทำความสะอาดหรือสเปรย์
- การระบายอากาศ : Ensure the device's ventilation slots are not blocked to prevent overheating.
- อัพเดตเฟิร์มแวร์: Periodically check with your Internet Service Provider (ISP) for available firmware updates to ensure optimal performance and security.
- การเริ่มต้นใหม่: If you experience connectivity issues, try restarting the device by unplugging the power adapter for 10 seconds and then plugging it back in.
7 การแก้ไขปัญหา
หัวข้อนี้จะกล่าวถึงปัญหาทั่วไปที่คุณอาจพบเจอ:
7.1 ไม่มีการเชื่อมต่ออินเทอร์เน็ต
- ตรวจสอบสายเคเบิล: Ensure all cables (power, internet source, Ethernet) are securely connected.
- ไฟแสดงสถานะ: Verify that the POWER, BROADBAND, and SERVICE lights are solid green. If not, refer to Section 5.1 or contact your ISP.
- รีสตาร์ทอุปกรณ์: Power cycle the GigaCenter 844E-1 by unplugging it for 10 seconds and plugging it back in.
- ISP ของคุณtage: Check with your ISP for any service outagอยู่ในพื้นที่ของคุณ
7.2 Wi-Fi Not Working or Slow
- Wi-Fi Lights: Ensure the WIFI 2.4 GHz and/or WIFI 5 GHz lights are solid green.
- รหัสผ่าน: Double-check that you are entering the correct Wi-Fi password (WPA Key).
- ความแรงของสัญญาณ: Move closer to the GigaCenter 844E-1 to improve signal strength.
- การรบกวน: ลดการรบกวนจากอุปกรณ์อิเล็กทรอนิกส์อื่นๆ
- การเพิ่มประสิทธิภาพช่องทาง: เข้าถึง web interface to change Wi-Fi channels if experiencing congestion.
7.3 ไม่สามารถเข้าถึงได้ Web อินเทอร์เฟซ
- ที่อยู่ IP: Confirm you are using the correct IP Address (e.g., 192.168.1.1).
- การเชื่อมต่อ: Ensure your device is connected to the GigaCenter's network.
- ข้อมูลประจำตัว: Verify the User/Password from the product label.
- ไฟร์วอลล์/โปรแกรมป้องกันไวรัส: ปิดใช้งานไฟร์วอลล์หรือซอฟต์แวร์ป้องกันไวรัสบนคอมพิวเตอร์ของคุณชั่วคราว ซึ่งอาจบล็อกการเข้าถึงอยู่
7.4 ฟังก์ชันการทำงานของ WPS
The WPS (Wi-Fi Protected Setup) button allows for easy connection of WPS-compatible devices without manually entering the password. Press the WPS button on the GigaCenter 844E-1 and then activate WPS on your client device within two minutes. The WPS light will flash during the pairing process.
8. ข้อมูลจำเพาะ
| คุณสมบัติ | รายละเอียด |
|---|---|
| แบบอย่าง | GigaCenter 844E-1 (100-04015 13) |
| ยี่ห้อ | กระเปาะ |
| เทคโนโลยีการเชื่อมต่อ | Wireless-Wi-Fi 802.11ac, Ethernet (RJ-45) Hub/Switch, 5G |
| มาตรฐานไร้สาย | 802.11ac, 802.11n, 802.11a/g/b |
| ระดับย่านความถี่ | ดูอัลแบนด์ (2.4 GHz, 5 GHz) |
| Maximum LAN Data Rate | 1000 เมกะบิตต่อวินาที |
| พอร์ต | 4 x Ethernet (RJ-45), 1 x USB 2.0, 2 x RJ-11 (Phone) |
| อุปกรณ์ที่รองรับ | Personal Computer, Network Devices |
| ข้อแนะนำการใช้ | บ้าน |
| ส่วนประกอบที่รวมอยู่ | แหล่งจ่ายไฟ |
| น้ำหนักสินค้า | 3 ปอนด์ |
9. ข้อมูลด้านความปลอดภัย
- อย่าให้เครื่องโดนน้ำหรือความชื้น
- อย่าเปิดอุปกรณ์casinก. ส่งต่อการบริการทั้งหมดให้กับบุคลากรที่มีคุณสมบัติเหมาะสม
- ใช้เฉพาะอะแดปเตอร์ที่ให้มาเท่านั้น
- เก็บอุปกรณ์ให้ห่างจากแหล่งความร้อนและแสงแดดโดยตรง
- ตรวจสอบให้แน่ใจว่ามีการระบายอากาศที่เหมาะสมเพื่อป้องกันภาวะความร้อนมากเกินไป
10. การรับประกันและการสนับสนุน
For warranty information and technical support, please contact your Internet Service Provider (ISP) or the vendor from whom you purchased this device. The Calix GigaCenter 844E-1 is typically provided and supported by your ISP as part of your internet service package.
For general inquiries or to find more information about Calix products, you may visit the official Calix website (if available, search online for "Calix official webเว็บไซต์").


