1. บทนำ
จักรเย็บผ้าและจักรเย็บผ้าควิลท์ระบบคอมพิวเตอร์ Elna eXcellence 710 ออกแบบมาเพื่อความแม่นยำและใช้งานง่าย มีพื้นที่เย็บขนาดใหญ่ ระบบป้อนผ้าคู่ขั้นสูง และตะเข็บและฟังก์ชั่นในตัวที่หลากหลายเพื่อรองรับโครงการเย็บผ้าที่แตกต่างกัน คู่มือนี้ให้ข้อมูลที่จำเป็นสำหรับการตั้งค่า การใช้งาน การบำรุงรักษา และการแก้ไขปัญหาเครื่องจักรของคุณ

รูปที่ 1 : ด้านหน้า view ของเครื่องเย็บผ้าและเครื่องควิลท์ Elna eXcellence 710
2. คุณสมบัติหลัก
- 170 ฝีเข็ม: ประกอบด้วยตัวอักษรและรังดุมอัตโนมัติ 10 แบบ โดยมีความกว้างของตะเข็บ 9 มม.
- ฟังก์ชั่นอำนวยความสะดวก: ระบบตัดด้ายอัตโนมัติแบบกดปุ่ม การเปลี่ยนแผ่นเข็มแบบขั้นตอนเดียว และการเย็บล็อคตะเข็บ
- แผงควบคุมแบบสัมผัส: เพื่อให้เลือกรูปแบบการเย็บและการตั้งค่าได้ง่าย
- ความเร็วในการเย็บสูง: เย็บได้สูงสุด 1000 ฝีเข็มต่อนาที
- ระบบป้อนวัสดุคู่ขั้นสูง: ช่วยเลื่อนผ้าจากด้านบนและด้านล่างอย่างสม่ำเสมอเพื่อความแม่นยำ เหมาะอย่างยิ่งสำหรับการเย็บผ้าหลายชั้นและการจัดเรียงลวดลาย มาพร้อมกับตีนผีป้อนผ้าคู่แบบถอดได้
- ตีนผีเย็บผ้า 15 ชิ้น: สำหรับอุปกรณ์เย็บผ้าหลากหลายประเภท รวมถึงชุดเย็บผ้าควิลท์แบบป้อนผ้าสองด้านที่กว้างและปรับเปลี่ยนได้สำหรับการเย็บแบบฟรีโมชั่น
- การจัดเก็บข้อมูลแบบบูรณาการ: ช่องด้านบนสำหรับใส่ตีนผี และมีช่องอีกสองช่องที่แขนจักรเย็บผ้า
- อุปกรณ์ยกเข่า: ช่วยให้คุณยกตีนผีด้วยขาได้ โดยที่มือทั้งสองข้างยังคงอยู่บนชิ้นงาน
- ไฟ LED: ไฟ LED สีขาวในตัว 5 ดวง กระจายอยู่ใน 3 จุด เพื่อเพิ่มทัศนวิสัยให้ดียิ่งขึ้น
3. การตั้งค่า
3.1 การแกะและการจัดวาง
นำเครื่องออกจากบรรจุภัณฑ์อย่างระมัดระวัง วางเครื่องบนพื้นผิวที่มั่นคงและเรียบ ตรวจสอบให้แน่ใจว่ามีพื้นที่รอบเครื่องเพียงพอสำหรับการใช้งานอย่างสะดวกสบาย

รูปที่ 2: ด้านข้าง view ของเครื่องพิมพ์ 3 มิติ Elna eXcellence 710 ที่แสดงให้เห็นถึงดีไซน์ที่กะทัดรัด
3.2 การเชื่อมต่อสายไฟ
เชื่อมต่อสายไฟเข้ากับเครื่อง แล้วเสียบเข้ากับเต้ารับไฟฟ้าที่เหมาะสม ตรวจสอบให้แน่ใจว่าสวิตช์เปิดปิดของเครื่องอยู่ในตำแหน่ง 'ปิด' ก่อนทำการเชื่อมต่อ
3.3 การติดตั้งโต๊ะต่อขยาย
โต๊ะเสริมช่วยเพิ่มพื้นที่ทำงาน โดยเฉพาะอย่างยิ่งสำหรับงานเย็บผ้าควิลท์และชิ้นงานขนาดใหญ่ เลื่อนโต๊ะเสริมเข้าไปบนแขนอิสระจนกระทั่งล็อคเข้าที่อย่างแน่นหนา

รูปที่ 3: โต๊ะทำงาน Elna eXcellence 710 พร้อมโต๊ะเสริมที่เพิ่มพื้นที่ใช้งาน
3.4 การม้วนกระสวย
วางม้วนด้ายลงบนแกนม้วนด้าย นำด้ายผ่านแผ่นปรับความตึงของกระสวย แล้วพันรอบกระสวยเปล่า วางกระสวยลงบนแกนหมุนกระสวย แล้วดันไปทางขวา กดปุ่มเริ่ม/หยุดเพื่อเริ่มการพันด้าย เครื่องจะหยุดโดยอัตโนมัติเมื่อกระสวยเต็ม
3.5 เกลียวบน
ยกตีนผีและเข็มขึ้นไปที่ตำแหน่งสูงสุด ปฏิบัติตามเส้นทางการร้อยด้ายที่มีหมายเลขกำกับไว้บนเครื่อง โดยตรวจสอบให้แน่ใจว่าด้ายเข้าที่ในช่องนำและแผ่นปรับความตึงด้ายทั้งหมดอย่างแน่นหนา ใช้ที่สนเข็มในตัวเพื่อความสะดวกในการร้อยด้ายเข้ารูเข็ม

รูปที่ 4: ด้านบน view ภาพประกอบแสดงเส้นทางการร้อยด้ายและแผนภูมิการเลือกตะเข็บ
3.6 การใส่กระสวย
เปิดฝาครอบกระสวย ใส่กระสวยที่พันด้ายแล้วเข้าไปในกล่องกระสวย ตรวจสอบให้แน่ใจว่าด้ายคลายตัวในทิศทางที่ถูกต้อง (โดยปกติคือทวนเข็มนาฬิกา) นำด้ายผ่านสปริงปรับความตึงและใบมีดตัด ปิดฝาครอบกระสวย
4. คู่มือการใช้งาน
4.1 การเลือกเย็บ
ใช้แผงควบคุมแบบสัมผัสเพื่อเลือกตะเข็บที่ต้องการ เครื่องมีตะเข็บในตัว 170 แบบ รวมถึงตะเข็บใช้งานทั่วไป ตะเข็บตกแต่ง และตะเข็บรังดุม ดูแผนผังตะเข็บที่อยู่บนฝาครอบด้านบนของเครื่องเพื่อเป็นข้อมูลอ้างอิง

รูปที่ 5 : ด้านหน้า view เมื่อเปิดช่องเก็บของออก จะเผยให้เห็นอุปกรณ์เสริมและแผนผังลายถัก
4.2 การปรับการตั้งค่าตะเข็บ
หลังจากเลือกแบบเย็บแล้ว แผงควบคุมแบบสัมผัสจะแสดงความยาวและความกว้างของตะเข็บที่แนะนำ คุณสามารถปรับค่าเหล่านี้ได้โดยใช้ปุ่มเฉพาะบนแผงควบคุมเพื่อให้เหมาะกับเนื้อผ้าและความต้องการของชิ้นงาน

รูปที่ 6: ภาพระยะใกล้ของแผงควบคุมแบบสัมผัสสำหรับการปรับแต่งตะเข็บและการตั้งค่า
4.3 เริ่มต้นเย็บผ้า
วางผ้าไว้ใต้ตีนผี ลดตีนผีลง ใช้ปุ่มเริ่ม/หยุด หรือแป้นเหยียบควบคุมเพื่อเริ่มเย็บ ปรับความเร็วในการเย็บโดยใช้แถบเลื่อนควบคุมความเร็ว
5. การบำรุงรักษา
5.1 การทำความสะอาดเครื่องจักร
ทำความสะอาดบริเวณกระสวยและฟันเฟืองป้อนผ้าเป็นประจำเพื่อกำจัดเศษด้ายและฝุ่นละออง ใช้แปรงปัดเศษด้ายที่ให้มาด้วย ถอดปลั๊กเครื่องออกจากแหล่งจ่ายไฟก่อนทำความสะอาด ห้ามใช้น้ำยาทำความสะอาดหรือตัวทำละลาย
5.2 การเปลี่ยนเข็ม
ควรเปลี่ยนเข็มบ่อยๆ โดยเฉพาะเมื่อเย็บผ้าต่างชนิดกัน หรือหากเข็มทื่อหรือบิดงอ ควรใช้เข็มชนิดและขนาดที่เหมาะสมกับผ้าเสมอ
6 การแก้ไขปัญหา
6.1 ปัญหาทั่วไป
- ข้ามตะเข็บ: ตรวจสอบว่าใส่เข็มถูกต้องหรือไม่ เข็มงอหรือทื่อหรือไม่ หรือใช้เข็มชนิดที่เหมาะสมกับเนื้อผ้าหรือไม่
- การขาดของเส้นด้าย: ตรวจสอบให้แน่ใจว่าได้ใส่ด้ายเข้าเครื่องอย่างถูกต้อง แรงตึงเหมาะสม และด้ายไม่เก่าหรือชำรุด
- การติดขัดของผ้า: ตรวจสอบให้แน่ใจว่าได้ลดตีนผีลงก่อนเย็บ และใช้ตีนผีที่ถูกต้องสำหรับงานนั้น
- เย็บไม่เท่ากัน: ตรวจสอบความตึงของด้ายบนและด้ายล่าง ตรวจสอบให้แน่ใจว่าเครื่องสะอาดและปราศจากเศษด้าย
7. ข้อมูลจำเพาะ
| คุณสมบัติ | รายละเอียด |
|---|---|
| ขนาดสินค้า | 9 x 20.4 x 12.4 นิ้ว (ลึก 9 นิ้ว x กว้าง 20.4 นิ้ว x สูง 12.4 นิ้ว) |
| น้ำหนักสินค้า | 26.9 ปอนด์ |
| ผู้ผลิต | เอลน่า |
| หมายเลขรุ่นสินค้า | EL710 |
| แหล่งพลังงาน | สายไฟ |
| วัสดุ | โลหะ, พลาสติก |
| สี | สีขาว/สีแดง |
| จำเป็นต้องประกอบ | เลขที่ |
| แบตเตอรี่ที่จำเป็น | เลขที่ |

รูปที่ 7: ขนาดของจักรเย็บผ้า Elna eXcellence 710
8. อุปกรณ์เสริมที่รวมอยู่
เครื่องดูดฝุ่น Elna eXcellence 710 มาพร้อมอุปกรณ์เสริมครบครัน เพื่อให้คุณเริ่มต้นใช้งานได้ทันที:
- เท้ามาตรฐาน A
- ตีนผีม้วนง
- ซิปเท้า E
- ตีนผีเย็บผ้าซาติน F
- ตีนผีเย็บซาตินแบบเปิดหัวแม่เท้า F2
- ตีนผีตาบอด G
- ตีนผีโอเวอร์ล็อค M
- ตีนตะเข็บ ¼” O
- ตีนผี PD-H
- ชุดอุปกรณ์เย็บผ้าควิลท์แบบฟรีโมชั่นปรับเปลี่ยนได้ QB-S (ประกอบด้วย: ตีนผีแบบปิดปลาย, ตีนผีแบบเปิดปลาย, ตีนผีใส-)view เท้า)
- ตีนผีทำรังดุมอัตโนมัติ รุ่น R พร้อมแผ่นรองกันสั่น
- ตีนเย็บกระดุม T
- ระบบป้อนอาหารคู่ AD แบบกว้าง
- แผ่นครอบเข็มเย็บแบบตรง
- เครื่องยกเข่า
- แถบนำทางควิลท์
- ลูกกระสวย
- ตัวเลาะตะเข็บ
- ชุดเข็ม
- แปรงปัดฝุ่น
- ที่วางม้วนด้ายขนาดเล็ก x2
- ที่วางม้วนด้ายขนาดใหญ่ x2
- ที่วางม้วนด้ายแบบพิเศษ x2
- ส่วนที่เหลือของสปูล
- เบาะสักหลาด
- สปูลพินเพิ่มเติม
- ไขควง
- สไตลัสแผงสัมผัส
- ตัวควบคุมด้วยเท้า
- ปกกึ่งแข็ง
- จักรเย็บผ้า eXcellence 710
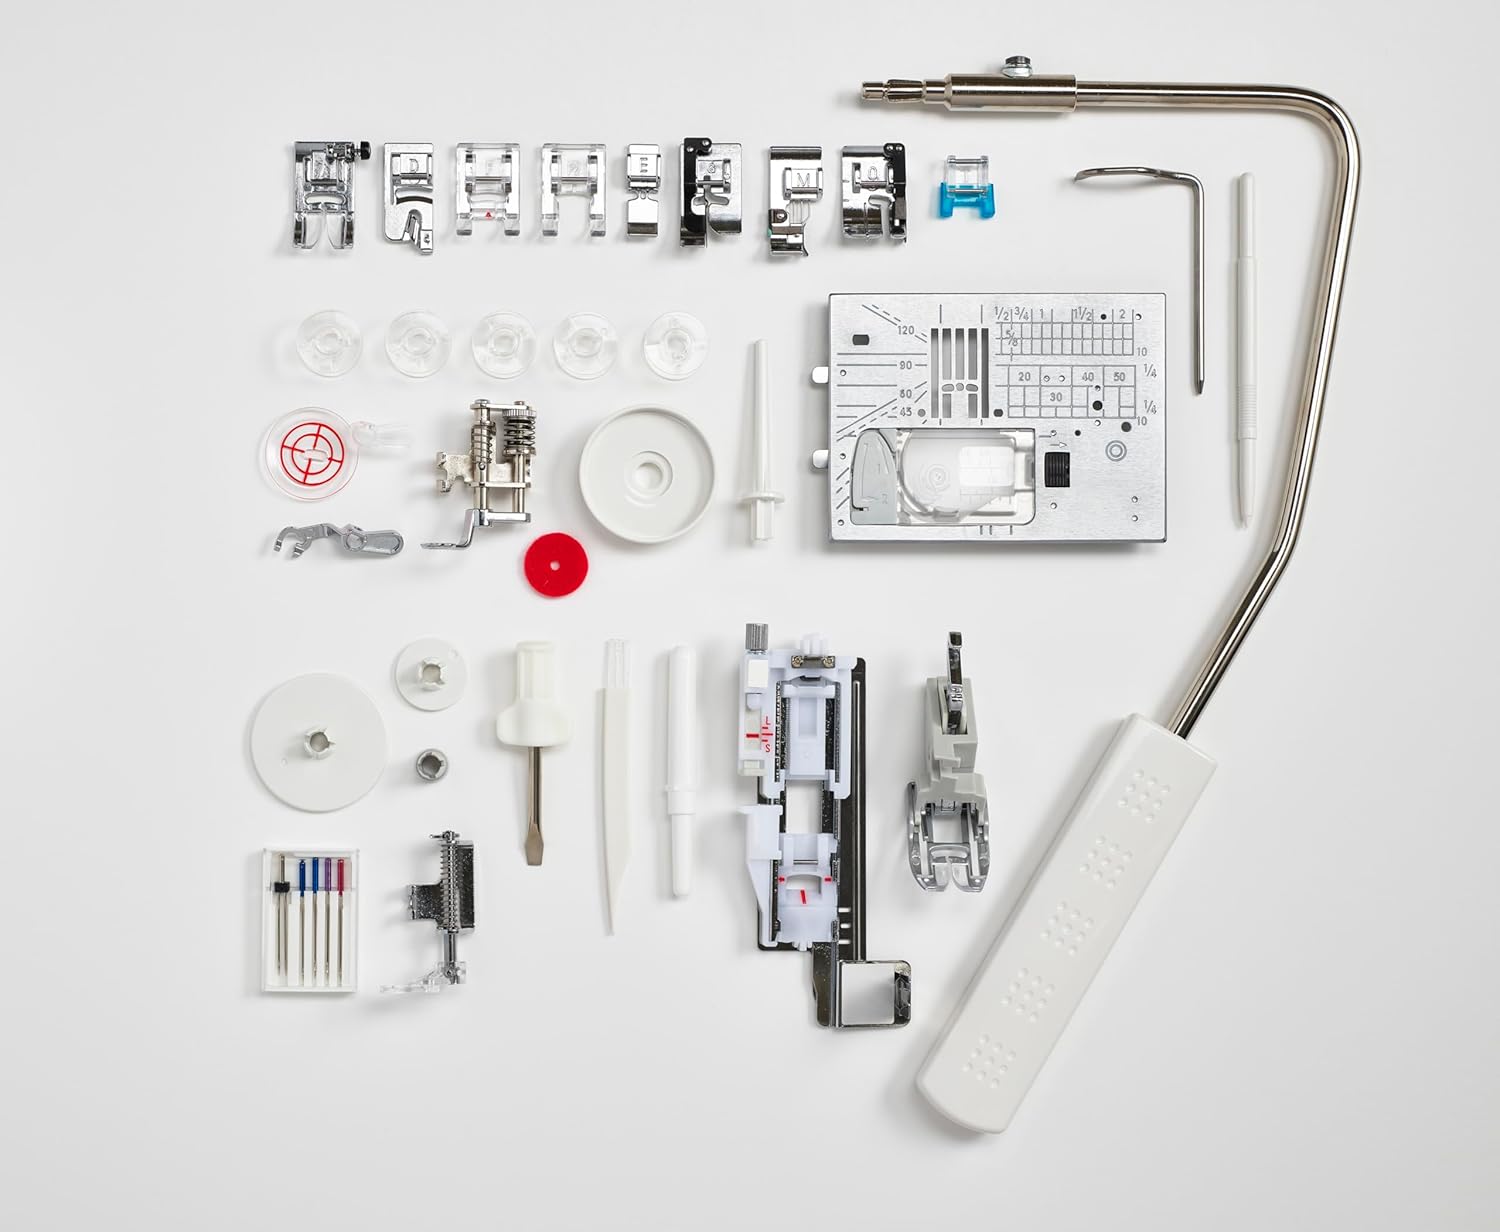
ภาพที่ 8: อุปกรณ์เสริมทั้งหมดที่รวมมาให้ รวมถึงตีนผีและเครื่องมือต่างๆ
9. การรับประกันและการสนับสนุน
สำหรับข้อมูลการรับประกันและการบริการลูกค้า โปรดดูเอกสารที่แนบมากับผลิตภัณฑ์ของคุณ หรือเยี่ยมชมเว็บไซต์อย่างเป็นทางการของ Elna webไซต์นี้ โปรดเก็บหลักฐานการซื้อไว้เพื่อใช้ยืนยันการรับประกัน
10. วิดีโอผลิตภัณฑ์
ไม่พบวิดีโอแนะนำผลิตภัณฑ์อย่างเป็นทางการจากผู้ขายสำหรับรุ่นนี้ในข้อมูลที่ให้มา โปรดดูคำแนะนำที่เป็นลายลักษณ์อักษรหรือเอกสารจากผู้ผลิต webเว็บไซต์สำหรับคู่มือภาพประกอบ