1. ข้อมูลด้านความปลอดภัยที่สำคัญ
โปรดอ่านคำแนะนำทั้งหมดอย่างละเอียดก่อนใช้งานจอภาพนี้ เก็บคู่มือนี้ไว้เพื่อใช้อ้างอิงในอนาคต
- พลัง: ใช้เฉพาะอะแดปเตอร์แปลงไฟที่มาพร้อมกับจอภาพเท่านั้น ตรวจสอบให้แน่ใจว่าเต้ารับไฟฟ้ามีการต่อสายดินอย่างถูกต้อง
- การระบายอากาศ : อย่าปิดกั้นช่องระบายอากาศ ควรเว้นพื้นที่รอบจอภาพให้เพียงพอเพื่อให้อากาศถ่ายเทได้สะดวก
- ความชื้น: Do not expose the monitor to rain, moisture, or excessive humidity. Do not place objects filled with liquids on the monitor.
- ความร้อน: Keep the monitor away from heat sources such as radiators, heat registers, stoves, or other heat-producing appliances.
- การทำความสะอาด: Unplug the monitor from the power outlet before cleaning. Use a soft, dry cloth. Do not use liquid or aerosol cleaners.
- การบริการ: อย่าพยายามให้บริการผลิตภัณฑ์นี้ด้วยตนเอง ส่งต่อการบริการทั้งหมดไปยังช่างบริการที่ผ่านการรับรอง
2. เนื้อหาบรรจุภัณฑ์
โปรดตรวจสอบว่าสินค้าทั้งหมดในพัสดุของคุณครบถ้วน หากมีสินค้าใดขาดหายหรือเสียหาย โปรดติดต่อฝ่ายบริการลูกค้า
- KOORUI 24-inch PC Monitor (Model P01)
- ขาตั้งจอมอนิเตอร์ (ฐานและคอ)
- อะแดปเตอร์แปลงไฟ
- สาย HDMI
- คู่มือการใช้งาน

Image: KOORUI 24-inch PC Monitor P01 and its included accessories, including the monitor, stand, power adapter, HDMI cable, and user manual.
3. คำแนะนำในการตั้งค่า
3.1 การประกอบขาตั้งจอภาพ
- ถอดส่วนประกอบของจอภาพและขาตั้งออกจากบรรจุภัณฑ์อย่างระมัดระวัง
- ติดส่วนคอของขาตั้งเข้ากับแผงจอภาพ ตรวจสอบให้แน่ใจว่าล็อคเข้าที่อย่างแน่นหนา หรือยึดด้วยสกรูหากมีให้
- Attach the stand base to the stand neck. Tighten the thumb screw at the bottom of the base to secure it.

Image: The KOORUI 24-inch PC Monitor P01 fully assembled with its stand, ready for connection.
3.2 การเชื่อมต่อจอภาพ
The monitor supports HDMI and VGA connections.
- การเชื่อมต่อไฟฟ้า: Connect the power adapter to the monitor's DC input port, then plug the other end into a power outlet.
- การเชื่อมต่อวิดีโอ:
- For HDMI: Connect one end of the HDMI cable to the HDMI port on your computer and the other end to the HDMI port on the monitor.
- For VGA: Connect one end of the VGA cable to the VGA port on your computer and the other end to the VGA port on the monitor.
- ไฟล์เสียง (ไม่บังคับ): If your computer supports audio output via HDMI, the monitor's built-in speakers will play audio.

ภาพ: ภาพระยะใกล้ view of the monitor's rear panel, highlighting the HDMI, VGA, and DC power input ports for easy identification during connection.

Image: The KOORUI 24-inch PC Monitor P01 connected to a laptop, demonstrating a typical setup for extended display use.
4. คู่มือการใช้งาน
4.1 การเปิด/ปิดเครื่อง
กดปุ่มเปิด/ปิดที่ด้านขวาล่างของจอภาพเพื่อเปิดหรือปิดเครื่อง ไฟแสดงสถานะเปิด/ปิดเครื่องจะสว่างขึ้นเมื่อจอภาพเปิดอยู่
4.2 เมนูการแสดงผลบนหน้าจอ (OSD)
Use the control buttons on the bottom right of the monitor to navigate the OSD menu. These buttons typically include Menu, Up, Down, Select, and Exit.
- เมนู: เปิดเมนู OSD
- ขึ้นลง: นำทางผ่านตัวเลือกเมนู
- เลือก: ยืนยันการเลือกหรือเข้าสู่เมนูย่อย
- ทางออก: ออกจากเมนูหรือ OSD ปัจจุบัน
4.3 การปรับการตั้งค่าการแสดงผล
ภายในเมนู OSD คุณสามารถปรับการตั้งค่าต่างๆ ได้:
- ความสว่าง/คอนทราสต์: ปรับความสว่างโดยรวมและอัตราส่วนความคมชัดของหน้าจอแสดงผล
- การตั้งค่าสี: ปรับอุณหภูมิสี เฉดสี และความอิ่มตัวของสี
- แหล่งสัญญาณเข้า: Manually select between HDMI and VGA input.
- โหมดแสงสีน้ำเงินต่ำ: Activates a filter to reduce blue light emissions, minimizing eye strain during prolonged use.
- Adaptive FreeSync: Enables dynamic refresh rate adjustment for smoother visuals, especially in gaming.
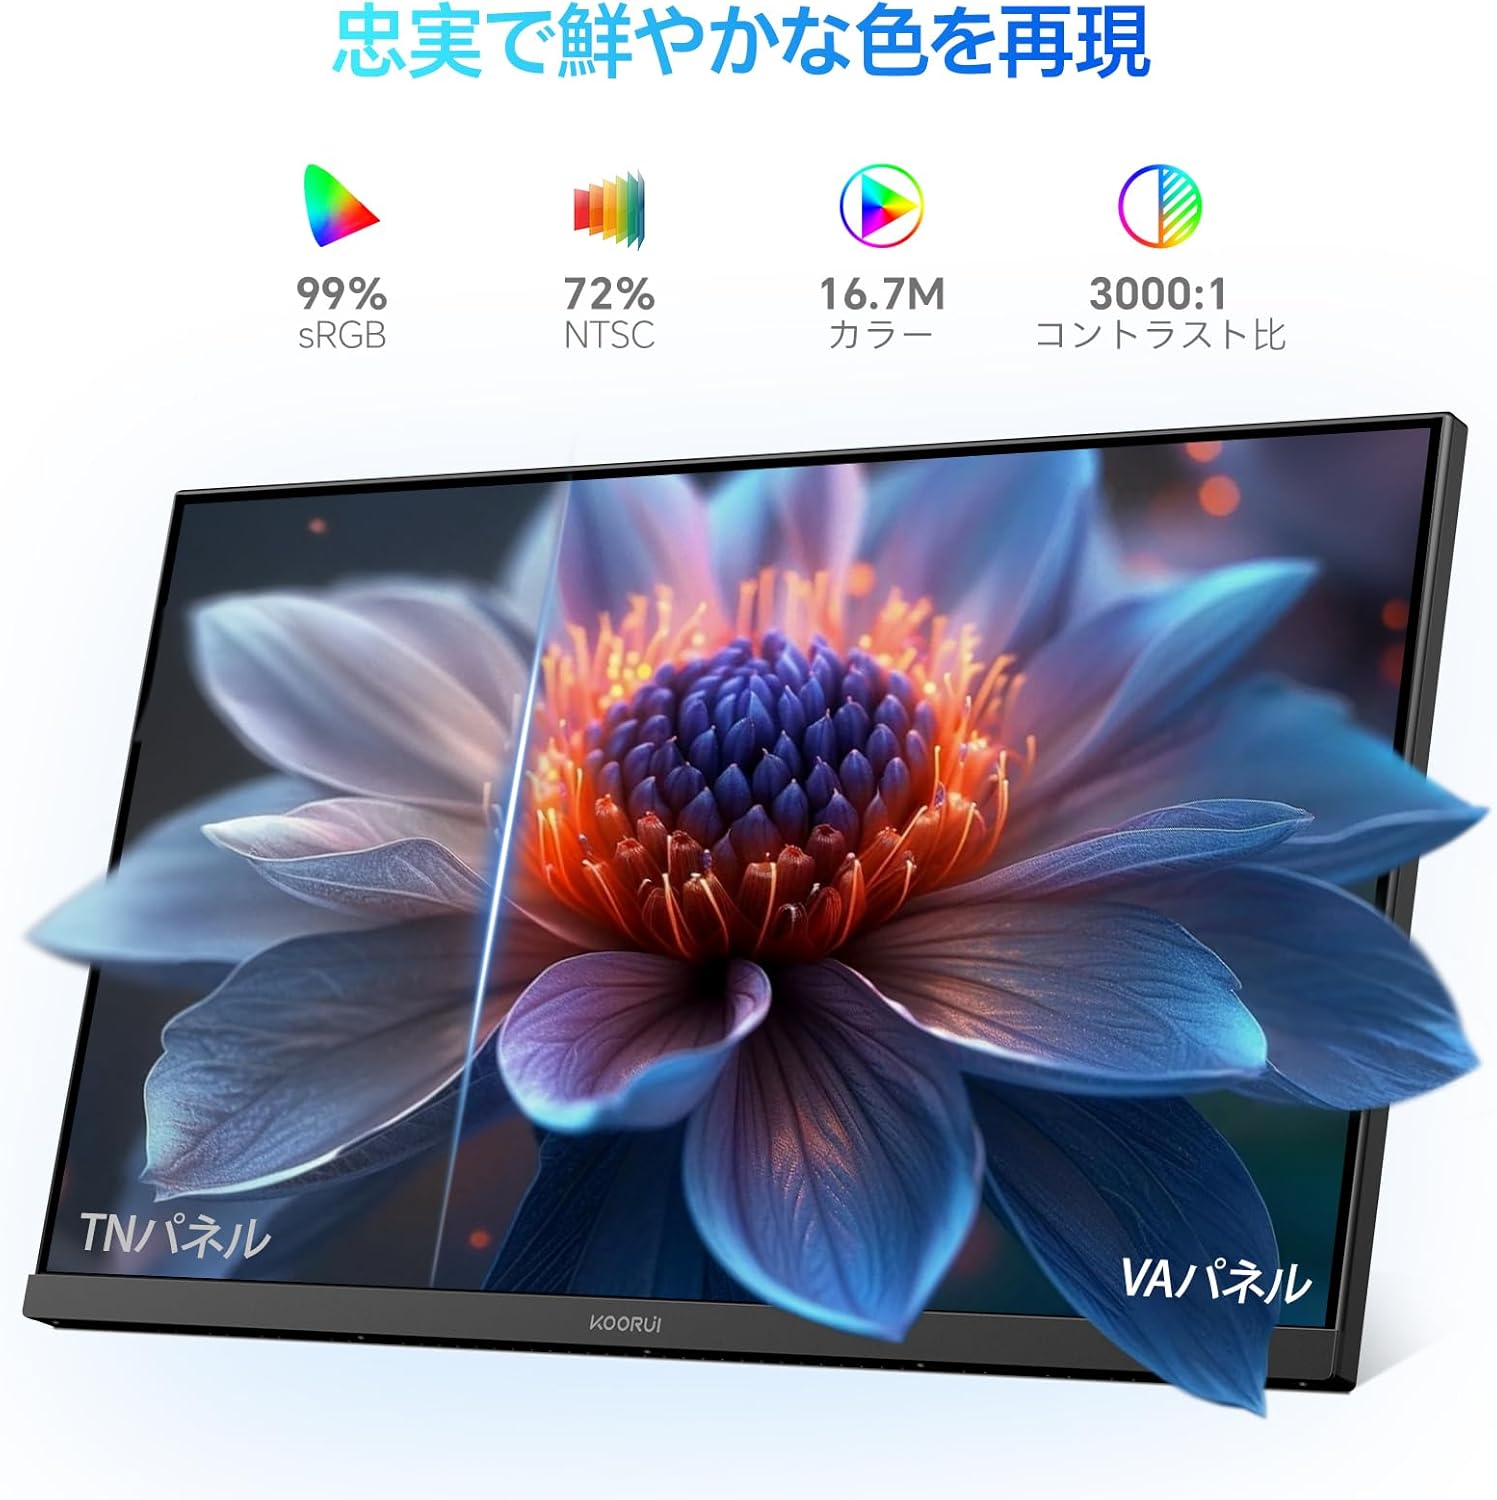
Image: A user working at a desk with the KOORUI 24-inch PC Monitor P01, illustrating the visual comfort provided by the Low Blue Light mode.

Image: A visual comparison demonstrating the benefits of Flicker-free and Low Blue Light technologies in reducing eye strain compared to a conventional display.
4.4 การปรับตำแหน่งทางกายภาพ
จอภาพสามารถปรับเอียงได้เพื่อเพิ่มประสิทธิภาพของคุณ viewมุมอิง
- เอียง: Gently tilt the monitor panel forward (up to 5 degrees) or backward (up to 15 degrees) to find your preferred viewตำแหน่งการวางตำแหน่ง

ภาพ: โปรด้านข้างfile of the monitor illustrating its adjustable tilt feature, allowing users to angle the screen for optimal comfort.
5. การบำรุงรักษา
5.1 การทำความสะอาดจอภาพ
เพื่อให้จอภาพของคุณมีอายุการใช้งานยาวนานและมีประสิทธิภาพสูงสุด โปรดปฏิบัติตามคำแนะนำในการทำความสะอาดดังต่อไปนี้:
- ควรถอดปลั๊กจอภาพออกจากเต้ารับไฟฟ้าทุกครั้งก่อนทำความสะอาด
- ใช้ผ้านุ่มไม่เป็นขุยเช็ดเล็กน้อยampened with water to clean the screen. Avoid applying excessive pressure.
- สำหรับจอภาพ casinง. ใช้ผ้าแห้งนุ่มๆ
- Do not use alcohol, ammonia-based cleaners, or abrasive cleaning agents, as these can damage the screen or casing.
5.2 การดูแลทั่วไป
- หลีกเลี่ยงการวางวัตถุหนักบนจอภาพหรือสายเคเบิล
- อย่าวางจอภาพไว้ในที่ที่มีแสงแดดส่องโดยตรงหรือในอุณหภูมิที่สูงหรือต่ำเกินไป
- หากจะไม่ใช้จอภาพเป็นเวลานาน ให้ถอดปลั๊กออกจากเต้าเสียบไฟฟ้า
6 การแก้ไขปัญหา
หากคุณพบปัญหาเกี่ยวกับจอภาพของคุณ โปรดดูปัญหาทั่วไปและวิธีแก้ไขต่อไปนี้:
| ปัญหา | สาเหตุที่เป็นไปได้ | สารละลาย |
|---|---|---|
| ไม่มีภาพบนหน้าจอ | จอภาพไม่ได้เปิดอยู่; สายวิดีโอหลวมหรือหลุด; เลือกแหล่งสัญญาณเข้าไม่ถูกต้อง | ตรวจสอบให้แน่ใจว่าเสียบสายไฟและเปิดจอภาพแล้ว ตรวจสอบการเชื่อมต่อสายวิดีโอ เลือกแหล่งสัญญาณเข้าที่ถูกต้องผ่านเมนู OSD |
| ภาพเบลอหรือบิดเบี้ยว | ความละเอียดไม่ถูกต้อง; ปัญหาจากสายเคเบิลวิดีโอ | ตั้งค่าความละเอียดในการแสดงผลเป็น 1920x1080 ลองใช้สายวิดีโออื่น |
| สีไม่ถูกต้อง | Color settings in OSD; Video cable issue. | Adjust color settings in OSD menu; Check video cable for damage. |
| จอภาพกระพริบ | อัตราการรีเฟรชไม่ตรงกัน; ปัญหาจากสายเคเบิล | Ensure refresh rate is set to 100Hz (or compatible); Try a different video cable. |
| ไม่มีเสียง | Volume too low; Incorrect audio output selected on computer; HDMI cable not transmitting audio. | Increase monitor volume; Check computer's audio output settings; Ensure HDMI cable supports audio. |
If the problem persists after trying these solutions, please contact KOORUI customer support.
7. ข้อมูลจำเพาะ
Technical specifications for the KOORUI 24-inch PC Monitor P01:
| คุณสมบัติ | ข้อมูลจำเพาะ |
|---|---|
| ยี่ห้อ | คูรุย |
| หมายเลขรุ่น | P01 |
| ขนาดหน้าจอ | 24 นิ้ว |
| ปณิธาน | ความละเอียด Full HD 1920 x 1080 พิกเซล |
| อัตราส่วนภาพ | 16:9 น. |
| ประเภทแผง | แผงเวอร์จิเนีย |
| อัตราการรีเฟรช | 100 เฮิรตซ์ |
| เวลาตอบสนอง | 5 มิลลิวินาที |
| อัตราส่วนคอนทราสต์ | 3000:1 น. |
| Viewอิงแองเกิล | 178° (แนวนอน/แนวตั้ง) |
| คำอธิบายพื้นผิว | แมทต์ |
| คุณสมบัติพิเศษ | Low Blue Light Filter, Tilt Adjustment, Frameless Design, Flicker-Free, Adaptive FreeSync |
| การเชื่อมต่อ | hdmi, vga |
| สี | สีดำ |

Image: Detailed diagram showing the dimensions and weight of the KOORUI 24-inch PC Monitor P01.
8. การรับประกันและการสนับสนุน
8.1 ข้อมูลการรับประกัน
This KOORUI monitor comes with a การรับประกันจากผู้ผลิต 3 ปีการรับประกันนี้ครอบคลุมข้อบกพร่องด้านวัสดุและฝีมือการผลิตภายใต้การใช้งานปกติ โปรดเก็บหลักฐานการซื้อไว้เพื่อขอรับสิทธิ์การรับประกัน
8.2 การสนับสนุนลูกค้า
KOORUI is committed to providing premium service. If you encounter any damage, malfunctions, or missing accessories, please do not hesitate to contact us. We offer 24-hour assistance and a 12-month replacement service for eligible issues.
หากต้องการความช่วยเหลือ โปรดเยี่ยมชมเว็บไซต์อย่างเป็นทางการของ KOORUI webเว็บไซต์หรือติดต่อร้านค้าปลีกของคุณ