1. สินค้าหมดview
The QIACHIP WiFi Smart Relay Module is a versatile device designed for home automation. It allows users to remotely control connected appliances or devices via the eWeLink app. This module supports third-party voice control systems such as Amazon Alexa and Google Home, offering enhanced convenience for smart home integration. Key functionalities include timing on/off, scene linkage, power-on settings, inching (momentary) settings, and sharing control.

Image 1.1: QIACHIP WiFi Smart Relay Module with its packaging, highlighting compatibility with Google Home and Alexa.
2. ข้อมูลด้านความปลอดภัย
- แหล่งจ่ายไฟ: This device requires a stable USB 5V DC power input. Do not use power sources exceeding 5V to prevent damage.
- การเดินสายไฟ: Ensure all wiring is performed by a qualified individual if connecting to AC loads. Always disconnect power before wiring.
- สิ่งแวดล้อม: Use the module in a dry environment. Avoid exposure to moisture, extreme temperatures, or corrosive substances.
- ความจุในการรับน้ำหนัก: Adhere to the maximum switching voltagอีและวัตtage specifications to prevent overloading the relay.
3. เนื้อหาบรรจุภัณฑ์
- QIACHIP WiFi Smart Relay Module (KR05-1CHKG-W-EW)
- คู่มือการใช้งาน (เอกสารนี้)
Note: A USB power adapter and cable are required for operation and are not included. Remote controls are also sold separately.
4. คุณสมบัติของผลิตภัณฑ์
- รีโมทคอนโทรล: ควบคุมอุปกรณ์ต่างๆ ได้จากทุกที่โดยใช้แอป eWeLink บนสมาร์ทโฟนของคุณ
- การควบคุมด้วยเสียง: เข้ากันได้กับ Amazon Alexa และ Google Home เพื่อการใช้งานแบบแฮนด์ฟรี
- โหมดการทำงาน: Supports both self-locking (toggle) and inching (momentary) modes, configurable via the app.
- การกำหนดตารางและตัวจับเวลา: Set schedules, countdowns, and loop timers for automated control.
- เอาต์พุตสัมผัสแบบแห้ง: Provides a passive output, suitable for controlling various devices like garage door openers, access control systems, and traditional switches.
- 2.4G Remote Control Support: Can be paired with a 2.4G smart remote control (sold separately) for local control, offering a range of up to 30 meters in open areas.
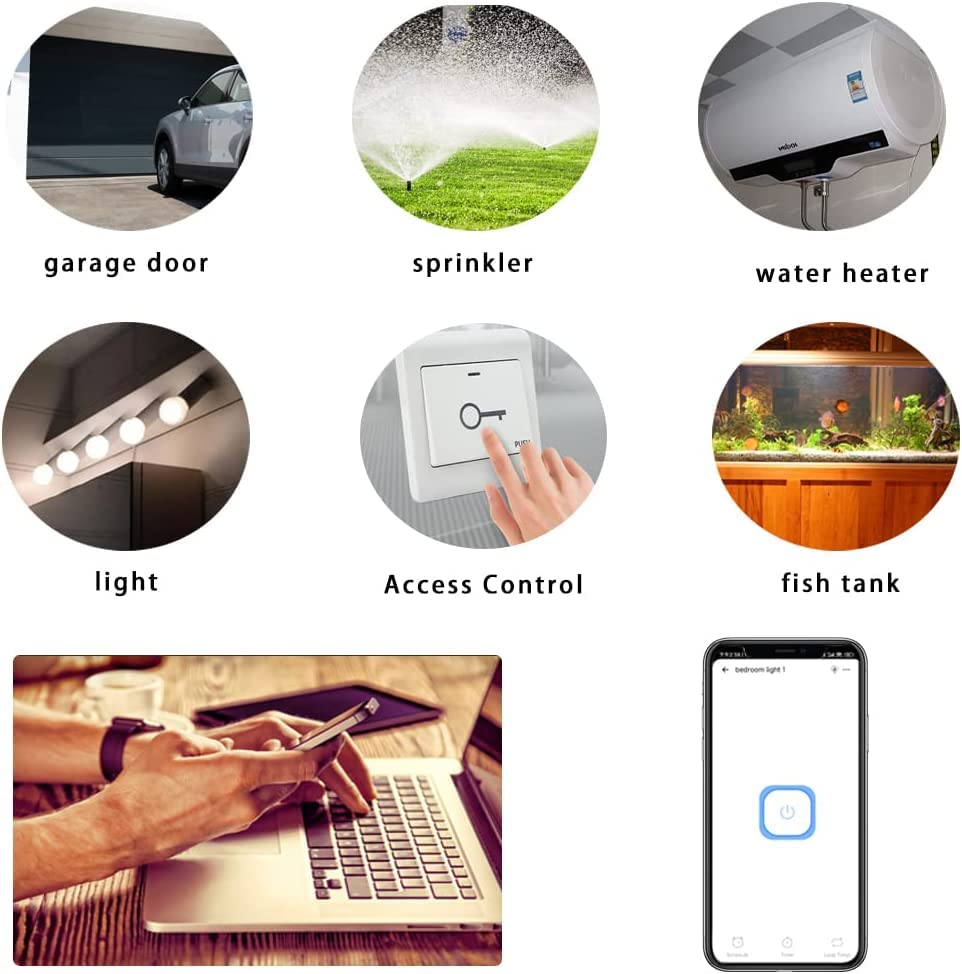
ภาพที่ 4.1: อดีตamples of devices and systems that can be controlled by the smart relay module.
5. การระบุส่วนประกอบ

ภาพที่ 5.1: รายละเอียด view of the KR05-1CH module with key components labeled.
- Input USB 5V: Micro USB port for power supply.
- On/Off Switch/Setting Button: Used for manual control and pairing.
- WiFi Network Indicator Light: แสดงสถานะการเชื่อมต่อ Wi-Fi
- Relay Indicator Light: Indicates the relay's activation status.
- ขั้วต่ออินพุต/เอาต์พุต: Screw terminals for connecting the device to be controlled (dry contact).
6. คู่มือการติดตั้ง
6.1. การเปิดเครื่อง
Connect a standard USB 5V power adapter (not included) to the Micro USB port on the module. The module will power on, and the Wi-Fi indicator light will begin to flash, indicating it is ready for pairing.
6.2. Wiring Diagram (Dry Contact)
The module provides a dry contact (passive output) relay. This means it acts as a switch, opening or closing a circuit without supplying power itself. You will need to connect the device you wish to control to the Input and Output terminals.
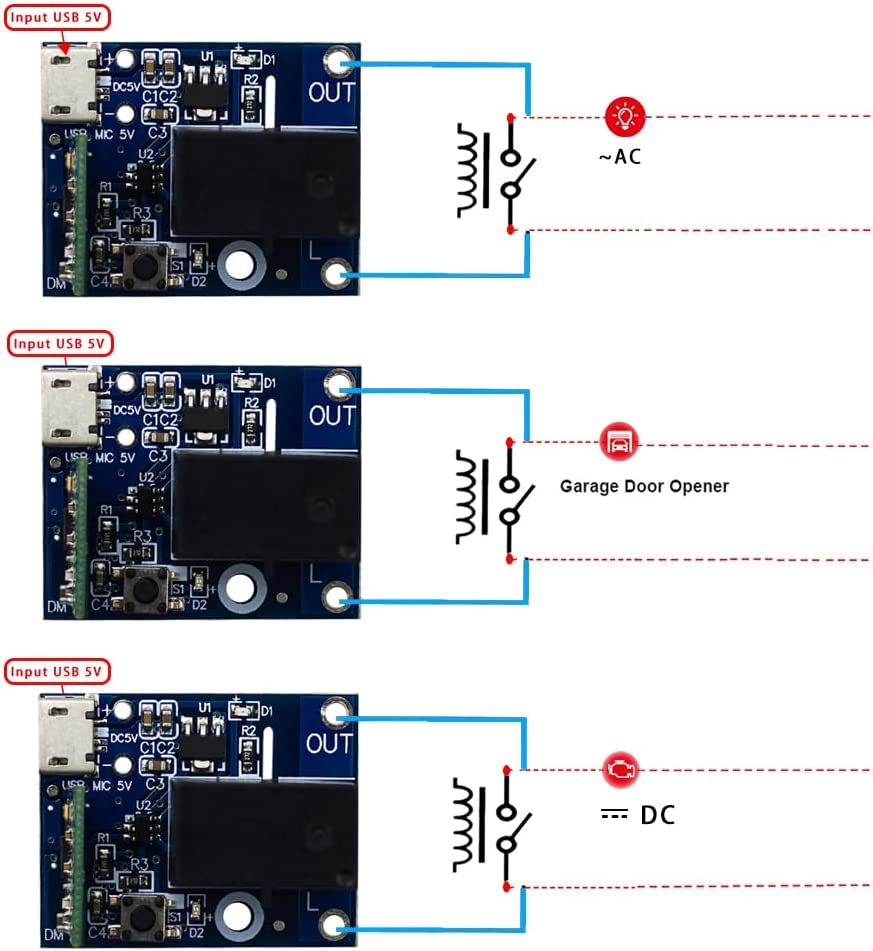
ภาพที่ 6.1: อดีตamples of dry contact wiring for various applications.
- For AC Loads: Connect the module's output terminals in series with one of the AC lines (e.g., Live wire) of your AC device. The module itself is powered by USB 5V, not the AC line.
- For DC Loads: Connect the module's output terminals in series with the positive or negative line of your DC device.
- For Garage Door/Access Control: Connect the module's output terminals to the control input terminals of your garage door opener or access control system, which typically require a momentary contact closure.
6.3. การติดตั้งและการจับคู่แอป
- ดาวน์โหลดแอป eWeLink: ค้นหา "eWeLink" in your smartphone's app store (Google Play Store for Android or Apple App Store for iOS) and install it.
- ลงทะเบียน/เข้าสู่ระบบ: เปิดแอป eWeLink แล้วลงทะเบียนบัญชีใหม่ หรือเข้าสู่ระบบด้วยบัญชีที่มีอยู่แล้ว
- เข้าสู่โหมดจับคู่: Power on the module. Press and hold the "on/off switch/setting button" on the module for approximately 5 seconds until the Wi-Fi network indicator light flashes rapidly.
- เพิ่มอุปกรณ์: In the eWeLink app, tap the "+" icon (or "Add Device") and follow the on-screen instructions to add a new device. Select the appropriate pairing mode (e.g., Quick Pairing Mode).
- เชื่อมต่อกับ Wi-Fi: Enter your 2.4GHz Wi-Fi network name and password. The module only supports 2.4GHz Wi-Fi networks, not 5GHz.
- การจับคู่แบบสมบูรณ์: The app will search for and connect to the module. Once connected, you can rename the device and assign it to a room.
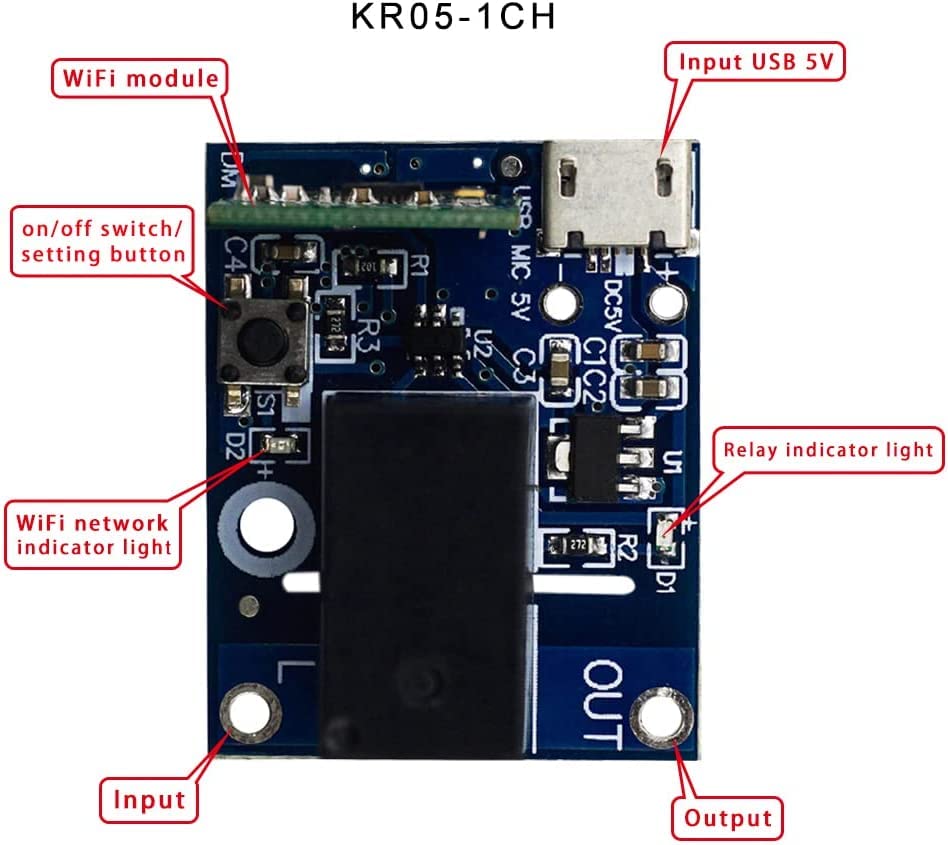
Image 6.2: eWeLink app interface for controlling the smart relay module.
7. โหมดการทำงาน
7.1. Self-Locking Mode (Default)
In self-locking mode, the relay acts like a traditional toggle switch. When you turn it ON, it stays ON until you manually turn it OFF. Similarly, when you turn it OFF, it stays OFF until manually turned ON. This mode is suitable for controlling lights, fans, or other devices that require a continuous ON/OFF state.
7.2. Inching (Momentary) Mode
In inching mode, the relay will automatically turn OFF after a set duration once it has been turned ON. This mode is ideal for applications like garage door openers, electric strikes, or pulse-activated devices. The duration of the momentary pulse can be adjusted within the eWeLink app (e.g., 0.5 seconds to several minutes).
To switch between modes, access the device settings within the eWeLink app and select the desired working mode.
8. การบูรณาการบ้านอัจฉริยะ
The QIACHIP WiFi Smart Relay Module is compatible with popular smart home platforms:
- อเมซอนอเล็กซ่า: Link your eWeLink account in the Alexa app to control the module with voice commands (e.g., "Alexa, turn on the garage door").
- Google Home/Assistant: Link your eWeLink account in the Google Home app to control the module with voice commands (e.g., "Hey Google, open the gate").
- IFTTT: Create custom automations and applets by connecting your eWeLink account to IFTTT (If This Then That).
Ensure your eWeLink account is bound and devices are synchronized within the respective third-party smart home applications.

Image 8.1: Illustration of multiple modules in a home environment, indicating remote control capabilities.
9. การบำรุงรักษา
- การทำความสะอาด: Gently wipe the module with a dry, soft cloth. Do not use liquid cleaners or solvents.
- อัพเดตเฟิร์มแวร์: ตรวจสอบแอป eWeLink เป็นระยะเพื่อดูการอัปเดตเฟิร์มแวร์ที่มีให้ใช้งาน เพื่อให้มั่นใจได้ถึงประสิทธิภาพและความปลอดภัยสูงสุด
- เสถียรภาพพลังงาน: Ensure the USB 5V power supply is stable to prevent unexpected behavior.
10 การแก้ไขปัญหา
- Q: Device not connecting to Wi-Fi?
- A: Ensure your Wi-Fi network is 2.4GHz. Check that the Wi-Fi password is correct. Move the module closer to your Wi-Fi router. Try resetting the module by holding the setting button for 5 seconds until the indicator flashes rapidly, then re-attempt pairing.
- Q: Relay not responding to app commands?
- A: Verify the module is powered on and connected to Wi-Fi (solid blue indicator light). Check your internet connection. Ensure the wiring to the controlled device is correct and secure. Test the manual button on the module.
- Q: Voice control not working?
- A: Confirm that your eWeLink account is correctly linked and synchronized with Amazon Alexa or Google Home. Check the device name in the eWeLink app and use that name in your voice commands. Ensure your smart speaker is connected to the internet.
- Q: Inching mode duration is incorrect?
- A: Adjust the inching duration setting within the device's settings in the eWeLink app.
11. ข้อมูลจำเพาะ
| พารามิเตอร์ | ค่า |
|---|---|
| หมายเลขรุ่น | KR05-1CHKG-W-EW (CK-BL602-4SW-HS(138)) |
| อินพุต Voltage | ช่องเสียบ USB DC5V |
| ประเภทเอาท์พุต | Dry Contact (Passive Output) |
| ปริมาณการสลับสูงสุดtage | 5 Volts (for control signal, not power) |
| วัดtage | 50 watts (Max load capacity) |
| โหมดการทำงาน | Automatic (App controlled) |
| การเชื่อมต่อ | Wi-Fi 2.4GHz (IEEE 802.11 b/g/n) |
| ประเภทขั้วต่อ | ไมโคร USB |
| วัสดุติดต่อ | ทองแดง |
| ประเภทการติดต่อ | เปิดปกติ |
| ประเภทการติดตั้ง | การติดตั้งบนพื้นผิว |
| ขนาดสินค้า | 7 x 5 x 3 ซม. |
| น้ำหนักผลิตภัณฑ์ | 20 กรัม |
| ยูพีซี | 787996396422 |
12. การรับประกันและการสนับสนุน
For warranty information, technical support, or further assistance, please refer to the contact details provided with your purchase or visit the official QIACHIP webไซต์นี้ โปรดเก็บหลักฐานการซื้อไว้เพื่อใช้ยืนยันการรับประกัน


