1. บทนำ
This manual provides detailed instructions for the installation, operation, and maintenance of your Geek Smart Fingerprint Door Lock, Model L-B201. Please read this manual thoroughly before installation and use to ensure proper function and longevity of the product. Keep this manual for future reference.
2. คุณสมบัติของผลิตภัณฑ์
- การจดจำลายนิ้วมือ: Stores up to 20 unique fingerprints for quick and secure access. Unlocks in approximately 0.1 seconds.
- โหมดการทำงานแบบคู่: Easily switch between Normal mode (auto-lock after 5 seconds) and Passage mode (remains unlocked for free passage).
- อายุการใช้งานแบตเตอรี่ยาวนาน: Powered by 4 AAA batteries (not included), providing approximately 8-12 months of operation.
- ไฟฉุกเฉิน: Equipped with a USB port for emergency charging if batteries deplete.
- การติดตั้งง่าย: Designed for easy DIY installation with minimal tools required. Voice assistant guides programming.
- เข้ากันได้สากล: Suitable for both left and right-handed doors. Fits standard door thicknesses from 1-3/8'' to 2-1/8'' (35 to 55mm). Adjustable latch for 2-3/8'' (60mm) or 2-3/4'' (70mm) backsets.
- การเข้าถึงการสำรองข้อมูล: Includes physical keys for manual override.
3. เนื้อหาบรรจุภัณฑ์
ตรวจสอบว่าส่วนประกอบทั้งหมดมีอยู่ก่อนเริ่มการติดตั้ง:
- ชุดแฮนด์หน้า
- ชุดจับหลัง
- สลัก
- จานตี
- กุญแจ (2)
- Keyhole Cover Pin
- สกรูยึด (4)
- ปะเก็นยาง
- คู่มือการใช้งาน (เอกสารนี้)
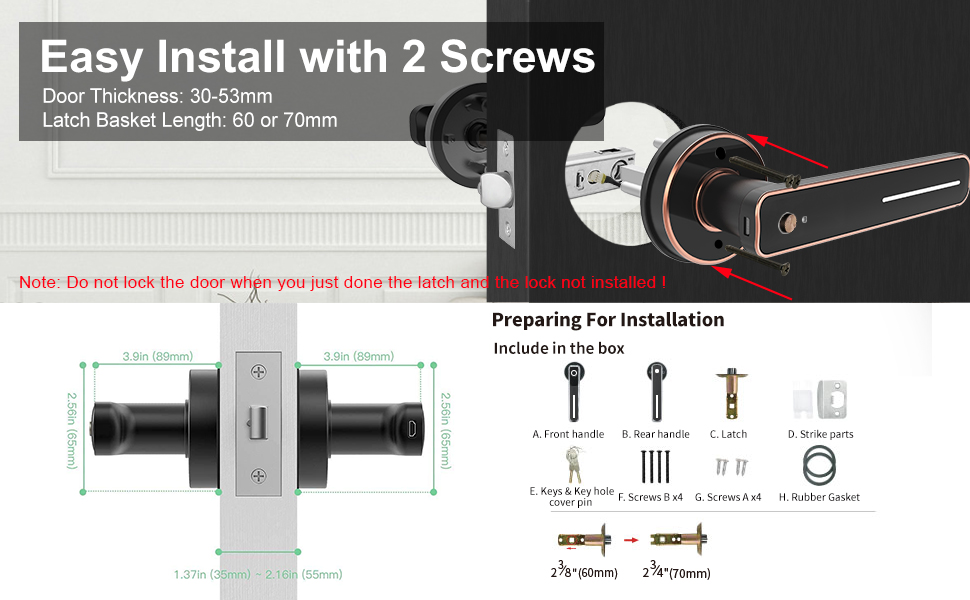
Image: Included components for installation, featuring front and rear handles, latch, strike plate, keys, screws, and gasket.
4. คู่มือการติดตั้ง
Installation typically requires only a screwdriver. Follow these steps carefully:
- เตรียมประตู: Ensure your door meets the thickness requirements (1-3/8'' to 2-1/8'' or 35-55mm) and that the latch backset is set correctly (60mm or 70mm).
- ติดตั้งสลัก: Insert the latch into the door edge. Ensure the bevel of the latch bolt faces the door frame. Secure with screws.
- ติดตั้งมือจับด้านหน้า: Position the front handle assembly on the exterior side of the door, aligning the spindle with the latch mechanism.
- ติดตั้งมือจับด้านหลัง: Place the rubber gasket on the interior side of the door. Connect the rear handle assembly to the front handle, ensuring wires are not pinched.
- การรักษาความปลอดภัยล็อค: Use the provided screws to firmly attach both handle assemblies to the door.
- ติดตั้งแผ่นปิดช่องลม: Mount the strike plate on the door frame, aligning it with the latch bolt.
- ใส่แบตเตอรี่: Open the battery compartment on the rear handle and insert 4 AAA batteries (not included), observing polarity.

Image: Visual guide for installing the smart lock using two screws, highlighting door thickness and latch basket length.
Note: Do not lock the door when you have just installed the latch and the lock is not fully assembled.
5. การดำเนินการ
5.1 Initial Setup and Fingerprint Enrollment
- After battery installation, the lock will prompt you with voice instructions.
- To add the first administrator fingerprint, follow the voice prompts. You will typically need to place your finger on the sensor multiple times from different angles.
- Once the administrator fingerprint is registered, you can add additional user fingerprints (up to 20 total) by following similar voice prompts.

Image: The fingerprint sensor in action, showing a quick 0.1-second read speed and capacity for 20 fingerprints.
5.2 การปลดล็อคประตู
- ลายนิ้วมือ: Place a registered finger on the sensor. The lock will unlock if the fingerprint is recognized.
- สำคัญ: In case of emergency or battery depletion, use the provided physical key to unlock the door.
5.3 Mode Switching (Passage Mode / Normal Mode)
The lock features a mode switching button, typically located on the interior handle. Press this button to toggle between modes.
- โหมดปกติ: The lock will automatically engage (auto-lock) approximately 5 seconds after being unlocked. This is the standard secure mode.
- โหมดทาง: The lock will remain unlocked, allowing free entry and exit without requiring a fingerprint or key. This mode is suitable for periods of high traffic.
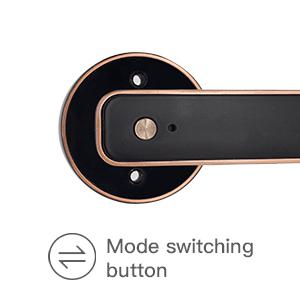
Image: Detail of the mode switching button on the lock's interior handle.

Image: The lock set to Passage Mode, allowing unrestricted entry and exit.
5.4 การชาร์จฉุกเฉิน
If the batteries run out, the lock can be temporarily powered using a standard USB power bank connected to the emergency USB port on the exterior handle. This allows you to unlock the door with a registered fingerprint or key.

Image: The USB port for emergency power, located on the exterior handle.

Image: A physical backup key provided for manual access.
6. การบำรุงรักษา
- การทำความสะอาด: Wipe the lock surface with a soft, dry cloth. Avoid abrasive cleaners or solvents that could damage the finish or electronic components.
- การเปลี่ยนแบตเตอรี่: Replace all 4 AAA batteries when the low battery indicator or voice prompt is activated. Do not mix old and new batteries.
- การดูแลรักษาเซ็นเซอร์สแกนลายนิ้วมือ: รักษาเซ็นเซอร์สแกนลายนิ้วมือให้สะอาดและแห้งเพื่อประสิทธิภาพสูงสุด
7 การแก้ไขปัญหา
| ปัญหา | สาเหตุที่เป็นไปได้ | สารละลาย |
|---|---|---|
| ล็อคไม่ตอบสนอง | แบตเตอรี่หมด | เปลี่ยนแบตเตอรี่หรือใช้ไฟสำรองจาก USB |
| ไม่พบลายนิ้วมือ | Finger is wet/dirty, sensor is dirty, or fingerprint not properly registered. | Clean finger and sensor. Re-enroll fingerprint if necessary. Try a different registered finger. |
| ตัวล็อกไม่ล็อกอัตโนมัติ | Lock is in Passage Mode. | Press the mode switching button to return to Normal Mode. |
| Voice prompts are unclear or absent. | Low battery or internal error. | เปลี่ยนแบตเตอรี่ หากปัญหายังคงอยู่ โปรดติดต่อฝ่ายบริการลูกค้า |
8. ข้อมูลจำเพาะ
| คุณสมบัติ | รายละเอียด |
|---|---|
| แบบอย่าง | L-B201 |
| ยี่ห้อ | ฉลาดเกินบรรยาย |
| ประเภทล็อค | Biometric Fingerprint Handle Lock |
| วัสดุ | อลูมิเนียม |
| สี | สีดำ |
| ความจุของลายนิ้วมือ | สูงถึง 20 |
| ปลดล็อคความเร็ว | ประมาณ 0.1 วินาที |
| แหล่งพลังงาน | 4 x แบตเตอรี่ AAA (ไม่รวม) |
| ไฟฟ้าฉุกเฉิน | พอร์ต USB |
| อายุการใช้งานแบตเตอรี่ | 8-12 months (approx.) |
| ความหนาของประตู | 1-3/8'' to 2-1/8'' (35-55mm) |
| สลักแบบปรับได้ | 2-3/8'' (60mm) or 2-3/4'' (70mm) |
| ขนาด (กว้าง x ยาว x สูง) | 6.03 x 2.55 x 2.82 นิ้ว |
| น้ำหนักสินค้า | 2.72 ปอนด์ |
| การเชื่อมต่อ | ไม่มีการเชื่อมต่อบลูทูธหรือ Wi-Fi |
9. การรับประกันและการสนับสนุน
For warranty information and customer support, please refer to the official Geek Smart webตรวจสอบเว็บไซต์หรือติดต่อร้านค้าที่คุณซื้อสินค้ามา เก็บใบเสร็จรับเงินไว้เป็นหลักฐานการซื้อ


