1. บทนำ
ขอบคุณสำหรับการซื้อasing the LEICKE Portable DAB+ Radio. This device offers a versatile listening experience with DAB/DAB+ and FM radio, Bluetooth 5.0 connectivity, and various media playback options. Its compact design and rechargeable battery make it ideal for both indoor and outdoor use. Please read this manual carefully to ensure proper operation and to get the most out of your radio.
2. คำแนะนำด้านความปลอดภัย
- ห้ามให้อุปกรณ์โดนฝน ความชื้น หรืออุณหภูมิที่สูงหรือต่ำเกินไป
- หลีกเลี่ยงการทำอุปกรณ์หล่นหรือกระแทกอย่างรุนแรง
- ห้ามถอดประกอบหรือพยายามซ่อมแซมอุปกรณ์ด้วยตนเอง แนะนำให้ส่งช่างผู้ชำนาญเข้ารับบริการทั้งหมด
- Keep the device away from heat sources such as radiators, stoves, or other heat-producing appliances.
- ใช้เฉพาะสายไฟและอุปกรณ์เสริมที่ให้มาเท่านั้น
- ตรวจสอบให้แน่ใจว่ามีการระบายอากาศที่เหมาะสมรอบ ๆ อุปกรณ์ในระหว่างการทำงาน
3. เนื้อหาบรรจุภัณฑ์
กรุณาตรวจสอบว่าสินค้าทั้งหมดอยู่ในกล่อง:
- 1 x LEICKE Portable DAB+ Radio
- สายไฟ 1 เส้น
- สายสัญญาณเสียง AUX 1 เส้น
- คู่มือเริ่มต้นอย่างรวดเร็ว 1 ชุด

ภาพ: เนื้อหาภายในบรรจุภัณฑ์ของผลิตภัณฑ์
4. สินค้าหมดview
Familiarize yourself with the radio's controls and ports.
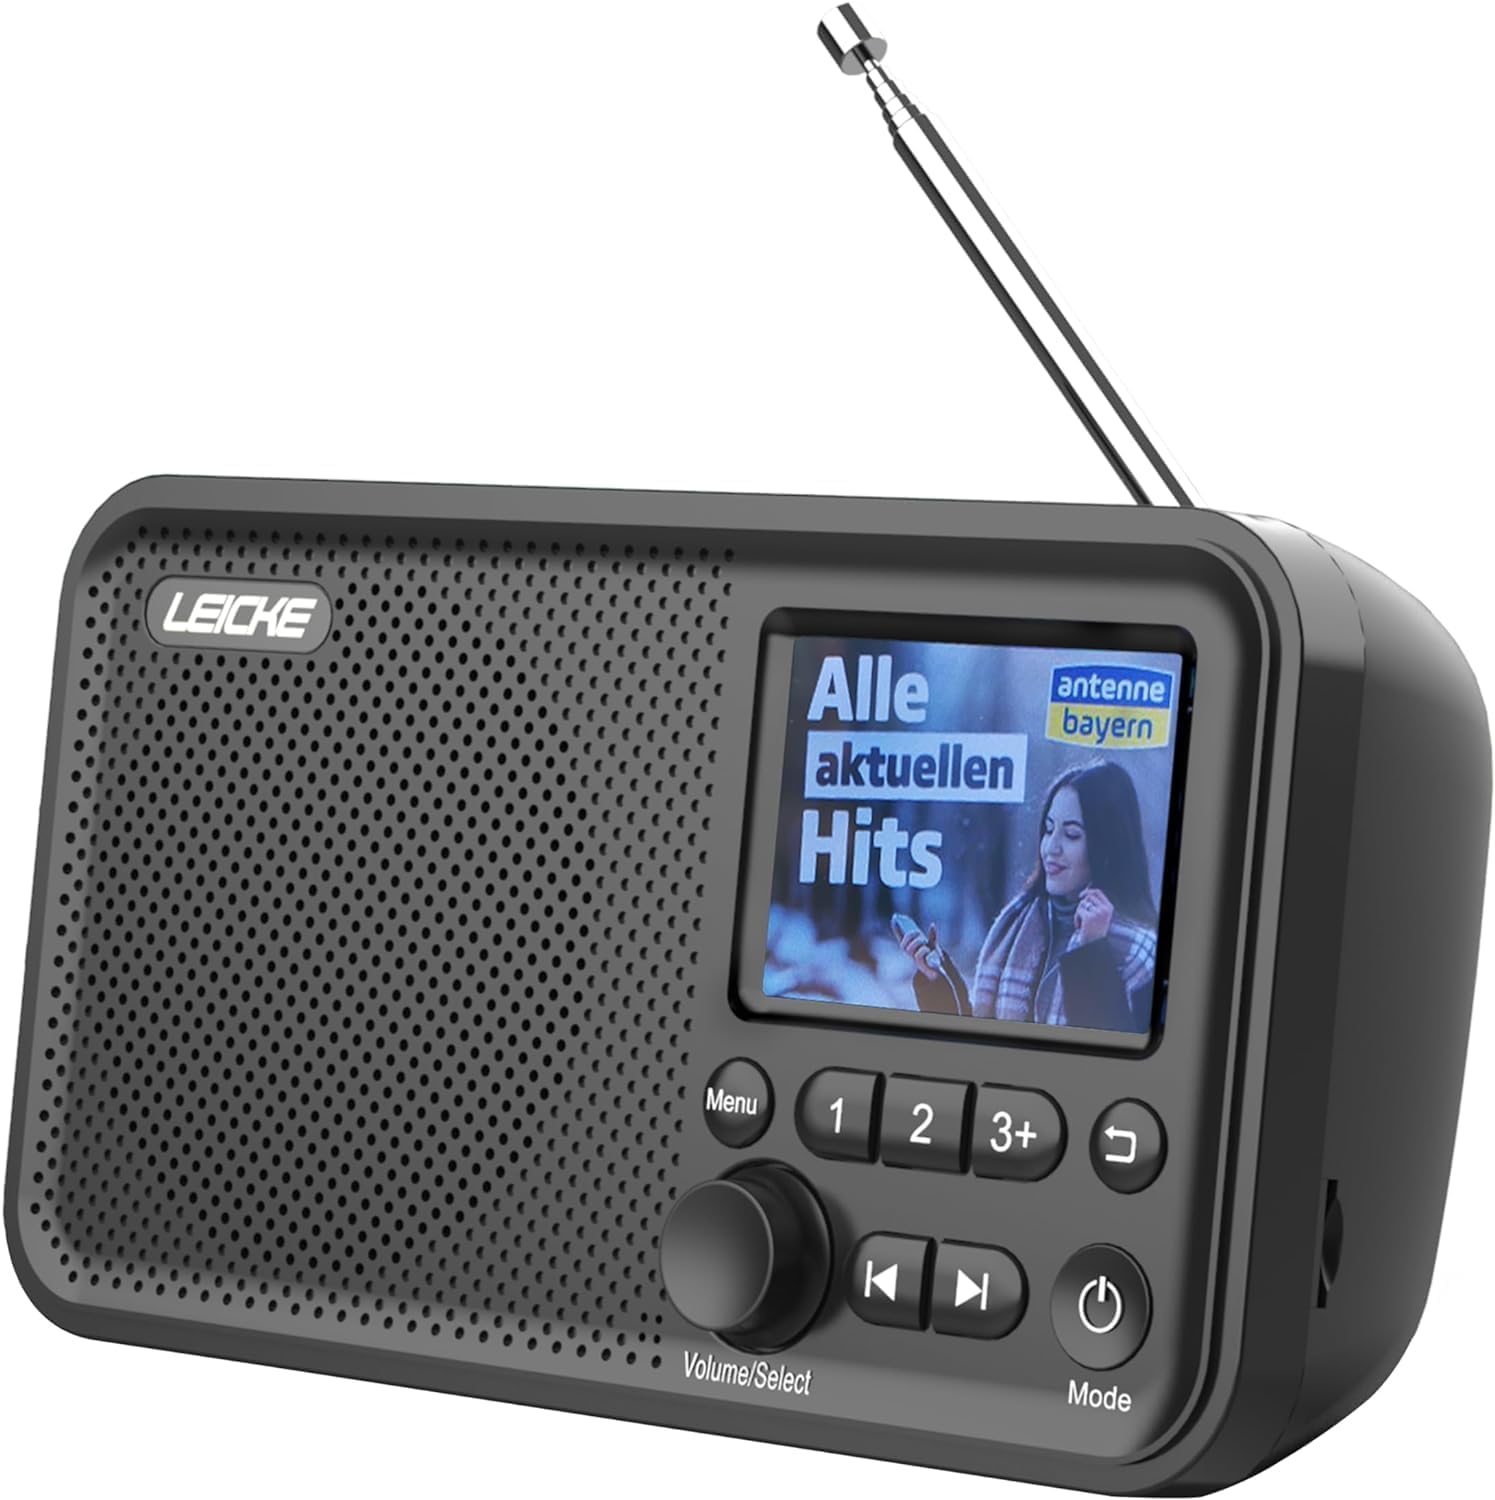
ภาพ: ด้านหน้า view of the LEICKE Portable DAB+ Radio.
การควบคุมและการแสดงผล:
- 2.4-inch Colour Display: แสดงข้อมูลสถานี เวลา และตัวเลือกเมนู
- ปุ่มเมนู: เข้าสู่เมนูหลัก
- Volume/Select Knob: Rotates to adjust volume or navigate menus; presses to select.
- Preset Buttons (1, 2, 3+): Quick access to saved stations.
- ปุ่มก่อนหน้า/ถัดไป: Navigates through stations or tracks.
- ปุ่มย้อนกลับ: กลับไปยังหน้าจอที่แล้ว
- ปุ่มเปิด / ปิดโหมด: Turns the radio on/off and switches between modes (DAB, FM, Bluetooth, AUX, MicroSD).
พอร์ตและการเชื่อมต่อ:

ภาพ: ด้านหลัง view of the radio highlighting the MicroSD/TF card slot and 3.5mm headphone jack.
- เสาอากาศยืดไสลด์: เพื่อการรับสัญญาณวิทยุที่ดีที่สุด
- MicroSD/TF Card Slot: สำหรับการเล่นเสียง fileจากการ์ดหน่วยความจำ
- แจ็คหูฟัง 3.5 มม.: สำหรับการฟังส่วนตัว
- อินพุต AUX: สำหรับเชื่อมต่ออุปกรณ์เสียงภายนอก
- พอร์ต DC 5V: For charging the internal battery and powering the device.
5. การตั้งค่า
5.1 การชาร์จแบตเตอรี่
The radio has a built-in 2000 mAh rechargeable battery. Before first use, fully charge the battery.
- Connect the provided power cable to the DC 5V port on the radio.
- Plug the other end of the power cable into a suitable USB power adapter (not always included) or a powered USB port.
- ไฟแสดงสถานะการชาร์จบนหน้าจอจะแสดงสถานะการชาร์จ
- Once fully charged, the indicator will show a full battery icon.

Image: The radio displaying battery charging status.
5.2 การตั้งค่าเสาอากาศ
For optimal radio reception, extend the telescopic antenna fully.
5.3 Initial Power On & Language Selection
- กดปุ่มค้างไว้ พลังงาน/โหมด ปุ่มเพื่อเปิดวิทยุ
- Upon first use, the radio may prompt you to select a language.
- หมุน Volume/Select knob to scroll through the language options.
- กดปุ่ม Volume/Select ปุ่มเพื่อยืนยันการเลือกของคุณ
6. โหมดการทำงาน
6.1 DAB/DAB+ Radio Mode
The radio supports DAB/DAB+ (Digital Audio Broadcasting) for crystal clear digital radio reception.

Image: The radio displaying radio frequency information.
6.1.1 การสแกนหาสถานี
- กดปุ่ม พลังงาน/โหมด ปุ่มสำหรับสลับไปใช้โหมด DAB
- The radio will automatically perform a full scan for available DAB/DAB+ stations. This may take a few moments.
- Once the scan is complete, the first available station will begin playing.
6.1.2 การเลือกสถานี
- หมุน Volume/Select knob to browse through the list of available stations.
- กดปุ่ม Volume/Select knob to select and tune into a station.
6.1.3 Saving Presets
You can store up to 20 DAB+ stations as presets.
- ปรับคลื่นวิทยุไปที่สถานี DAB+ ที่ต้องการ
- กดปุ่มตั้งค่าล่วงหน้าปุ่มใดปุ่มหนึ่งค้างไว้ (1, 2, หรือ 3+) until the display confirms the station has been saved.
- For presets beyond 3, press and hold 3+, then rotate the Volume/Select knob to choose a preset number (4-20), and press to confirm.
6.1.4 RDS/DLS Information
The 2.4-inch colour display shows station information (DLS - Dynamic Label Segment) and program details (RDS - Radio Data System) where available.
โหมดวิทยุ FM 6.2
The radio supports FM radio with RDS (Radio Data System).
6.2.1 การสแกนหาสถานี
- กดปุ่ม พลังงาน/โหมด ปุ่มเพื่อเปลี่ยนเป็นโหมด FM
- กดปุ่มค้างไว้ Volume/Select knob to initiate an auto-scan for FM stations. The radio will scan and save all strong signals.
6.2.2 การเลือกสถานี
- หมุน Volume/Select knob to manually tune the frequency.
- ใช้ ก่อนหน้า/ถัดไป buttons to jump to the next available strong station.
6.2.3 Saving Presets
You can store up to 40 FM stations as presets, similar to DAB+ mode.
- ปรับไปยังสถานี FM ที่ต้องการ
- กดปุ่มตั้งค่าล่วงหน้าปุ่มใดปุ่มหนึ่งค้างไว้ (1, 2, หรือ 3+) until the display confirms the station has been saved.
- For presets beyond 3, press and hold 3+, then rotate the Volume/Select knob to choose a preset number (4-40), and press to confirm.
6.3 โหมดบลูทู ธ
สตรีมเสียงแบบไร้สายจากอุปกรณ์ที่รองรับบลูทูธของคุณ

Image: The radio displaying Bluetooth connection status.
6.3.1 การจับคู่
- กดปุ่ม พลังงาน/โหมด button to switch to Bluetooth mode. The display will show "Bluetooth" and indicate it's ready for pairing.
- On your Bluetooth device (e.g., smartphone, tablet), enable Bluetooth and search for available devices.
- Select "LEICKE DAB Radio" from the list of devices.
- Once paired, the radio will confirm the connection on its display.
6.3.2 การเล่นเสียง
- Once connected, play audio from your Bluetooth device. The sound will be output through the radio's speaker.
- ใช้ Volume/Select knob on the radio or the volume controls on your connected device to adjust the volume.
- การ ก่อนหน้า/ถัดไป buttons on the radio can control track skipping on your connected device.
6.4 MicroSD/TF Card Playback
เล่นเสียง files directly from a MicroSD/TF card.
6.4.1 Inserting Card
- Ensure the radio is powered off or in another mode.
- Carefully insert a MicroSD/TF card (up to 32GB, FAT32 format) into the card slot until it clicks into place.
6.4.2 การเล่นเสียง
- กดปุ่ม พลังงาน/โหมด button to switch to MicroSD/TF mode.
- The radio will automatically start playing audio fileจากการ์ด
- ใช้ ก่อนหน้า/ถัดไป ปุ่มสำหรับนำทางระหว่างแทร็ก
- หมุน Volume/Select ลูกบิดเพื่อปรับระดับเสียง
อินพุต AUX 6.5 ช่อง
เชื่อมต่ออุปกรณ์เสียงภายนอกโดยใช้สาย AUX ขนาด 3.5 มม.
6.5.1 การเชื่อมต่ออุปกรณ์ภายนอก
- Connect one end of the 3.5mm AUX audio cable to the AUX input port on the radio.
- Connect the other end to the headphone jack or audio output of your external device (e.g., MP3 player, smartphone).
- กดปุ่ม พลังงาน/โหมด ปุ่มเพื่อสลับไปยังโหมด AUX
- Play audio from your external device. The sound will be output through the radio's speaker.
6.6 ฟังก์ชั่นปลุก
The radio features dual alarm clocks.
6.6.1 การตั้งค่าสัญญาณเตือน
- กดปุ่ม เมนู ปุ่ม.
- หมุน Volume/Select knob to navigate to "Alarm" and press to select.
- Select "Alarm 1" or "Alarm 2".
- Follow the on-screen prompts to set the alarm time, source (Buzzer, DAB, or FM), frequency (Once, Daily, Weekdays, Weekends), and volume.
- กดปุ่ม Volume/Select knob to confirm each setting.
6.6.2 Snooze/Stop Alarm
- เมื่อเสียงปลุกดัง ให้กด Volume/Select knob to activate snooze (alarm will sound again after a short period).
- หากต้องการหยุดสัญญาณเตือนโดยสมบูรณ์ ให้กดปุ่ม พลังงาน/โหมด ปุ่ม.
6.7 ตัวตั้งเวลาปิดเครื่อง
Set the radio to automatically turn off after a specified period.
- กดปุ่ม เมนู ปุ่ม.
- หมุน Volume/Select knob to navigate to "Sleep Timer" and press to select.
- Choose the desired sleep duration (e.g., 15, 30, 60, 90, 120 minutes, or Off).
- วิทยุจะปิดเองโดยอัตโนมัติหลังจากเวลาที่กำหนดไว้
7. การบำรุงรักษา
7.1 การทำความสะอาด
- ถอดสายไฟออกทุกครั้งก่อนทำความสะอาด
- ใช้ผ้าแห้งนุ่มเช็ดภายนอกวิทยุ
- ห้ามใช้สารทำความสะอาดที่มีฤทธิ์กัดกร่อน ขี้ผึ้ง หรือตัวทำละลาย เพราะอาจทำให้พื้นผิวเสียหายได้
7.2 การดูแลแบตเตอรี่
- เพื่อยืดอายุการใช้งานแบตเตอรี่ ควรหลีกเลี่ยงการปล่อยแบตเตอรี่จนหมดบ่อยครั้ง
- หากไม่ได้ใช้งานวิทยุเป็นเวลานาน ควรชาร์จแบตเตอรี่ให้เต็มก่อนเก็บรักษา และควรชาร์จใหม่ทุกๆ สองสามเดือน
7.3 พื้นที่จัดเก็บ
- เก็บวิทยุไว้ในที่แห้งและเย็น หลีกเลี่ยงแสงแดดโดยตรงและอุณหภูมิที่สูงหรือต่ำเกินไป
8 การแก้ไขปัญหา
If you encounter issues with your radio, please refer to the following table:
| ปัญหา | สาเหตุที่เป็นไปได้ | สารละลาย |
|---|---|---|
| No power/Radio won't turn on | Battery is depleted; Power cable not connected properly. | ชาร์จแบตเตอรี่ ตรวจสอบให้แน่ใจว่าเสียบสายไฟแน่นดีแล้ว |
| การรับสัญญาณวิทยุไม่ดี (DAB/FM) | เสาอากาศไม่ได้ยืดออก; บริเวณที่มีสัญญาณอ่อน; มีสัญญาณรบกวน | Fully extend the telescopic antenna; Relocate the radio to an area with better signal; Move away from other electronic devices. |
| บลูทูธไม่เชื่อมต่อ | Radio not in Bluetooth mode; Device not in pairing mode; Already connected to another device. | Switch radio to Bluetooth mode; Ensure your device's Bluetooth is on and searching; Disconnect from other devices. |
| No sound from MicroSD/TF card | ใส่บัตรไม่ถูกต้อง; ไม่รองรับ file รูปแบบ; เสียหาย files. | Reinsert the card; Ensure files are in a supported format (e.g., MP3); Try a different card. |
| จอแสดงผลว่างเปล่าหรือค้าง | ซอฟต์แวร์มีปัญหาชั่วคราว | Press and hold the Power/Mode button for 10 seconds to force a restart. |
9. ข้อมูลจำเพาะ

Image: Dimensions of the LEICKE Portable DAB+ Radio.
| คุณสมบัติ | รายละเอียด |
|---|---|
| หมายเลขรุ่น | EP18227 |
| ยี่ห้อ | ลีค |
| ความถี่ตบเบาๆ/ตบเบาๆ+ | 174-240 เมกะเฮิรตซ์ |
| คลื่นความถี่เอฟเอ็ม | 87.5 - 108 เมกะเฮิรตซ์ |
| เวอร์ชันบลูทูธ | 5.0 |
| แสดง | 2.4 inch Colour LCD |
| พรีเซ็ต | 60 (40 FM, 20 DAB+) |
| ความจุของแบตเตอรี่ | 2000 มิลลิแอมป์ |
| แหล่งพลังงาน | Battery Powered / DC 5V |
| การเชื่อมต่อ | Bluetooth, Auxiliary, MicroSD/TF |
| ขนาดสินค้า | 17 x 5.5 x 9.5 ซม. (โดยประมาณ) |
| น้ำหนัก | 370 ก. (โดยประมาณ) |
10. การรับประกันและการสนับสนุน
LEICKE products come with a standard manufacturer's warranty. For detailed warranty terms and conditions, please refer to the warranty card included with your product or visit the official LEICKE webเว็บไซต์.
If you require technical support or have any questions regarding your LEICKE Portable DAB+ Radio, please contact LEICKE customer service through the following channels:
- Webเว็บไซต์: www.leicke.com
- อีเมล: Refer to the contact information on the LEICKE website or your quick start guide.
Please have your model number (EP18227) and purchase details ready when contacting support.


