1. บทนำ
ขอบคุณสำหรับการซื้อasing the IRRADIO VDP-4600HDW LCD/LED Projector. This manual provides essential information for the safe and efficient operation of your device. Please read it thoroughly before use and retain it for future reference.
2. คำแนะนำด้านความปลอดภัย
- อย่าปิดกั้นช่องระบายอากาศ ตรวจสอบให้แน่ใจว่ามีการระบายอากาศรอบ ๆ โปรเจ็กเตอร์อย่างเพียงพอเพื่อป้องกันความร้อนสูงเกินไป
- อย่ามองตรงเข้าไปในเลนส์โปรเจ็กเตอร์เมื่อลamp เปิดอยู่เนื่องจากแสงที่สว่างเกินไปอาจทำให้ดวงตาเสียหายได้
- Keep the projector away from water or other liquids. Do not operate in damp หรือสภาวะเปียกชื้น
- ใช้เฉพาะอะแดปเตอร์ไฟฟ้าที่มาพร้อมกับโปรเจ็กเตอร์เท่านั้น
- อย่าพยายามซ่อมโปรเจคเตอร์ด้วยตนเอง โปรดส่งซ่อมโดยช่างผู้ชำนาญการเท่านั้น
- วางโปรเจ็กเตอร์บนพื้นผิวที่มั่นคงและระดับเพื่อป้องกันไม่ให้ตก
3. เนื้อหาบรรจุภัณฑ์
กรุณาตรวจสอบว่ามีรายการทั้งหมดอยู่ในแพ็คเกจของคุณ:
- IRRADIO VDP-4600HDW Projector
- รีโมทคอนโทรล
- สายไฟ
- สาย HDMI
- เคเบิ้ล AV
- คู่มือการใช้งาน
4. สินค้าหมดview
4.1. ส่วนประกอบของโปรเจคเตอร์

รูปที่ 4.1: โดยรวม view of the IRRADIO VDP-4600HDW Projector. This image displays the projector from an angled perspective, highlighting its compact design and the lens on the front left side, with ventilation grilles and control buttons visible on the top and sides.

รูปที่ 4.2: ด้านหน้า view of the projector. This image focuses on the large projection lens on the left, with the IRRADIO logo and ventilation grilles on the right side of the front panel.

รูปที่ 4.3: หลัง view of the projector. This image shows the VGA port, focus adjustment knob, and keystone correction knob on the rear panel, along with additional ventilation.
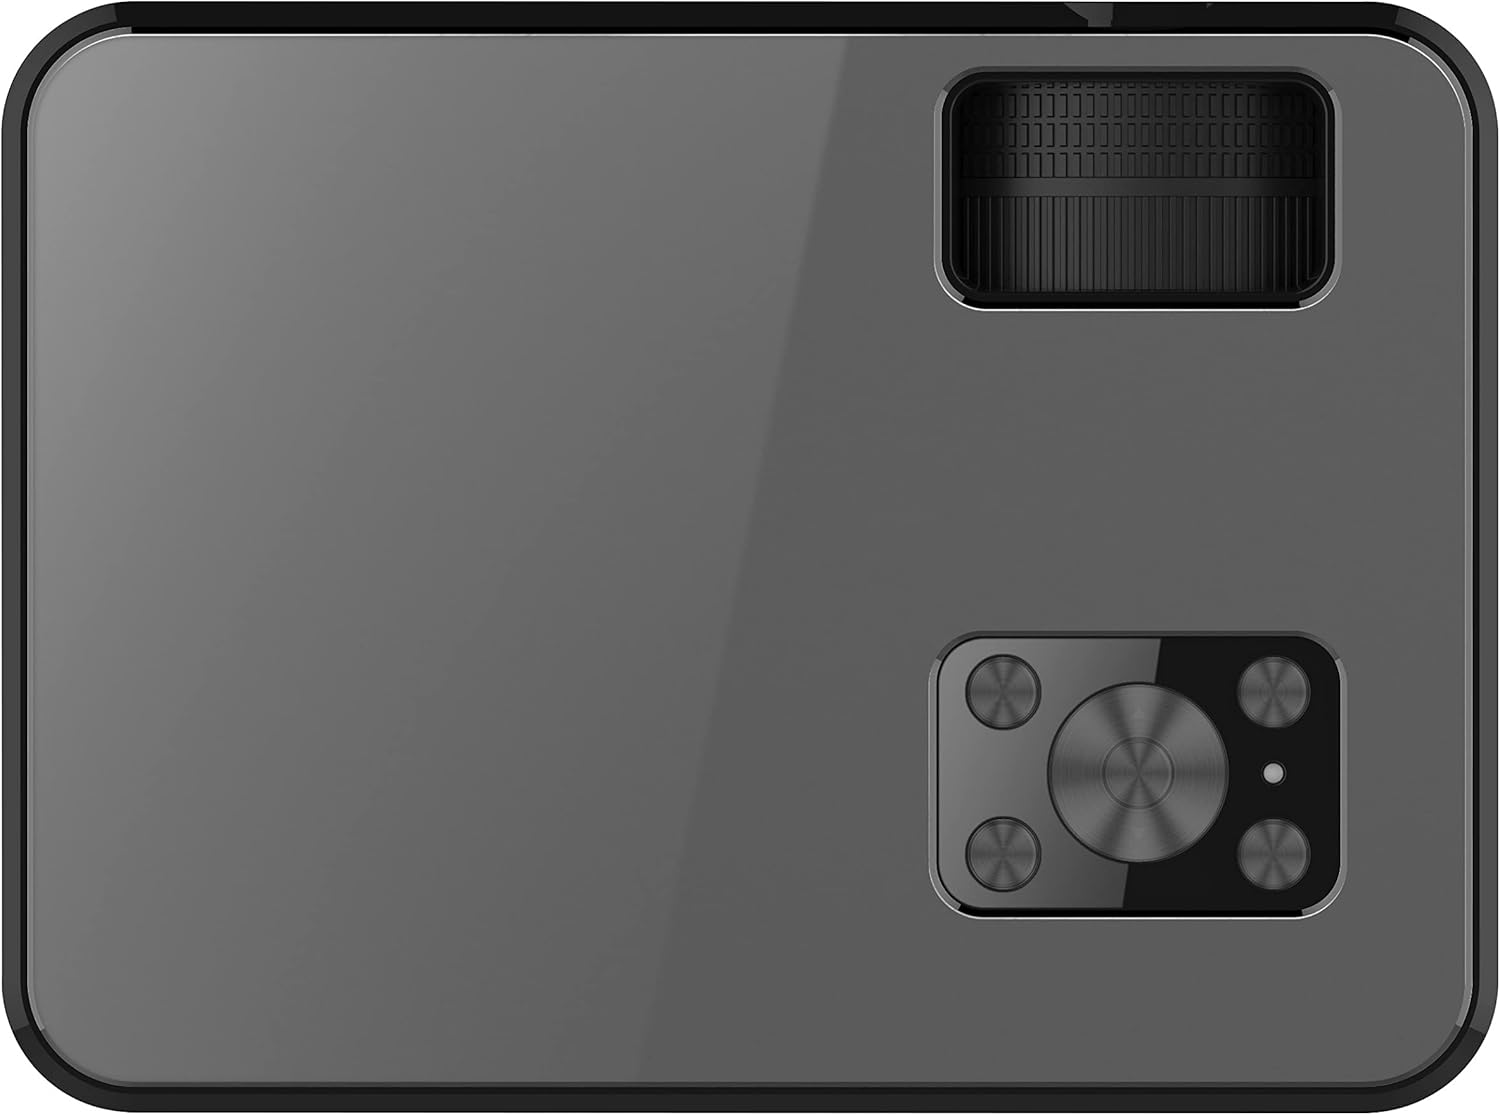
รูปที่ 4.4: สูงสุด view of the projector. This image displays the control panel with navigation buttons (up, down, left, right, OK), source, menu, and exit buttons, along with the power button and volume controls.

รูปที่ 4.5: ด้านข้าง view of the projector showing input/output ports. This image highlights two HDMI ports, AV input, two USB ports, and a 3.5mm headphone jack (audio out).

รูปที่ 4.6: ฝั่งตรงข้าม view of the projector. This image shows the power input port and additional ventilation grilles.

รูปที่ 4.7: ด้านล่าง view of the projector. This image displays the mounting points for ceiling installation and rubber feet for stable placement on a flat surface.
4.2. รีโมทคอนโทรล
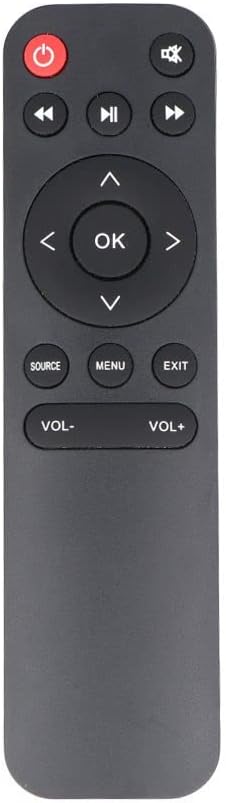
รูปที่ 4.8: The remote control for the IRRADIO VDP-4600HDW Projector. It features buttons for power, mute, navigation (up, down, left, right, OK), source selection, menu, exit, and volume control.
4.3. Ports and Controls Overview
- ปุ่มเปิด/ปิด: เปิด/ปิดโปรเจ็กเตอร์
- เลนส์: ฉายภาพภาพลักษณ์
- วงแหวนโฟกัส: ปรับความคมชัดของภาพ
- การแก้ไขคีย์สโตน: Adjusts image distortion.
- พอร์ต HDMI (x2): Connect to HDMI-enabled devices (laptops, gaming consoles, Blu-ray players).
- พอร์ต USB (x2): เชื่อมต่อไดรฟ์ USB สำหรับการเล่นสื่อ
- พอร์ต VGA: เชื่อมต่อกับคอมพิวเตอร์ที่มีพอร์ต VGA
- พอร์ต AV: Connect to older devices using composite video.
- เอาต์พุตเสียง 3.5 มม.: เชื่อมต่อลำโพงภายนอกหรือหูฟัง
- ตัวรับสัญญาณ IR: สำหรับสัญญาณควบคุมระยะไกล
5. การตั้งค่า
5.1 การวาง
Place the projector on a stable, flat surface or mount it to the ceiling. Ensure the projector is positioned directly in front of the projection screen or wall. The optimal projection distance ranges from 1.52 meters to 3.48 meters, yielding a screen size between 50 and 120 inches.
- การฉายภาพด้านหน้า: Place the projector in front of the screen.
- การยื่นออกด้านหลัง: วางโปรเจ็กเตอร์ไว้ด้านหลังฉากกั้นโปร่งแสง
- ติดเพดาน: The projector can be inverted and mounted to the ceiling. Adjust settings in the OSD menu for inverted projection.
5.2. การเชื่อมต่อไฟฟ้า
- เชื่อมต่อสายไฟเข้ากับพอร์ตอินพุตไฟของโปรเจ็กเตอร์
- Plug the other end of the power cable into a standard electrical outlet (220V AC, 50Hz).
- กดปุ่มเปิด/ปิดบนโปรเจ็กเตอร์หรือรีโมทคอนโทรลเพื่อเปิดเครื่อง
5.3 การปรับโฟกัสและคีย์สโตน
- เปิดโปรเจ็กเตอร์และแสดงภาพ
- หมุน วงแหวนโฟกัส (located near the lens) until the image appears sharp and clear.
- ปรับแต่ง Keystone Correction knob (located on the rear panel) to correct any trapezoidal distortion, making the image rectangular.
6. ปฏิบัติการ
6.1. เปิด/ปิดเครื่อง
กดปุ่มเปิด/ปิดบนโปรเจคเตอร์หรือรีโมทคอนโทรลเพื่อเปิดหรือปิดเครื่อง
6.2. การเลือกแหล่งอินพุต
หลังจากเปิดเครื่องแล้วให้กดปุ่ม แหล่งที่มา button on the remote control or the projector's control panel to cycle through available input sources (HDMI1, HDMI2, USB1, USB2, VGA, AV).
6.3. การเชื่อมต่ออุปกรณ์ภายนอก
- ช่องต่อ HDMI: Connect an HDMI cable from your device (e.g., laptop, game console) to one of the projector's HDMI ports. Select the corresponding HDMI input.
- VGA: Connect a VGA cable from your computer to the projector's VGA port. Select the VGA input.
- เอวี: Use the provided AV cable to connect to devices with composite video output. Select the AV input.
- ยูเอสบี: Insert a USB flash drive into a USB port. The projector's media player interface will appear automatically or can be accessed via the source menu.
6.4. การเล่นสื่อ (USB)
The integrated media player supports various formats:
- รูปแบบภาพ: JPEG, BMP, PNG, MPO
- รูปแบบวิดีโอ: MPEG1, MPEG2, H.263, H.264, AVS, MJPEG, RV30, RV40, HEVC
- รูปแบบเสียง: MPEG1, MPEG2, LPCM, MP3
นำทางผ่าน files using the remote control's arrow keys and press OK ที่จะเลือก
6.5. Wireless Audio Connection
The projector features an integrated wireless audio function for connecting to external audio devices. Refer to the on-screen display (OSD) menu for specific pairing instructions. Typically, you will need to enable the wireless audio feature in the projector's settings and then pair it with your desired external speaker or headphone.
7. การบำรุงรักษา
7.1. การทำความสะอาดเลนส์
Use a soft, lint-free cloth and a specialized lens cleaning solution to gently wipe the lens. Avoid abrasive materials or excessive pressure.
7.2. การทำความสะอาดแผ่นกรองฝุ่น
Regularly check and clean the dust filters to ensure optimal airflow and prevent overheating. Use a soft brush or a vacuum cleaner with a brush attachment to remove dust from the ventilation grilles.
7.3. การจัดเก็บ
When not in use for extended periods, store the projector in a cool, dry place, protected from dust and direct sunlight. Use the original packaging or a protective case.
8 การแก้ไขปัญหา
- ไม่มีไฟฟ้า: ตรวจสอบให้แน่ใจว่าสายไฟเชื่อมต่อแน่นหนาและปลั๊กไฟใช้งานได้ปกติ
- ไม่มีรูป: Check the input source selection. Ensure the connected device is powered on and sending a signal. Verify cable connections.
- ภาพเบลอ: Adjust the focus ring. Ensure the projection distance is within the optimal range.
- Image Distorted: ปรับแก้คีย์สโตน
- ไม่มีเสียง: Check the volume settings on both the projector and the connected device. If using external speakers, ensure they are properly connected or paired via wireless audio.
- รีโมทคอนโทรลไม่ทำงาน: เปลี่ยนแบตเตอรี่ ตรวจสอบให้แน่ใจว่าไม่มีสิ่งกีดขวางระหว่างรีโมทและตัวรับสัญญาณอินฟราเรดของโปรเจ็กเตอร์
9. ข้อมูลจำเพาะ
| คุณสมบัติ | ข้อมูลจำเพาะ |
|---|---|
| ระบบฉายภาพ | LCD panel with LED light source |
| ความละเอียดดั้งเดิม | 1920x1080 (Full HD 1080p) |
| อัตราส่วนคอนทราสต์แบบไดนามิก | 2000:1 น. |
| ความสว่างของแหล่งกำเนิดแสง | 3000 ลูเมน |
| แอลอีดีแอลamp ชีวิต | 50,000 ชั่วโมง |
| เลนส์ | โฟกัสแบบแมนนวล |
| ฟังก์ชั่นเสียงไร้สาย | บูรณาการ |
| การเชื่อมต่อ | 2x HDMI, 2x USB, VGA, AV Composite, 3.5mm Headphone Jack (output) |
| อัตราส่วนภาพ | 16:9 Native / 4:3 Compatible |
| ขนาดการฉายภาพที่เหมาะสมที่สุด | 50" - 120" |
| ระยะฉายภาพที่เหมาะสมที่สุด | 1.52 ม. ถึง 3.48 ม. |
| โหมดการฉายภาพ | Front, Rear, Ceiling (Front/Rear) |
| เสียง | 1x 3W Hi-Fi Speaker |
| ระบบระบายความร้อน | ระบบทำความเย็นแบบคู่ |
| ภาษา OSD | 23 ภาษา |
| แหล่งจ่ายไฟ | 220V AC 50Hz (single phase) |
| น้ำหนัก | 1.4 กก. |
| ขนาด (กว้าง x สูง x ลึก) | 222 x 91 x 173 มม. |
10. การรับประกันและการสนับสนุน
Information regarding specific warranty terms and support contacts is not available in the provided product data. Please refer to the product packaging or the retailer's webเว็บไซต์สำหรับรายละเอียดการรับประกันและข้อมูลการสนับสนุนลูกค้า


