1. บทนำ
This user manual provides detailed instructions for the installation, operation, and maintenance of your ESCAM WNK710 3MP Wireless WiFi IP Camera. This smart home indoor camera is designed for monitoring various indoor environments such as nurseries, pet areas, garages, or yards, offering features like 3MP high-definition video, two-way audio, motion detection, and night vision capabilities. Please read this manual thoroughly before using the product to ensure proper and safe operation.

Figure 1: ESCAM WNK710 3MP Wireless WiFi IP Camera, front view.
2. ข้อมูลด้านความปลอดภัย
- Use only the power adapter provided with the camera. Using unauthorized power sources may damage the device and void the warranty.
- Do not expose the camera to extreme temperatures, humidity, or direct sunlight. This product is designed for indoor use.
- หลีกเลี่ยงการวางกล้องไว้ใกล้สนามแม่เหล็กแรงสูงหรือแหล่งรบกวน
- อย่าพยายามถอดประกอบหรือดัดแปลงกล้อง โปรดติดต่อช่างผู้ชำนาญเพื่อขอรับบริการทั้งหมด
- เก็บกล้องและอุปกรณ์เสริมให้พ้นมือเด็กและสัตว์เลี้ยง
- Ensure the camera is securely mounted to prevent accidental falls.
3. อะไรอยู่ในกล่อง
ตรวจสอบว่ามีส่วนประกอบทั้งหมดอยู่ในแพ็คเกจก่อนดำเนินการติดตั้ง
- ESCAM WNK710 WiFi IP Camera (x1)
- 12V 2A Power Adapter (x1)
- Screw Pack (x1)
- คู่มือเริ่มต้นอย่างรวดเร็ว (x1)
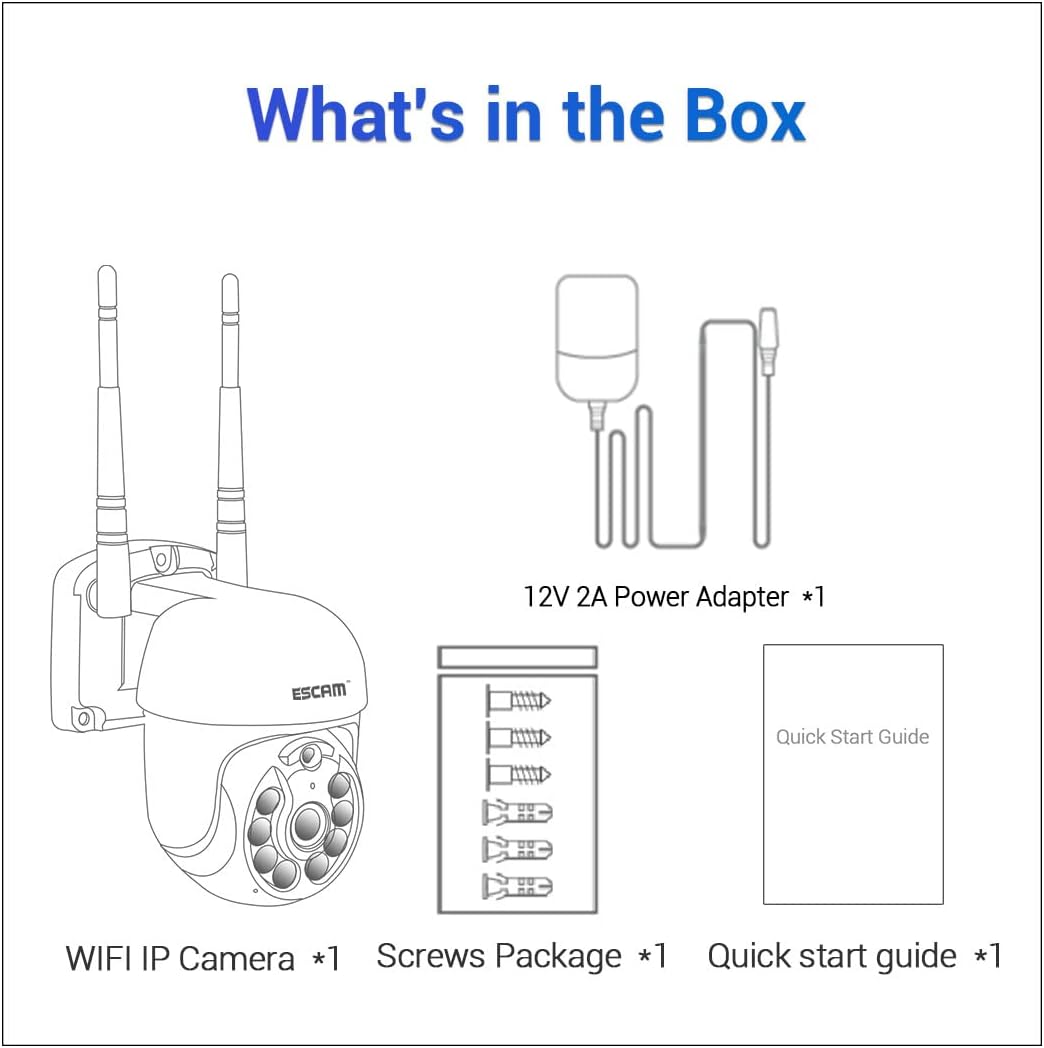
Figure 2: Package contents including the camera, power adapter, screws, and quick start guide.
4. สินค้าหมดview
Familiarize yourself with the various parts and interfaces of the ESCAM WNK710 camera.
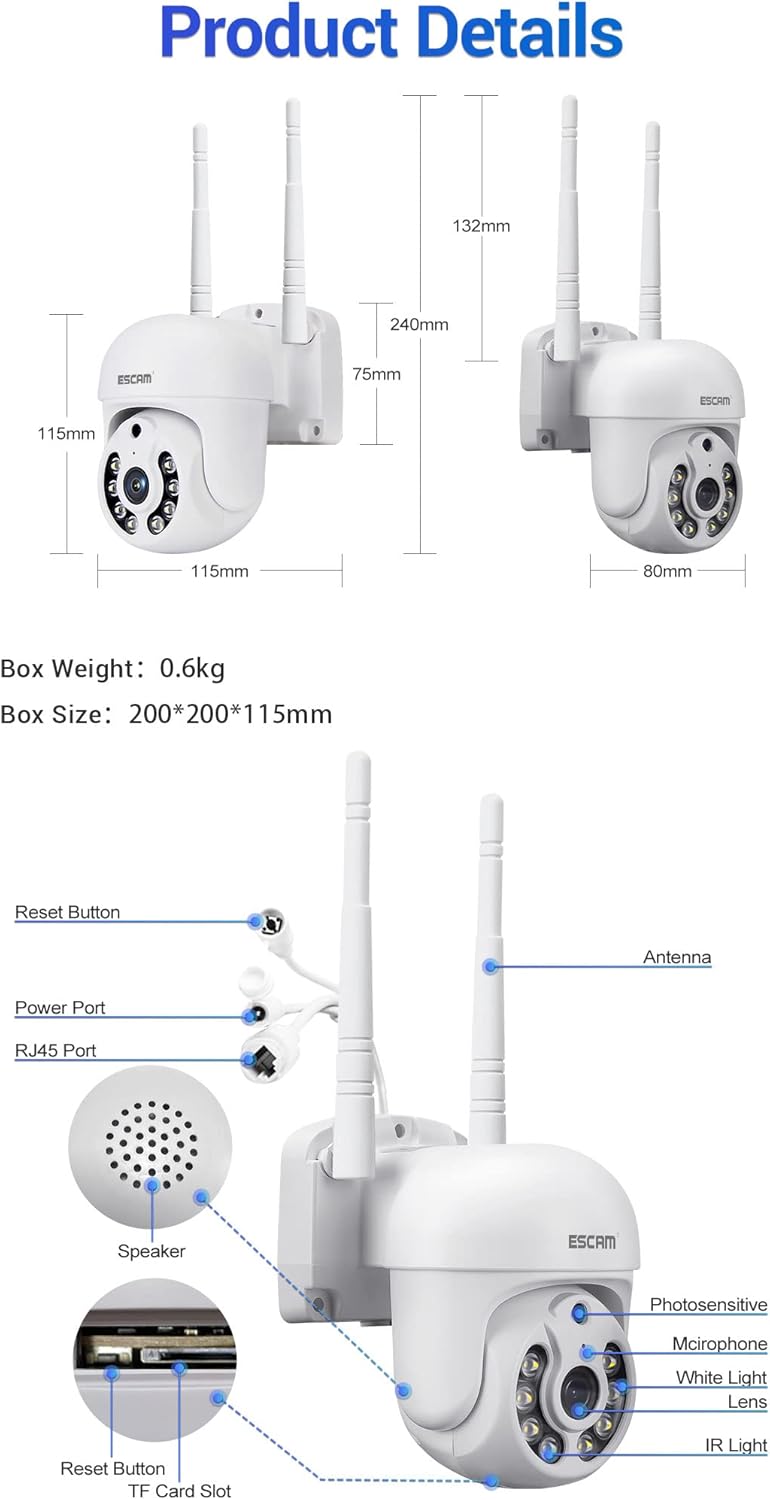
รูปที่ 3: รายละเอียด view of the camera showing dimensions, reset button, power port, RJ45 port, speaker, photosensitive sensor, microphone, white light LEDs, lens, IR light LEDs, and TF card slot.
- เลนส์: จับภาพวิดีโอ footage.
- IR Light LEDs: ให้แสงสว่างอินฟราเรดเพื่อการมองเห็นในเวลากลางคืน
- ไฟ LED สีขาว: Provide white light illumination for full-color night vision and deterrence.
- เซ็นเซอร์รับแสง: ตรวจจับระดับแสงโดยรอบเพื่อสลับระหว่างโหมดกลางวันและกลางคืน
- ไมโครโฟน: บันทึกเสียงเพื่อการสื่อสารสองทางและการบันทึกเสียง
- ผู้บรรยาย: ส่งสัญญาณเสียงเพื่อการสื่อสารสองทาง
- เสาอากาศ: For wireless (WiFi) connectivity.
- พอร์ตไฟ: Connects to the 12V 2A power adapter.
- พอร์ต RJ45: สำหรับการเชื่อมต่ออีเทอร์เน็ตแบบมีสาย
- ปุ่มรีเซ็ต: ใช้เพื่อรีเซ็ตกล้องให้กลับเป็นการตั้งค่าจากโรงงาน
- ช่องเสียบการ์ด TF: Supports up to 128GB Micro SD card for local storage.
5. การตั้งค่า
5.1 การติดตั้งทางกายภาพ
The camera can be wall-mounted or placed on a flat surface. For wall mounting, use the provided screw pack.
- เลือกตำแหน่งที่เหมาะสมสำหรับกล้องโดยให้แน่ใจว่าจะมองเห็นได้ชัดเจน view of the area you wish to monitor and is within range of your WiFi network (if using wireless).
- ใช้ฐานของกล้องเป็นแบบในการทำเครื่องหมายจุดที่จะเจาะบนผนัง
- เจาะรูและติดตั้งพุกยึดผนัง (ถ้าจำเป็น)
- ยึดกล้องเข้ากับผนังโดยใช้สกรูที่ให้มา
5.2 การเชื่อมต่อสายไฟ
Connect the provided 12V 2A power adapter to the camera's power port and then plug it into a power outlet. The camera will power on and initiate its self-test sequence.
5.3 การเชื่อมต่อเครือข่าย
The ESCAM WNK710 supports both WiFi and wired Ethernet connections.

Figure 4: Connection methods for the camera, including direct AP connection to a phone and WiFi connection via a router.
5.3.1 การเชื่อมต่อ WiFi
- ดาวน์โหลด อีซี่คลาวด์ ดาวน์โหลดแอปจากแอปสโตร์ของอุปกรณ์มือถือของคุณ (iOS App Store หรือ Google Play Store)
- ลงทะเบียนบัญชีและเข้าสู่ระบบ
- แตะไอคอน "+" ในแอปเพื่อเพิ่มอุปกรณ์ใหม่
- Select "WiFi Camera" and follow the on-screen instructions to connect the camera to your home WiFi network. This typically involves scanning a QR code on the camera or entering your WiFi credentials.
- Once connected, the camera's status indicator will change, and you will see the camera added to your device list in the app.
5.3.2 Wired Ethernet Connection
For a stable connection, you can use the RJ45 Ethernet port.
- ต่อปลายด้านหนึ่งของสายอีเธอร์เน็ตเข้ากับพอร์ต RJ45 ของกล้อง
- เชื่อมต่อปลายอีกด้านของสายอีเธอร์เน็ตเข้ากับพอร์ต LAN ที่พร้อมใช้งานบนเราเตอร์หรือสวิตช์เครือข่ายของคุณ
- The camera will automatically obtain an IP address via DHCP.
- เปิด อีซี่คลาวด์ app, tap "+" to add a device, and select "Wired Camera" or "ค้นหา devices on LAN" to discover and add the camera.
6. คู่มือการใช้งาน
6.1 สด View
After successfully adding the camera to the EseeCloud app, tap on the camera's name in the device list to access the live video feed. You can view ฟูแบบเรียลไทม์tagถ่ายภาพจากกล้องของคุณได้ทุกที่ทุกเวลา
6.2 การควบคุมแพน/เอียง
The ESCAM WNK710 features pan and tilt functionality, allowing you to remotely adjust the camera's viewมุมอิง
- ในไลฟ์สด view interface of the EseeCloud app, use the directional controls (usually an on-screen joystick or arrows) to pan the camera horizontally (350°) and tilt it vertically (90°).
6.3 เสียงสองทาง
The camera is equipped with a built-in microphone and speaker for two-way audio communication.
- To speak through the camera, tap the microphone icon in the live view interface of the app. Hold the button to speak, and release to listen.
- Ensure your phone's microphone is enabled for the EseeCloud app.
6.4 การตรวจจับการเคลื่อนไหวและการแจ้งเตือน
กล้องสามารถตรวจจับการเคลื่อนไหวและส่งการแจ้งเตือนไปยังอุปกรณ์มือถือของคุณได้
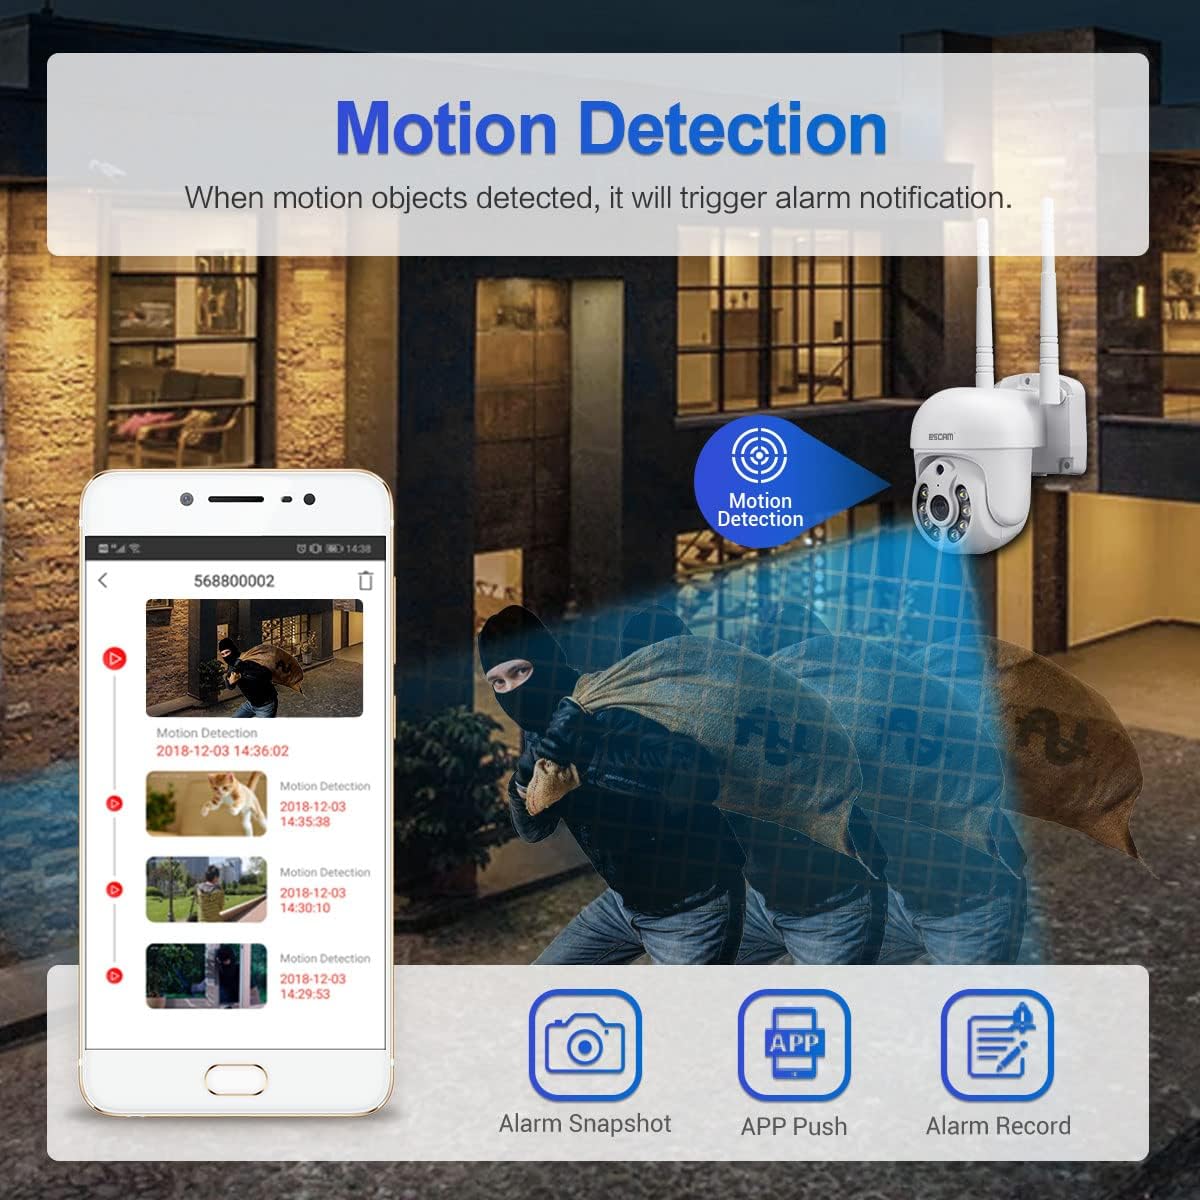
Figure 5: Illustration of motion detection triggering an alarm notification on a mobile phone, with options for alarm snapshot, app push, and alarm record.
- Navigate to the camera settings in the EseeCloud app.
- เปิดใช้งาน "การตรวจจับการเคลื่อนไหว" และปรับระดับความไวตามต้องการ
- You can also set up specific detection zones and schedules.
- When motion is detected, the camera will trigger an alarm notification, send a push alert to your phone, and can record video clips.
- The camera features intelligent humanoid detection to reduce false positives.
6.5 โหมดการมองเห็นตอนกลางคืน
The ESCAM WNK710 offers three intelligent night vision modes for clear monitoring in low-light conditions.
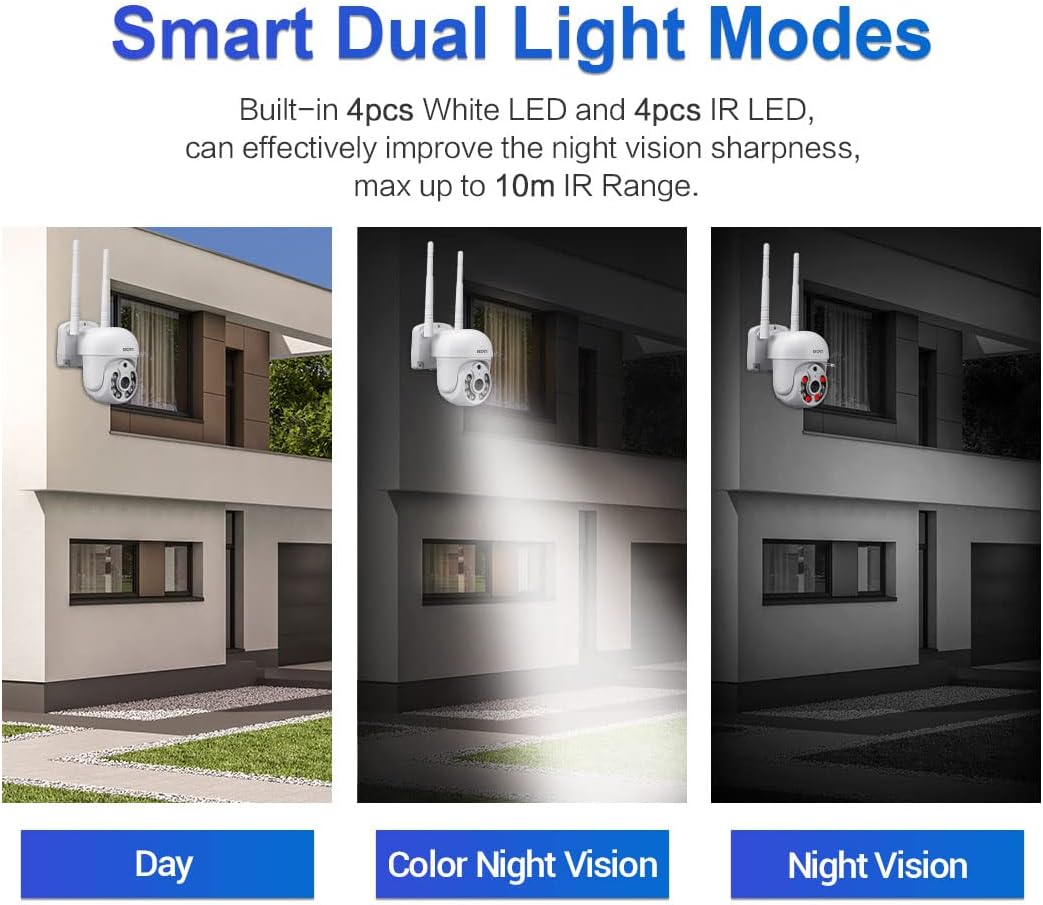
Figure 6: Comparison of Day mode, Color Night Vision mode (using white LEDs), and Night Vision mode (using IR LEDs).
- Infrared Mode (Black/White Night Vision): Uses IR LEDs for clear black and white images in complete darkness, up to 10m range.
- Full-Color Mode (Color Night Vision): Activates the built-in white light LEDs to provide full-color video even in low light. This mode can also act as a deterrent.
- โหมดอัจฉริยะ: The camera automatically switches between IR and white light based on detected motion or specific settings, providing full-color video when activity is detected.
- You can select your preferred night vision mode in the EseeCloud app settings.
6.6 การบันทึกและการเล่น
The camera supports continuous recording, motion-triggered recording, and scheduled recording to a Micro SD card (up to 128GB, not included) or cloud storage (subscription may be required).
- การติดตั้งการ์ด Micro SD: Insert a Micro SD card into the TF card slot on the camera. Ensure the camera is powered off before inserting or removing the card.
- การเล่นซ้ำ: In the EseeCloud app, navigate to the playback section to view บันทึกเสียงฟูtage. คุณสามารถกรองข้อมูลตามวันที่และเวลาได้
7. การบำรุงรักษา
- การทำความสะอาด: ใช้ผ้านุ่มและแห้งเช็ดเลนส์และตัวกล้อง ห้ามใช้น้ำยาทำความสะอาดหรือวัสดุขัดถู
- อัพเดตเฟิร์มแวร์: Regularly check for firmware updates through the EseeCloud app. Updates can improve performance, add new features, and enhance security. Follow the app's instructions carefully during updates.
- การจัดการการ์ด SD: If using an SD card, periodically check its status in the app. Format the card occasionally to maintain optimal recording performance.
8 การแก้ไขปัญหา
| ปัญหา | สาเหตุที่เป็นไปได้ / วิธีแก้ไข |
|---|---|
| กล้องออฟไลน์ในแอป |
|
| ไม่สามารถเชื่อมต่อ WiFi ได้ |
|
| No sound from camera or app. |
|
| ไม่ได้รับการแจ้งเตือนการตรวจจับการเคลื่อนไหว |
|
| ไม่สามารถบันทึกข้อมูลลงการ์ด SD ได้ |
|
9. ข้อมูลจำเพาะ
| คุณสมบัติ | รายละเอียด |
|---|---|
| แบบอย่าง | WNK710 |
| พิกเซล | 3 Million Pixels (2304*1296) |
| เซ็นเซอร์ | เซ็นเซอร์ CMOS ขนาด 1/2.7 นิ้ว |
| การประมวลผลวิดีโอ | H.264/H.265 video encoding, support dual stream |
| อัตราเฟรม | 15 เฟรมต่อวินาที |
| โหมดกลางวันและกลางคืน | IR-CUT infrared filter, supports infrared / full color / smart modes |
| การประมวลผลเสียง | G.711 codec standard, support audio and video synchronization |
| พอร์ตเสียง | 1 input (MIC/pickup), 1 output (speaker) |
| เครือข่ายแบบมีสาย | 1 RJ45 Ethernet interface, 10/100M adaptive |
| เครือข่ายไร้สาย | 802.11b/g/n (2.4GHz WiFi) |
| พื้นที่จัดเก็บ | Support 128G Micro SD card (not included) |
| การมองเห็นตอนกลางคืน | 4 infrared LEDs + 4 white light LEDs |
| แพน/เอียง | แพน 350° / เอียง 90° |
| แหล่งจ่ายไฟ | 12V 2A (Power adapter included) |
| ขนาด (กว้าง x ยาว x สูง) | 7.87 x 7.87 x 4.72 นิ้ว (200 x 200 x 115 มม.) |
| น้ำหนักสินค้า | 1.76 ปอนด์ (0.8 กก.) |
| การใช้งานภายใน/ภายนอกอาคาร | ในร่ม |
10. การรับประกันและการสนับสนุน
For technical support, troubleshooting assistance, or warranty inquiries, please contact visiPower customer service. Refer to the contact information provided in the Quick Start Guide or on the official visiPower webเว็บไซต์.
Please note that protection plans are available for purchase separately to extend coverage beyond the standard manufacturer's warranty. These plans are offered by third-party providers and details can be found where the product was purchased.
