1. บทนำ
This manual provides comprehensive instructions for the installation, operation, and maintenance of your COUGAR Archon 2 RGB Mid Tower Case. Please read this manual carefully before beginning installation to ensure proper setup and to maximize the performance and longevity of your product.

รูปที่ 1.1: มุม view of the COUGAR Archon 2 RGB Mid Tower Case, showcasing the tempered glass side panel and front RGB fans.
2. คุณสมบัติของผลิตภัณฑ์
The COUGAR Archon 2 RGB Mid Tower Case is designed for PC enthusiasts seeking a balance of aesthetics, airflow, and functionality. Key features include:
- Elegant Design with Tempered Glass: A sleek black finish combined with a tempered glass side panel allows for a clear view of internal components and RGB lighting.
- การไหลเวียนของอากาศที่ปรับให้เหมาะสม: Supports multiple fan configurations and includes three pre-installed 120mm ARGB fans at the front for efficient cooling.
- ความเข้ากันได้อย่างกว้างขวาง: Accommodates Mini ITX, Micro ATX, and ATX motherboards.
- Ampตัวเลือกการจัดเก็บข้อมูล: Provides bays for both 3.5" HDDs and 2.5" SSDs.
- Convenient Front I/O: Features USB 3.0 and USB 2.0 ports for easy peripheral connectivity.
- การควบคุมแสง RGB: Integrated ARGB fans offer customizable lighting effects.

รูปที่ 2.1 : ด้านหน้า view of the COUGAR Archon 2 RGB case, highlighting the three pre-installed ARGB fans.
3. คู่มือการติดตั้ง
Follow these steps to properly install your components into the COUGAR Archon 2 RGB case.
3.1. รายการตรวจสอบก่อนการติดตั้ง
- Ensure you have all necessary components: motherboard, CPU, RAM, GPU, power supply, storage drives, and appropriate tools (screwdriver, zip ties).
- Work on a clean, static-free surface. Consider using an anti-static wrist strap.
3.2. การเปิดคดี
- Carefully remove the tempered glass side panel by unscrewing the thumbscrews located at the rear of the case. Set the panel aside on a soft, flat surface to prevent scratches.
- Remove the opposite metal side panel by unscrewing its thumbscrews and sliding it backward.
3.3. การติดตั้งเมนบอร์ด
- ติดตั้งแผ่นปิดพอร์ต I/O (หากยังไม่ได้ติดตั้งไว้กับเมนบอร์ด) เข้ากับช่องเปิดด้านหลังของเคส
- Align your motherboard with the standoffs inside the case. Ensure all standoffs match the screw holes on your motherboard.
- ยึดเมนบอร์ดด้วยสกรูที่ให้มา อย่าขันแน่นเกินไป
3.4. การติดตั้งชุดจ่ายไฟ (PSU)
- ค้นหาพื้นที่ติดตั้ง PSU ที่ด้านหลังล่างของเคส
- Slide your PSU into the designated bay from the rear of the case, ensuring the fan faces downwards for optimal cooling (if the case has a bottom vent).
- ยึดพาวเวอร์ซัพพลายด้วยสกรูจากด้านหลังของเคส
3.5. การติดตั้งไดรฟ์จัดเก็บข้อมูล
The Archon 2 RGB supports both 3.5" HDDs and 2.5" SSDs.
- For 3.5" HDDs: Locate the drive cage usually beneath the PSU shroud. Slide the HDD into the drive bay and secure it with screws.
- For 2.5" SSDs: Mount SSDs to the designated mounting points on the back of the motherboard tray or within the drive cage, securing them with screws.
3.6 การติดตั้งการ์ดขยาย (GPU)
- ถอดฝาครอบสล็อต PCIe ที่จำเป็นออกจากด้านหลังของเคส
- Insert your graphics card or other expansion cards into the appropriate PCIe slot on the motherboard.
- Secure the card with screws to the case.
3.7. Cable Management and Front Panel Connections
Route all power and data cables neatly behind the motherboard tray. Connect the front panel I/O cables (USB, audio, power switch, reset switch, LED indicators) to their respective headers on the motherboard according to your motherboard manual.

Figure 3.1: Dimensions of the COUGAR Archon 2 RGB case, useful for planning component fit and space.
4. คู่มือการใช้งาน
4.1. เปิดเครื่อง
Once all components are installed and cables are connected, replace both side panels. Connect your monitor, keyboard, mouse, and power cable to the PSU. Press the power button on the top panel of the case to start your system.
4.2. การควบคุมแสง RGB
The pre-installed ARGB fans are typically controlled via a dedicated button on the case's front I/O panel or through your motherboard's RGB software (if connected to an ARGB header). Refer to your motherboard manual for software-based control options.
5. การบำรุงรักษา
การบำรุงรักษาตามปกติจะช่วยให้มั่นใจได้ถึงประสิทธิภาพสูงสุดและอายุการใช้งานที่ยาวนานของส่วนประกอบพีซีของคุณ
- การทำความสะอาดฝุ่น: Periodically clean dust filters (if present) and internal components using compressed air. Ensure the system is powered off and unplugged before cleaning.
- การจัดการสายเคเบิล: Ensure cables are neatly routed to avoid obstructing airflow.
- การตรวจสอบพัดลม: Check fans for dust buildup or obstructions that could impede their operation.
6 การแก้ไขปัญหา
หากคุณพบปัญหา โปรดดูขั้นตอนการแก้ไขปัญหาทั่วไปต่อไปนี้:
- ระบบไม่เปิดเครื่อง:
- Check all power connections, including the PSU to the wall outlet, PSU to motherboard (24-pin and CPU 8-pin), and front panel power switch header.
- ตรวจสอบให้แน่ใจว่าสวิตช์ของแหล่งจ่ายไฟ (PSU) อยู่ในตำแหน่ง 'เปิด'
- Fans Not Spinning / RGB Not Working:
- Verify fan power cables are securely connected to the motherboard or fan controller.
- Check ARGB headers for proper connection to the motherboard or RGB controller.
- Ensure RGB software or case button is correctly configured.
- ไม่มีการแสดงผล:
- Confirm the monitor cable is connected to the graphics card (not the motherboard integrated graphics, unless no dedicated GPU is present).
- ติดตั้งการ์ดจอและโมดูล RAM ใหม่
7. ข้อมูลจำเพาะ
Detailed specifications for the COUGAR Archon 2 RGB Mid Tower Case:
| คุณสมบัติ | รายละเอียด |
|---|---|
| ชื่อรุ่น | ARCHON 2 RGB |
| ประเภทเคส | มิดทาวเวอร์ |
| ความเข้ากันได้ของเมนบอร์ด | มินิไอทีเอ็กซ์, ไมโครเอทีเอ็กซ์, เอทีเอ็กซ์ |
| ขนาด (กxยxส) | 14.96 x 8.27 x 18.5 นิ้ว (380 x 210 x 470 มม.) |
| น้ำหนักสินค้า | 11.37 ปอนด์ (5.17 กก.) |
| วัสดุ | โลหะ, กระจกนิรภัย |
| สี | สีดำ |
| พัดลมที่ติดตั้งล่วงหน้า | 3 x 120mm ARGB fans (Front) |
| ฐานรองพัดลม (ด้านหน้า) | 3 x 120มม. หรือ 2 x 140มม. |
| พอร์ต I/O | 1 x USB 2.0, 2 x USB 3.0, Audio In/Out |
| ประเภทการติดตั้งแหล่งจ่ายไฟ | การติดตั้งด้านล่าง |
| วิธีการทำความเย็น | อากาศ |
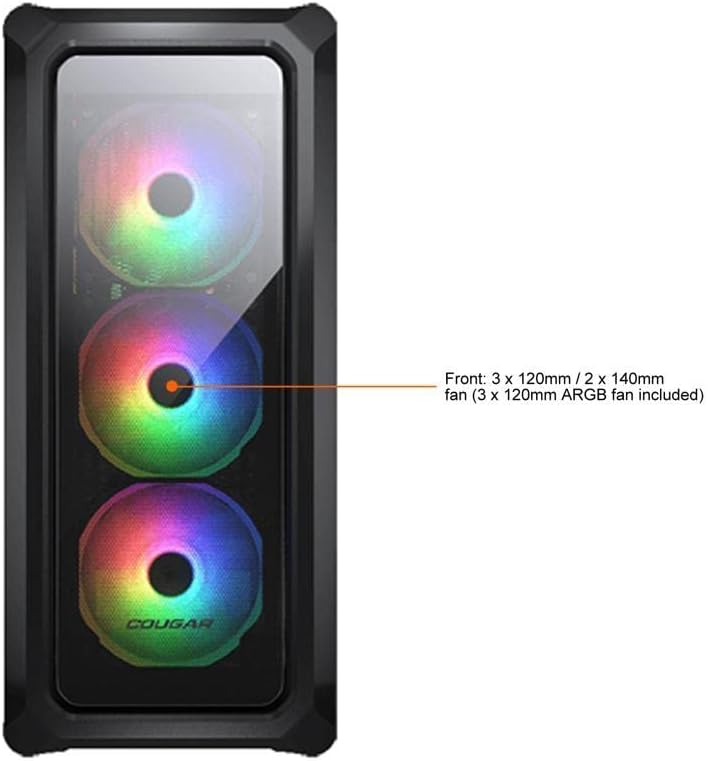
Figure 7.1: Front panel fan configuration and size options for the COUGAR Archon 2 RGB case.
8. การรับประกันและการสนับสนุน
For warranty information and technical support, please refer to the official COUGAR webหรือติดต่อฝ่ายบริการลูกค้า โปรดเก็บหลักฐานการซื้อไว้เพื่อใช้ในการเคลมประกัน
COUGAR Official Webเว็บไซต์: cougargaming.คอม


