1. สินค้าหมดview
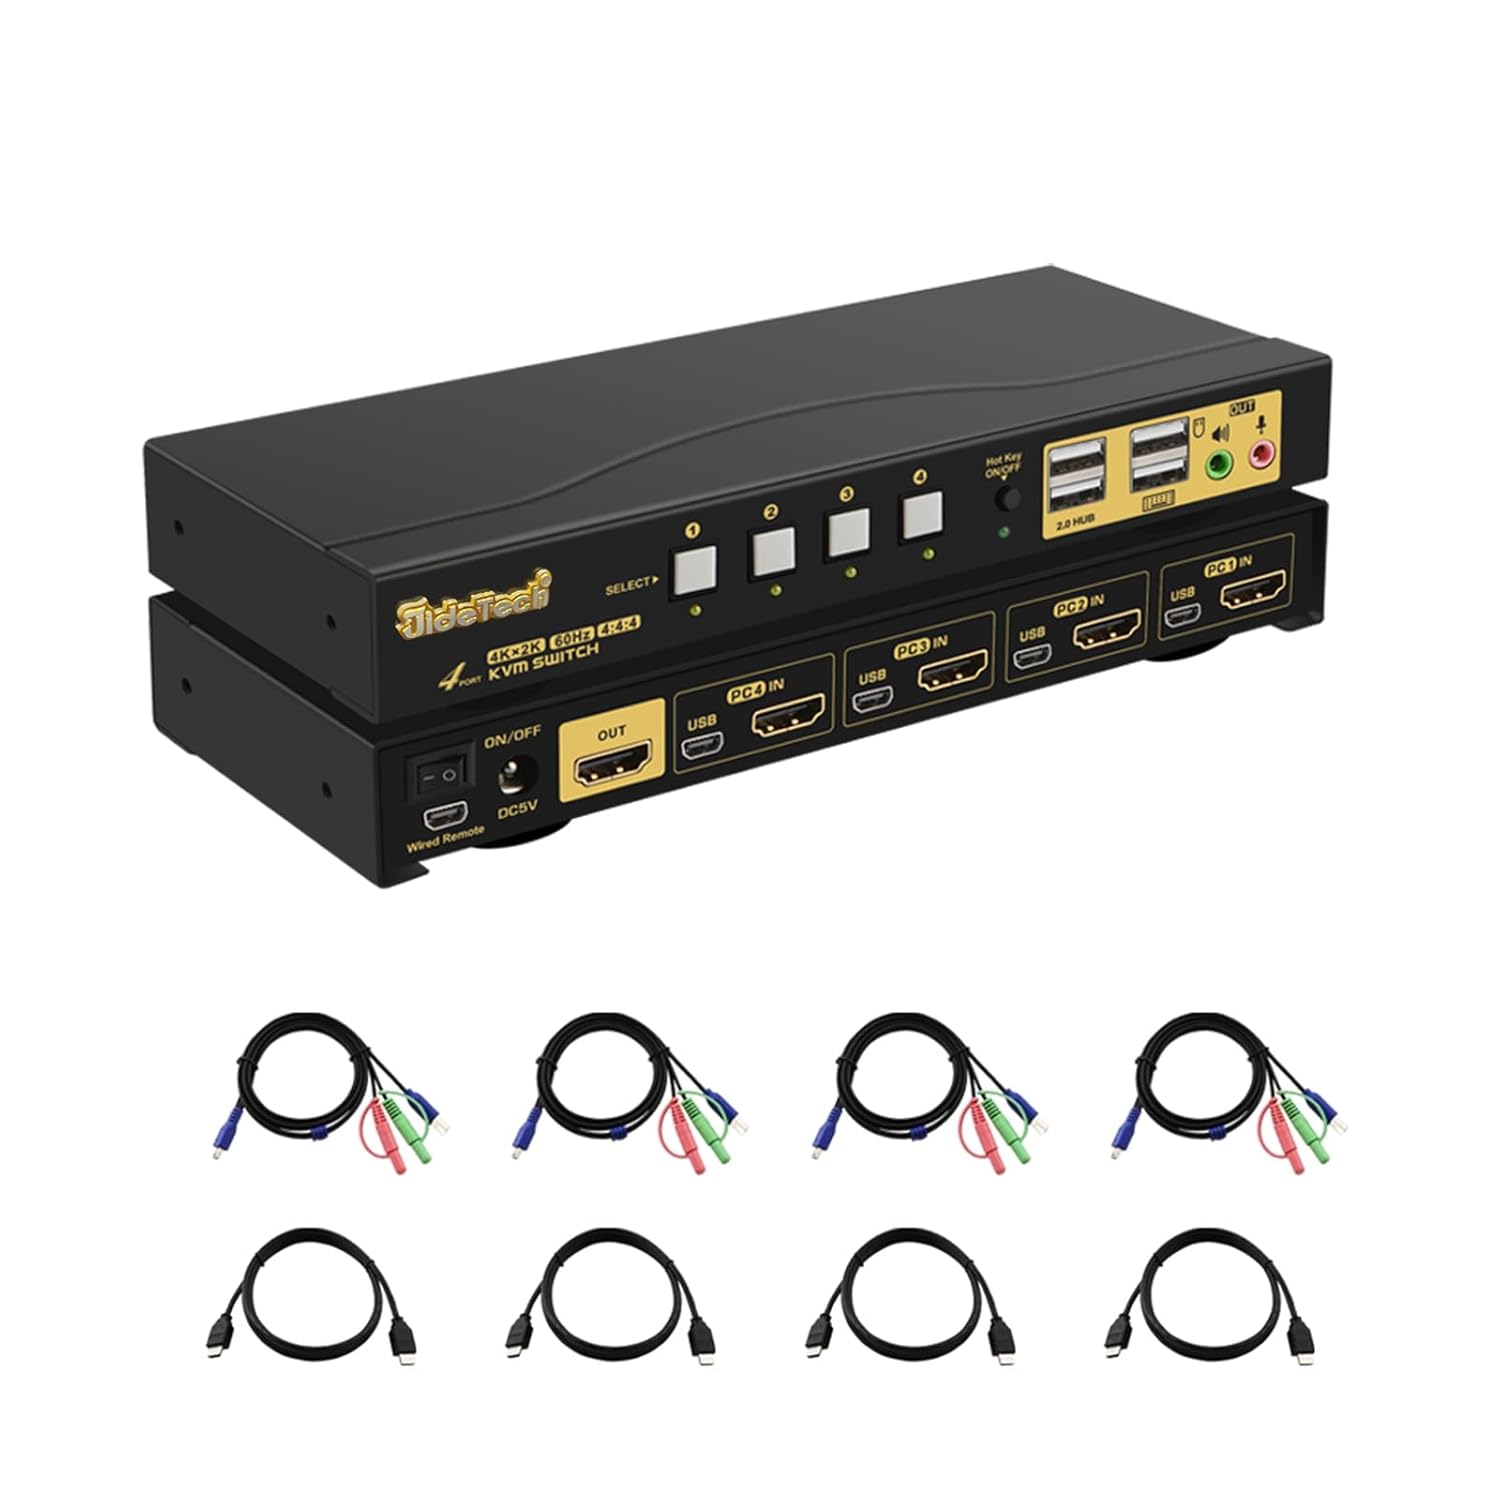
The JideTech 4-Port HDMI KVM Switch allows you to control up to four HDMI-enabled computers or devices using a single set of USB keyboard, USB mouse, and HDMI monitor. It supports Ultra HD 4K@60Hz resolution, ensuring high-quality video output. This switch is designed to streamline your workspace by reducing cable clutter and simplifying multi-system management.
คุณสมบัติหลัก:
- Supports 4 HDMI devices (PC, Servers, NVR, Game Consoles, AppleTV, etc.)
- Ultra HD 4K (4096x2160) @ 60Hz resolution support
- Compatible with HDMI 2.0, EDID, HDCP2.2, HDR10
- Integrated 2-port USB 2.0 hub for sharing peripherals (printers, scanners, USB drives)
- 3.5mm microphone and speaker ports for audio input/output
- Multiple switching methods: Front Panel Button, Wired Remote, Keyboard Hotkey, Mouse Switching
- Plug and Play functionality, driver-free for most operating systems
เนื้อหาแพ็คเกจ:
- 1 x JideTech 4-Port HDMI KVM Switch
- 1 x ตัวแปลงไฟ USB
- สายเคเบิล USB 4 3.0 เส้น
- 4 x สาย HDMI
- 1 x รีโมทคอนโทรลแบบมีสาย
- 1 x คู่มือผู้ใช้ (เอกสารนี้)
2. การตั้งค่าและการติดตั้ง
Follow these steps to properly set up your KVM switch:
- ปิดอุปกรณ์: โปรดตรวจสอบให้แน่ใจว่าคอมพิวเตอร์และจอภาพทั้งหมดปิดอยู่ก่อนทำการเชื่อมต่อใดๆ
- เชื่อมต่อจอภาพ: Connect your HDMI monitor to the 'OUT' HDMI port on the KVM switch.
- Connect Computers (HDMI): Connect the HDMI output of each computer (PC1, PC2, PC3, PC4) to the corresponding 'PC IN' HDMI ports on the KVM switch.
- Connect Computers (USB): Connect the USB 3.0 cable from each computer's USB port to the corresponding 'USB IN' ports on the KVM switch. These cables transmit keyboard, mouse, and USB hub data.
- เชื่อมต่อคีย์บอร์ดและเมาส์: Plug your USB keyboard and USB mouse into the dedicated keyboard and mouse USB ports on the front panel of the KVM switch.
- เชื่อมต่ออุปกรณ์ต่อพ่วง USB: If desired, connect additional USB devices (e.g., printer, USB drive) to the '2.0 HUB' ports on the front panel.
- เชื่อมต่อเสียง: Connect your speakers or headphones to the green audio output port and your microphone to the pink microphone input port on the front panel.
- เชื่อมต่อพลังงาน: Plug the provided USB power adapter into the 'DC5V' port on the KVM switch and then into a power outlet.
- เปิดเครื่อง: Power on the KVM switch using the 'ON/OFF' switch, then power on your monitor and computers.


3. คู่มือการใช้งาน
The JideTech KVM Switch offers multiple convenient ways to switch between connected computers:
3.1. การสลับโหมด

- Front Panel Button Switching:
Press the 'SELECT' buttons (1, 2, 3, 4) on the front panel of the KVM switch to directly switch to the corresponding computer input.

Figure 6: The Hotkey On/Off switch on the KVM. - Wired Remote Control Switching:
Use the included wired remote control to switch between inputs. Press the numbered buttons (1, 2, 3, 4) to select the desired computer. The 'AUTO' button can initiate an auto-scan function.
- Keyboard Hotkey Switching:
Ensure the 'Hot Key On/Off' switch on the front panel is in the 'ON' (green light) position. Use the following hotkey commands:
- Switch to PC1: Press CTRL ขวา สองครั้งแล้ว 1, แล้ว เข้า.
- Switch to PC2: Press CTRL ขวา สองครั้งแล้ว 2, แล้ว เข้า.
- Switch to PC3: Press CTRL ขวา สองครั้งแล้ว 3, แล้ว เข้า.
- Switch to PC4: Press CTRL ขวา สองครั้งแล้ว 4, แล้ว เข้า.
- Disable Beep Sound: Press CTRL ขวา สองครั้งแล้ว B, แล้ว เข้า.
- Enable Loudspeaker (Audio): Press CTRL ขวา สองครั้งแล้ว P, แล้ว เข้า.
Note: Hotkey functionality may vary with certain specialized keyboards (e.g., gaming or mechanical keyboards). If issues arise, try connecting the keyboard to a USB hub connected to the KVM's USB 2.0 hub port.
- การสลับเมาส์:
Move the mouse cursor to the far right edge of the screen and quickly move it right again. This will switch to the next active input. Repeat to cycle through inputs.
3.2. Audio Capabilities
The KVM switch includes 3.5mm audio input and output ports, allowing you to share speakers and a microphone across all connected computers. Simply plug your audio devices into the corresponding ports on the front panel.

4. การบำรุงรักษา
To ensure the longevity and optimal performance of your JideTech KVM Switch, follow these maintenance guidelines:
- การทำความสะอาด: Use a soft, dry cloth to clean the exterior of the KVM switch. Avoid using liquid cleaners or aerosols, which may damage the device.
- การระบายอากาศ : ตรวจสอบให้แน่ใจว่าได้วางสวิตช์ KVM ในบริเวณที่มีการระบายอากาศที่ดีเพื่อป้องกันความร้อนสูงเกินไป อย่าปิดกั้นช่องระบายอากาศใดๆ
- การจัดการสายเคเบิล: Keep cables organized and untangled to prevent damage to ports and cables. Avoid excessive bending or pulling of cables.
- แหล่งจ่ายไฟ: Always use the original power adapter provided with the KVM switch.
- พื้นที่จัดเก็บ: หากต้องเก็บรักษาอุปกรณ์เป็นเวลานาน ควรตัดการเชื่อมต่อสายเคเบิลทั้งหมดและเก็บไว้ในที่แห้งและเย็น
5 การแก้ไขปัญหา
หากคุณพบปัญหาเกี่ยวกับสวิตช์ KVM โปรดดูปัญหาทั่วไปและวิธีแก้ไขต่อไปนี้:
- No Display or Flickering Screen:
- Ensure all HDMI cables are securely connected to both the KVM switch and the computers/monitor.
- Verify that the KVM switch is powered on.
- Try using different HDMI cables, especially if they are not the ones provided.
- Check the display resolution settings on your computers. Ensure they are compatible with 4K@60Hz or a supported lower resolution.
- Power cycle the KVM switch and all connected devices.
- Keyboard or Mouse Unresponsive:
- Ensure the keyboard and mouse are plugged into the dedicated USB ports on the front panel.
- Try unplugging and replugging the keyboard/mouse.
- If using a specialized keyboard/mouse (e.g., gaming, mechanical, or wireless with a dongle), connect them to a powered USB 2.0 hub, then connect the hub to one of the KVM's '2.0 HUB' ports.
- ตรวจสอบให้แน่ใจว่าสาย USB 3.0 จากคอมพิวเตอร์ไปยัง KVM เชื่อมต่อแน่นหนาดีแล้ว
- Disable hotkey switching if it interferes with your specific keyboard/mouse.
- ไม่มีเสียงหรือเสียงผิดเพี้ยน:
- Check that speakers/headphones and microphone are correctly plugged into the 3.5mm audio ports.
- Verify audio output settings on your computer.
- Ensure the 'Loudspeaker' hotkey (Right CTRL twice, then P, then Enter) is enabled if needed.
- Loud Beep Sound When Switching:
- The beep sound can be disabled using the hotkey command: Press CTRL ขวา สองครั้งแล้ว B, แล้ว เข้า.
- ระบบสแกนอัตโนมัติไม่ทำงาน:
- Ensure all connected computers are powered on and sending a video signal.
- Check the wired remote control connection.
If the problem persists after trying these solutions, please contact JideTech customer support for further assistance.
6. ข้อมูลจำเพาะ
| คุณสมบัติ | คำอธิบาย |
|---|---|
| หมายเลขรุ่น | 64H2UA |
| ขนาดสินค้า | 2.95 x 0.97 x 8.07 นิ้ว |
| น้ำหนัก | 2.93 ปอนด์ |
| ความละเอียดวิดีโอ | ความละเอียดสูงสุด 4096x2160@60Hz (4K@60Hz) |
| มาตรฐาน HDMI | HDMI2.0 การเชื่อมต่อ |
| รองรับ HDCP | HDCP2.2 ขึ้นไป |
| รองรับ HDR | HDR10 |
| พอร์ต USB | 2 x USB 2.0 Hub, Dedicated Keyboard/Mouse USB ports |
| พอร์ตเสียง | 3.5mm Stereo Audio Out, 3.5mm Microphone In |
| วิธีการเปลี่ยน | Front Panel Button, Wired Remote, Keyboard Hotkey, Mouse Switching |
| ปฏิบัติการฉบับที่tage | 5 โวลต์ |
| ระบบปฏิบัติการที่รองรับ | Windows 10/7/2000/XP/Vista, Linux, Mac, Debian, Ubuntu, Fedora, Raspbian, etc. |


7. การรับประกันและการสนับสนุน
For warranty information and technical support, please refer to the official JideTech webหรือติดต่อฝ่ายบริการลูกค้าโดยตรง รายละเอียดเกี่ยวกับการลงทะเบียนผลิตภัณฑ์ การเรียกร้องการรับประกัน และความช่วยเหลือทางเทคนิค มักจะพบได้ในหน้าสนับสนุนของผู้ผลิต
ข้อมูลติดต่อ: กรุณาเข้าเยี่ยมชม JideTech Store on Amazon หรืออย่างเป็นทางการของพวกเขา webไซต์สำหรับรายละเอียดการติดต่อฝ่ายสนับสนุนล่าสุด


