1. บทนำ
Thank you for choosing the VITCOCO 5 Megapixel 1920P HD Otoscope Ear Cleaner. This device is designed to provide a clear visual inspection of the ear canal and assist in ear cleaning. This manual provides essential information for the safe and effective use of your otoscope. Please read it thoroughly before operation and retain it for future reference.

Image 1.1: VITCOCO Otoscope connected to a smartphone, showing a clear view ของช่องหู
2. ข้อมูลด้านความปลอดภัย
- This device is intended for visual inspection and gentle ear cleaning. It is not a medical device for diagnosis or treatment of ear conditions. Consult a medical professional for any ear health concerns.
- Exercise extreme caution when inserting the otoscope into the ear canal. Avoid excessive force or deep insertion to prevent injury to the eardrum or ear canal.
- Always use the provided silicone ear tips to protect the ear canal. A protective ring is integrated to safeguard sensitive areas, especially when used on children.
- The otoscope features an intelligent temperature control system to maintain a safe temperature during use (ear spoon 20-25°C, handle 30-34°C). If the device feels uncomfortably warm, discontinue use immediately.
- The lens of the otoscope is IP67 waterproof and can be rinsed with water or alcohol. The main body of the otoscope is not waterproof; do not immerse it in liquids.
- Keep out of reach of children. Adult supervision is required if used on children.

Image 2.1: The otoscope in use, demonstrating its application for visual ear inspection. Note the emphasis on gentle use, especially for sensitive users.
3. เนื้อหาบรรจุภัณฑ์
ตรวจสอบว่ามีรายการทั้งหมดอยู่ในแพ็คเกจ:
- VITCOCO Otoscope
- สายชาร์จ USB-C
- Box with 5 Silicone Ear Tips
- คู่มือการใช้งาน
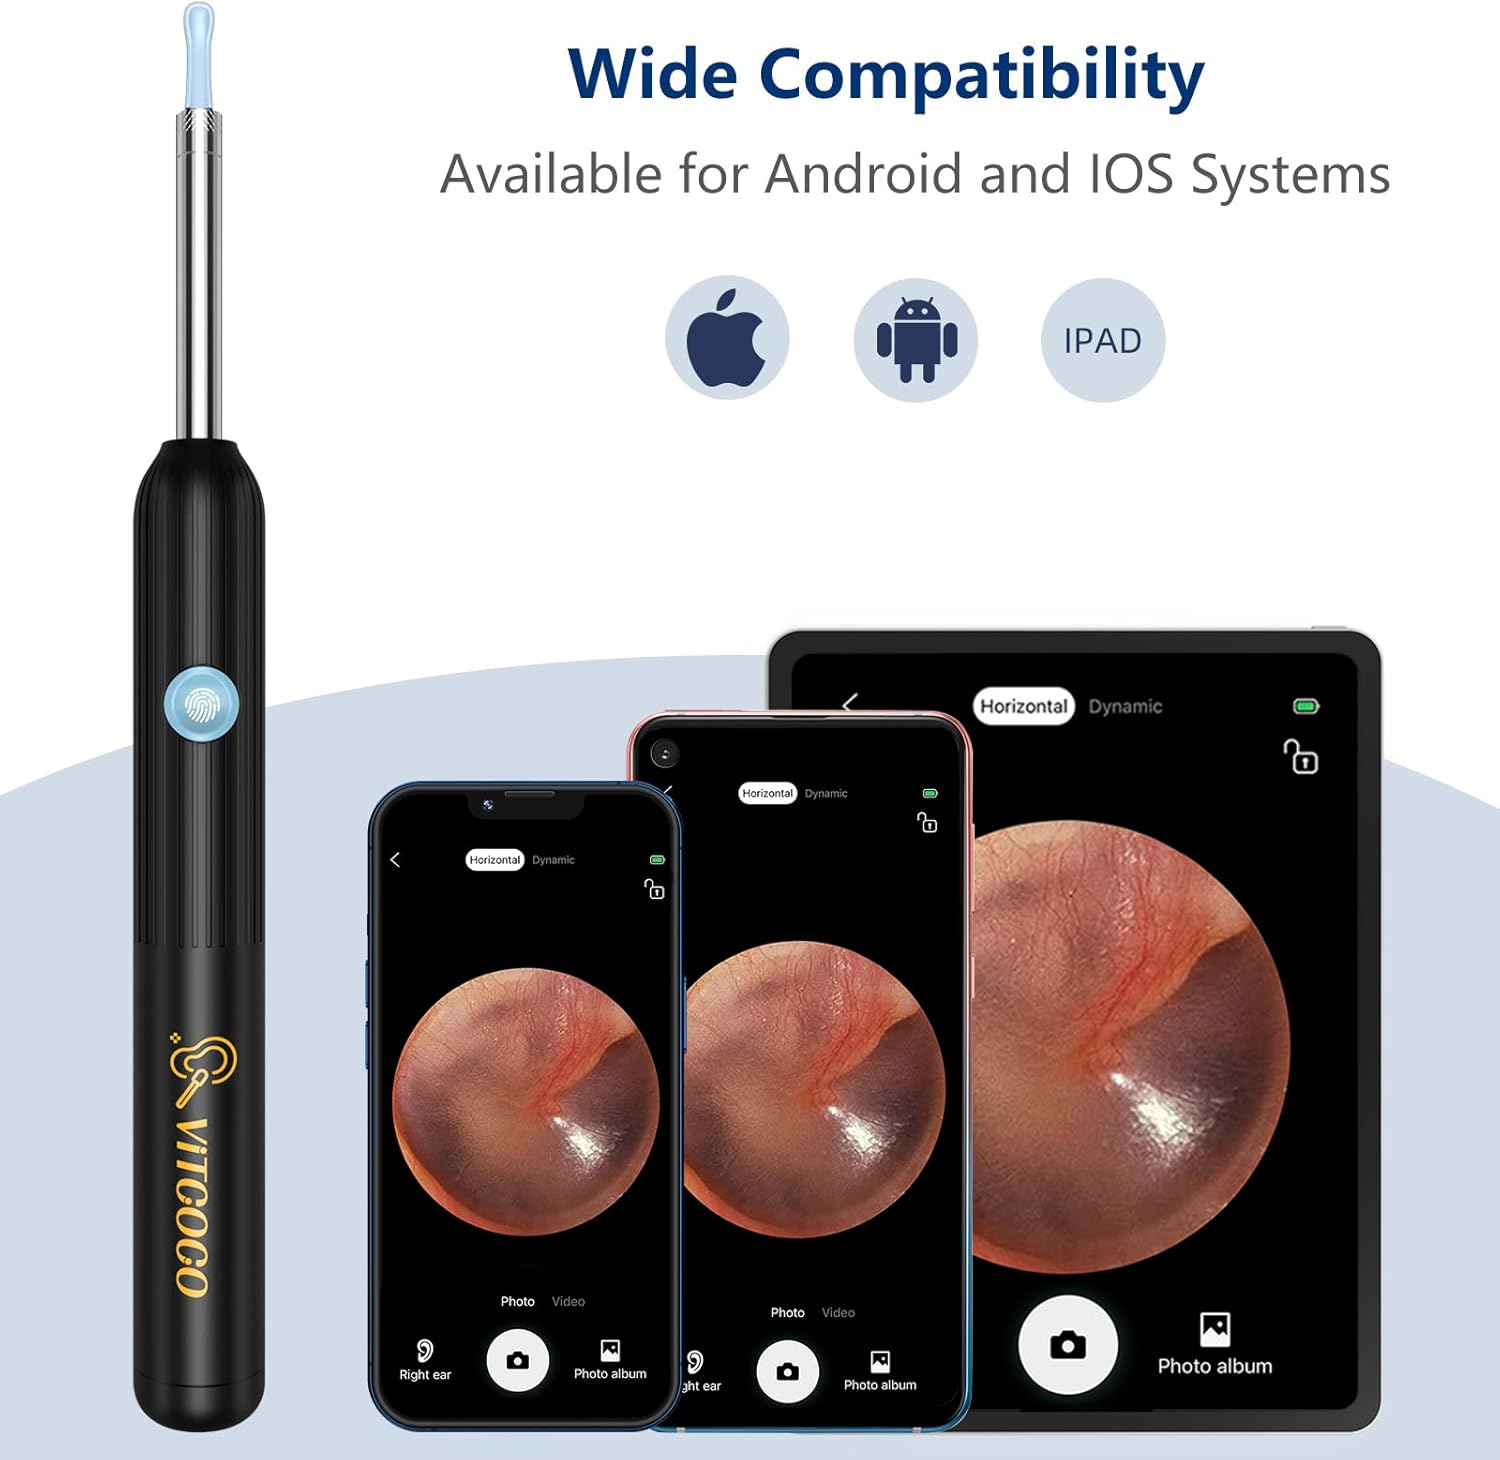
Image 3.1: All components included in the VITCOCO Otoscope package.
4. สินค้าหมดview
The VITCOCO Otoscope features advanced technology for clear and safe ear inspection:
- กล้องความละเอียดสูง: 5 Megapixel, 1920P HD camera for detailed images and videos.
- การให้แสงสว่าง: Equipped with 6 powerful LED lights to illuminate the ear canal.
- การออกแบบที่กะทัดรัด: Ultra-small 3.9mm lens diameter for comfortable insertion.
- มั่นคง Viewการลง: 6-axis gyroscope and 360° wide-angle lens ensure a stable image regardless of rotation.
- การควบคุมอุณหภูมิอัจฉริยะ: Maintains optimal temperatures for user comfort and safety.
- การเชื่อมต่อไร้สาย: Fast 2.4GHz WiFi chip for seamless image transmission to your smartphone or tablet.
- อายุการใช้งานแบตเตอรี่ยาวนาน: 350mAh battery provides approximately 90 minutes of continuous use.
- เลนส์กันน้ำ: IP67 rated lens for easy cleaning.

ภาพที่ 4.1: รายละเอียด view of the otoscope's camera system, including the 5 Megapixel HD camera and 6 LED lights.

Image 4.2: The 6-axis gyroscope ensures a stable, non-deviating image angle during use.

Image 4.3: Key components and intelligent temperature control design of the otoscope.
5. การตั้งค่า
Follow these steps to set up your VITCOCO Otoscope:
- ดาวน์โหลดแอป: สแกนรหัส QR ด้านล่างหรือเยี่ยมชม http://qr19.cn/CRUIhc to download the "Suear" application from the App Store (iOS) or Google Play Store (Android). The app is compatible with Android 4.4+ and iOS 9.0+ devices.
- เปิดเครื่อง: Press and hold the power button on the otoscope for approximately 5 seconds until the indicator light turns on.
- เชื่อมต่อกับ Wi-Fi: On your smartphone or tablet, go to your Wi-Fi settings and connect to the network named "Suear-X7-XXXX" (the last four characters will vary).
- เปิดแอป: Return to the "Suear" app and click the home icon to enter the device interface. You should now see a live view จากกล้องตรวจหู

Image 5.1: Visual guide for the four-step setup process.

Image 5.2: The integrated Smart WiFi Chip ensures fast and smooth image transmission.
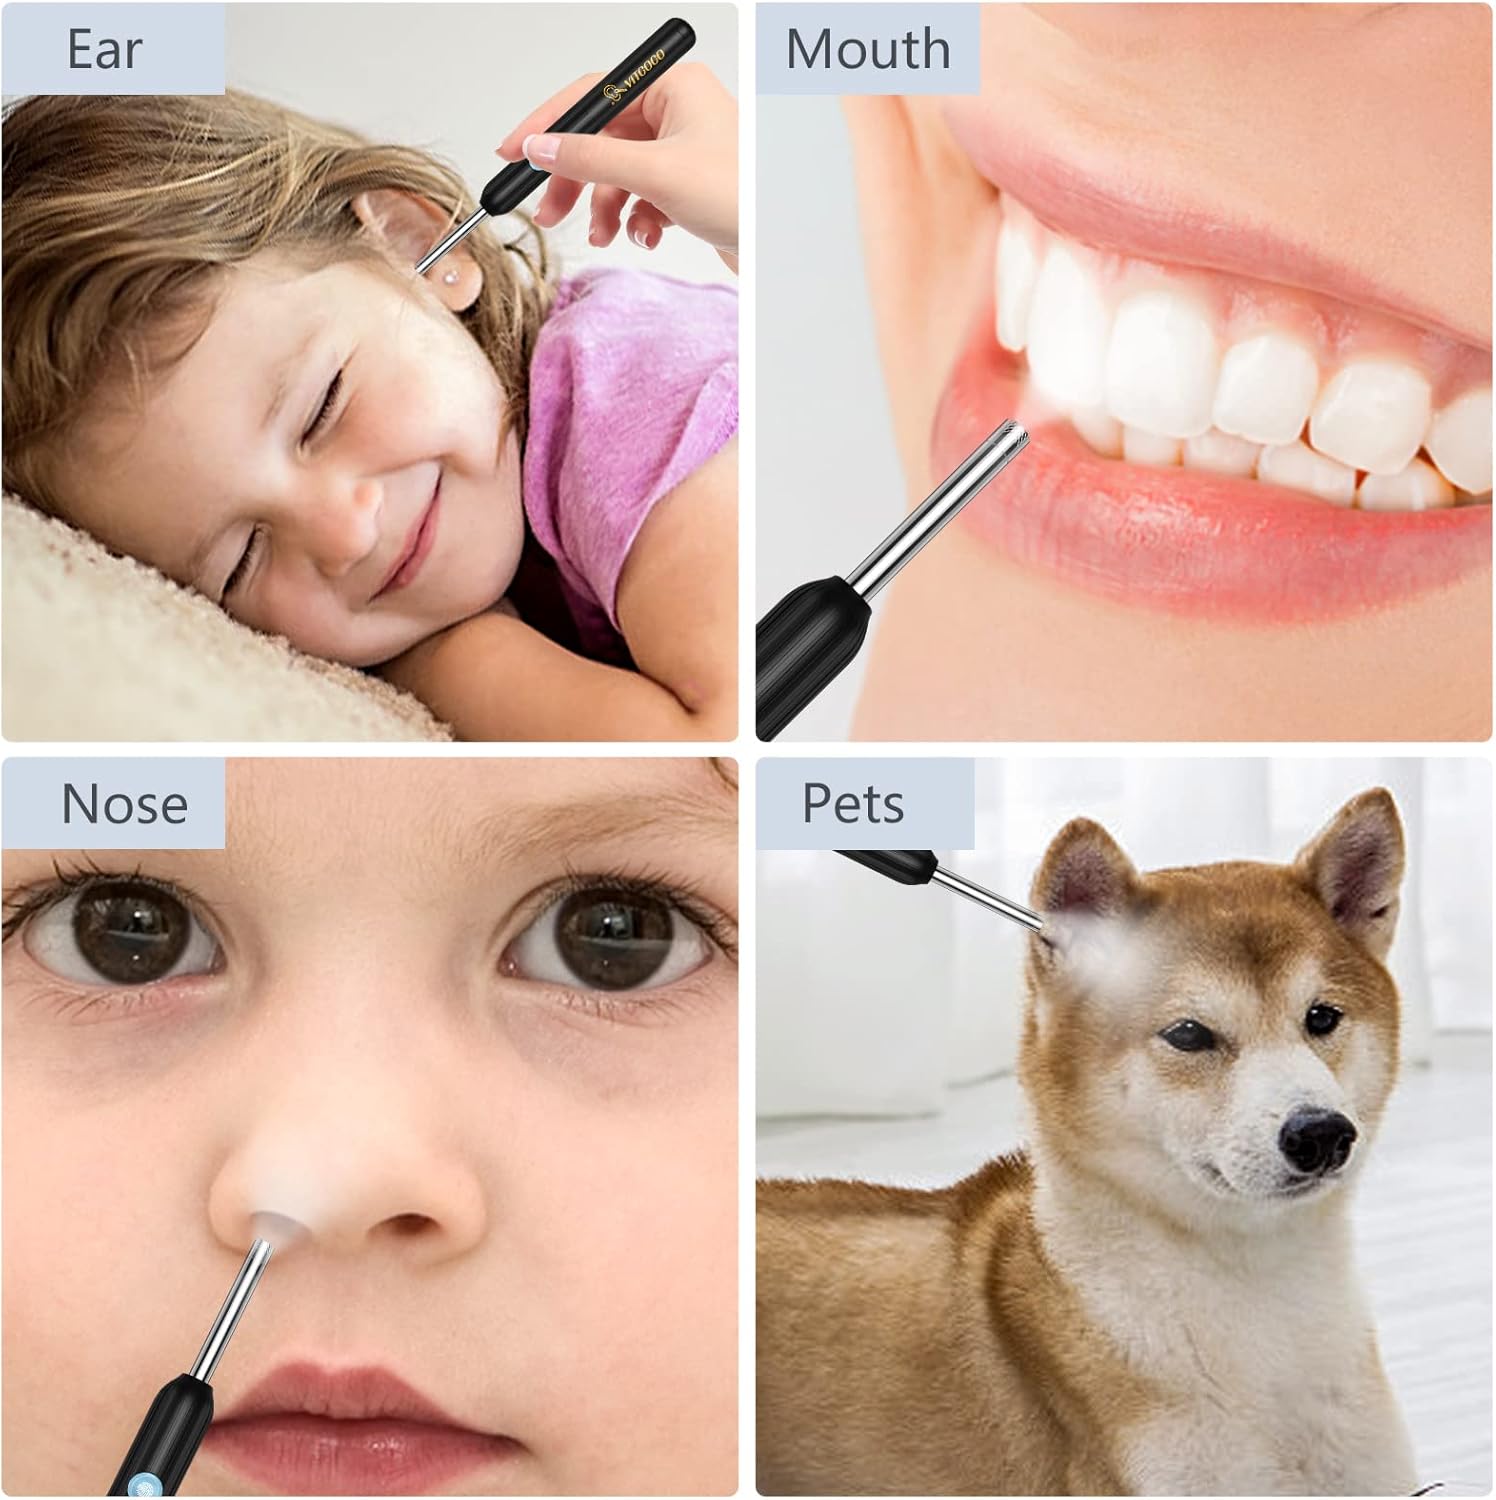
Image 5.3: The otoscope offers wide compatibility with various mobile operating systems.
6. คู่มือการใช้งาน
Before use, ensure the otoscope is fully charged and connected to your device via the "Suear" app.
- Attach Ear Tip: Select a suitable silicone ear tip and gently screw it onto the otoscope's camera head. Ensure it is securely fastened.
- การวางตำแหน่ง: Carefully insert the otoscope into the ear canal while observing the live feed on your connected device. Adjust the angle slowly to get a clear view.
- ฟังก์ชั่นแอพ: The "Suear" app provides various functions:
- ภาพถ่าย/วิดีโอ: Capture images or record videos of the ear canal.
- Lens Mode: สลับไปมาระหว่าง viewโหมดไอเอ็นจี
- จอแสดงผลแบตเตอรี่: ตรวจสอบระดับแบตเตอรี่ที่เหลืออยู่
- ล็อค/ปลดล็อค: Stabilize the image.
- Landscape/Portrait: Adjust screen orientation.
- Left/Right Ear: Optimize the camera's orientation for the respective ear.
- การทำความสะอาด: Use the ear tip to gently remove visible earwax. Do not push earwax deeper into the canal. If resistance is met, stop immediately.
- การใช้งานอเนกประสงค์: The otoscope can also be used for visual inspection of other areas such as the mouth, nose, or even for pets, always with appropriate caution.

Image 6.1: Proper attachment of the silicone ear tip and the compact size of the otoscope.

ภาพที่ 6.2: อดีตamples of the otoscope's application for various visual inspections.
7. การบำรุงรักษา
- การทำความสะอาดเลนส์: After each use, gently remove the silicone ear tip. The camera lens (IP67 waterproof) can be cleaned by rinsing with water or wiping with an alcohol swab. Ensure the lens is dry before storing. Do not immerse the main body of the otoscope.
- การทำความสะอาดจุกหู: The silicone ear tips can be washed with soap and water or disinfected with alcohol. Ensure they are completely dry before reuse or storage.
- การชาร์จ: Connect the provided USB-C cable to the charging port on the otoscope and to a standard USB power adapter (not included). A full charge provides approximately 90 minutes of continuous operation or 120 days of standby time.
- พื้นที่จัดเก็บ: Store the otoscope and its accessories in a clean, dry place away from direct sunlight and extreme temperatures.

Image 7.1: Information on the IP67 waterproof lens for cleaning and the dual thermostat system.
8 การแก้ไขปัญหา
- No Image on App:
- Ensure the otoscope is powered on (long press the button).
- Verify your phone/tablet is connected to the otoscope's Wi-Fi network ("Suear-X7-XXXX").
- Close and reopen the "Suear" app.
- Restart both the otoscope and your device.
- คุณภาพของภาพต่ำ:
- ทำความสะอาดเลนส์กล้องตามวิธีที่อธิบายไว้ในส่วนการบำรุงรักษา
- Ensure there is sufficient light from the otoscope's LEDs.
- Check for any obstructions on the lens or ear tip.
- อุปกรณ์ไม่ชาร์จ:
- Ensure the USB-C cable is securely connected to both the otoscope and the power source.
- ลองใช้สาย USB-C หรืออะแดปเตอร์ไฟอื่น
- ตรวจสอบว่าพอร์ตชาร์จสะอาดและไม่มีสิ่งสกปรก
- อุปกรณ์ร้อนเกินไป:
- The otoscope has intelligent temperature control. If it feels excessively hot, discontinue use immediately and allow it to cool down.
- ตรวจสอบให้แน่ใจว่ามีการระบายอากาศที่เหมาะสมระหว่างการใช้งาน
9. ข้อมูลจำเพาะ
| ยี่ห้อ | วิทโคโค่ |
| หมายเลขรุ่น | 001 |
| ความละเอียดของกล้อง | 5 Megapixel, 1920P HD |
| ไฟ LED | 6 |
| เส้นผ่านศูนย์กลางเลนส์ | 3.9มม. |
| ความจุของแบตเตอรี่ | 350mAh |
| เวลาทำงาน | ประมาณ 90 นาที |
| เวลาสแตนด์บาย | ประมาณ 120 วัน |
| พอร์ตชาร์จ | ยูเอสบี-ซี |
| การเชื่อมต่อแบบไร้สาย | Wi-Fi 2.4 GHz |
| ความเข้ากันได้ | Android 4.4 +, iOS 9.0 + |
| ระดับการกันน้ำ | มาตรฐาน IP67 (เฉพาะเลนส์) |
| ขนาดสินค้า | 17.5 x 6.5 x 1.9 ซม. |
| น้ำหนักผลิตภัณฑ์ | 50 กรัม |
10. การรับประกันและการสนับสนุน
For warranty information and customer support, please refer to the documentation included with your product packaging or contact VITCOCO customer service through their official website. Please have your model number (001) and purchase details available when seeking support.


