1. บทนำ
This manual provides detailed instructions for the installation, operation, and maintenance of your ESLYYDS Double Din Car Stereo. This advanced multimedia system offers a wide range of features including Apple CarPlay, Android Auto, Bluetooth connectivity, a high-definition touchscreen, and support for a backup camera, enhancing your in-car entertainment and navigation experience.

Figure 1.1: ESLYYDS Double Din Car Stereo Overview
2. เนื้อหาบรรจุภัณฑ์
โปรดตรวจสอบว่ารายการทั้งหมดที่ระบุไว้ด้านล่างมีอยู่ในแพ็คเกจของคุณหรือไม่:
- ESLYYDS Double Din Car Stereo Unit
- ชุดขายึด
- Camera Wire A
- Camera Wire B
- Steering Wheel Control Unit
- ชุดสายไฟ A
- ชุดสายไฟ B
- หลัง-view กล้อง
- รีโมทคอนโทรล
- คู่มือการใช้งาน (เอกสารนี้)

Figure 2.1: Stereo Dimensions and Included Accessories
3. คุณสมบัติของผลิตภัณฑ์
The ESLYYDS Double Din Car Stereo is equipped with a variety of features designed for convenience and enhanced driving experience:
- รองรับ Apple CarPlay และ Android Auto: Seamlessly integrate your smartphone for navigation, music, calls, and messages using voice control.
- 7-inch HD Capacitive Touch Screen: A responsive and accurate display supporting 1080P video playback.
- Bluetooth 5.2: For stable and clear hands-free calling and audio streaming.
- ลิงค์มิเรอร์โทรศัพท์: Display your smartphone's screen directly on the stereo.
- อินเทอร์เฟซ USB คู่: One port for media playback and another with 2.1A fast charging capability.
- หลัง View อินพุตกล้อง: Supports the included 12 HD LED light, night vision, 170° viewing angle waterproof backup camera for safer reversing.
- ระบบควบคุมพวงมาลัย (SWC): รองรับการควบคุมบนพวงมาลัยที่มีอยู่เพื่อการใช้งานที่สะดวก
- AM/FM Audio Receiver: Access to radio stations with user-friendly digital control.
- AUX IN Connectivity: สำหรับอุปกรณ์เสียงภายนอก
- 7 Color LED Buttons: สามารถปรับแต่งการส่องสว่างปุ่มได้
3.1 Apple CarPlay และ Android Auto
Connect your smartphone via USB to access navigation, phone contacts, email, notifications, and music directly on the stereo display. This feature utilizes voice control technology for safe operation while driving.
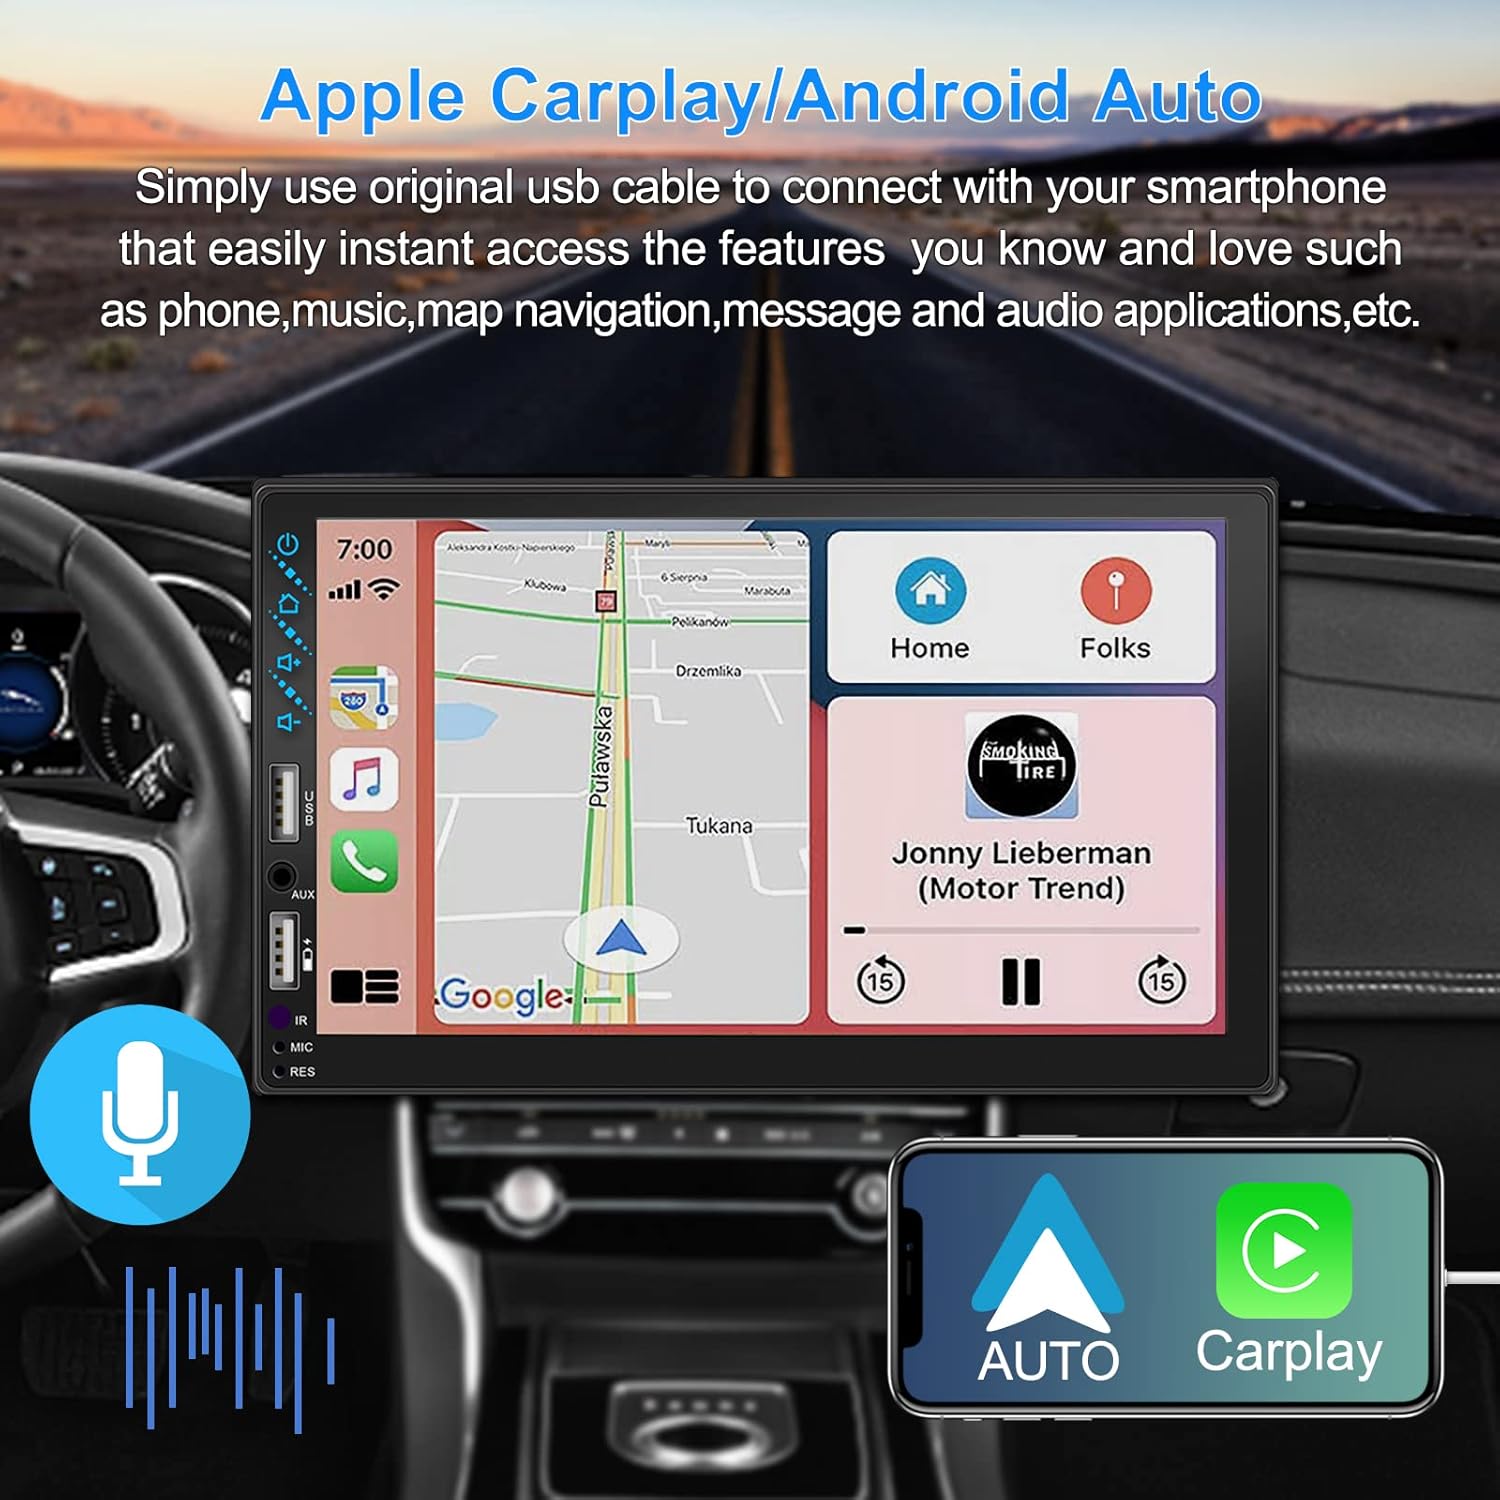
Figure 3.1: Apple CarPlay and Android Auto Interface
3.2 การควบคุมด้วยเสียง
Utilize voice commands to control various functions such as making calls, playing music, and navigating, allowing you to keep your hands on the wheel and eyes on the road.

รูปที่ 3.2: ฟังก์ชันการควบคุมด้วยเสียง
3.3 การเชื่อมต่อมิเรอร์โทรศัพท์
The Mirror Link function allows you to display your smartphone's screen directly onto the stereo's touchscreen. This supports Android devices (version 10.1 and below) and iPhone devices (version 14.5 and below, including iPhone 12, 11, XR, and 8 series and below) with resolutions up to 1920x1080 pixels.
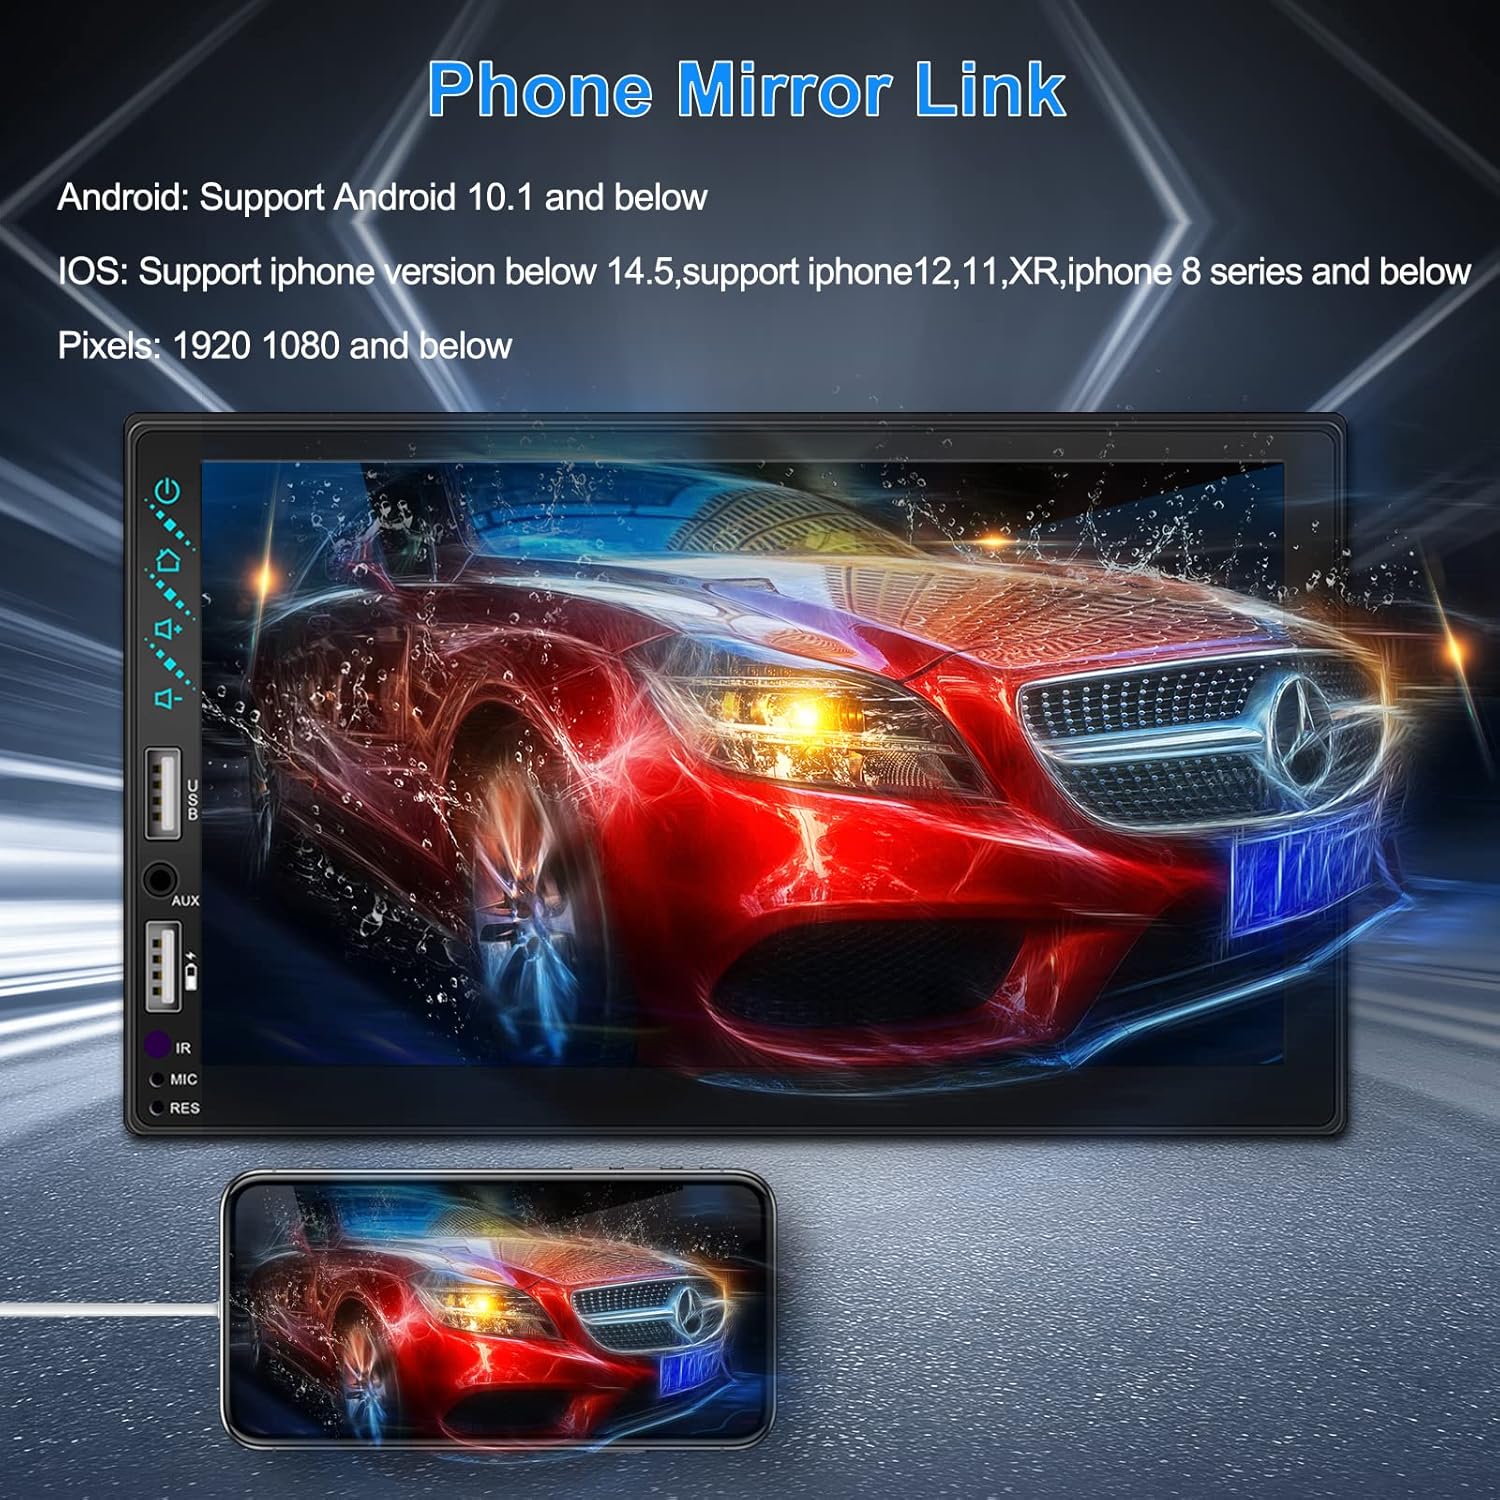
Figure 3.3: Phone Mirror Link
3.4 ด้านหลัง View กล้อง
The included waterproof backup camera features 12 HD LED lights for night vision and a 170° viewing angle. When you shift into reverse, the system automatically displays the camera feed on the screen, providing optimal visibility in various weather conditions.
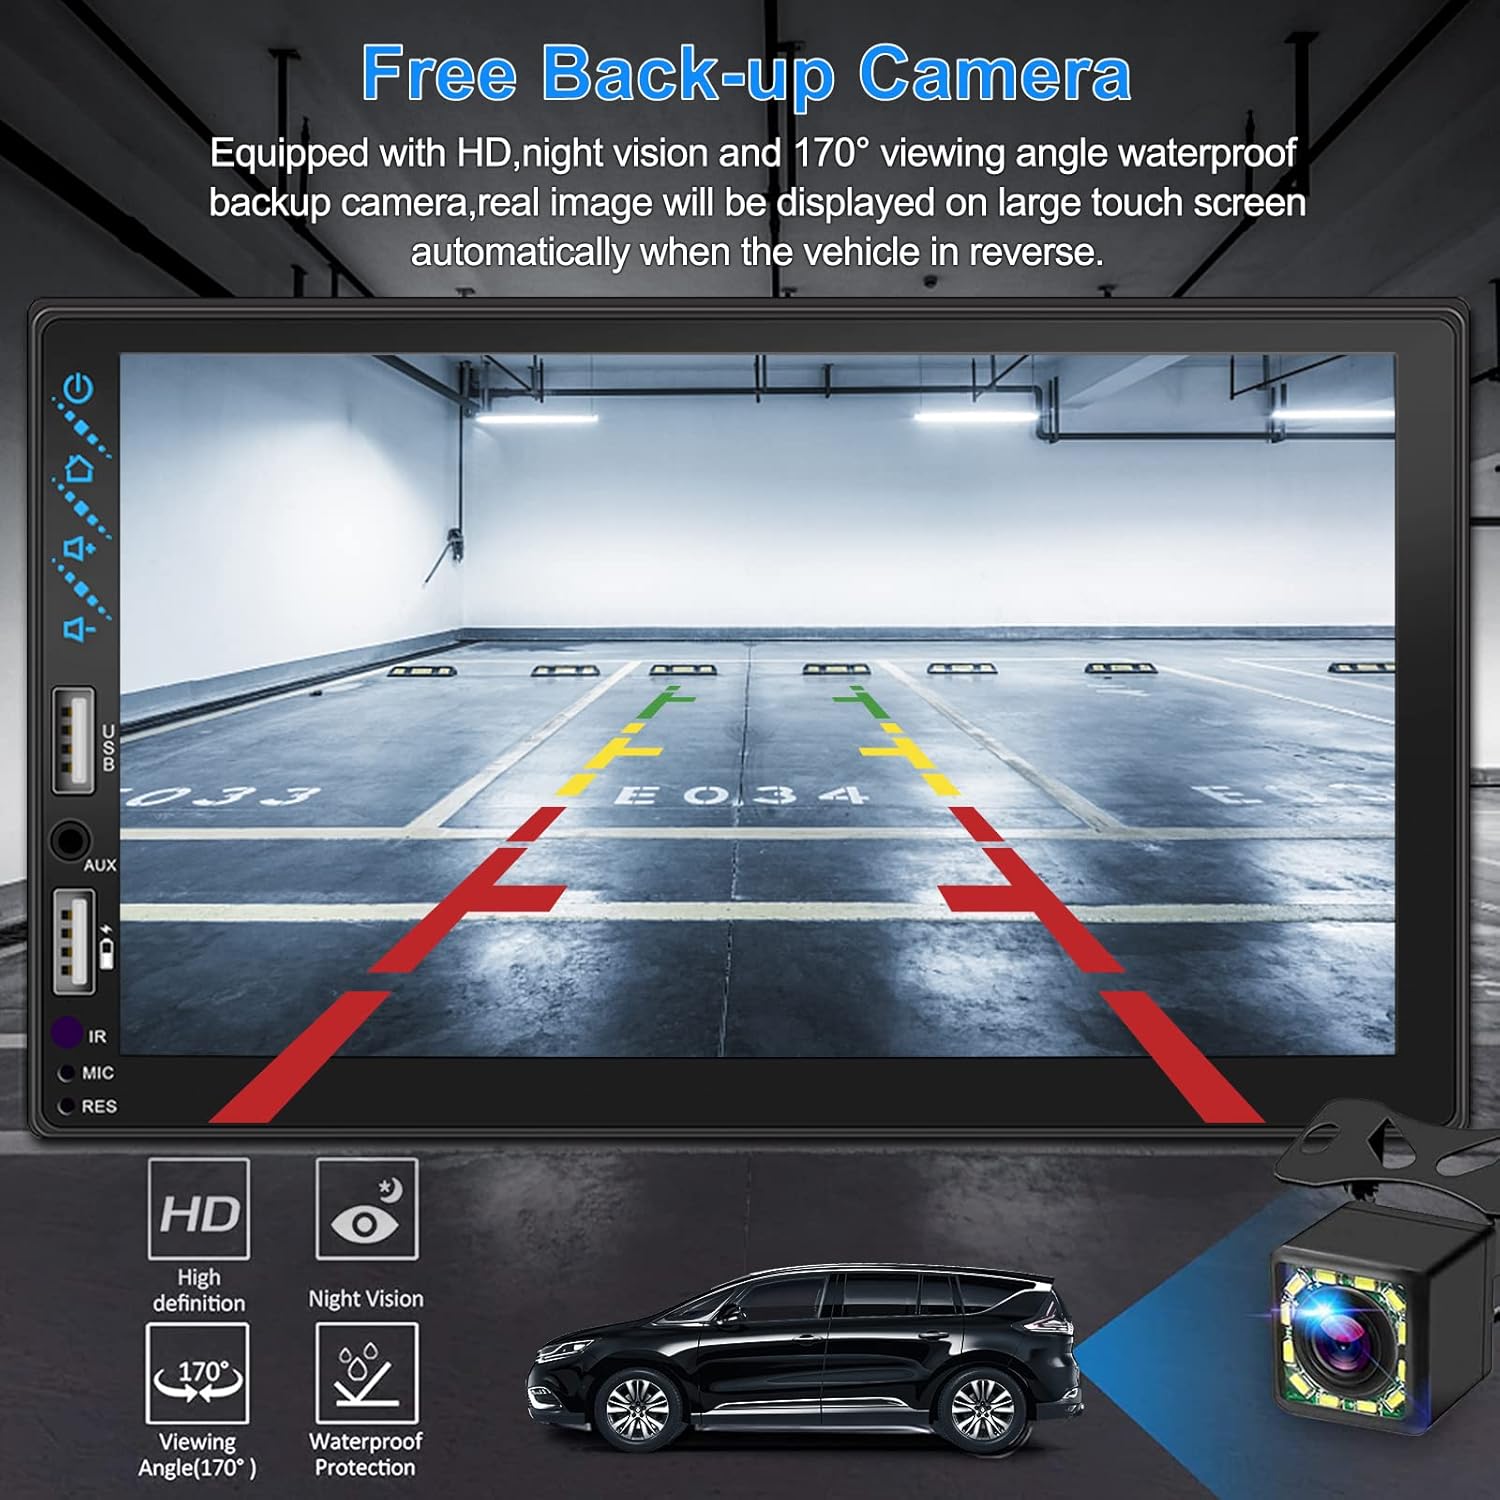
รูปที่ 3.4: ด้านหลัง View จอแสดงผลกล้อง
4. คู่มือการติดตั้ง
การติดตั้งอย่างถูกต้องเป็นสิ่งสำคัญอย่างยิ่งต่อประสิทธิภาพการทำงานสูงสุด ขอแนะนำให้ติดตั้งโดยผู้เชี่ยวชาญหากคุณไม่คุ้นเคยกับระบบสายไฟเครื่องเสียงรถยนต์
4.1 มิติ
The stereo unit has a standard double din size. Refer to Figure 2.1 for detailed dimensions.
- ความกว้าง: 178mm (7 นิ้ว)
- ความสูง: 102mm (4 นิ้ว)
- ความลึก: 60mm (2.6 นิ้ว)
4.2 แผนผังการเดินสายไฟ
Carefully follow the wiring diagram below to connect the stereo to your vehicle's electrical system. Ensure all connections are secure to prevent malfunctions.
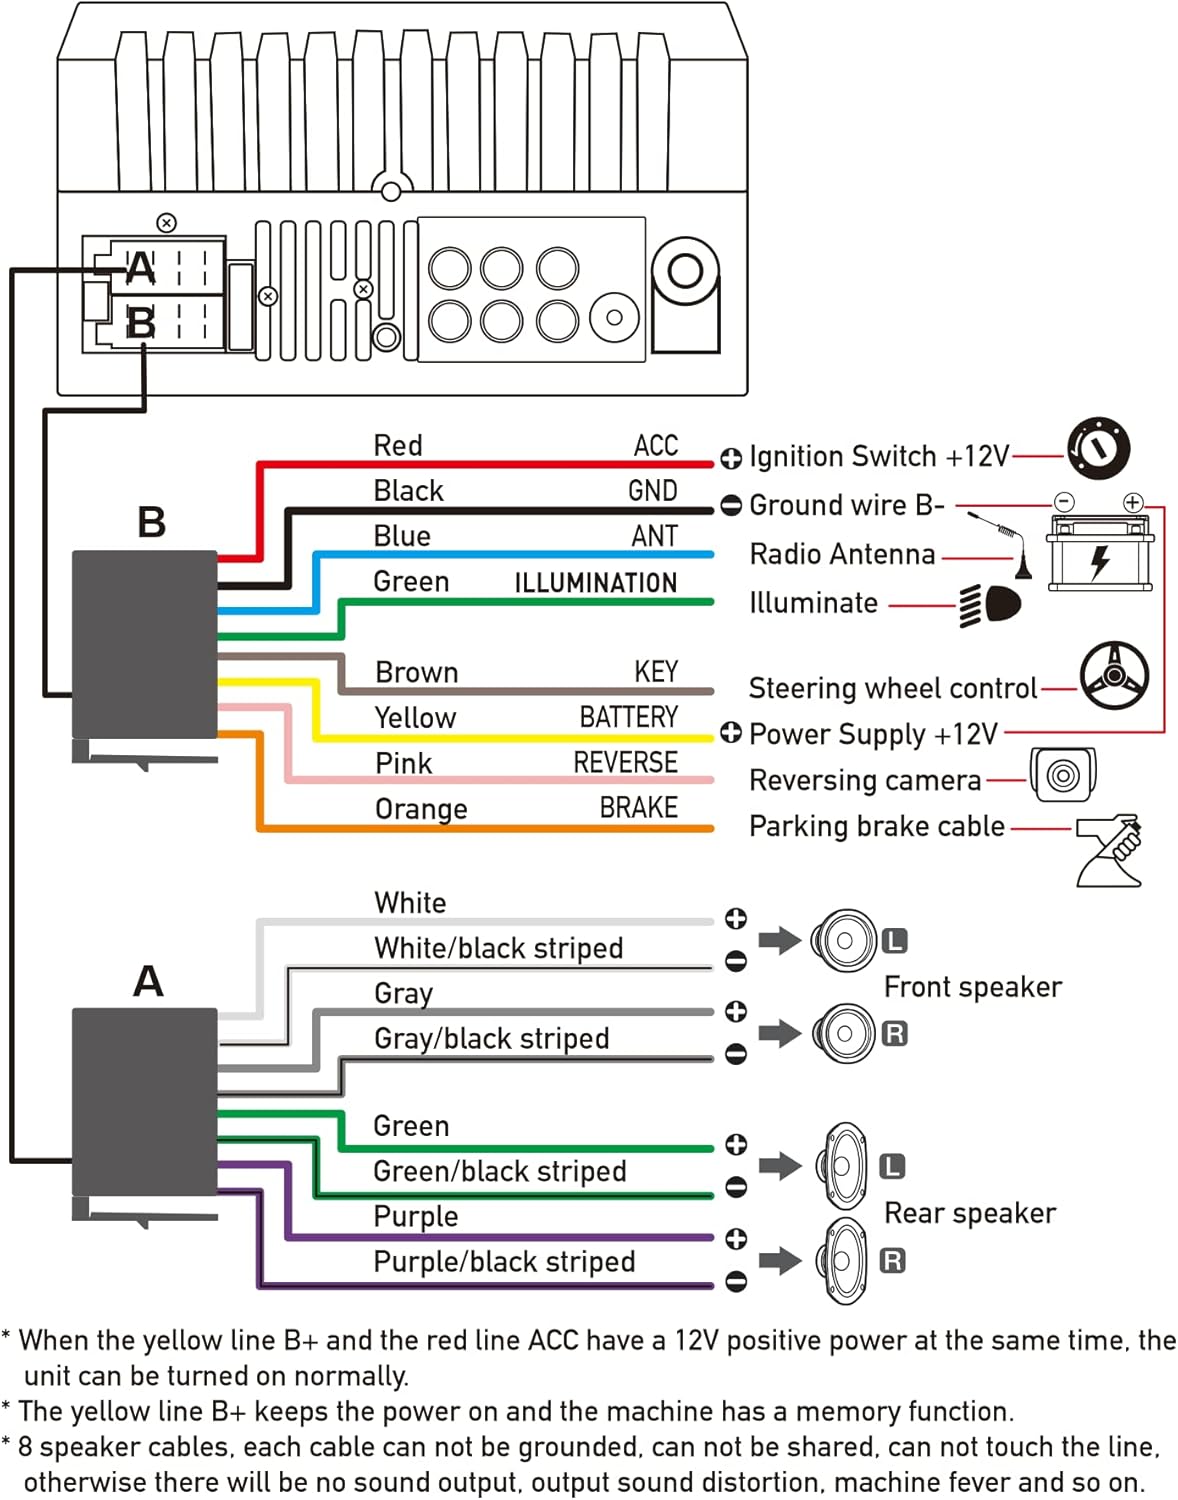
รูปที่ 4.1: แผนผังสายไฟหลัก
- สีแดง (ACC): Connect to Ignition Switch +12V.
- สีดำ (GND): Connect to Ground wire B-.
- สีฟ้า (ANT): Connect to Radio Antenna (if applicable).
- Green (ILLUMINATION): Connect to Illuminate wire.
- สีน้ำตาล (คีย์): Connect to Steering wheel control.
- สีเหลือง (แบตเตอรี่): Connect to Power Supply +12V.
- สีชมพู (ด้านหลัง): Connect to Reversing camera input.
- Orange (BRAKE): Connect to Parking brake cable.
Speaker Connections (8 speakers supported):
- White / White/black striped: ลำโพงด้านหน้าซ้าย
- Gray / Gray/black striped: ลำโพงด้านหน้าขวา
- Green / Green/black striped: ลำโพงด้านหลังซ้าย
- Purple / Purple/black striped: ลำโพงด้านหลังขวา
หมายเหตุสำคัญ:
- The unit requires both the Yellow (BATTERY) and Red (ACC) wires to have a 12V positive power supply simultaneously for normal operation.
- The Yellow (BATTERY) wire keeps the power on and maintains memory functions.
- For speaker connections, each cable must not be grounded or shared with other cables. Incorrect wiring can lead to no sound output, sound distortion, or damage to the machine.
5. คู่มือการใช้งาน
5.1 การดำเนินการพื้นฐาน
- เปิด/ปิดเครื่อง: กดปุ่มเปิด/ปิดที่แผงด้านหน้าหรือรีโมทคอนโทรล
- การควบคุมระดับเสียง: Use the volume buttons on the front panel, steering wheel controls, or remote control.
- การเลือกแหล่งที่มา: Tap the 'Source' or 'Mode' icon on the touchscreen to switch between Radio, Bluetooth, USB, AUX, CarPlay, and Android Auto.
5.2 Apple CarPlay / Android Auto Usage
- Connect your compatible iPhone or Android smartphone to the stereo's USB port using a certified USB cable.
- The stereo will automatically detect the connection and prompt you to launch CarPlay or Android Auto.
- ปฏิบัติตามคำแนะนำบนหน้าจอเพื่อดำเนินการตั้งค่าให้เสร็จสมบูรณ์
- Once connected, you can access supported apps like Maps, Phone, Messages, and Music directly from the stereo's touchscreen or via voice commands.
5.3 การจับคู่บลูทูธ
- เปิดบลูทูธบนสมาร์ทโฟนของคุณ
- บนเครื่องเสียงรถยนต์ ให้เข้าไปที่เมนูบลูทูธ
- ค้นหา available devices on your smartphone. The stereo's Bluetooth name will typically be 'ESLYYDS' or similar.
- Select the stereo from your smartphone's list and confirm the pairing code if prompted.
- เมื่อจับคู่แล้ว คุณสามารถโทรออก/รับสาย และสตรีมเสียงแบบไร้สายได้
5.4 Phone Mirror Link Usage
- เชื่อมต่อสมาร์ทโฟนของคุณเข้ากับพอร์ต USB ของเครื่องเสียง
- Select the 'Mirror Link' option on the stereo's screen.
- Follow the specific instructions displayed on the stereo for your phone's operating system (Android or iOS) to enable screen mirroring. This may involve enabling USB debugging for Android or trusting the device for iOS.
5.5 การใช้งานวิทยุ
- Select the 'Radio' source.
- Use the 'Scan' function to automatically search and save stations, or manually tune using the frequency controls.
- บันทึกสถานีโปรดของคุณไปยังปุ่มตั้งค่าล่วงหน้าเพื่อการเข้าถึงอย่างรวดเร็ว
5.6 การเล่น USB
- เสียบไดรฟ์ USB ที่มีไฟล์เสียงหรือวิดีโอ files into the designated USB playback port.
- The stereo will automatically switch to USB mode or prompt you to select it.
- เรียกดูและเล่นสื่อของคุณ files using the touchscreen controls.
6. การบำรุงรักษา
เพื่อให้เครื่องเสียงในรถยนต์ของคุณมีอายุการใช้งานยาวนานและมีประสิทธิภาพเหมาะสมที่สุด โปรดปฏิบัติตามคำแนะนำในการบำรุงรักษาดังต่อไปนี้:
- การทำความสะอาด: Use a soft, dry cloth to clean the screen and exterior. For stubborn smudges on the screen, use a screen cleaner specifically designed for electronic displays. Avoid abrasive cleaners or solvents.
- อุณหภูมิ: หลีกเลี่ยงการเปิดเผยเครื่องในอุณหภูมิที่สูงหรือต่ำเกินไป ทั้งร้อนและเย็น เป็นระยะเวลานาน
- ความชื้น: เก็บอุปกรณ์ให้แห้ง อย่าให้โดนน้ำหรือความชื้นมากเกินไป
- อัพเดตเฟิร์มแวร์: ตรวจสอบของผู้ผลิต webไซต์เป็นระยะสำหรับการอัปเดตเฟิร์มแวร์ที่มีอยู่เพื่อปรับปรุงประสิทธิภาพและเพิ่มคุณสมบัติใหม่
7 การแก้ไขปัญหา
If you encounter issues with your ESLYYDS car stereo, please refer to the following common problems and solutions. If the problem persists, contact customer support.
| ปัญหา | สาเหตุที่เป็นไปได้ | สารละลาย |
|---|---|---|
| ไม่มีไฟฟ้า | สายไฟไม่ถูกต้อง ฟิวส์ขาด ปัญหาแบตเตอรี่รถยนต์ | Check power (Yellow and Red) and ground (Black) wire connections. Inspect vehicle fuses. Ensure vehicle battery is charged. |
| ไม่มีเสียง | สายลำโพงต่อไม่ถูกต้อง ระดับเสียงต่ำเกินไป ฟังก์ชันปิดเสียงทำงานอยู่ | Verify all speaker wire connections (ensure no shorts or grounds). Increase volume. Check if mute is enabled. |
| บลูทูธไม่เชื่อมต่อ | ไม่ได้เปิดใช้งานบลูทูธในโทรศัพท์/เครื่องเสียง; ขั้นตอนการจับคู่ไม่ถูกต้อง | Ensure Bluetooth is active on both devices. Delete previous pairings and re-attempt pairing process. |
| CarPlay/Android Auto ไม่เปิดใช้งาน | Faulty USB cable; Phone not compatible; Software issue. | Use a high-quality, certified USB cable. Ensure your phone's OS version is compatible. Restart both phone and stereo. |
| กล้องหลังไม่แสดงผล | Camera wire disconnected; Reverse trigger wire not connected. | Check the camera's video input and power connections. Ensure the Pink (REVERSE) wire is correctly connected to the vehicle's reverse light trigger. |
| USB not reading media | ไม่ได้รับการสนับสนุน file format; Corrupted USB drive; USB port issue. | รับรองสื่อ files are in supported formats (e.g., MP3, MP4, MKV). Try a different USB drive. |
8. ข้อมูลจำเพาะ
| คุณสมบัติ | ข้อมูลจำเพาะ |
|---|---|
| ขนาดสินค้า | 7 x 2.6 x 3.94 นิ้ว |
| น้ำหนักสินค้า | 2.33 ปอนด์ |
| หมายเลขรุ่น | L3 |
| ขนาดจอแสดงผล | 7 นิ้ว (18 ซม.) |
| ประเภทจอภาพ | HD Capacitive Touchscreen |
| เทคโนโลยีการเชื่อมต่อ | Carplay, Android Auto, Mirror-Link, Bluetooth 5.2, USB, AUX |
| ประเภทตัวควบคุม | Google Assistant, iOS, Android |
| คุณสมบัติพิเศษ | Touchscreen, RDS, Steering Wheel Control (SWC), Fast Charging USB (2.1A) |
| อุปกรณ์ที่รองรับ | สมาร์ทโฟน |
| ประเภทขั้วต่อ | ยูเอสบี |
| โหมดเอาต์พุตเสียง | ล้อมรอบ |
| การกำหนดค่าช่องเสียงรอบทิศทาง | 5.1 |
| การรองรับการเข้ารหัสวิดีโอ | เอ็มเควี |
| สี | สีดำ |
| วันที่พร้อมใช้งานครั้งแรก | วันที่ 25 กันยายน 2021 |
9. การรับประกันและการสนับสนุน
ESLYYDS is committed to providing excellent customer service and technical support. For any inquiries or assistance, please contact our professional technical team.
- การรับประกันคืนเงิน: 30-day period from purchase.
- การรับประกันการเปลี่ยน: 12-month period for product replacement.
- การสนับสนุนด้านเทคนิค: Life-time technical support is provided.
Please refer to your purchase documentation for specific contact details or visit the official ESLYYDS webเว็บไซต์สำหรับข้อมูลสนับสนุน


