1. บทนำ
This manual provides essential information for the safe and efficient operation of your SHINCO WIFI Portable Dehumidifier, model SDZ1-50D. Please read it thoroughly before using the appliance and retain it for future reference. This dehumidifier is designed to remove excess moisture from the air, helping to create a healthier and more comfortable indoor environment. It features a powerful compressor, multiple drainage options, and smart control capabilities.

รูปที่ 1.1: ด้านหน้า view of the SHINCO WIFI Portable Dehumidifier SDZ1-50D. This image displays the unit's compact design, control panel, and visible water tank level indicator.

รูปที่ 1.2: เกินview of key features including 50L/day dehumidification, 24-hour timer, automatic humidity capture, and quiet operation.
2. คำแนะนำด้านความปลอดภัย
โปรดปฏิบัติตามข้อควรระวังด้านความปลอดภัยต่อไปนี้เพื่อป้องกันการบาดเจ็บหรือความเสียหายต่อเครื่องใช้ไฟฟ้า:
- Always connect the unit to a grounded power outlet with the correct voltagอี (220V)
- ห้ามใช้งานเครื่องลดความชื้นหากสายไฟหรือปลั๊กชำรุด
- ควรเก็บเครื่องใช้ไฟฟ้าให้ห่างจากน้ำและของเหลวอื่นๆ ห้ามจุ่มลงในน้ำ
- Ensure adequate ventilation around the unit. Do not block air inlets or outlets.
- ห้ามสอดสิ่งของเข้าไปในช่องระบายอากาศ
- ถอดปลั๊กเครื่องก่อนทำความสะอาดหรือดำเนินการบำรุงรักษาใดๆ
- อุปกรณ์นี้ไม่ได้มีไว้สำหรับผู้ที่มีความบกพร่องทางร่างกาย ประสาทสัมผัส หรือทางจิต เว้นแต่จะได้รับการควบคุมดูแล
- ห้ามใช้เครื่องลดความชื้นในบริเวณที่มีการเก็บก๊าซหรือของเหลวไวไฟ
3. ส่วนประกอบผลิตภัณฑ์
ทำความรู้จักกับส่วนประกอบหลักของเครื่องลดความชื้นของคุณ:
- แผงควบคุมพร้อมจอแสดงผลแบบดิจิตอล
- เครื่อง Outlet
- ช่องลมเข้าพร้อมแผ่นกรอง
- ถังน้ำ (ความจุ 7 ลิตร)
- เต้าเสียบระบายน้ำอย่างต่อเนื่อง
- Lift Pump Drainage Outlet
- สายไฟ
- Casters for mobility

รูปที่ 3.1: หลัง view showing the continuous drainage port and a top view with the water tank removed, illustrating internal components.
3.1 แผงควบคุม
The control panel allows you to manage all functions of the dehumidifier.

รูปที่ 3.2: Close-up of the control panel, displaying buttons for power, mode selection, humidity adjustment, fan speed, internal cleaning, and timer.

รูปที่ 3.3: Detail of the power button and digital display, which shows current humidity levels or timer settings.
4. การตั้งค่า
4.1 การแกะกล่อง
- นำเครื่องลดความชื้นออกจากบรรจุภัณฑ์อย่างระมัดระวัง
- นำวัสดุบรรจุภัณฑ์ออกทั้งหมด และตรวจสอบให้แน่ใจว่าไม่มีชิ้นส่วนใดสูญหาย
- Inspect the unit for any damage incurred during shipping. If damaged, do not operate and contact customer support.
4.2 การจัดวาง
- วางเครื่องลดความชื้นบนพื้นผิวเรียบและมั่นคง
- ตรวจสอบให้แน่ใจว่ามีพื้นที่ว่างรอบเครื่องอย่างน้อย 20 เซนติเมตร (8 นิ้ว) เพื่อให้มีการไหลเวียนของอากาศที่เหมาะสม
- หลีกเลี่ยงการวางเครื่องไว้ใกล้แหล่งความร้อน ใต้แสงแดดโดยตรง หรือในบริเวณที่โดนน้ำกระเซ็น
- The unit is equipped with casters for easy movement.
4.3 การเชื่อมต่อสายไฟ
- Plug the power cord into a suitable 220V grounded electrical outlet.
- ห้ามใช้สายไฟต่อพ่วงหรือปลั๊กหลายตัว
5. คู่มือการใช้งาน
5.1 เปิด/ปิดเครื่อง
- กดปุ่ม พลัง ปุ่ม (
 ) บนแผงควบคุมเพื่อเปิดหรือปิดเครื่อง
การเลือกโหมด 5.2
กดปุ่ม โหมด ปุ่ม () เพื่อสลับไปมาระหว่างโหมดต่างๆ ที่มีให้เลือก:
- โหมดอัตโนมัติ: The unit will automatically operate to maintain the set humidity level (30% to 80% RH). It will turn off when the target humidity is reached and restart if humidity rises.
- โหมดซักผ้า: Designed to absorb excess moisture from clothes, reducing drying time.
- โหมดละลายน้ำแข็ง: The unit features an automatic defrost mode for efficient operation even at low temperatures (down to 5°C).
5.3 การตั้งค่าความชื้น
- ในโหมดอัตโนมัติ ให้กดปุ่ม ความชื้น ปุ่ม () to adjust the desired humidity level between 30% and 80% in 5% increments.
ความเร็วพัดลม 5.4 ระดับ
- กดปุ่ม ความเร็วพัดลม ปุ่ม () to select between High and Low fan speeds.
5.5 ฟังก์ชั่นจับเวลา
- กดปุ่ม ตัวจับเวลา ปุ่ม () to set the operating time from 1 to 24 hours. The unit will automatically turn off after the set time.

รูปที่ 5.1: Illustration of the timer function, allowing scheduled operation for convenience.
5.6 Internal Cleaning Function
- กดปุ่ม ทำความสะอาด ปุ่ม () to activate the internal drying function, which helps prevent mold and odors inside the unit.
5.7 WIFI Control (Smart Home App)
Control your dehumidifier remotely using the Smart Home application on your smartphone.
- Download the "Smart Home" app from your device's app store.
- Follow the in-app instructions to pair your dehumidifier with your Wi-Fi network.
- Once connected, you can power on/off, change modes, set humidity, and manage the timer from your phone.

รูปที่ 5.2: Screenshot of the Smart Home app interface, demonstrating remote control capabilities for the dehumidifier.
6. ตัวเลือกการระบายน้ำ
Your dehumidifier offers three methods for water removal:
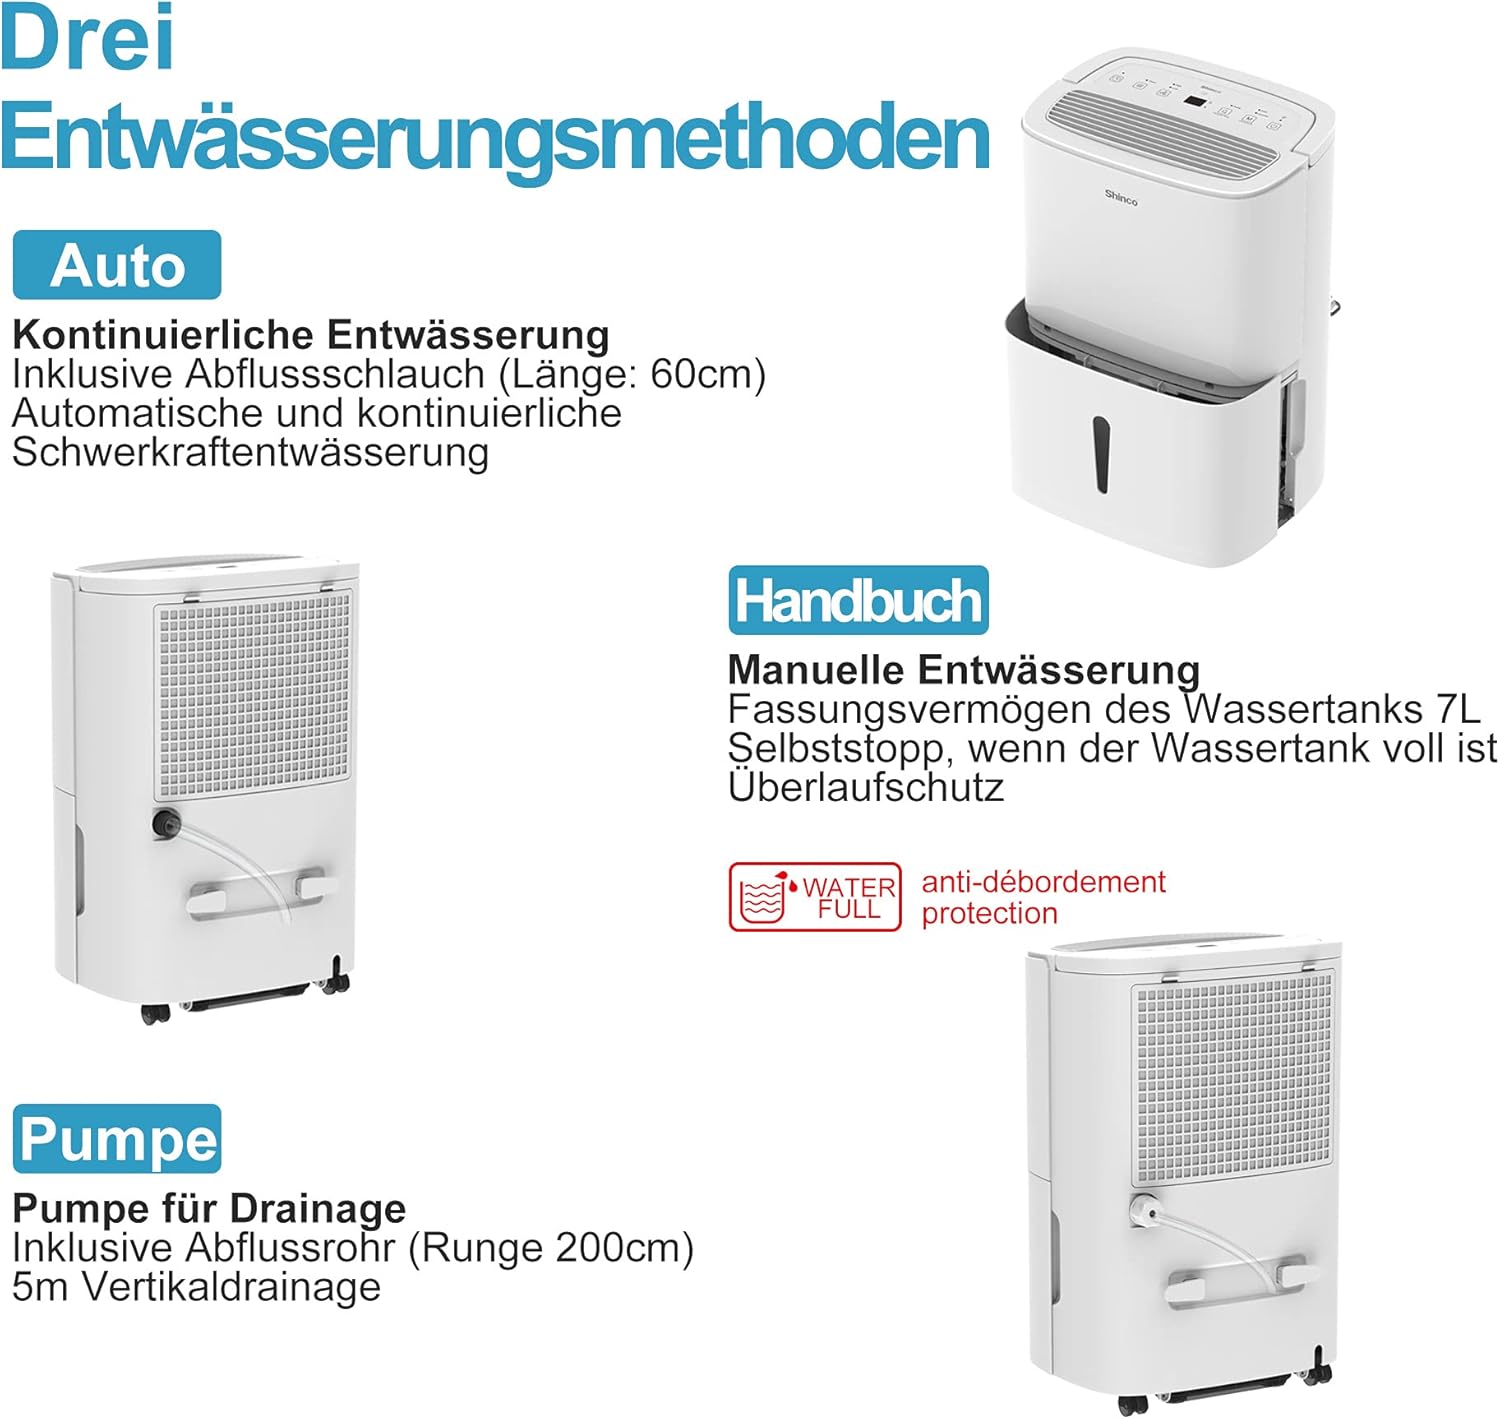
รูปที่ 6.1: Visual representation of the three drainage options: manual tank, continuous gravity drainage, and lift pump drainage.
6.1 การระบายน้ำด้วยตนเอง (ถังเก็บน้ำ)
- The dehumidifier collects water in its removable 7-liter tank.
- When the tank is full, the unit will automatically stop operating, and an indicator light will illuminate.
- ถอดถังออกอย่างระมัดระวัง เทน้ำที่สะสมไว้ทิ้ง แล้วใส่ถังกลับเข้าไปให้แน่นสนิท

รูปที่ 6.2: The display showing a 'Full' indicator, signaling that the water tank needs to be emptied.
6.2 Continuous Gravity Drainage
- For continuous operation without emptying the tank, attach the provided 60 cm drainage hose to the continuous drainage outlet on the back of the unit.
- Ensure the hose is sloped downwards to allow water to drain by gravity into a floor drain or suitable container.
6.3 Lift Pump Drainage
- The unit includes a lift pump and a 2-meter drainage hose for situations where gravity drainage is not possible.
- Connect the 2-meter hose to the lift pump drainage outlet. The pump can discharge water vertically up to 5 meters.
7. การบำรุงรักษา
การบำรุงรักษาตามปกติจะช่วยให้เครื่องลดความชื้นของคุณมีประสิทธิภาพสูงสุดและมีอายุการใช้งานยาวนาน
7.1 การทำความสะอาดแผ่นกรองอากาศ
The dehumidifier is equipped with an active carbon filter to purify the air. Clean the filter regularly.
- ปิดเครื่องและถอดปลั๊กออก
- ถอดแผ่นกรองอากาศออกจากด้านหลังของเครื่อง
- Clean the filter with a vacuum cleaner or wash it with warm, soapy water. Rinse thoroughly and allow it to air dry completely before reinserting.
- เปลี่ยนตัวกรอง

รูปที่ 7.1: Illustration of how to remove and clean the air filter, showing both the pre-filter and the active carbon filter.
7.2 การทำความสะอาดภายนอกตัวเครื่อง
- เช็ดด้านนอกของตัวเครื่องด้วยผ้านุ่มdamp ผ้า.
- ห้ามใช้สารเคมีรุนแรง น้ำยาทำความสะอาดที่มีฤทธิ์กัดกร่อน หรือตัวทำละลาย
8 การแก้ไขปัญหา
If you encounter issues, refer to the following table before contacting customer support:
| ปัญหา | สาเหตุที่เป็นไปได้ | สารละลาย |
|---|---|---|
| เครื่องไม่เปิด | ไม่มีแหล่งจ่ายไฟ เชื่อมต่อสายไฟไม่ถูกต้อง | ตรวจสอบเต้ารับไฟฟ้าและการเสียบปลั๊ก Ensure the outlet is functional |
| ไม่มีการลดความชื้น | ถังน้ำเต็ม ไส้กรองอากาศอุดตัน อุณหภูมิห้องต่ำเกินไป | ถังน้ำเปล่า ทำความสะอาดตัวกรองอากาศ Ensure room temperature is above 5°C |
| หน่วยมีเสียงดัง | หน่วยไม่อยู่บนพื้นผิวระดับ ไส้กรองอากาศอุดตัน | วางหน่วยบนพื้นผิวที่เรียบและมั่นคง ทำความสะอาดตัวกรองอากาศ |
| การรั่วไหลของน้ำ | Water tank not properly inserted Continuous drainage hose loose or blocked | Reinsert water tank correctly Check hose connection and clear any blockages |
| การเชื่อมต่อ WiFi ล้มเหลว | รหัสผ่าน Wi-Fi ไม่ถูกต้อง Router too far แอพไม่ได้อัปเดต | Verify Wi-Fi password Move unit closer to router or use a Wi-Fi extender Update Smart Home app |
9. ข้อมูลจำเพาะ
Technical details for the SHINCO WIFI Portable Dehumidifier SDZ1-50D:
| คุณสมบัติ | ข้อมูลจำเพาะ |
|---|---|
| หมายเลขรุ่น | ส.ด.แซด1-50ดี |
| ลดความชื้นความจุ | 50 ลิตร/วัน |
| กำลังไฟที่กำหนด | 750 วัตต์ |
| เล่มที่tage | 220 โวลต์ |
| ความจุถังน้ำ | 7 ลิตร |
| ระดับเสียง | 49 เดซิเบล |
| ขนาด (กว้าง x ยาว x สูง) | 29 x 39.5 x 52 ซม. |
| น้ำหนัก | 19 กิโลกรัม |
| สารทำความเย็น | R290 |
| ขนาดห้องที่แนะนำ | พื้นที่สูงสุด 55 ตารางเมตร (ประมาณ 592 ตารางฟุต) |
| ส่วนประกอบที่รวมอยู่ | Dehumidifier, Drain Hose, Instruction Manual |

รูปที่ 9.1: Diagram illustrating the physical dimensions of the dehumidifier and a summary of its technical specifications.
10. การรับประกันและการสนับสนุน
For warranty information or technical support, please refer to the warranty card included with your product or contact SHINCO customer service through their official website or the contact details provided in your purchase documentation. Please have your model number (SDZ1-50D) and purchase date ready when contacting support.


