1. บทนำ
Thank you for choosing the ETA Falco Smart Robot Vacuum Cleaner with Mopping Function. This manual provides essential information for the safe and efficient operation, maintenance, and troubleshooting of your device. Please read this manual thoroughly before using the product and keep it for future reference.
ข้อมูลด้านความปลอดภัยที่สำคัญ
- ตรวจสอบให้แน่ใจเสมอว่าหุ่นยนต์วางอยู่บนพื้นผิวที่มั่นคงและเรียบเสมอกัน
- เก็บอุปกรณ์ให้ห่างจากน้ำและความชื้น
- Do not allow children or unauthorized persons to operate the robot.
- Use only the original charging adapter and accessories provided.
- Before cleaning or maintenance, ensure the robot is powered off and unplugged from the charging station.
- Avoid operating the robot near open flames or flammable materials.
2. สินค้าหมดview
ส่วนประกอบและการควบคุม
Familiarize yourself with the main parts and controls of your ETA Falco Smart robot vacuum cleaner.
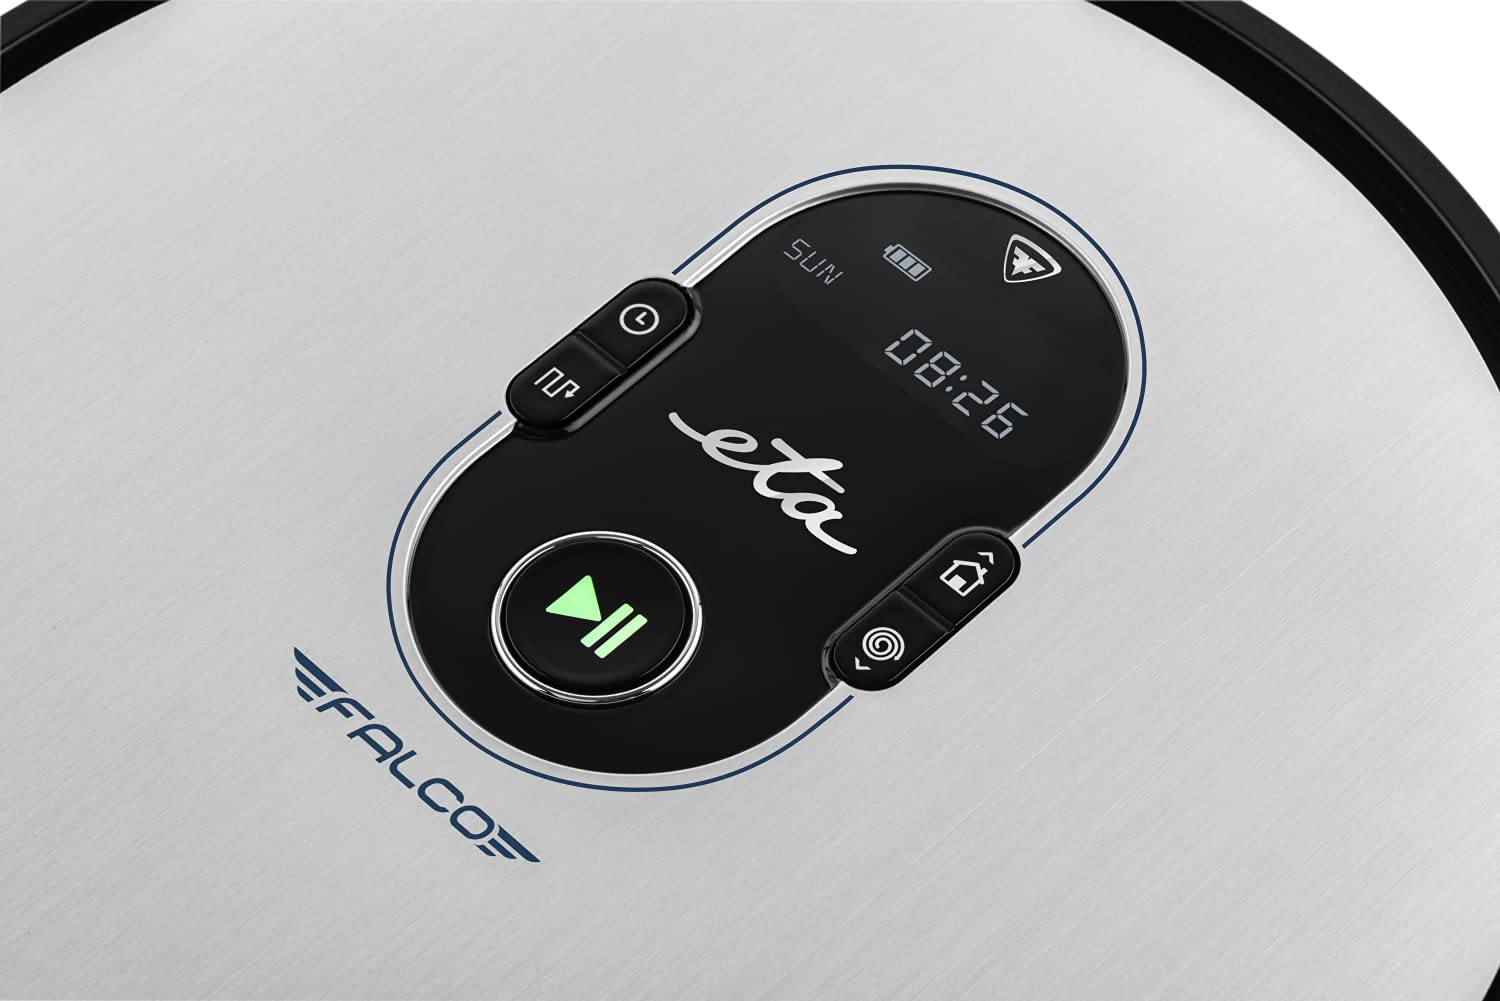
ภาพที่ 2.1: Top panel controls. This image shows the main control panel on the top of the robot, including buttons for power, scheduling, and return to charging station, along with a digital display.

ภาพที่ 2.2: ส่วนล่าง view. This image displays the bottom of the robot, highlighting the main brush, two side brushes, and the mop attachment.

ภาพที่ 2.3: Underside diagram. This diagram labels the key components on the robot's underside, including the side brushes, main brush, and mop attachment.
3. เนื้อหาบรรจุภัณฑ์
เมื่อแกะกล่องแล้วโปรดตรวจสอบให้แน่ใจว่ามีสิ่งของต่อไปนี้ครบถ้วน:
- ETA Falco Smart Robot Vacuum Cleaner
- สถานีชาร์จ
- อะแดปเตอร์ชาร์จไฟ
- รีโมทคอนโทรล
- 2x Spare Side Brushes
- Special Rotary and Lamella Brush
- 2x Cleaning Cloths (Mop Pads)
- แผ่นกรอง HEPA สำรอง
- Mop Attachment with 300 ml Water Tank
- กำแพงเสมือนจริง
4. การตั้งค่า
4.1 การชาร์จเริ่มต้น
- วางแท่นชาร์จชิดผนังในพื้นที่โล่ง โดยตรวจสอบให้แน่ใจว่าไม่มีสิ่งกีดขวางในระยะ 1 เมตรจากด้านข้างและ 2 เมตรจากด้านหน้า
- Connect the charging adapter to the charging station and plug it into a power outlet.
- Place the robot vacuum cleaner on the charging station. Ensure the charging contacts align. The robot will begin charging automatically. A full charge takes approximately 5 hours.
4.2 การติดตั้งแปรงด้านข้าง
Attach the side brushes to the designated posts on the underside of the robot by pressing them down until they click into place. Ensure the 'L' and 'R' markings on the brushes match the corresponding markings on the robot.
4.3 Connecting to the ETA SMART App
The ETA SMART app enhances the functionality of your robot. Download the app from your smartphone's app store. Follow the in-app instructions to connect your robot to your home Wi-Fi network and pair it with the app.
4.4 Setting up the Virtual Wall
The virtual wall creates an invisible barrier to restrict the robot's access to certain areas. Place the virtual wall device on the floor where you want to create a boundary. Ensure the infrared beam is directed towards the area you wish to block. The robot will detect this beam and avoid crossing it.

ภาพที่ 4.1: Robot with charging station and virtual wall. This image shows the robot positioned near its charging station, with a virtual wall device placed nearby to illustrate its function.
5. คู่มือการใช้งาน
โหมดทำความสะอาด 5.1 โหมด
The ETA Falco Smart offers four distinct cleaning modes:
- ฉลาด: General cleaning mode for optimal coverage.
- คลาสสิค: Standard cleaning pattern.
- ขอบ: ทำความสะอาดตามผนังและขอบเฟอร์นิเจอร์
- จุด: Concentrated cleaning in a specific area.
You can select these modes via the ETA SMART app or the remote control.
5.2 การกำหนดตารางการทำความสะอาด
Use the ETA SMART app to set a cleaning schedule for your robot. You can program specific times and days for the robot to automatically start cleaning.
5.3 การควบคุมด้วยตนเอง
You can manually control the robot's movement and functions using the remote control or the ETA SMART app. The app also allows you to monitor cleaning activity, battery charge, and view cleaning routes.

ภาพที่ 5.1: ETA Smart App features. This image displays the ETA Smart App interface on a smartphone, highlighting features such as remote control, cleaning history, activity monitoring, battery status, cleaning modes (SMART, CLASSIC, EDGE, SPOT), cleaning schedule, mopping intensity control, and suction power adjustment.
5.4 ฟังก์ชันถูพื้น
- Fill the 300 ml water tank with clean water. Do not use detergents or cleaning solutions that are not approved for robot vacuums.
- Attach a clean mop pad to the mop attachment.
- Slide the mop attachment into the designated slot on the underside of the robot.
- เริ่มรอบการทำความสะอาด หุ่นยนต์จะดูดฝุ่นและถูพื้นไปพร้อมกัน
6. การบำรุงรักษา
การบำรุงรักษาตามปกติจะช่วยให้หุ่นยนต์ดูดฝุ่นของคุณทำงานได้อย่างเหมาะสมที่สุดและยืดอายุการใช้งาน
6.1 การทำความสะอาดถังเก็บฝุ่นและตัวกรอง
- กดปุ่มปลดล็อคถังเก็บฝุ่นและนำถังเก็บฝุ่นออก
- เปิดถังขยะและเทขยะทั้งหมดลงในถังขยะทั่วไป
- Remove the HEPA filter and primary filter. Tap them gently to remove dust. If washable, rinse under running water and allow to air dry completely before reinserting.
- Wipe the inside of the dust bin with a dry cloth.
- Reassemble the filters and dust bin, then reinsert into the robot.
6.2 การทำความสะอาดแปรงหลัก
- พลิกหุ่นยนต์
- ถอดฝาครอบแปรงหลักออกโดยกดแท็บปลดล็อค
- ยกแปรงหลักออก
- Use the cleaning tool (if provided) or scissors to remove hair and debris tangled around the brush.
- Clean the brush compartment.
- ใส่แปรงหลักกลับเข้าไปและปิดฝาครอบให้แน่น
6.3 การทำความสะอาดแปรงด้านข้าง
Periodically check the side brushes for tangled hair or debris. If necessary, remove them by gently pulling upwards and clean them. Replace worn or damaged brushes with the spare ones provided.
6.4 การทำความสะอาดแผ่นม็อบและถังน้ำ
After each mopping session, remove the mop pad and wash it thoroughly. Empty any remaining water from the water tank and rinse it. Allow both to air dry completely before storing or reusing.
6.5 การทำความสะอาดเซ็นเซอร์
Wipe the anti-drop sensors, bumper sensors, and charging contacts on the robot and charging station with a clean, dry cloth to ensure proper function.
7 การแก้ไขปัญหา
If your robot vacuum cleaner encounters an issue, refer to the following common problems and solutions:
| ปัญหา | สาเหตุที่เป็นไปได้ | สารละลาย |
|---|---|---|
| หุ่นยนต์ไม่เปิดขึ้น | แบตเตอรี่ต่ำ; ปิดสวิตช์ไฟ | Charge the robot; Ensure power switch is ON |
| หุ่นยนต์ไม่ชาร์จ | Charging contacts dirty; Charging station unplugged | ทำความสะอาดจุดสัมผัสการชาร์จ ตรวจสอบให้แน่ใจว่าเสียบปลั๊กแท่นชาร์จแล้ว |
| ประสิทธิภาพการทำความสะอาดแย่ | ถังเก็บฝุ่นเต็ม; แปรงพันกัน; ตัวกรองอุดตัน | Empty dust bin; Clean brushes; Clean/replace filter |
| หุ่นยนต์ติดขัดบ่อยมาก | สิ่งกีดขวางบนพื้น เซ็นเซอร์สกปรก | Clear floor of cables/small items; Clean sensors |
| Virtual wall not working | Virtual wall batteries low; Incorrect placement | Replace batteries; Adjust virtual wall position |
หากปัญหายังคงมีอยู่หลังจากลองวิธีแก้ไขเหล่านี้แล้ว โปรดติดต่อฝ่ายสนับสนุนลูกค้า
8. ข้อมูลจำเพาะ
Technical specifications for the ETA Falco Smart Robot Vacuum Cleaner (Model ETA251590000):
| คุณสมบัติ | รายละเอียด |
|---|---|
| ผู้ผลิต | เวลาถึงโดยประมาณ |
| ขนาดสินค้า (กว้าง x ยาว x สูง) | 32.5 x 33.5 x 7.5 ซม. |
| น้ำหนัก | 250 กรัม |
| หมายเลขรุ่นสินค้า | ETA251590000 (T2261) |
| สีโมเดล | สีฟ้า |
| วัสดุ | พลาสติก |
| ประเภทพลังงาน | ใช้พลังงานจากแบตเตอรี่ |
| เล่มที่tage | 3 Volts (14.4V Li-ion battery, 2400 mAh) |
| จำนวนสินค้าในบรรจุภัณฑ์ | 1 |
| คุณสมบัติพิเศษ | Pet brush compatibility, Smart App control, Floating brush system, HEPA filter, Virtual wall |
| ส่วนประกอบที่รวมอยู่ | Battery, Filter, Charging station, Adapter, Remote control, Side brushes, Rotary brush, Cleaning cloths, Mop attachment, Virtual wall |
| องค์ประกอบของแบตเตอรี่ | ลิเธียมไอออน |
| อายุการใช้งานแบตเตอรี่ | สูงสุด 120 นาที |
| เวลาในการชาร์จ | ประมาณ 5 ชั่วโมง |
| คำแนะนำด้านพื้นผิว | ลามิเนต |
| ประเภทตัวควบคุม | การควบคุมแอพ |
| ความพร้อมของอะไหล่ | ไม่มีข้อมูลเกี่ยวกับอะไหล่ |
9. การรับประกันและการสนับสนุน
For warranty information, product support, or to inquire about spare parts, please refer to the warranty card included with your purchase or visit the official ETA webไซต์นี้ โปรดเก็บหลักฐานการซื้อไว้เพื่อใช้ยืนยันการรับประกัน


