1. บทนำ
This manual provides detailed instructions for the installation, operation, and maintenance of your LoraTap SS9111Q1 Wireless Light Switch Kit. Please read this manual thoroughly before installation and use to ensure proper function and safety.
2. ข้อมูลด้านความปลอดภัย
- Ensure power is disconnected before performing any electrical work.
- การติดตั้งควรดำเนินการโดยช่างไฟฟ้าที่มีคุณสมบัติหากคุณไม่แน่ใจ
- อย่าให้อุปกรณ์สัมผัสกับความชื้นหรืออุณหภูมิที่สูงเกินไป
- ใช้ตามคำแนะนำในคู่มือนี้เท่านั้น
3. เนื้อหาบรรจุภัณฑ์
ตรวจสอบว่ามีส่วนประกอบทั้งหมดอยู่ในแพ็คเกจของคุณ:
- 1x LoraTap Wireless Receiver Module
- 1x LoraTap Wireless Switch (Transmitter)
- 1x Magnetic Wall Plate for Switch
- 1x CR2032 Battery (pre-installed in switch)
- เทปกาวสองหน้า 2 ชิ้น
- Screws and Wall Plugs (for wall plate mounting)
- คู่มือการใช้งาน
4. สินค้าหมดview
The LoraTap SS9111Q1 kit consists of a wireless receiver module and a portable wireless switch. The receiver connects to your lighting circuit, while the switch sends wireless signals to control it.

รูปที่ 4.1: LoraTap Wireless Switch Kit showing the receiver module and the wireless switch with its magnetic base.
4.1. Wireless Receiver Module
This compact module is designed to be installed behind an existing light switch or directly into a ceiling rose/junction box. It receives signals from the wireless switch to control the connected light fixture.
- ป้อนข้อมูล: L (Live), N (Neutral)
- เอาท์พุต: L (Live to lamp), N (Neutral to lamp)
- สลับอินพุต: S1, S2 (for connecting a traditional wired switch, if desired)
- ปุ่มจับคู่: Used for pairing with wireless switches.
4.2. Wireless Switch (Transmitter)
The wireless switch is battery-powered and communicates with the receiver via 868Mhz radio frequency. It features a magnetic base for easy attachment to the wall plate and can be removed for use as a portable remote control.

รูปที่ 4.2: The LoraTap wireless switch can be used as a fixed wall switch or removed from its magnetic base for portable remote control.
5. การตั้งค่าและการติดตั้ง
Before starting, ensure the main power supply to the circuit is turned off at the consumer unit/fuse box.
5.1. Receiver Module Wiring
The receiver module can be installed in various locations, such as behind an existing wired switch or in a ceiling rose. Refer to the wiring diagrams below.

รูปที่ 5.1: Wiring diagram showing the receiver module connected behind a traditional wall switch. Ensure Live (L) and Neutral (N) inputs are correctly connected, and the output connects to the lamp.
- Connect the Live (L) wire from the mains supply to the 'L' input terminal on the receiver.
- Connect the Neutral (N) wire from the mains supply to the 'N' input terminal on the receiver.
- Connect the Live wire going to the lamp to the 'L' output terminal on the receiver.
- Connect the Neutral wire going to the lamp to the 'N' output terminal on the receiver.
- If connecting a traditional wired switch, connect its terminals to S1 and S2 on the receiver.
- ตรวจสอบให้แน่ใจว่าการเชื่อมต่อทั้งหมดมีความปลอดภัย
5.2. Wireless Switch Wall Plate Installation
The magnetic wall plate for the wireless switch can be installed using adhesive tape or screws.

รูปที่ 5.2: Two methods for installing the magnetic wall plate: using double-sided adhesive tape or mounting with screws.
- Method 1 (Adhesive): Clean the desired wall surface. Apply the provided double-sided adhesive tape to the back of the wall plate. Press firmly onto the wall for 30 seconds.
- วิธีที่ 2 (สกรู): Mark the screw positions on the wall using the wall plate as a template. Drill pilot holes, insert wall plugs if necessary, and secure the wall plate with screws.
- Once the wall plate is installed, the wireless switch can be magnetically attached to it.
6. Pairing the Wireless Switch with the Receiver
The kit usually comes pre-paired. If re-pairing is needed or you are adding additional switches/receivers, follow these steps:
- เปิดแหล่งจ่ายไฟหลัก
- Press and hold the pairing button on the receiver module for approximately 3 seconds until the indicator light on the receiver starts flashing.
- Within 10 seconds, press the wireless switch button once. The receiver's indicator light will stop flashing, indicating successful pairing.
- To clear all paired switches from the receiver, press and hold the pairing button for approximately 10 seconds until the indicator light flashes rapidly and then turns off.
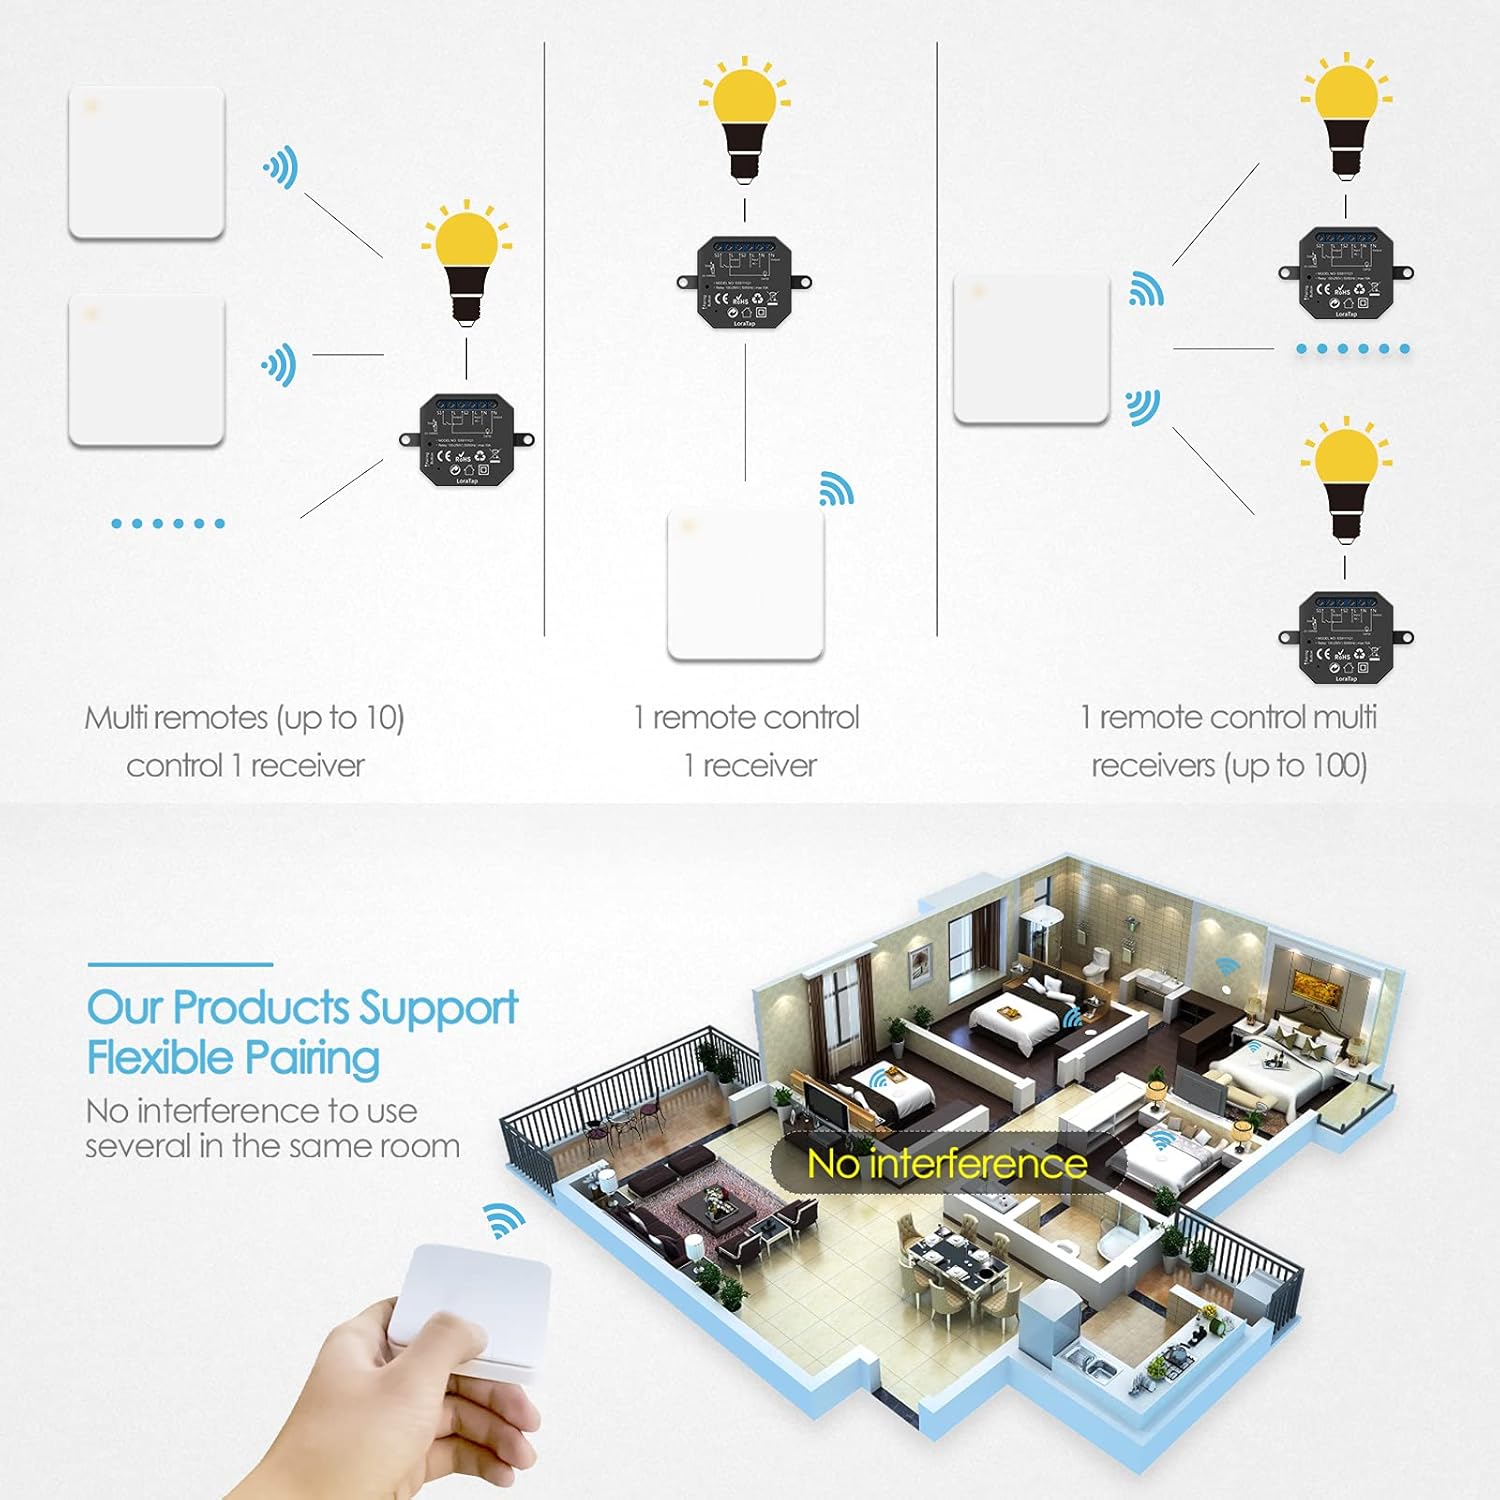
รูปที่ 6.1: The LoraTap system supports flexible pairing: multiple switches can control one receiver, or one switch can control multiple receivers, allowing for versatile lighting control configurations.
7. คู่มือการใช้งาน
Once installed and paired, operating the LoraTap Wireless Light Switch Kit is straightforward.
- การเปิด/ปิด: Press the wireless switch button once to toggle the connected light fixture on or off.
- พิสัย: The wireless switch has an indoor range of approximately 30-60 meters and an outdoor range of up to 200 meters, effective even through walls.

รูปที่ 7.1: Illustration of the wireless control range, showing effective operation indoors (30-60m) and outdoors (up to 200m).
8. การบำรุงรักษา
8.1. การเปลี่ยนแบตเตอรี่
The wireless switch is powered by a CR2032 battery, which typically lasts over 10 years or 220,000 clicks.
- Gently pry open the back cover of the wireless switch.
- ถอดแบตเตอรี่ CR2032 เก่าออก
- ใส่แบตเตอรี่ CR2032 ใหม่โดยให้ด้านบวก (+) หันขึ้น
- ปิดฝาด้านหลังอย่างแน่นหนา
8.2. การทำความสะอาด
Wipe the surfaces of the switch and receiver with a soft, dry cloth. Do not use abrasive cleaners or immerse in water.
9 การแก้ไขปัญหา
| ปัญหา | สาเหตุที่เป็นไปได้ | สารละลาย |
|---|---|---|
| Light does not respond to wireless switch. |
|
|
| Short range or intermittent control. |
|
|
10. ข้อมูลจำเพาะ
| คุณสมบัติ | รายละเอียด |
|---|---|
| หมายเลขรุ่น | SS9111Q1 |
| ยี่ห้อ | ลอร่าแท็ป |
| ปฏิบัติการฉบับที่tage (ผู้รับ) | แรงดันไฟฟ้า 100-250 โวลต์ 50/60 เฮิรตซ์ |
| รับน้ำหนักสูงสุด (ตัวรับสัญญาณ) | 10เอ |
| ความถี่ไร้สาย | 868เมกะเฮิรตซ์ |
| Wireless Range (Indoor) | 30-60 เมตร |
| Wireless Range (Outdoor) | สูงสุด 200 เมตร |
| Switch Battery Type | CR2032 (รวม) |
| Switch Battery Life | >10 years / 220,000 clicks |
| ขนาดตัวรับ | 46 มม. x 46 มม. x 18 มม. (โดยประมาณ) |
| ขนาดสวิตช์ | 9.6 x 6.7 x 8.7 ซม. (โดยประมาณ) |
| โหมดการทำงาน | ON-ON-ON (Toggle) |
| Type of Contact | เปิดปกติ |
| ประเภทการติดตั้ง | Wall Mount (for switch) |
11. การรับประกันและการสนับสนุน
For warranty information and technical support, please refer to the contact details provided with your purchase or visit the official LoraTap webไซต์นี้ โปรดเก็บหลักฐานการซื้อไว้เพื่อใช้ยืนยันการรับประกัน


