1. บทนำ
Welcome to the user manual for your GeekVape M100 Aegis Mini 2 Kit. This device is a powerful and durable e-cigarette vaporizer designed for an optimal vaping experience. It features a robust 2500mAh internal battery, capable of delivering up to 100W of power, and is paired with the GeekVape Z Nano 2 Tank, compatible with GeekVape B Series Coils.
The M100 Aegis Mini 2 is built with advanced durability, boasting an IP68 rating for water and dust resistance, along with innovative shock resistance. Its A-lock design prevents accidental firing, ensuring a stable and safe output. The device also features a clear 1.08-inch full screen display for easy operation and monitoring.
หมายเหตุด้านความปลอดภัยที่สำคัญ: This product does not contain nicotine or tobacco. Sale is prohibited to persons under 18 years of age. By ordering this product, you certify that you are over 18 years old.
2. เนื้อหาบรรจุภัณฑ์
กรุณาทำเครื่องหมายในช่องสำหรับรายการต่อไปนี้:
- 1 x GeekVape M100 Aegis Mini 2 Mod
- 1 x GeekVape Z Nano 2 Tank (3.5ml)
- 1 x GeekVape B Series 0.2ohm Coil (Pre-installed)
- 1 x GeekVape B Series 0.6ohm Coil (Spare)
- 1 x Drip Tip
- เครื่องมือคอยล์ 1 ชิ้น
- 1 x Spare Parts Pack
- 1 x Spare Glass Tube
- สาย USB Type-C 1 เส้น

Image: The GeekVape M100 Aegis Mini 2 Kit, its packaging, and all included accessories laid out.
3. สินค้าหมดview
Familiarize yourself with the main components of your GeekVape M100 Aegis Mini 2 Kit.

ภาพ: ด้านหน้า view of the assembled GeekVape M100 Aegis Mini 2 Kit in classic black.
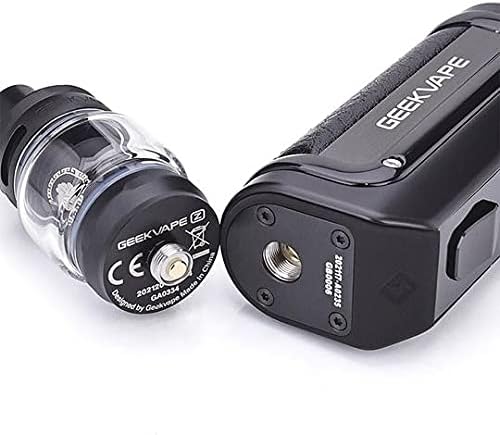
ภาพ: ระยะใกล้ view of the 510 connection point on the mod and the base of the Z Nano 2 Tank.

ภาพ: รายละเอียด view of the 1.08-inch full screen display showing power, resistance, ampเอะอะโวลtage, and puff counter.

Image: Several GeekVape B Series Coils, highlighting their mesh design and resistance markings.
4. คู่มือการติดตั้ง
4.1. Installing the Coil
- Unscrew the base of the Z Nano 2 Tank from the main tank section.
- Carefully push the GeekVape B Series Coil into the designated slot in the tank base. Ensure it is seated firmly.
- เตรียมคอยล์ให้พร้อม: Before reassembling, apply a few drops of e-liquid to the cotton wicking ports of the new coil. This saturates the cotton and prevents dry hits.
- Screw the tank base back onto the tank section.
4.2. Filling the E-liquid
- Locate the top cap of the Z Nano 2 Tank.
- Twist the top cap a quarter turn counter-clockwise to remove it, revealing the fill ports.
- Insert the nozzle of your e-liquid bottle into one of the fill ports (avoid the center airflow hole).
- Slowly fill the tank with e-liquid up to the maximum fill line.
- Replace the top cap by aligning it and twisting clockwise until secure.
- สำคัญ: After filling a new coil, let the tank stand upright for at least 5-10 minutes to allow the e-liquid to fully saturate the coil. This prevents burning the coil.
4.3. การชาร์จอุปกรณ์
- Locate the Type-C charging port on the side of the M100 Mod, usually protected by a silicone flap.
- Open the silicone flap.
- Connect the provided USB Type-C cable to the device and the other end to a 5V/2A wall adapter or a compatible USB port.
- The screen will display the charging status. The battery icon will indicate charging progress.
- Once fully charged, disconnect the cable and close the silicone flap to maintain IP68 rating.

Image: Close-up of the GeekVape M100 Mod showing the Type-C charging port with its protective cover open.
5. คู่มือการใช้งาน
5.1. เปิด/ปิดเครื่อง
- หากต้องการเปิดเครื่อง ON: Press the fire button 5 times rapidly within 2 seconds. The screen will light up.
- หากต้องการเปิดเครื่อง ปิด: Press the fire button 5 times rapidly within 2 seconds. The screen will display "System Off".
5.2. การปรับค่าน้ำtage
- Once the device is on, use the - และ - adjustment buttons located below the screen to increase or decrease the wattage.
- วัดtage range is typically 5W to 100W. Adjust according to your coil's recommended wattage range for optimal performance and coil longevity.
5.3. A-Lock Function
- The M100 features an A-lock switch on the side of the device.
- เลื่อนสวิตช์ ลง to lock the device, preventing accidental presses and firing. This is useful when carrying the device in a pocket or bag.
- เลื่อนสวิตช์ up to unlock the device and resume normal operation.
5.4. การสูบบุหรี่ไฟฟ้า
- With the tank filled and coil primed, and the device powered on and unlocked, press and hold the fire button while inhaling from the drip tip.
- ปล่อยปุ่มยิงเมื่อคุณสูดหายใจเสร็จ
6. การบำรุงรักษา
6.1. การเปลี่ยนคอยล์
- Coils typically need to be replaced every 1-2 weeks, depending on usage and e-liquid type.
- A burnt taste, reduced vapor production, or diminished flavor are signs that the coil needs replacement.
- Follow the steps in Section 4.1 to replace the coil.
6.2. การทำความสะอาดถัง
- To clean the tank, disassemble it by removing the top cap, glass tube, and coil.
- Rinse all components (except the coil) with warm water. For a deeper clean, use a mild dish soap and rinse thoroughly.
- ตรวจสอบให้แน่ใจว่าชิ้นส่วนทั้งหมดแห้งสนิทก่อนประกอบกลับเข้าไปใหม่
6.3. การทำความสะอาดอุปกรณ์
- Wipe the mod body with a soft, damp cloth to remove any dust or e-liquid residue.
- รักษาช่องชาร์จให้สะอาดและปราศจากสิ่งสกปรก
- Do not submerge the entire device in water, despite its IP68 rating, unless specifically instructed for cleaning. The rating is for accidental exposure.
7 การแก้ไขปัญหา
| ปัญหา | สาเหตุที่เป็นไปได้ | สารละลาย |
|---|---|---|
| อุปกรณ์ไม่เปิด | แบตเตอรี่เหลือน้อย; อุปกรณ์ปิดอยู่; อุปกรณ์มีปัญหา | ชาร์จอุปกรณ์; กดปุ่มยิง 5 ครั้งอย่างรวดเร็ว; ติดต่อฝ่ายสนับสนุนหากปัญหายังคงอยู่ |
| ไม่มีการผลิตไอระเหย | Coil not installed correctly; No e-liquid; Low battery; Wattage too low; Coil burnt out | Ensure coil is seated; Fill tank; Charge device; Increase wattage; Replace coil. |
| รสไหม้ | Coil not primed; Coil burnt out; E-liquid level too low; Wattagอีสูงเกินไป | Prime new coil; Replace coil; Refill tank; Reduce wattage. |
| E-liquid leaking from tank | Coil not installed correctly; O-rings damaged/missing; Tank overfilled; Airflow not closed during filling | Reinstall coil; Check/replace O-rings; Do not overfill; Ensure top cap is secure. |
| "Atomizer Short" or "No Atomizer" error | Coil not making contact; Faulty coil; Tank not screwed on properly | Reseat coil; Try a new coil; Ensure tank is screwed on firmly but not overtightened. |
8. ข้อมูลจำเพาะ
| คุณสมบัติ | รายละเอียด |
|---|---|
| ยี่ห้อ | กีควาป |
| แบบอย่าง | Aegis Mini 2 (M100) Kit |
| สี | Classic Black (Noir Classique) |
| ขนาด (กว้าง x ยาว x สูง) | 30 x 10 x 70 mm (approximate for mod) |
| น้ำหนัก | 100 กรัม (โดยประมาณ) |
| ความจุของแบตเตอรี่ | 2500 mAh (ภายใน) |
| เอาท์พุต วัดtage | สูงสุด 100 วัตต์ |
| พอร์ตชาร์จ | ประเภท C, 5V/2A |
| ปริมาตรถัง | 3.5 Milliliters (Z Nano 2 Tank) |
| ความเข้ากันได้ของคอยล์ | GeekVape B Series Coils |
| หน้าจอแสดงผล | 1.08 inch Full Screen |
| ระดับความทนทาน | IP68 Water & Dust Resistance, Shock Resistance |
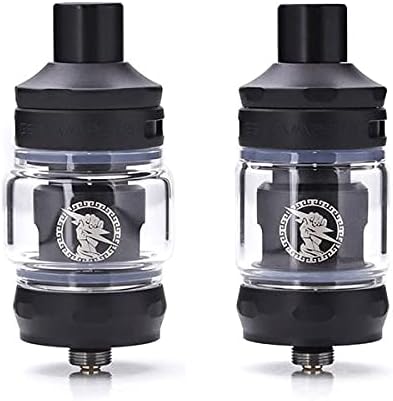
Image: The GeekVape M100 Aegis Mini 2 Kit being splashed with water, illustrating its IP68 water resistance.
9. ข้อมูลด้านความปลอดภัย
Please read and adhere to the following safety guidelines to ensure safe operation of your device:
- Keep the device away from extreme temperatures, direct sunlight, and moisture (beyond its IP68 rating).
- อย่าใช้แบตเตอรี่หรือเครื่องชาร์จที่ชำรุด
- ห้ามถอดชิ้นส่วนอุปกรณ์เกินกว่าที่ระบุไว้ในคู่มือนี้
- เก็บให้พ้นจากมือเด็กและสัตว์เลี้ยง
- Use only genuine GeekVape coils and accessories.
- กำจัดอุปกรณ์และส่วนประกอบอย่างมีความรับผิดชอบตามกฎระเบียบท้องถิ่น
- ผลิตภัณฑ์นี้มีไว้สำหรับผู้สูบบุหรี่และนักสูบบุหรี่ไฟฟ้าที่เป็นผู้ใหญ่เท่านั้น
10. การรับประกันและการสนับสนุน
For warranty information and customer support, please refer to the warranty card included in your package or visit the official GEEKVAPE website. If you encounter any issues not covered in this manual, please contact the retailer or manufacturer's customer service for assistance.
โปรดเก็บหลักฐานการซื้อไว้เพื่อใช้ในกรณีเรียกร้องการรับประกัน


