1. บทนำ
This manual provides comprehensive instructions for the installation, operation, and maintenance of your Defiant GA7X2D01AAP Castle Satin Nickel Single Cylinder Electronic Keypad Deadbolt. This electronic deadbolt offers enhanced security and convenience through keyless entry technology, eliminating the need for traditional keys. It is designed for ease of use and reliable performance, suitable for residential applications.
Please read this manual thoroughly before installation and operation to ensure proper functionality and to maximize the lifespan of your product.
2. การตั้งค่าและการติดตั้ง
The Defiant GA7X2D01AAP deadbolt is designed for simple installation without the need for hard wiring. It is compatible with doors ranging from 1-3/8 inches to 1-3/4 inches in thickness. Ensure you have the necessary tools, such as a screwdriver, before beginning the installation process.
2.1 เนื้อหาบรรจุภัณฑ์
ตรวจสอบว่าส่วนประกอบทั้งหมดมีอยู่ก่อนเริ่มการติดตั้ง:
- Electronic Keypad Assembly (Exterior)
- ชุดเดดโบลต์ภายใน
- สลัก Deadbolt
- จานตี
- สกรูยึด
- ปุ่มกดจริง 2 ปุ่ม
- แม่แบบการติดตั้ง (ถ้ามี)

Figure 2.1: Included components, showing the two physical keys, the strike plate, and a cylindrical mounting ring.
2.2 การติดตั้งแบตเตอรี่
The deadbolt operates on 4 AA batteries (not included). It is recommended to use new, high-quality alkaline batteries for optimal performance.
- Remove the battery cover from the interior deadbolt assembly.
- ใส่แบตเตอรี่ AA จำนวน 4 ก้อน โดยให้แน่ใจว่าขั้วถูกต้อง (+/-)
- เปลี่ยนฝาครอบแบตเตอรี่
2.3 ขั้นตอนการติดตั้งทางกายภาพ
Follow these general steps for physical installation. Refer to the detailed instructions provided in your product packaging for specific drilling and mounting procedures.
- Prepare the door: Ensure the door is properly bored for a deadbolt. The deadbolt is designed for standard door preparations.
- Install the latch: Insert the deadbolt latch into the door edge. Ensure the "UP" arrow (if present) is facing upwards.
- Install the exterior keypad assembly: Feed the cable from the exterior keypad through the door hole and align the keypad with the latch.
- Install the interior assembly: Connect the cable from the exterior keypad to the interior assembly. Secure the interior assembly to the door using the provided mounting screws.
- Install the strike plate: Secure the strike plate to the door frame, ensuring it aligns correctly with the deadbolt latch.
- Test the lock: After installation, test the deadbolt using both the keypad and the physical key to ensure smooth operation.

รูปที่ 2.2: ด้านข้าง view of the deadbolt latch mechanism, showing how it fits into the door edge.
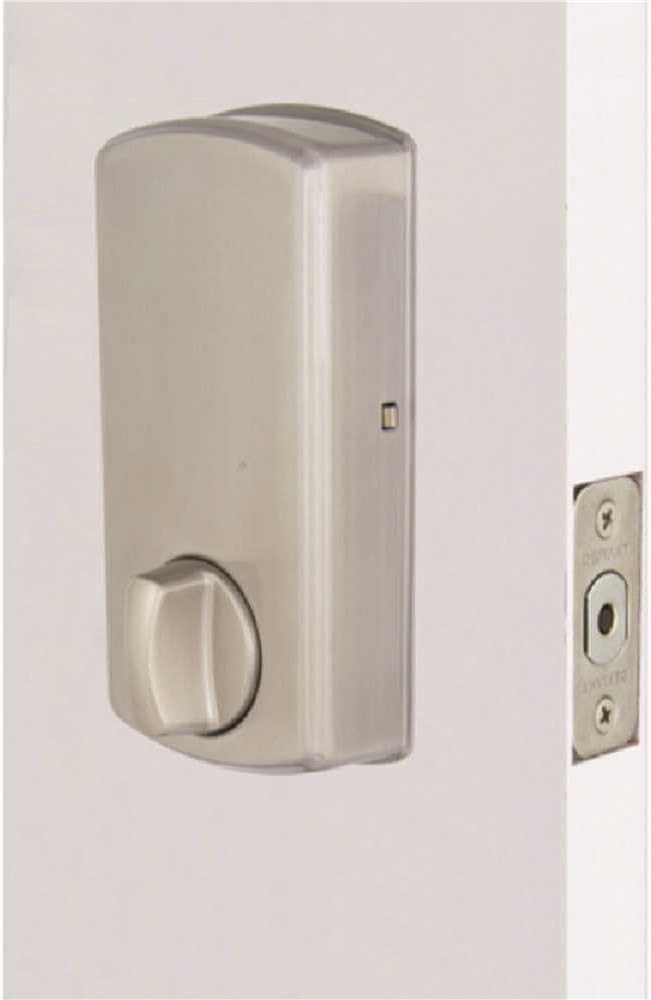
รูปที่ 2.3 : ภายใน view of the deadbolt, showing the thumb turn and battery compartment.
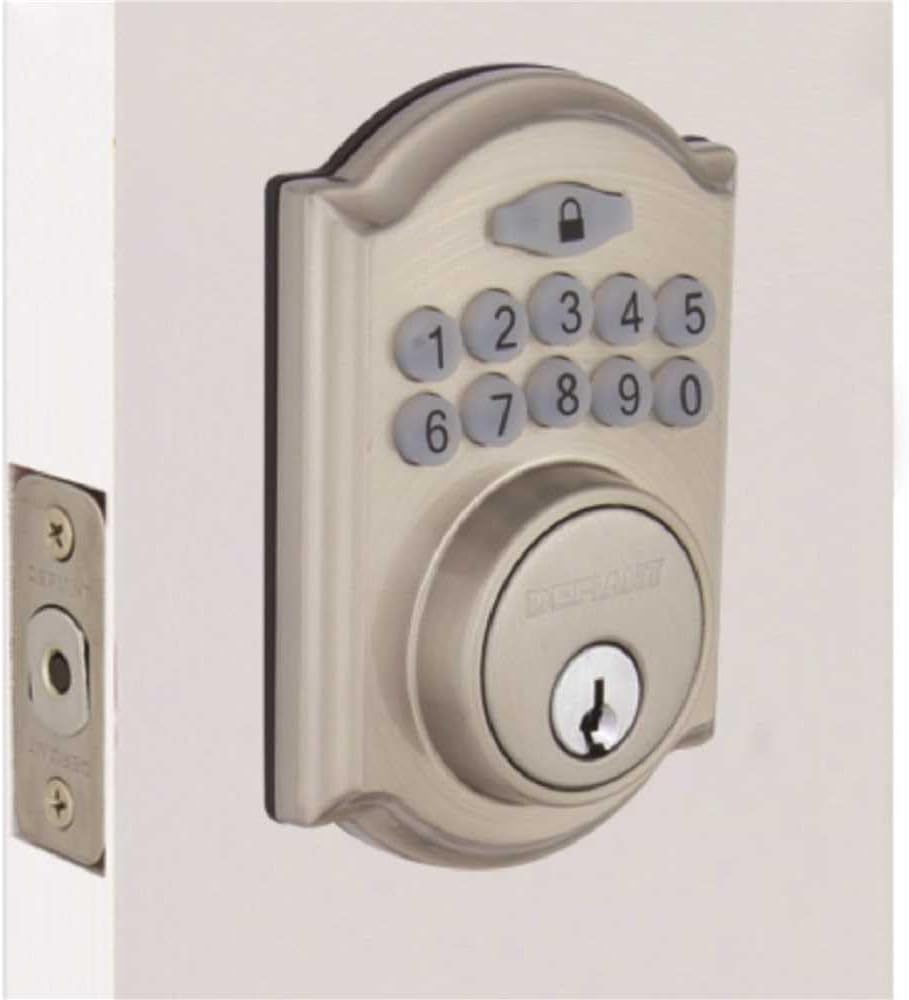
Figure 2.4: The Defiant electronic deadbolt installed on a door, providing a visual of the complete exterior assembly.
3. คู่มือการใช้งาน
Your Defiant electronic deadbolt offers convenient keyless access and customizable security features.
3.1 ปุ่มกดโอเวอร์view

Figure 3.1: The electronic keypad, featuring a backlit display for improved visibility in low light conditions.
The keypad is backlit for increased visibility, making it easy to operate in low-light conditions.
3.2 Setting User Codes
Refer to your product's specific programming guide for detailed steps on how to set, change, and delete user codes. Typically, this involves entering a master code followed by a sequence to add or modify user codes.
3.3 การล็อคและปลดล็อค
- การปลดล็อค: Enter a valid user code on the keypad. The deadbolt will retract.
- ล็อค: Press the lock button on the keypad, or use the thumb turn on the interior side.
3.4 คุณสมบัติล็อคอัตโนมัติ
The deadbolt features an auto-lock function with an adjustable delay, typically ranging from 10 to 99 seconds. This feature automatically locks the deadbolt after a set period once it has been unlocked, providing added security. Consult your programming guide to enable and adjust this setting.
3.5 โหมดวันหยุด
User codes can be temporarily deactivated as needed, which is useful for vacation periods or when you want to restrict access without deleting codes. Refer to your programming guide for instructions on activating and deactivating vacation mode.
4. การบำรุงรักษา
Regular maintenance ensures the longevity and reliable operation of your electronic deadbolt.
4.1 การทำความสะอาด
ทำความสะอาดด้านนอกของกลอนประตูด้วยผ้าเนื้อนุ่มและแห้งamp ผ้า หลีกเลี่ยงการใช้น้ำยาทำความสะอาดที่มีฤทธิ์กัดกร่อน ตัวทำละลาย หรือสารเคมีรุนแรง เพราะอาจทำให้พื้นผิวและชิ้นส่วนอิเล็กทรอนิกส์เสียหายได้
4.2 การเปลี่ยนแบตเตอรี่
The deadbolt is equipped with a low battery indicator. When the batteries are low, the indicator will alert you, typically through a series of beeps or a flashing light. Replace all 4 AA batteries promptly when this occurs to ensure continuous operation. Always use new, high-quality alkaline batteries.
- ถอดฝาครอบแบตเตอรี่ที่ส่วนประกอบภายในออก
- ถอดแบตเตอรี่เก่าออกและกำจัดทิ้งตามระเบียบข้อบังคับของท้องถิ่น
- ใส่แบตเตอรี่ AA ใหม่ โดยสังเกตขั้วให้ถูกต้อง
- เปลี่ยนฝาครอบแบตเตอรี่
4.3 Mechanical Check
Periodically check the screws and mounting hardware to ensure they are tight. Ensure the deadbolt latch moves freely and smoothly without obstruction. Lubricate the latch mechanism with a silicone-based lubricant if necessary, avoiding oil-based lubricants that can attract dust.
5 การแก้ไขปัญหา
This section addresses common issues you might encounter with your electronic deadbolt.
5.1 Keypad Not Responding / No Power
- ตรวจสอบแบตเตอรี่: The most common cause. Replace all 4 AA batteries with new ones.
- การวางแนวแบตเตอรี่: ตรวจสอบให้แน่ใจว่าใส่แบตเตอรี่ในขั้วที่ถูกต้อง (+/-)
- การเชื่อมต่อหลวม: Verify that the cable connecting the exterior keypad to the interior assembly is securely plugged in.
5.2 Deadbolt Does Not Lock or Unlock
- รหัสไม่ถูกต้อง: Ensure the correct user code is being entered.
- แบตเตอรี่ต่ำ: Replace batteries if the low battery indicator is active.
- การจัดตำแหน่งที่ไม่ถูกต้อง: Check if the deadbolt latch and strike plate are properly aligned. Adjust the strike plate if necessary.
- สิ่งกีดขวาง: Ensure there are no obstructions in the door frame or latch mechanism.
- Programming Issue: If codes are not working, try reprogramming them according to the programming guide.
5.3 Auto-Lock Not Functioning
- Feature Enabled: Verify that the auto-lock feature is enabled in the lock's programming.
- Delay Setting: Check the auto-lock delay setting. It might be set to a longer duration than expected.
5.4 Keypad Backlight Not Working
- แบตเตอรี่: Low batteries can affect backlight performance. Replace batteries.
- เซ็นเซอร์: Some keypads have a light sensor. Ensure it's not obstructed or in an unusually bright environment that would prevent the backlight from activating.
6. ข้อมูลจำเพาะ
| คุณสมบัติ | รายละเอียด |
|---|---|
| ยี่ห้อ | ท้าทาย |
| ชื่อรุ่น | GA7X2D01AAP |
| ประเภทล็อค | สลักเกลียวปุ่มกดอิเล็กทรอนิกส์ |
| วัสดุ | สังกะสี |
| เสร็จ | นิกเกิลซาติน |
| ขนาด (กว้าง x ยาว x สูง) | ประมาณ 5 x 5 x 5 นิ้ว |
| น้ำหนักสินค้า | ประมาณ 10.1 ปอนด์ |
| แหล่งพลังงาน | แบตเตอรี่ AA 4 ก้อน (ไม่รวม) |
| ความเข้ากันได้ของความหนาของประตู | 1-3/8 นิ้ว ถึง 1-3/4 นิ้ว |
| เกรดความปลอดภัย | ANSI / BHMA เกรด 3 |
| ส่วนประกอบที่รวมอยู่ | Electronic Deadbolt, 2 Keys |
| คุณสมบัติพิเศษ | Backlit Keypad, Auto-Lock (adjustable delay), Low Battery Indicator, Vacation Mode |
7. การรับประกันและการสนับสนุน
7.1 การรับประกันสินค้า
The Defiant GA7X2D01AAP Electronic Keypad Deadbolt is backed by a รับประกัน 1 ปี นับจากวันที่ซื้อ การรับประกันนี้ครอบคลุมถึงความบกพร่องของวัสดุและฝีมือการผลิตภายใต้การใช้งานปกติ โปรดเก็บหลักฐานการซื้อไว้เพื่อขอรับสิทธิ์การรับประกัน
The warranty does not cover damage resulting from improper installation, misuse, abuse, neglect, unauthorized repairs, or acts of nature.
7.2 การสนับสนุนลูกค้า
For technical assistance, troubleshooting beyond this manual, or warranty inquiries, please contact Defiant customer support. Refer to the contact information provided in your product packaging or visit the official Defiant webเว็บไซต์สำหรับรายละเอียดการสนับสนุนล่าสุด
When contacting support, please have your product model number (GA7X2D01AAP) and proof of purchase readily available.


