1. บทนำ
Thank you for choosing the CREATE WINDCALM M Ceiling Fan. This manual provides essential information for the safe installation, operation, and maintenance of your new ceiling fan. Please read this manual thoroughly before installation and keep it for future reference.

Image 1.1: The CREATE WINDCALM M Ceiling Fan, showcasing its sleek design, accompanying remote control, and the smartphone app interface for smart control.
2. คำแนะนำด้านความปลอดภัย
ควรปฏิบัติตามข้อควรระวังด้านความปลอดภัยขั้นพื้นฐานเสมอเมื่อติดตั้งและใช้งานเครื่องใช้ไฟฟ้า เพื่อลดความเสี่ยงจากไฟไหม้ ไฟฟ้าช็อต และการบาดเจ็บส่วนบุคคล
- ตรวจสอบให้แน่ใจว่าได้ถอดแหล่งจ่ายไฟออกก่อนการติดตั้งหรือการบำรุงรักษา
- Installation should be performed by a qualified electrician or a competent person.
- The mounting structure must be capable of supporting the fan's weight.
- ห้ามสอดสิ่งของเข้าไปในใบพัดของพัดลมขณะที่พัดลมกำลังทำงาน
- ควรกันเด็กและสัตว์เลี้ยงให้อยู่ห่างจากพัดลมขณะใช้งาน
- This fan is suitable for indoor and outdoor covered areas.
3. เนื้อหาบรรจุภัณฑ์
แกะกล่องส่วนประกอบทั้งหมดอย่างระมัดระวังและตรวจสอบกับรายการด้านล่าง หากมีชิ้นส่วนใดขาดหายหรือเสียหาย โปรดติดต่อฝ่ายบริการลูกค้าทันที
- Ceiling Fan Motor Unit
- Fan Blades (3x)
- ตัวยึด
- รีโมทคอนโทรล
- อุปกรณ์สำหรับติดตั้ง (สกรู, พุก, แหวนรอง)
- คู่มือการใช้งาน
4. การตั้งค่าและการติดตั้ง
โปรดทำตามขั้นตอนเหล่านี้เพื่อการติดตั้งที่ถูกต้อง แนะนำให้ติดตั้งโดยช่างผู้เชี่ยวชาญ
- เตรียมสถานที่ติดตั้ง: Ensure the ceiling joist or support structure can hold the fan's weight (approximately 6.22 kg).
- ติดตั้งขายึด: Secure the mounting bracket to the ceiling using the provided screws and anchors. Ensure it is firmly attached.
- การเดินสายไฟ: Connect the fan's electrical wires to your household wiring according to local electrical codes. The fan operates on 240 Volts. Ensure correct connection of Live (L), Neutral (N), and Ground (Earth) wires.
- Attach the Fan Unit: Carefully lift the fan motor unit and attach it to the mounting bracket. Many models include a hook to temporarily hang the fan while wiring.
- ติดตั้งใบพัดพัดลม: Attach the three fan blades to the motor unit using the provided screws. Ensure all screws are tightened securely.

ภาพที่ 4.1: รายละเอียด view of the fan's central unit, showing the robust construction and points for blade attachment.

Image 4.2: The ceiling fan seamlessly integrated into a room, demonstrating its aesthetic appeal and compact design.
5. การดำเนินการ
Your CREATE WINDCALM M Ceiling Fan can be controlled via the included remote control or the CREATE mobile application (for Wi-Fi enabled models).
5.1. ฟังก์ชั่นการควบคุมระยะไกล
- เปิด/ปิดเครื่อง: เปิดหรือปิดพัดลม
- การควบคุมความเร็ว: สามารถปรับความเร็วพัดลมได้ 6 ระดับ
- ตัวจับเวลา: ตั้งค่าพัดลมให้ปิดอัตโนมัติหลังจากผ่านไป 1, 2 หรือ 4 ชั่วโมง
- โหมดฤดูร้อน/ฤดูหนาว: เปลี่ยนทิศทางการหมุนของใบพัด
5.2. Summer/Winter Operation
พัดลมรุ่นนี้มีมอเตอร์ที่หมุนได้สองทิศทาง เพื่อความสบายตลอดทั้งปี
- โหมดฤดูร้อน (หมุนทวนเข็มนาฬิกา): Pushes cool air downwards, creating a refreshing breeze. This mode helps to cool the room by circulating air.
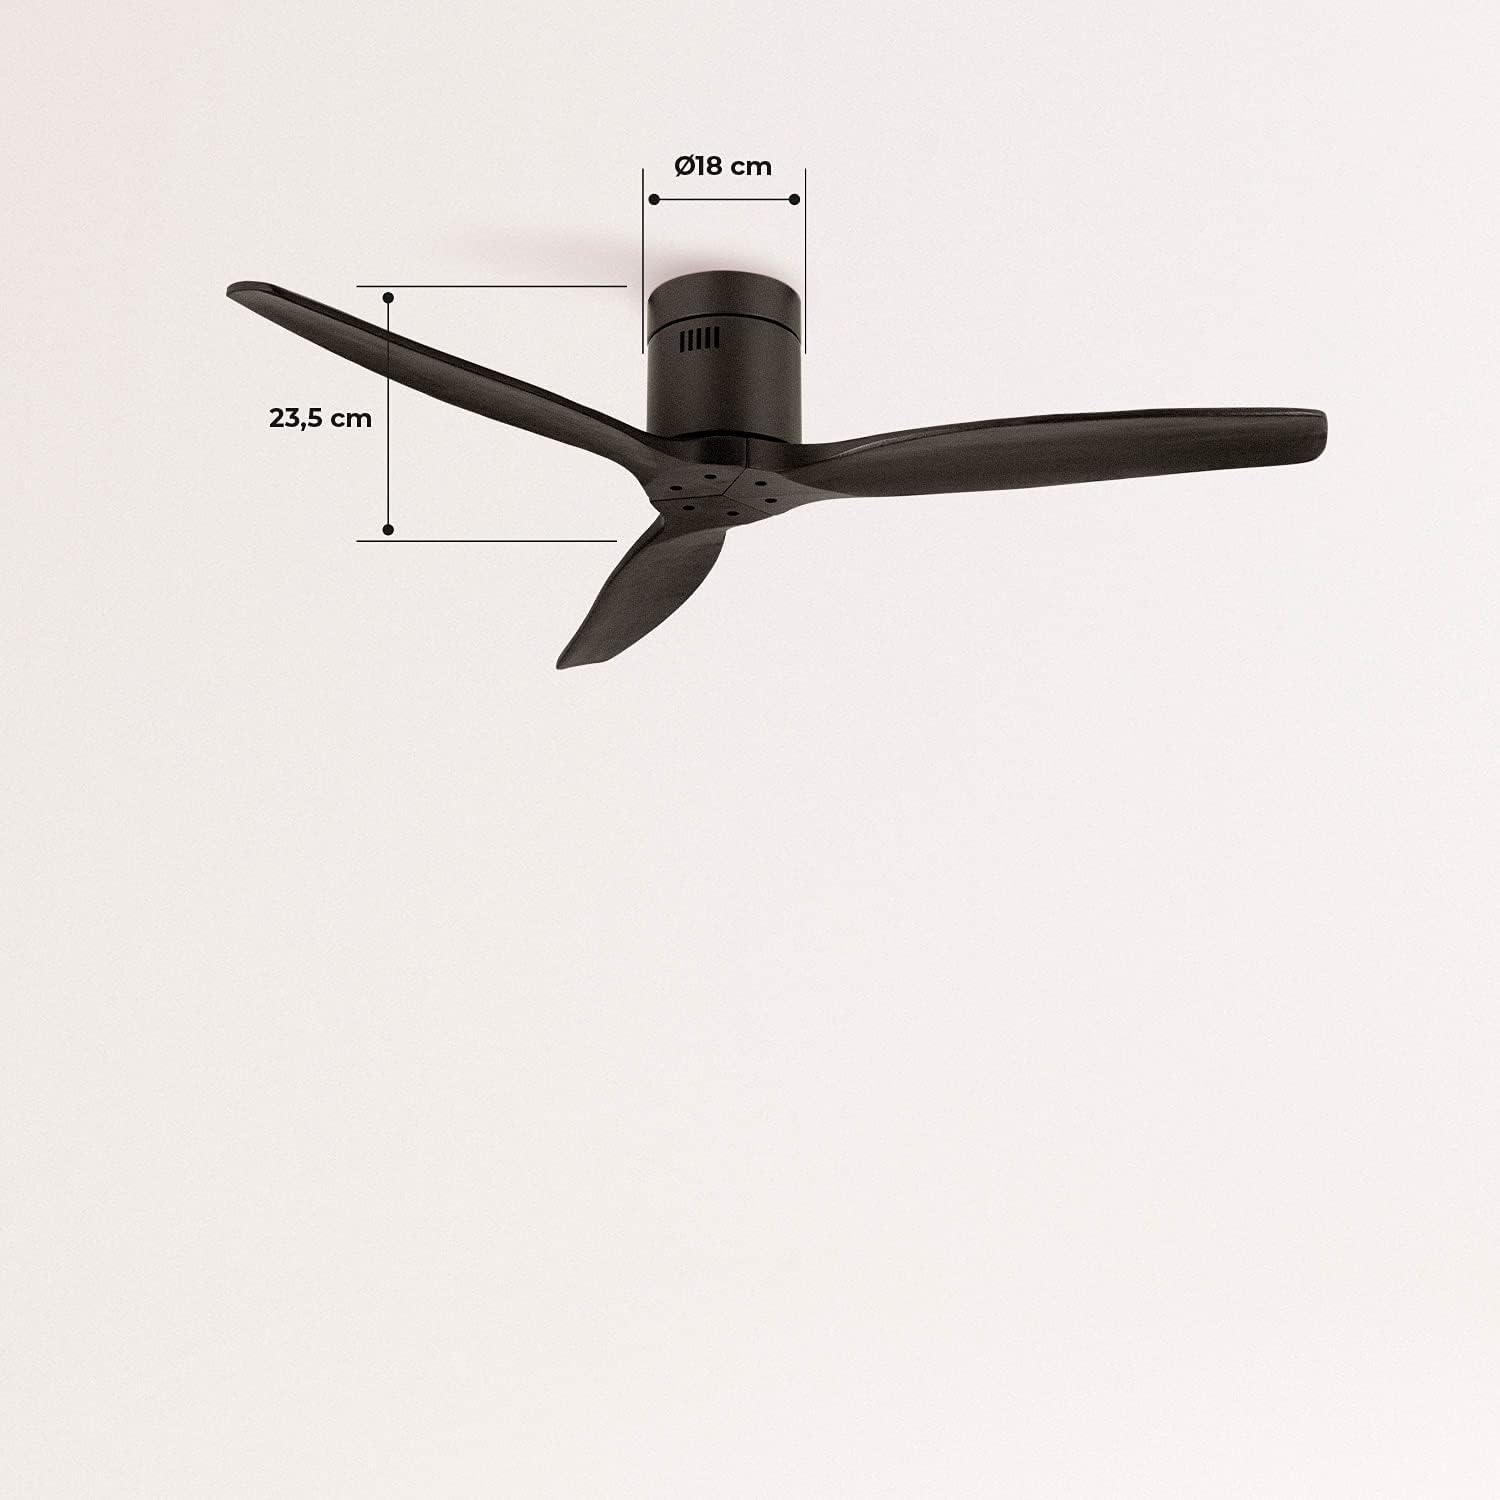
Image 5.1: Visual representation of the fan's airflow in Summer Mode, where cool air is directed downwards.
- โหมดฤดูหนาว (หมุนตามเข็มนาฬิกา): Draws cool air upwards, circulating warm air trapped near the ceiling downwards. This helps to distribute heat more evenly, reducing heating costs.

Image 5.2: Visual representation of the fan's airflow in Winter Mode, where warm air is recirculated from the ceiling.
5.3. Wi-Fi and App Control (Smart Option)
If your model includes the Wi-Fi option, download the CREATE app to control and program your fan from your smartphone. Follow the in-app instructions for pairing your device.
6. การบำรุงรักษา
การบำรุงรักษาตามปกติจะช่วยให้พัดลมของคุณมีประสิทธิภาพสูงสุดและมีอายุการใช้งานยาวนาน
- การทำความสะอาด: ปัดฝุ่นใบพัดลมและตัวเรือนมอเตอร์เป็นประจำด้วยผ้านุ่มๆamp ผ้า ห้ามใช้สารทำความสะอาดที่มีฤทธิ์กัดกร่อนหรือตัวทำละลาย
- การตรวจสอบใบมีด: ตรวจสอบความแน่นของสกรูยึดใบเลื่อยเป็นระยะ ใบเลื่อยที่หลวมอาจทำให้เครื่องสั่นและมีเสียงดัง
- การหล่อลื่นมอเตอร์: มอเตอร์ DC ของพัดลมได้รับการหล่อลื่นอย่างถาวรและไม่จำเป็นต้องเติมน้ำมันเพิ่มเติม
7 การแก้ไขปัญหา
หากคุณพบปัญหาเกี่ยวกับพัดลม โปรดดูปัญหาทั่วไปและวิธีแก้ไขต่อไปนี้:
| ปัญหา | สาเหตุที่เป็นไปได้ | สารละลาย |
|---|---|---|
| พัดลมไม่เปิด | No power supply; Remote control battery low; Incorrect wiring. | ตรวจสอบเบรกเกอร์วงจร; เปลี่ยนแบตเตอรี่รีโมท; ตรวจสอบการเชื่อมต่อสายไฟ |
| พัดลมสั่น | สกรูยึดใบพัดหลวม; ใบพัดไม่สมดุล; ตัวยึดใบพัดหลวม | Tighten all blade screws; Ensure blades are correctly installed; Check mounting bracket for secure attachment. |
| เสียงดังเกินไป | ชิ้นส่วนหลวม; ปัญหาที่มอเตอร์ | Check all screws and connections; If noise persists, contact customer support. |
| รีโมตคอนโทรลไม่ทำงาน | แบตเตอรี่เหลือน้อย/หมด; รีโมทไม่ได้เชื่อมต่อ | Replace battery; Refer to remote pairing instructions in the full manual (if applicable). |
| ปัญหาการเชื่อมต่อ Wi-Fi | Incorrect network password; Router too far; App issues. | Verify Wi-Fi password; Move router closer or use a Wi-Fi extender; Reinstall app or check for updates. |
8. ข้อมูลจำเพาะ
| คุณสมบัติ | ข้อมูลจำเพาะ |
|---|---|
| ยี่ห้อ | สร้าง |
| หมายเลขรุ่น | 93531_182750 |
| สี | สีดำ |
| สไตล์ | ไร้แสง |
| แหล่งพลังงาน | สายไฟ |
| เล่มที่tage | 240 โวลต์ |
| วัดtage | 40 วัตต์ |
| การไหลเวียนของอากาศ | 210 Cubic meters per minute |
| ระดับเสียง | 50 เดซิเบล |
| ความยาวใบมีด | 66 เซนติเมตร |
| เส้นผ่านศูนย์กลาง | 132 เซนติเมตร |
| ขนาดสินค้า | 132D x 132W x 23.5H ซม. |
| น้ำหนักสินค้า | 6.22 กิโลกรัม |
| คุณสมบัติพิเศษ | น้ำหนักเบา |

Image 8.1: Key dimensions of the fan, including its 132 cm diameter and 66 cm blade length.

Image 8.2: Additional dimensions, highlighting the fan's height of 23.5 cm and the 18 cm diameter of the motor housing.
9. การรับประกันและการสนับสนุน
Your CREATE WINDCALM M Ceiling Fan comes with a standard warranty. For specific warranty terms and conditions, please refer to the documentation included with your purchase or visit the official CREATE website. In case of any issues or for technical support, please contact CREATE customer service. The seller, CREATE, offers support and assistance for product-related inquiries.


