1. บทนำ
This manual provides comprehensive instructions for the installation, operation, maintenance, and troubleshooting of your TP-Link TL-SG3210XHP-M2 Jetstream 8-Port Multi-Gigabit L2+ Managed PoE Switch. Please read this manual thoroughly before using the device to ensure proper functionality and safety.
2. คุณสมบัติหลัก
- Eight 2.5Gbps Ports: Features 8x 2.5-Gigabit ports for high-performance multi-gigabit connections.
- อัปโหลด 10G SFP+: Includes 2x 10 Gbps SFP+ slots for high-bandwidth connectivity and non-blocking switching capacity.
- Flexible PoE Port Configuration: Equipped with 8x PoE+ (802.3at/af) 10/100/1000 Mbps RJ45 ports, providing up to 30W per port with a total PoE budget of 240W.
- การรวม Omada SDN: Supports the Omada Software Defined Networking platform, integrating network devices like switches, APs, and gateways with multiple control options (Omada Hardware Controller, Software Controller, or Standalone Mode).
- การเข้าถึงคลาวด์: Offers remote cloud access and an Omada app for centralized cloud management of the entire network from various sites, all controlled from a single interface.
- ความปลอดภัยเครือข่ายที่ได้รับการปรับปรุง: Advanced security features include 802.1Q VLAN, IP-MAC-Port binding, ACL, Port Security, DoS defense, Storm control, DHCP Snooping, and 802.1X radius authentication.
- คุณสมบัติของ L2+: Static Routing helps optimize internal traffic for efficient use of network resources.
3. เนื้อหาบรรจุภัณฑ์
ตรวจสอบว่าแพ็คเกจของคุณมีรายการต่อไปนี้:
- TL-SG3210XHP-M2 Switch
- สายไฟ
- คู่มือการติดตั้งอย่างรวดเร็ว (QIG)
- ชุดแร็คเมาท์
- ขายาง
4. ทางกายภาพมากกว่าview
Familiarize yourself with the ports, LEDs, and physical features of the switch.

รูปที่ 1 : ด้านหน้า view of the TL-SG3210XHP-M2 switch, showing the TP-Link logo, model number, LED indicators, 8x 2.5Gbps PoE+ ports, and 2x 10G SFP+ slots.
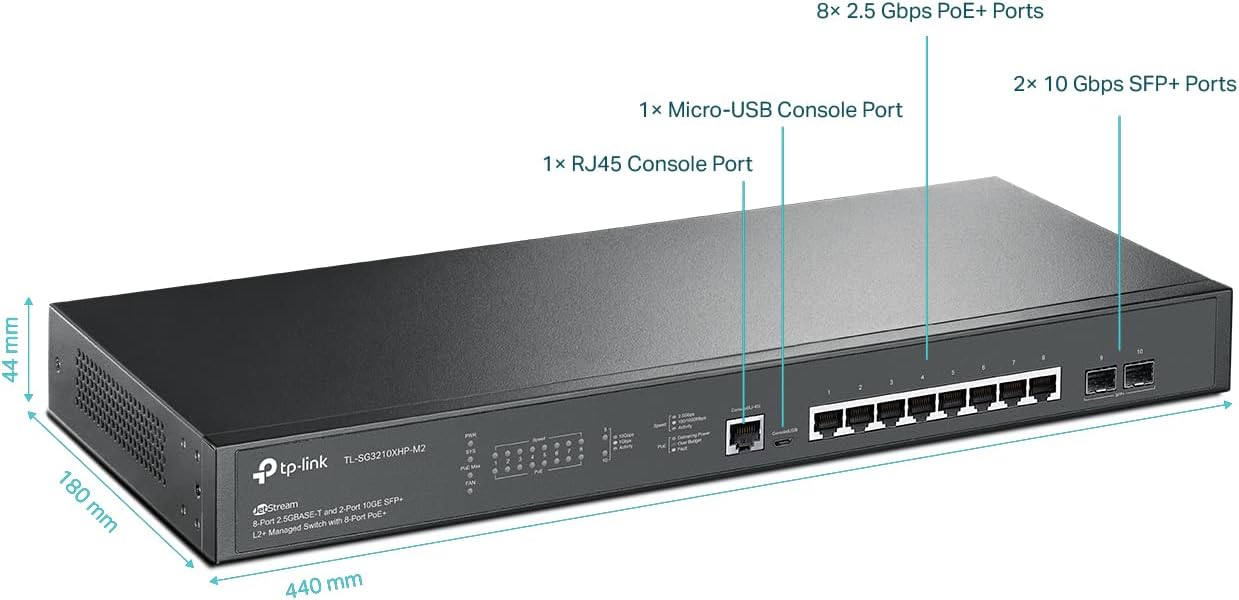
รูปที่ 2: รายละเอียด view highlighting the dimensions (440 mm length, 180 mm depth, 44 mm height) and port types: 8x 2.5 Gbps PoE+ Ports, 1x Micro-USB Console Port, 1x RJ45 Console Port, and 2x 10 Gbps SFP+ Ports.
5. การตั้งค่า
Follow these steps to set up your TL-SG3210XHP-M2 switch:
- การเชื่อมต่อไฟฟ้า: Connect the provided power cord to the switch's power inlet and then to a power outlet. Ensure the power LED illuminates.
- เชื่อมต่อเครือข่าย: Connect your network devices (e.g., computers, servers, access points, IP cameras) to the 2.5Gbps RJ45 ports using Ethernet cables. For high-speed uplinks, connect to the 10G SFP+ slots using appropriate SFP+ modules and fiber optic cables.
- การเชื่อมต่ออุปกรณ์ PoE: For PoE-powered devices, simply connect them to the PoE+ RJ45 ports. The switch will automatically detect and provide power.
- สิทธิ์การเข้าถึงของผู้บริหาร: For initial configuration or advanced management, connect a computer to any RJ45 port. You can access the switch's web-based GUI or use the Omada SDN controller for centralized management.
วิดีโอ 1: วิดีโอนี้ให้ภาพรวมview of the TP-Link 8-Port 2.5G L2+ Managed Omada Switch with 2 10G SFP+ slots, demonstrating its features and connectivity options.
6. คู่มือการใช้งาน
The TL-SG3210XHP-M2 switch can operate in standalone mode via its web GUI or be integrated into the Omada SDN for centralized management.
6.1 Standalone Mode (Web กุย)
เข้าถึงสวิตช์ webอินเทอร์เฟซการจัดการแบบอิงตาม โดยการป้อนที่อยู่ IP ลงในช่อง web browser. Refer to the Quick Installation Guide for default IP address and login credentials. The GUI allows for configuration of VLANs, QoS, security features, and other L2+ functionalities.
6.2 การรวม Omada SDN
For seamless network management across multiple devices, integrate the switch into the Omada SDN platform. This allows for centralized control, monitoring, and configuration through the Omada Software Controller, Hardware Controller, or cloud-based controller.

Figure 3: This diagram shows the Omada Centralized Cloud Management system, illustrating how an Omada Hardware Controller or Software Controller can manage networks remotely via the cloud.
Video 2: This video demonstrates how to upgrade an office network using a 2.5G + 10G switch, showcasing its practical application in a business environment.
7. การบำรุงรักษา
การบำรุงรักษาอย่างสม่ำเสมอจะช่วยให้สวิตช์ของคุณทำงานได้อย่างมีประสิทธิภาพสูงสุดและมีอายุการใช้งานยาวนาน:
- อัพเดตเฟิร์มแวร์: ตรวจสอบ TP-Link เป็นระยะ website for firmware updates to ensure your device has the latest features and security enhancements.
- การทำความสะอาด: รักษาสวิตช์ให้สะอาดและปราศจากฝุ่น ใช้ผ้าแห้งนุ่มๆ ในการทำความสะอาด ห้ามใช้น้ำยาทำความสะอาดหรือสเปรย์กระป๋อง
- สภาพแวดล้อม : Ensure the switch is operated within the recommended temperature and humidity ranges to prevent overheating or damage.
- การกู้คืน PoE อัตโนมัติ: The switch supports PoE Auto Recovery, which automatically reboots unresponsive PoE-powered devices, minimizing manual intervention.

Figure 4: This diagram illustrates the System Self-Healing with PoE Auto Recovery feature, showing how the switch automatically detects and reboots an unresponsive IP camera.
8 การแก้ไขปัญหา
If you encounter issues with your switch, consider the following common troubleshooting steps:
- ไม่มีไฟฟ้า: ตรวจสอบให้แน่ใจว่าสายไฟเชื่อมต่อกับทั้งสวิตช์และเต้ารับไฟฟ้าอย่างแน่นหนา ตรวจสอบว่าเต้ารับไฟฟ้าใช้งานได้
- ไม่มีการเชื่อมโยง/กิจกรรม: Check that Ethernet cables are properly connected to both the switch and the network device. Ensure the connected device is powered on and functioning correctly.
- อุปกรณ์ PoE ไม่เปิดเครื่อง: Verify that the connected device is PoE-compatible and within the switch's PoE budget. Check cable integrity.
- ความเร็วเครือข่ายช้า: Ensure all connected devices and cables support the desired speed (e.g., 2.5G or 10G). Check for network congestion or duplex mismatches.
- การเข้าถึง Web กุ้ยช่าย: Confirm your computer's IP address is in the same subnet as the switch's management IP. Clear browser cache or try a different browser.
9. ข้อมูลจำเพาะ
| คุณลักษณะ | ค่า |
|---|---|
| หมายเลขรุ่น | TL-SG3210XHP-M2 |
| ยี่ห้อ | ทีพี ลิงค์ |
| จำนวนพอร์ต | 8 (2.5Gbps PoE+ RJ45) + 2 (10Gbps SFP+) |
| ประเภทอินเทอร์เฟซ | PoE, RJ45, SFP+ |
| อัตราการถ่ายโอนข้อมูล | 2.5 Gigabit per second (RJ45), 10 Gigabit per second (SFP+) |
| งบประมาณ PoE | 240W total, up to 30W per port |
| ขนาดสินค้า | 17.32 x 7.09 x 1.73 นิ้ว |
| น้ำหนักสินค้า | 4.71 ปอนด์ (2.14 กิโลกรัม) |
| สี | สีดำ |
| คะแนนอุณหภูมิบน | 50 องศาเซลเซียส |
| อุปกรณ์ที่รองรับ | Camera, Desktop, Laptop, Printer, VoIP phone, Wireless access point |
| ส่วนประกอบที่รวมอยู่ | TL-SG3210XHP-M2, Power Cord, QIG, Rackmount Kit, Rubber Feet |
10. การรับประกันและการสนับสนุน
Your TP-Link TL-SG3210XHP-M2 switch is backed by an industry-leading 5-year manufacturer warranty. For technical assistance, please contact TP-Link support. Free technical support is available from 6am to 6pm PST, Monday to Friday.
For further support, visit the official TP-Link website or refer to the contact information provided in your Quick Installation Guide.
Video 3: This is a general product overview video from Amazon Product Imaging, providing a visual summary of the switch's features and design.


