1. บทนำ
The Retevis RA619 is a versatile two-way radio designed for reliable communication in various outdoor and recreational settings. It features a compact design, Bluetooth headset compatibility, multiple charging options, and essential safety functions like vibration alerts and an SOS button. This manual provides detailed instructions for the proper setup, operation, and maintenance of your RA619 walkie talkie.

Image 1.1: The Retevis RA619 walkie talkie with its included Bluetooth headset, showcasing its compact design and accessories.
2. อะไรอยู่ในกล่อง
Upon unpacking your Retevis RA619 walkie talkie, please verify that all the following items are included:
- 2x Retevis RA619 Bluetooth Walkie Talkie
- 2x Wireless Bluetooth Headset
- แท่นชาร์จ 2x
- สายชาร์จ USB 2x
- 2x Battery Cover with Li-ion Battery
- 1x คู่มือผู้ใช้

Image 2.1: A visual representation of all components included in the Retevis RA619 walkie talkie package.
3. สินค้าหมดview
Familiarize yourself with the various parts and controls of your Retevis RA619 walkie talkie.

Image 3.1: Detailed diagram illustrating the physical components and control buttons of the RA619 walkie talkie and its Bluetooth headset.
3.1 Walkie Talkie Components
- เสาอากาศ: สำหรับการส่งและรับสัญญาณ
- ไฟฉาย: Integrated LED flashlight for illumination.
- ปุ่มปรับระดับเสียง: Rotates to adjust speaker volume and powers the unit on/off.
- จอแสดงผล LCD: Shows channel number, battery status, and feature indicators.
- แจ็คลำโพง/ไมโครโฟน: สำหรับอุปกรณ์เสริมเสียงภายนอก
- ปุ่ม PTT (กดเพื่อพูด): กดค้างเพื่อส่งเสียงของคุณ
- ปุ่มโหมด: สลับไปมาระหว่างโหมดการทำงานต่างๆ
- ปุ่มเมนู: เข้าถึงการตั้งค่าและตัวเลือก
- ปุ่มขึ้น/ลง: Navigate menus and adjust settings (e.g., channel selection).
- ปุ่มมอนิเตอร์ (MON): Temporarily disables squelch to listen for weak signals.
- ปุ่มโทรออก: เริ่มเล่นเสียงเรียกเข้า
- ปุ่ม SOS: เปิดใช้งานฟังก์ชั่นสัญญาณเตือนฉุกเฉิน
- ผู้บรรยาย: สำหรับเอาต์พุตเสียง
3.2 Bluetooth Headset Components
- High Volume Button: Increases headset volume.
- Low Volume Button: Decreases headset volume.
- สวิตช์เปิด/ปิด: Powers the headset on or off.
- ปุ่มปตท.: Activates transmission when connected to the walkie talkie.
4. การตั้งค่า
4.1 การติดตั้งและการชาร์จแบตเตอรี่
The RA619 walkie talkie offers flexible power options, including a rechargeable lithium-ion battery and compatibility with AA batteries.
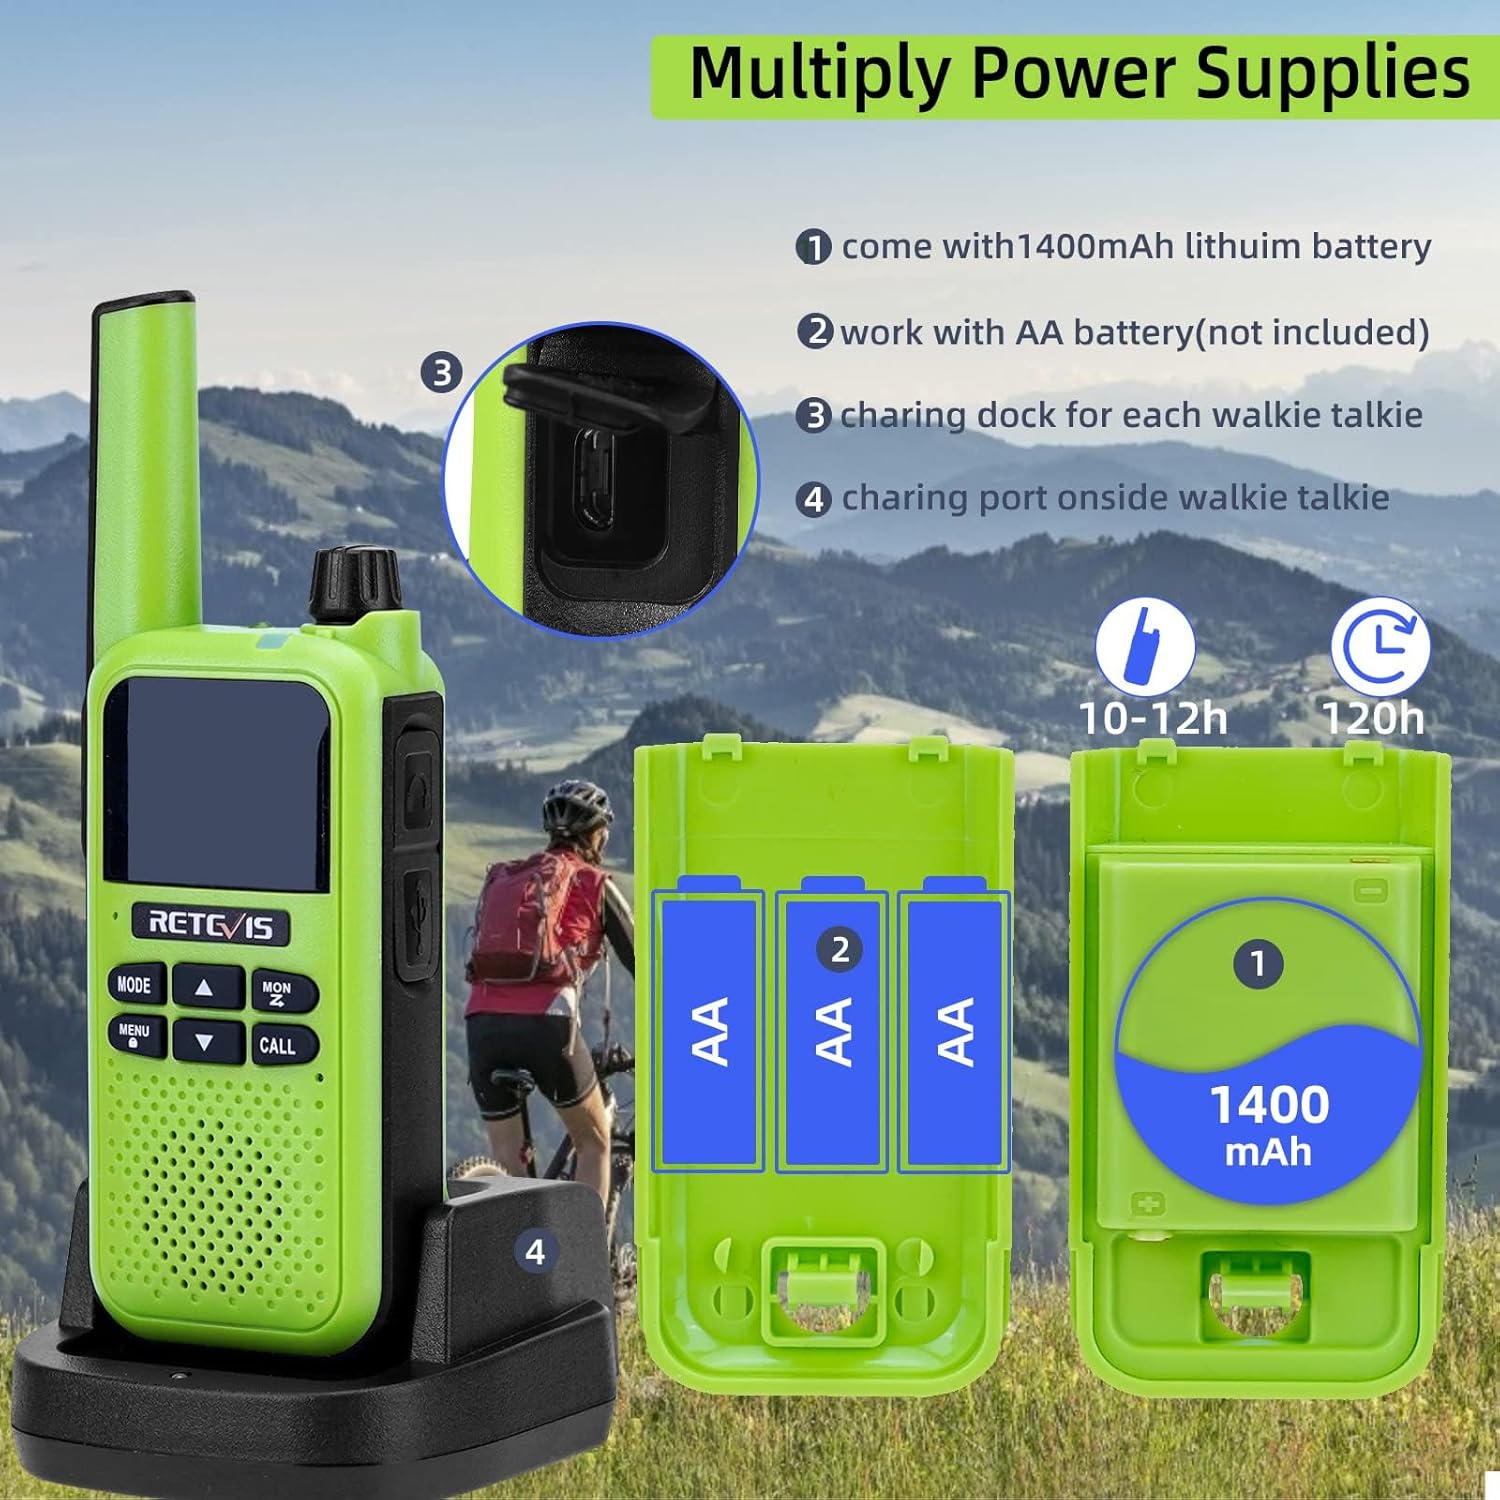
Image 4.1: Illustration of the various power supply methods for the RA619, including the 1400mAh lithium battery, AA battery compartment, charging dock, and micro USB port.
- แบตเตอรี่ลิเธียมไอออน: The walkie talkie comes with a 1400mAh lithium-ion battery pack. Insert this battery into the compartment on the back of the radio and secure it with the provided battery cover.
- AA Batteries (Not Included): Alternatively, you can power the walkie talkie using 3 AA batteries. Open the battery compartment, insert the AA batteries according to the polarity markings, and close the cover.
- การชาร์จผ่านแท่นชาร์จ: Place the walkie talkie into the charging dock. Connect the USB charging cable to the dock and a suitable USB power source. The charging indicator will show the charging status.
- การชาร์จผ่านไมโคร USB: For direct charging, connect the micro USB charging cable to the port on the side of the walkie talkie and a USB power source.
A full charge typically takes 10-12 hours and provides approximately 120 hours of standby time.
5. คู่มือการใช้งาน
5.1 การเปิด/ปิดเครื่องและการปรับระดับเสียง
- To power on the walkie talkie, rotate the Volume Knob clockwise until you hear a click.
- To power off, rotate the Volume Knob counter-clockwise until you hear a click.
- Adjust the volume by rotating the Volume Knob clockwise to increase and counter-clockwise to decrease.
5.2 การเลือกช่องสัญญาณ
The RA619 supports 16 channels for communication.
- กดปุ่ม เมนู ปุ่มเพื่อเข้าสู่เมนู
- ใช้ UP or ลง arrow buttons to navigate to the channel selection option.
- กด เมนู again to select the channel.
- ใช้ UP or ลง arrow buttons to choose your desired channel (1-16).
- กด เมนู เพื่อยืนยันการเลือกของคุณ จากนั้นกด โหมด เพื่อออกจากเมนู
5.3 การสื่อสารแบบกดเพื่อพูด (PTT)
- Ensure both walkie talkies are on the same channel.
- กดปุ่มค้างไว้ ปตท. button on the side of the walkie talkie.
- พูดใส่ไมโครโฟนอย่างชัดเจน
- ปล่อยตัว ปตท. ปุ่มเพื่อฟังคำตอบ
5.4 ฟังก์ชัน VOX (ระบบโทรศัพท์อัตโนมัติ)
The VOX function allows for hands-free communication, activating transmission when it detects your voice.

Image 5.1: A user on a motorcycle communicating hands-free, demonstrating the VOX feature of the RA619 walkie talkie.
- หากต้องการเปิดใช้งาน VOX ให้กด เมนู button, navigate to the VOX setting, and select your desired sensitivity level.
- When using a headset, ensure VOX is enabled on the walkie talkie for hands-free operation.
5.5 การจับคู่หูฟังบลูทูธ
The RA619 walkie talkie can be paired with the included Bluetooth headset for wireless communication.

Image 5.2: A Retevis RA619 walkie talkie and its Bluetooth headset, with a background depicting outdoor activity, highlighting its hands-free capability.

Image 5.3: Visual guide demonstrating the simple steps to pair the RA619 walkie talkie with its Bluetooth headset by pressing the dedicated Bluetooth button.
- ตรวจสอบให้แน่ใจว่าทั้งวิทยุสื่อสารและชุดหูฟังบลูทูธเปิดใช้งานอยู่
- Press and hold the Bluetooth button on the side of the walkie talkie until the pairing indicator flashes.
- The headset should automatically connect. A confirmation tone or indicator light will signal a successful connection.
5.6 Call Vibration Function
The RA619 features a vibration alert for incoming calls, useful in noisy environments or when discretion is required.

Image 5.4: The RA619 walkie talkie vibrating, indicating an incoming call, useful for discreet alerts in various settings.

Image 5.5: A visual representation of the RA619's vibration alert feature, ensuring notifications are received even in challenging conditions.
To enable or disable the vibration function, access the menu settings and locate the 'Vibration' option.
5.7 ฟังก์ชันฉุกเฉิน SOS
In emergency situations, the SOS function can be activated to alert others.

Image 5.6: Close-up of the RA619 showing the dedicated SOS button and the LED torch button.

Image 5.7: A scenario depicting the use of the RA619's SOS emergency function after an accident, highlighting its safety utility.
Press and hold the dedicated สัญญาณขอความช่วยเหลือ button to activate the emergency alarm. This will transmit an alert signal to other radios on the same channel.
ไฟฉาย LED 5.8 ดวง
The integrated LED flashlight provides illumination in dark environments.

Image 5.8: The RA619 walkie talkie illuminating a dark camping area with its built-in LED flashlight.
กดปุ่มเฉพาะ แสงคบเพลิง ปุ่มสำหรับเปิดหรือปิดไฟฉาย
5.9 ฟังก์ชันการคัดลอกแบบไร้สาย
The wireless copy function allows for quick and simultaneous duplication of settings between multiple RA619 walkie talkies.

Image 5.9: Diagram illustrating the wireless copy function, enabling quick synchronization of settings across multiple RA619 units.

Image 5.10: Two RA619 walkie talkies demonstrating the wireless copy feature, simplifying setup for multiple devices.
Refer to the specific instructions in the full user manual for detailed steps on initiating and completing the wireless copy process.
6. การบำรุงรักษา
- การทำความสะอาด: ใช้แบบนุ่มๆamp cloth to clean the exterior of the walkie talkie. Avoid using harsh chemicals or abrasive cleaners.
- พื้นที่จัดเก็บ: Store the walkie talkie in a cool, dry place away from direct sunlight and extreme temperatures when not in use for extended periods. Remove batteries if storing for several months.
- การดูแลแบตเตอรี่ Fully charge the lithium-ion battery before first use. Avoid overcharging or completely draining the battery to prolong its lifespan.
- ความต้านทานน้ำ: Note that the Retevis RA619 is ไม่กันน้ำ. Avoid exposure to rain, splashes, or immersion in water to prevent damage.
7 การแก้ไขปัญหา
If you encounter issues with your Retevis RA619 walkie talkie, refer to the following common problems and solutions:
| ปัญหา | สาเหตุที่เป็นไปได้ | สารละลาย |
|---|---|---|
| ไม่มีไฟฟ้า | แบตเตอรี่หมดหรือติดตั้งไม่ถูกต้อง | Charge the battery or replace AA batteries. Ensure batteries are correctly inserted. |
| ไม่สามารถส่งหรือรับได้ | เลือกช่องสัญญาณไม่ถูกต้อง อยู่นอกระยะ หรือแบตเตอรี่เหลือน้อย | Verify both radios are on the same channel. Move closer to the other radio. Charge battery. |
| คุณภาพเสียงไม่ดี | Volume too low, interference, or microphone/speaker obstruction. | Adjust volume. Move away from sources of interference. Ensure microphone and speaker are clear. |
| หูฟังบลูทูธจับคู่ไม่ได้ | Headset not in pairing mode or too far from radio. | Ensure headset is on and in pairing mode. Bring headset closer to the walkie talkie. |
หากปัญหายังคงอยู่หลังจากลองวิธีแก้ปัญหาเหล่านี้แล้ว โปรดติดต่อฝ่ายบริการลูกค้าของ Retevis เพื่อขอความช่วยเหลือเพิ่มเติม
8. ข้อมูลจำเพาะ
| คุณสมบัติ | รายละเอียด |
|---|---|
| หมายเลขรุ่น | EUA9217BX2 |
| ยี่ห้อ | เรเทวิส |
| สี | สีเขียว |
| จำนวนช่องสัญญาณ | 16 |
| ช่วงความถี่ | 446.00625-446.19375 เมกะเฮิรตซ์ |
| ระยะการสนทนาสูงสุด | 1.5 Mile (approximately 2.4 km) |
| ประเภทแบตเตอรี่ | 1400mAh Lithium Ion (included) or 3x AA (not included) |
| เล่มที่tage | 3.7 โวลต์ |
| ขนาดสินค้า | 3.4D x 5.5W x 15.8H เซนติเมตร |
| น้ำหนัก | 325 กรัม |
| ระดับความต้านทานต่อน้ำ | ไม่ทนน้ำ |
| คุณสมบัติพิเศษ | Call Vibration, Emergency Alarm, Bluetooth Headset, VOX, LED Flashlight, Wireless Copy |
9. ข้อมูลด้านความปลอดภัย
- ห้ามใช้งานวิทยุในบริเวณที่มีอากาศไวไฟ (เช่น ใกล้ก๊าซไวไฟ ฝุ่นละออง หรือผงโลหะ)
- Do not attempt to disassemble or modify the radio. Repairs should only be performed by authorized service personnel.
- เพื่อป้องกันความเสียหายและเพื่อความปลอดภัย โปรดใช้เฉพาะแบตเตอรี่และเครื่องชาร์จที่ได้รับการรับรองเท่านั้น
- Keep the radio and its accessories out of reach of small children.
- หลีกเลี่ยงการสัมผัสแสงแดดโดยตรงหรืออุณหภูมิที่สูงหรือต่ำเกินไปเป็นเวลานาน
- Do not immerse the radio in water, as it is not water resistant.
10. การรับประกันและการสนับสนุน
สำหรับข้อมูลการรับประกันและการบริการลูกค้า โปรดดูเอกสารที่แนบมาพร้อมกับสินค้าที่ซื้อ หรือเยี่ยมชมเว็บไซต์อย่างเป็นทางการของ Retevis website. Contact details for support are typically available on the manufacturer's webเว็บไซต์.


