1. บทนำ
This manual provides comprehensive instructions for the installation, operation, and maintenance of your PANOEAGLE DS-7608NI-I2/8P 8-Channel 4K Network Video Recorder (NVR). Please read this manual thoroughly before using the product to ensure proper setup and functionality. Retain this manual for future reference.
The PANOEAGLE DS-7608NI-I2/8P is an embedded Plug and Play 4K NVR designed for robust 24/7 surveillance recording. It supports up to 8 cameras simultaneously, offering high-resolution recording up to 12MP and utilizing H.264+/H.264/H.265 video compression for efficient storage. Its Power over Ethernet (PoE) capability simplifies camera installation by providing both power and data through a single cable.
2. สินค้าหมดview
Familiarize yourself with the components and interfaces of your NVR.
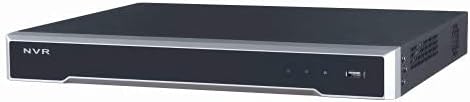
รูปที่ 2.1: แผงด้านหน้า View
This image displays the front panel of the NVR, featuring the 'NVR' branding, status indicators, and a USB port for peripheral connections.

รูปที่ 2.2: แผงด้านหลัง View
This image shows the rear panel of the NVR, highlighting the power input, cooling fan, 8 PoE ports, network port, USB ports, audio input/output, VGA, and HDMI video outputs, and alarm/control terminals.

Figure 2.3: Angled Rear View
An angled perspective of the NVR's rear panel, providing a clearer view of the various connectivity options and ventilation.
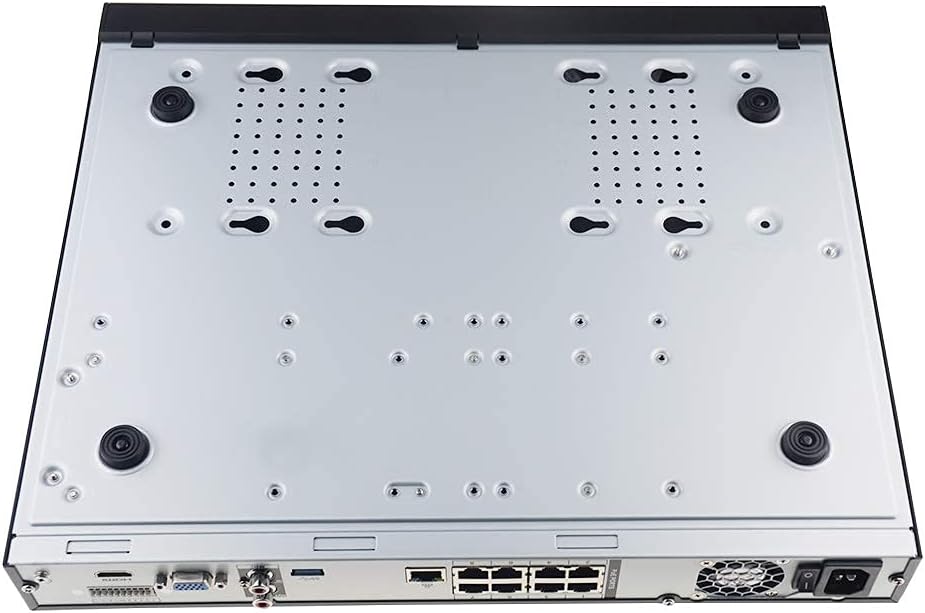
รูปที่ 2.4: แผงด้านล่าง View
This image displays the bottom of the NVR, showing mounting points and ventilation holes, along with rubber feet for stable placement.
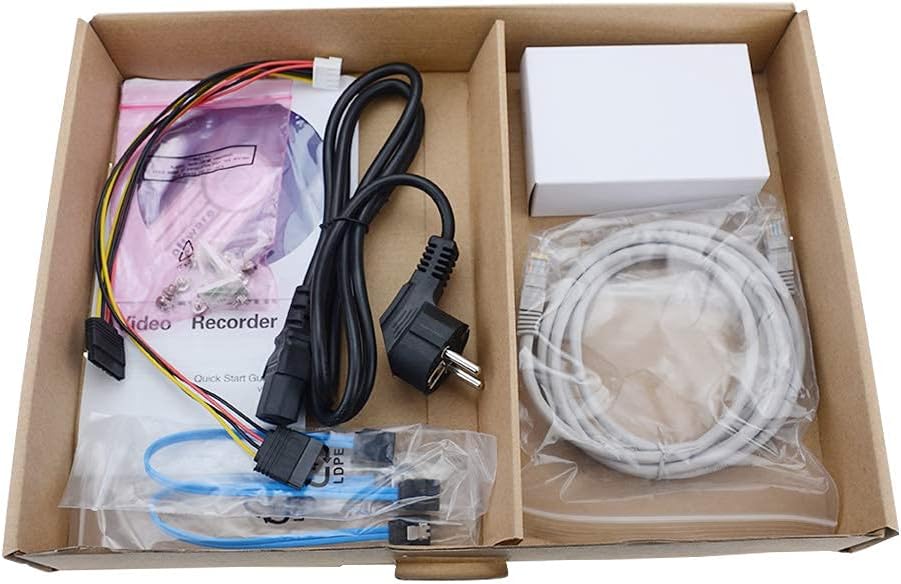
รูปที่ 2.5: สิ่งของในบรรจุภัณฑ์
A view of the accessories included with the NVR, typically comprising a power cable, network cable, USB mouse, SATA cables for hard drive installation, and a quick start guide.
3. คุณสมบัติหลัก
- การบันทึกเสียงแบบ 8 แชนแนล: Supports simultaneous recording from up to 8 IP cameras.
- รองรับความละเอียด 4K: Capable of recording and displaying video resolutions up to 12MP.
- PoE Easy Setup: Integrated Power over Ethernet (PoE) ports for direct connection and power supply to IP cameras via a single Ethernet cable.
- การบีบอัดวิดีโอขั้นสูง: Utilizes H.264+/H.264/H.265 codecs for efficient storage and bandwidth usage.
- บันทึกตลอด 24 ชั่วโมง: Designed for continuous, reliable surveillance monitoring.
- เอาท์พุต HDMI: High-definition video output for connecting to monitors or TVs.
- รองรับซาต้า: Features 2 SATA interfaces for internal hard drive installation (HDDs not included).
4. คู่มือการติดตั้ง
4.1. การติดตั้งฮาร์ดไดรฟ์ (ไม่บังคับ)
If your NVR did not come with a pre-installed hard drive, follow these steps:
- ปิดเครื่อง NVR และถอดสายเคเบิลทั้งหมดออก
- คลายสกรูและถอดฝาครอบด้านบนของตัวเครื่อง NVR ออก
- Connect the SATA data cable and power cable from the NVR to the hard drive.
- ยึดฮาร์ดไดรฟ์เข้ากับตัวเครื่อง NVR โดยใช้สกรูที่ให้มา
- ปิดฝาด้านบนกลับเข้าที่และยึดด้วยสกรู
4.2. การเชื่อมต่อเบื้องต้น
- เชื่อมต่อจอภาพ: เชื่อมต่อจอภาพเข้ากับพอร์ต HDMI หรือ VGA ของเครื่องบันทึกวิดีโอเครือข่าย (NVR)
- เชื่อมต่อเมาส์: เสียบเมาส์ USB เข้ากับพอร์ต USB ของ NVR พอร์ตใดพอร์ตหนึ่ง
- เชื่อมต่อกับเครือข่าย: Connect the NVR's LAN port to your router or network switch using an Ethernet cable.
- เชื่อมต่อกล้อง IP: Connect your PoE IP cameras to the NVR's PoE ports using Ethernet cables. The NVR will provide power and data to the cameras.
- เปิดเครื่อง: เชื่อมต่ออะแดปเตอร์แปลงไฟเข้ากับ NVR แล้วเสียบปลั๊กเข้ากับเต้ารับไฟฟ้า NVR จะเปิดใช้งานโดยอัตโนมัติ
4.3. การกำหนดค่าเริ่มต้น
Upon first boot, the NVR will guide you through an initial setup wizard. This typically includes:
- การตั้งรหัสผ่านผู้ดูแลระบบ
- Configuring network settings (DHCP is usually default).
- Initializing the hard drive (if newly installed).
- Searching for and adding connected IP cameras.
- การตั้งวันที่และเวลา
ทำตามคำแนะนำบนหน้าจอเพื่อสิ้นสุดการตั้งค่า
5. คู่มือการใช้งาน
5.1. สด View
After logging in, the NVR will typically display the live view ของกล้องที่เชื่อมต่อทั้งหมด คุณสามารถสลับระหว่างกล้องตัวเดียวได้ viewกริดกล้องหลายตัว viewและปรับแต่งรูปแบบการแสดงผลได้ตามต้องการ
5.2. การบันทึก
- การบันทึกต่อเนื่อง: Records 24/7. Configure schedules in the NVR's menu.
- การบันทึกการตรวจจับความเคลื่อนไหว: Records only when motion is detected. Sensitivity and detection zones can be adjusted.
- การบันทึกตามกำหนดเวลา: กำหนดเวลาเฉพาะสำหรับการบันทึก
Access recording settings via the NVR's main menu, usually under "Record" or "Storage" settings.
5.3. การเล่น
เพื่อview บันทึกเสียงฟูtage:
- จากเมนูหลัก เลือก "การเล่น"
- Choose the camera(s) and date/time range you wish to review.
- Use the timeline to navigate through recorded events. Options for fast-forward, rewind, and pause are available.
5.4. การเข้าถึงระยะไกล
The NVR supports remote viewing via a mobile app or web browser. Refer to the NVR's network settings for details on enabling P2P (peer-to-peer) or port forwarding for remote access. Download the official PANOEAGLE mobile application from your device's app store.
6. การบำรุงรักษา
- การทำความสะอาดปกติ: Keep the NVR free from dust. Use a soft, dry cloth for exterior cleaning. Ensure ventilation openings are clear.
- อัพเดตเฟิร์มแวร์: Periodically check the PANOEAGLE official website for firmware updates. Updates can improve performance, add features, and enhance security. Follow update instructions carefully.
- สุขภาพฮาร์ดไดรฟ์: Monitor the health of your hard drive(s) through the NVR's system information. Replace failing drives promptly to avoid data loss.
- การรักษาความปลอดภัยด้วยรหัสผ่าน: Regularly change your administrator password and use strong, unique passwords.
7 การแก้ไขปัญหา
| ปัญหา | สาเหตุที่เป็นไปได้ | สารละลาย |
|---|---|---|
| ไม่มีสัญญาณวิดีโอออกบนจอภาพ | Loose cable connection, incorrect input source on monitor, NVR not powered on. | Check HDMI/VGA cable connections. Ensure monitor is set to correct input. Verify NVR power. |
| กล้องไม่แสดงภาพสด view. | Camera not powered, network issue, camera not added to NVR, incorrect IP address. | Check camera power and Ethernet cables. Ensure cameras are connected to PoE ports. Use NVR's camera management to search and add cameras. Verify camera IP addresses. |
| No recording or missing footage. | Hard drive not installed/initialized, recording schedule not configured, hard drive full, hard drive failure. | Install and initialize HDD. Configure recording schedules. Check HDD status and capacity. Replace faulty HDD. |
| ไม่สามารถเข้าถึง NVR จากระยะไกลได้ | Network configuration issues, P2P disabled, incorrect app settings, firewall blocking. | Ensure NVR has internet access. Enable P2P service. Verify app settings and NVR's network configuration. Check router firewall settings. |
8. ข้อมูลจำเพาะ
| คุณสมบัติ | รายละเอียด |
|---|---|
| แบบอย่าง | DS-7608NI-I2/8P |
| ยี่ห้อ | PANOEAGLE (Compatible with Hi-k USA systems) |
| จำนวนช่องสัญญาณ | 8 |
| ความละเอียดสูงสุด | สูงถึง 12MP |
| การบีบอัดวิดีโอ | เอช.264+/เอช.264/เอช.265 |
| เอาท์พุตวิดีโอ | hdmi, vga |
| อินพุตเสียง | อาร์ซีเอ |
| อินเทอร์เฟซ SATA | 2 (for HDD) |
| เทคโนโลยีการเชื่อมต่อ | HDMI, Ethernet (PoE) |
| วันที่พร้อมใช้งานครั้งแรก | 28 กรกฎาคม 2021 |
9. การรับประกันและการสนับสนุน
For warranty information, please refer to the warranty card included with your product or visit the official PANOEAGLE website. Technical support may be available through the manufacturer's webโดยเข้าไปที่เว็บไซต์หรือติดต่อฝ่ายบริการลูกค้าของพวกเขา
Always ensure you are using official channels for support and firmware downloads to maintain product integrity and security.


