1. บทนำ
The Enttec OCTO Mk2 (model 71521) is a robust and reliable 8-universe, dual-output eDMX to LED pixel data converter designed for installation-grade projects. This smart controller connects directly to LED lights and supports various eDMX protocols including Art-Net, sACN, ESP, and KiNet. It is compatible with most SPI LED strips and offers features like standalone FX mode, Overdrive Mode for increased universe output, and an intuitive web อินเทอร์เฟซสำหรับการกำหนดค่า
2. ข้อมูลด้านความปลอดภัย
- Ensure the device is installed by qualified personnel in accordance with local electrical codes.
- Use only the specified power supply (DC 4-60V, 5W max) to prevent damage.
- ห้ามให้อุปกรณ์สัมผัสกับความชื้น อุณหภูมิที่สูงหรือสภาพแวดล้อมที่มีฤทธิ์กัดกร่อน
- ตัดการเชื่อมต่อไฟฟ้าก่อนทำการเชื่อมต่อใดๆ หรือดำเนินการบำรุงรักษา
- อุปกรณ์ได้รับการออกแบบสำหรับใช้ภายในอาคารเท่านั้น
3. เนื้อหาบรรจุภัณฑ์
The Enttec OCTO Mk2 package typically includes:
- Enttec OCTO Mk2 Unit
- Power Supply (with universal connectors)
- สายเคเบิลอีเทอร์เน็ต
- คู่มือเริ่มต้นอย่างรวดเร็ว (ไม่รวมอยู่ในคู่มือดิจิทัลฉบับนี้)
4. สินค้าหมดview
The OCTO Mk2 features a compact 4-module DIN-rail form factor with dual pixel outputs. It includes an Identify/Reset button for wiring verification and flexible mounting options.
4.1. ด้านหน้า View

รูปที่ 1 : ด้านหน้า view of the Enttec OCTO Mk2, highlighting the status LEDs for Power, Data RX, Data TX, and IP connection, along with the Identify button.
4.2. ด้านหลัง View (Mounting and Ethernet Ports)

รูปที่ 2: ด้านหลัง view of the Enttec OCTO Mk2, illustrating the DIN rail mounting clip and the Ethernet IN and THROUGH ports.
4.3. Ethernet Ports Detail

รูปที่ 3: รายละเอียด view of the Ethernet 10/100 IN and THROUGH ports, along with the Reset/Identify button.
4.4. Power and Output Terminals
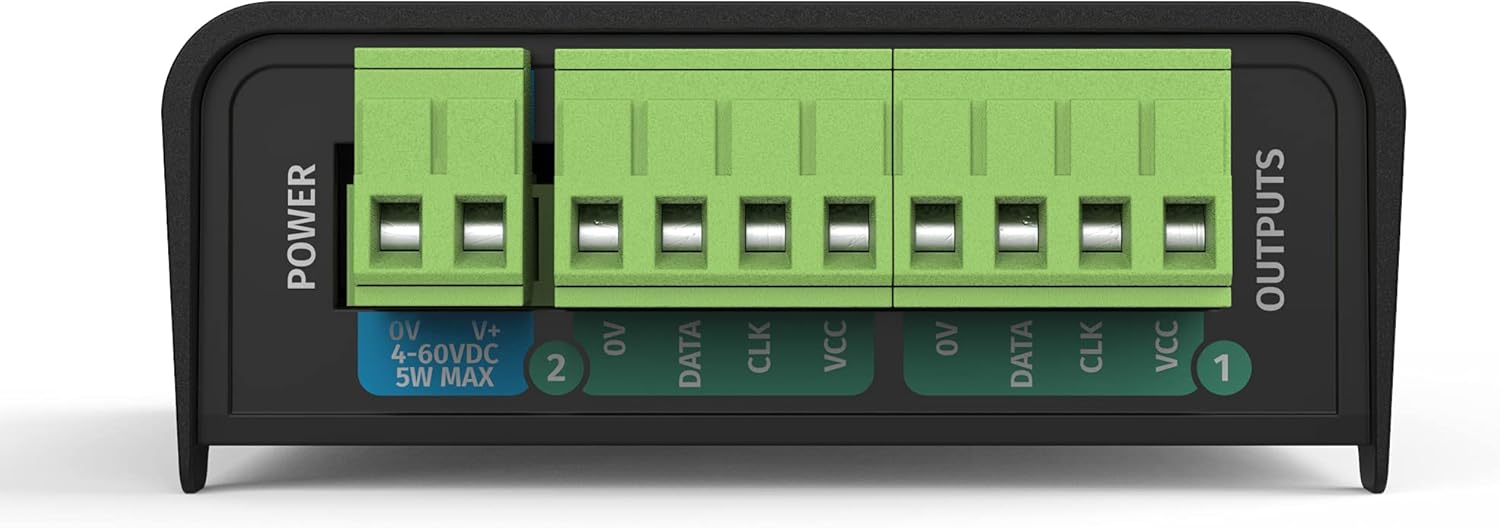
Figure 4: Close-up of the power input terminals (0V, V+, DC 4-60V) and the dual SPI-TTL data output terminals (0V, Data, CLK, VCC for each output).
5. การตั้งค่า
5.1. การเชื่อมต่อทางกายภาพ
- การเชื่อมต่อไฟฟ้า: Connect the provided power supply to the "POWER" terminals (0V and V+) on the OCTO Mk2. Ensure the voltage is within the DC 4-60V range.
- การเชื่อมต่ออีเทอร์เน็ต: Connect an Ethernet cable from your network switch or computer to the "IN" Ethernet port on the OCTO Mk2. For daisy-chaining, use the "THROUGH" port to connect to another network device.
- LED Pixel Output: Connect your SPI LED strips or pixel dots to the "OUTPUTS" terminals. Each output provides connections for 0V (Ground), Data, CLK (Clock), and VCC (Power). Refer to your LED strip's specifications for correct wiring.
5.2. Network Configuration (Accessing the Web อินเตอร์เฟซ)
The OCTO Mk2 features a built-in web interface for configuration. To access it, your computer needs to be on the same network as the OCTO Mk2.
- การเชื่อมต่อเริ่มต้น: Connect your computer directly to the OCTO Mk2 using an Ethernet cable, or ensure both are on the same local network.
- Identify IP Address: The default IP address for the OCTO Mk2 is typically printed on the device or found in the quick start guide. If using DHCP, the device will obtain an IP address from your network.
- เข้าถึง Web อินเทอร์เฟซ: เปิด web browser and enter the IP address of the OCTO Mk2 into the URL bar. This will open the device's configuration page.
- กำหนดค่าการตั้งค่าเครือข่าย:
- นำทางไปที่ การตั้งค่า แท็บ
- To assign a static IP address, uncheck the เปิดใช้งาน DHCP ตัวเลือก.
- Manually enter the desired ที่อยู่ IP, เน็ตมาสก์, และ เกตเวย์. Ensure the IP address is unique on your network and within the same subnet as your control computer.
- คลิก นำมาใช้ เพื่อบันทึกการเปลี่ยนแปลง
Refer to the datasheet image for an exampเลอของ web interface settings:

Figure 5: Excerpt from the Enttec OCTO Mk2 datasheet, showing an overview ของ web interface with network and DMX port settings.

Figure 6: Excerpt from the Enttec OCTO Mk2 datasheet, detailing updated features like UL Certification, Overdrive Mode, Standalone Mode, and Free ELM Software License.
6. โหมดการทำงาน
6.1. eDMX Control
The OCTO Mk2 supports various eDMX protocols for controlling your LED pixels from a compatible DMX software or console.
- โปรโตคอลที่รองรับ: Art-Net, sACN, ESP, and KiNet.
- การกำหนดค่า: ใน web อินเตอร์เฟซภายใต้ DMX Port Settings, ตั้งค่า พิมพ์ to "Output (DMX Out)" and select your desired โปรโตคอล (e.g., Art-Net). Configure the จักรวาล settings (Net, Subnet, Uni) to match your DMX setup.
- การรวมเอาท์พุต: The device supports output merging options like "LTP Merge (Latest Takes Precedence)" to handle multiple DMX sources.
6.2. Standalone Mode with Inbuilt FX Engine
The OCTO Mk2 can operate in Standalone Mode, allowing you to create and run gradient effects directly from the device without an external DMX source.
- Access the inbuilt FX engine via the web interface to design and edit effects.
- Configure the device to run these standalone shows automatically upon power-up.
6.3. Overdrive Mode
Overdrive Mode allows the OCTO Mk2 to output more than 4 universes per port, boosting total output up to 16 universes. This feature is useful for managing a higher universe count.
- Note that utilizing Overdrive Mode may result in a lower maximum Frames Per Second (FPS). Evaluate your specific needs to determine its suitability.
7. Supported SPI LED Protocols
The OCTO Mk2 is compatible with a wide range of SPI LED protocols, including but not limited to:
- อาปา 104
- GS8208B
- SPXL (16-bit & 8-bit)
- สก6812
- TM1804, TM1812, TM1814
- UCS1903, UCS2903, UCS2904, UCS8903 (16-bit & 8-bit), UCS8904 (16-bit & 8-bit)
- WS2811, WS2812, WS2812B, WS2813, WS2815, WS2818
- AHL003 (16-bit & 8-bit)
- SJ1221 (16-bit & 8-bit)
- TLC5973 (16-bit & 8-bit)
- Ability to create custom pixel output protocols (refer to the user manual for criteria).
8. การบำรุงรักษา
- การทำความสะอาด: ใช้ผ้านุ่มและแห้งเช็ดทำความสะอาดอุปกรณ์ ห้ามใช้น้ำยาทำความสะอาดชนิดน้ำหรือสเปรย์
- อัพเดตเฟิร์มแวร์: ตรวจสอบเป็นประจำ enttec.คอม for the latest firmware updates. Always review release notes for special instructions before updating.
- พื้นที่จัดเก็บ: เก็บอุปกรณ์ไว้ในที่แห้งและเย็นเมื่อไม่ใช้งาน
9 การแก้ไขปัญหา
- ไม่มีไฟฟ้า: Check power connections and ensure the power supply is functioning correctly. Verify the input voltage อยู่ในช่วงที่ระบุ
- ไม่มีการเชื่อมต่อเครือข่าย:
- Ensure Ethernet cables are securely connected.
- Verify network settings (IP address, subnet mask, gateway) in the web interface are correct for your network.
- If using a static IP, ensure it is unique and not conflicting with other devices.
- No DMX/Pixel Output:
- Check the DMX Port Settings in the web interface (Type, Protocol, Universe).
- Verify the wiring of your LED strips to the output terminals (Data, CLK, VCC, GND).
- Use the Identify button on the device to check correct wiring without a data source.
- Ensure your DMX control software is correctly configured to send data to the OCTO Mk2's IP address and universe.
- Lower FPS in Overdrive Mode: This is expected behavior. If higher FPS is critical, consider reducing the number of universes or adjusting your setup.
10. ข้อมูลจำเพาะ
| คุณสมบัติ | รายละเอียด |
|---|---|
| หมายเลขรุ่น | OCTO (71521) |
| ขนาดสินค้า | 3.96 x 2.84 x 1.34 นิ้ว |
| น้ำหนักสินค้า | 3.88 ออนซ์ |
| กำลังไฟเข้า | DC 4-60V, 5W max |
| จักรวาลดีเอ็มเอ็กซ์ | 8 (up to 16 with Overdrive Mode) |
| โปรโตคอลการเชื่อมโยงข้อมูล | อีเธอร์เน็ต |
| eDMX Protocols | อาร์ตเน็ต, sACN, ESP, KiNet |
| ตัวเลือกการติดตั้ง | TS35 DIN rail or Surface mount |
| ใบรับรอง UL | Yes (Serial numbers 2374307 or higher) |
11. การรับประกันและการสนับสนุน
For warranty information, technical support, and additional resources, please visit the official Enttec webไซต์ที่ www.enttec.com. You can also find information regarding the free ELM software 8 Universe license and the latest firmware downloads there.


