1. บทนำ
This manual provides detailed instructions for the installation, configuration, and operation of your ASRock Z590M Phantom Gaming 4 motherboard. Please read this manual thoroughly before attempting to install or use the product to ensure proper functionality and to prevent damage.
ข้อมูลด้านความปลอดภัย
- ถอดสายไฟออกจากเต้ารับที่ผนังทุกครั้งก่อนสัมผัสส่วนประกอบใดๆ ภายในเคสคอมพิวเตอร์
- ควรสวมสายรัดข้อมือป้องกันไฟฟ้าสถิตเมื่อทำการเคลื่อนย้ายชิ้นส่วนต่างๆ เพื่อป้องกันความเสียหายจากประจุไฟฟ้าสถิต (ESD)
- ตรวจสอบให้แน่ใจว่ามีการระบายอากาศที่เหมาะสมภายในเคสคอมพิวเตอร์เพื่อป้องกันความร้อนสูงเกินไป
- เก็บเมนบอร์ดให้ห่างจากความชื้นและอุณหภูมิที่สูงหรือต่ำเกินไป
2. สินค้าหมดview
The ASRock Z590M Phantom Gaming 4 is a Micro ATX motherboard designed for 10th and 11th Generation Intel Core processors, utilizing the LGA1200 socket and Intel Z590 chipset. It supports DDR4 memory, features USB 3.2 Gen2, Hyper M.2 (PCIe Gen4x4), and ASRock's Super Alloy design for enhanced durability and performance.
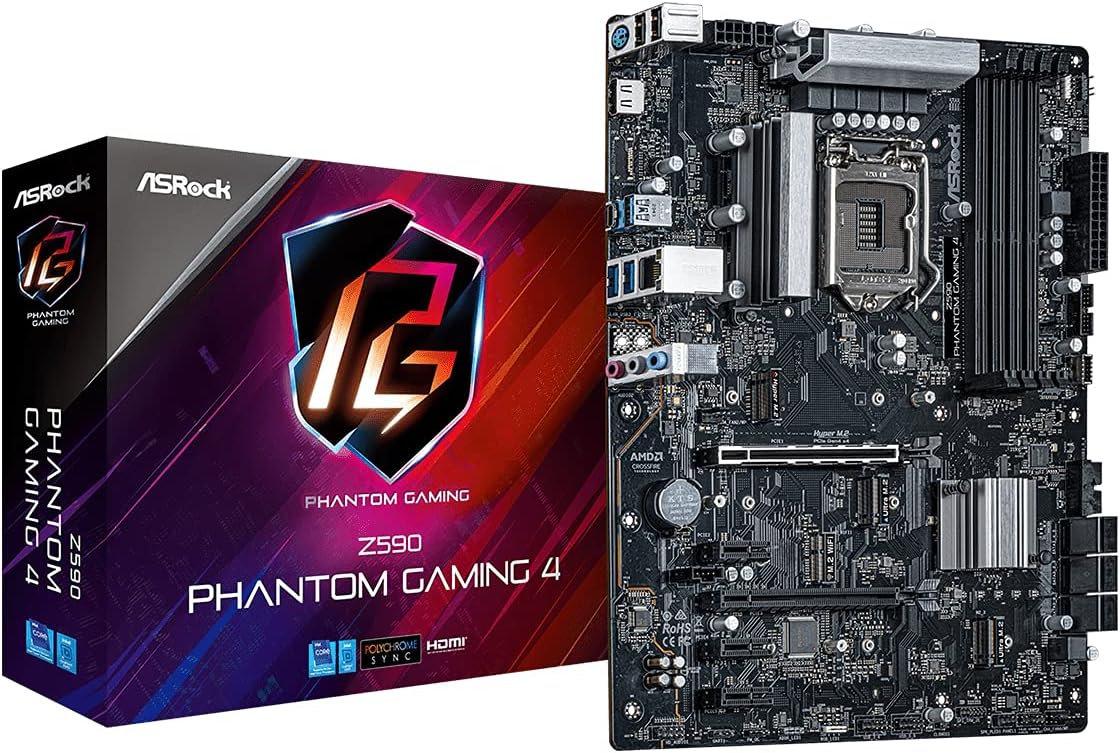
รูปที่ 2.1: The ASRock Z590M Phantom Gaming 4 motherboard alongside its retail packaging. This image provides a general view ของผลิตภัณฑ์และการสร้างแบรนด์
คุณสมบัติหลัก
- Supports 10th and 11th Gen Intel Core Processors (LGA1200)
- Intel Z590 Chipset
- Dual Channel DDR4 Memory Technology (up to 4800MHz)
- ASRock USB 3.2 Gen2 Type-A Port (10 Gb/s)
- ASRock Hyper M.2 (PCIe Gen4x4) for high-speed storage
- ASRock Super Alloy design with Premium 50A Power Chokes and Sapphire Black PCB
- ASRock Steel Slot for enhanced PCIe slot durability
- ASRock POST Status Checker (PSC) for diagnostic assistance
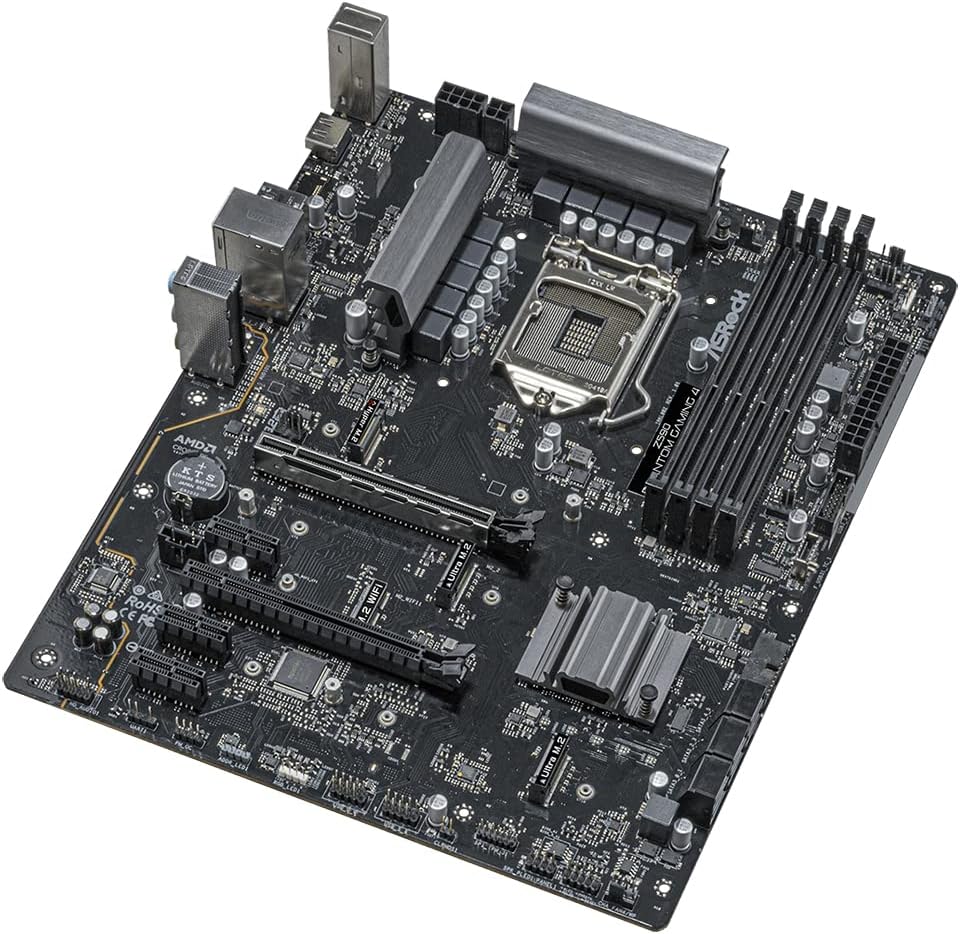
รูปที่ 2.2: An angled perspective of the ASRock Z590M Phantom Gaming 4 motherboard, highlighting the CPU socket, RAM slots, and various expansion slots.
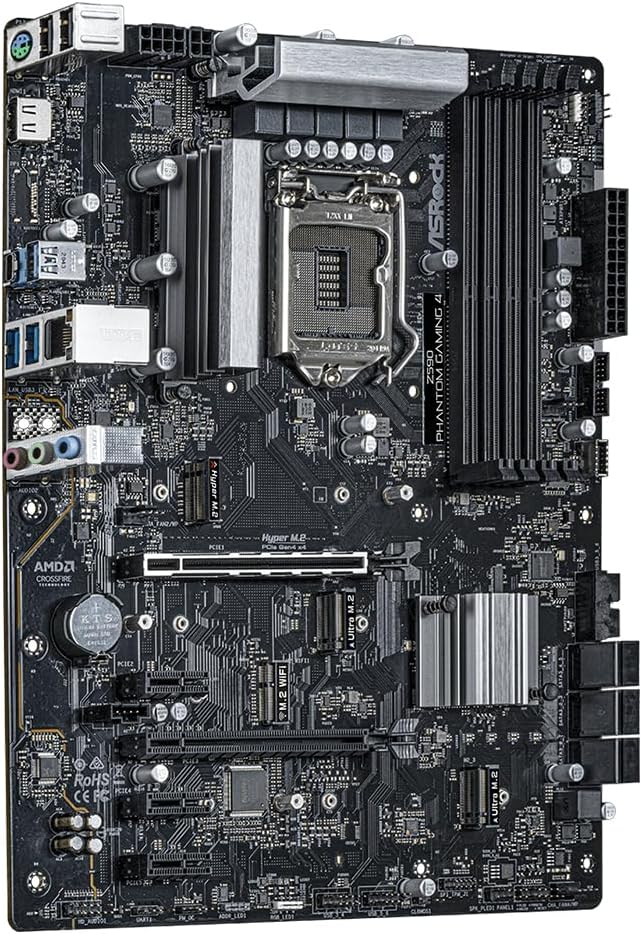
รูปที่ 2.3: แบบบน-ล่าง view of the ASRock Z590M Phantom Gaming 4 motherboard, showing the layout of components including the chipset heatsink, M.2 slots, and PCIe slots.
3. การตั้งค่าและการติดตั้ง
ปฏิบัติตามขั้นตอนเหล่านี้อย่างระมัดระวังเพื่อติดตั้งเมนบอร์ดและส่วนประกอบต่างๆ
3.1 การติดตั้ง CPU
- เปิดคันโยกซ็อกเก็ต CPU และยกแผ่นโหลดขึ้น
- จัดวาง CPU ให้ตรงกับซ็อกเก็ตอย่างระมัดระวัง โดยให้แน่ใจว่าสามเหลี่ยมทองคำบน CPU ตรงกับสามเหลี่ยมบนซ็อกเก็ต
- วาง CPU ลงในซ็อกเก็ตอย่างเบามือโดยไม่ต้องออกแรง
- ปิดแผ่นรับน้ำหนักและกดคันโยกลงจนล็อคเข้าที่
3.2 การติดตั้งหน่วยความจำ (RAM)
- คลายคลิปที่ปลายทั้งสองด้านของช่องเสียบ DIMM
- จัดตำแหน่งรอยบากบนโมดูลหน่วยความจำ DDR4 ให้ตรงกับรอยบากในช่อง DIMM
- Insert the memory module firmly into the slot until the clips snap into place. For dual-channel operation, refer to the motherboard manual for recommended slot configurations.
3.3 การติดตั้งอุปกรณ์จัดเก็บข้อมูล
- M.2 SSD: Locate the M.2 slots. Insert the M.2 SSD into the slot at a 30-degree angle, then gently push it down and secure it with the provided screw.
- ไดรฟ์ SATA: Connect SATA data cables from your SSD/HDD to the SATA ports on the motherboard. Connect power cables from your power supply to the drives.
3.4 Installing Expansion Cards
Insert graphics cards or other PCIe expansion cards into the appropriate PCIe slots. Ensure they are seated firmly and secured with a screw to the case.
3.5 การเชื่อมต่อแหล่งจ่ายไฟ
- Connect the 24-pin ATX power connector to the main power socket on the motherboard.
- Connect the 8-pin (or 4+4-pin) ATX 12V power connector to the CPU power socket.
- Connect power to any graphics cards or other components as required.
3.6 Connecting Front Panel and Rear I/O
- Connect the front panel headers (power switch, reset switch, HDD LED, power LED) to the corresponding pins on the motherboard. Refer to the motherboard diagram for correct pin assignments.
- Connect USB, audio, and other front panel connectors.
- Ensure the I/O shield is installed in your case before mounting the motherboard.

รูปที่ 3.1: The rear I/O panel of the ASRock Z590M Phantom Gaming 4 motherboard, displaying various ports including USB, Ethernet, and audio jacks.
4. คู่มือการใช้งาน
After successful installation, you can power on your system and configure the BIOS/UEFI.
4.1 การบูตครั้งแรกและการตั้งค่า BIOS/UEFI
- เปิดเครื่องคอมพิวเตอร์ของคุณ
- กดปุ่ม เดล or F2 กดปุ่มนี้ระหว่างการบูตเพื่อเข้าสู่ยูทิลิตี้การตั้งค่า BIOS/UEFI
- Configure essential settings such as boot order, date/time, and enable XMP for memory if desired.
- Save changes and exit. The system will restart.
4.2 การติดตั้งระบบปฏิบัติการ
Insert your operating system installation media (USB drive or DVD) and follow the on-screen prompts to install your preferred operating system.
4.3 การติดตั้งไดรเวอร์
After installing the operating system, install the necessary drivers from the ASRock support website or the provided driver CD (if applicable). Key drivers include chipset, audio, LAN, and graphics drivers.
5. การบำรุงรักษา
การบำรุงรักษาตามปกติจะช่วยให้เมนบอร์ดของคุณมีอายุการใช้งานยาวนานและมีประสิทธิภาพเหมาะสมที่สุด
5.1 การทำความสะอาด
- Periodically clean dust from inside your computer case using compressed air.
- ตรวจสอบให้แน่ใจว่าพัดลม (ซีพียู เคส การ์ดจอ) ไม่มีสิ่งกีดขวาง
- ถอดปลั๊กไฟทุกครั้งก่อนทำความสะอาด
อัพเดต BIOS/UEFI 5.2
ตรวจสอบ ASRock website for the latest BIOS/UEFI updates. Updates can improve stability, compatibility, and performance. Follow the instructions provided by ASRock carefully when performing a BIOS update.
6 การแก้ไขปัญหา
หัวข้อนี้จะกล่าวถึงปัญหาทั่วไปที่คุณอาจพบเจอ
6.1 ไม่มีไฟ / เปิดเครื่องไม่ติด
- ตรวจสอบการเชื่อมต่อสายไฟทั้งหมด (ขั้วต่อ ATX 24 พิน, ขั้วต่อ CPU, GPU 8 พิน)
- ตรวจสอบให้แน่ใจว่าได้เปิดแหล่งจ่ายไฟแล้ว
- Verify the front panel power switch connection to the motherboard.
- ทดสอบด้วยแหล่งจ่ายไฟอื่นถ้าเป็นไปได้
6.2 ไม่มีการแสดงผล
- Ensure the monitor is connected to the graphics card (or integrated graphics if no discrete GPU).
- ติดตั้งการ์ดจอและโมดูล RAM ใหม่
- Check the POST Status Checker (PSC) LEDs on the motherboard for diagnostic codes.
6.3 ความไม่เสถียรของระบบ / การขัดข้อง
- ตรวจสอบอุณหภูมิ CPU และ GPU ให้แน่ใจว่ามีการระบายความร้อนที่เพียงพอ
- เรียกใช้เครื่องมือวินิจฉัยหน่วยความจำเพื่อตรวจสอบข้อผิดพลาด RAM
- ตรวจสอบให้แน่ใจว่าไดร์เวอร์ทั้งหมดได้รับการอัปเดตแล้ว
- รีเซ็ต BIOS เป็นการตั้งค่าเริ่มต้น
7. ข้อมูลจำเพาะ
| คุณสมบัติ | ข้อมูลจำเพาะ |
|---|---|
| ยี่ห้อ | เอเอสร็อค |
| ชื่อรุ่น | Z590M PHANTOM GAMING 4 |
| ซ็อคเก็ตซีพียู | แอลจีเอ 1200 |
| โปรเซสเซอร์ที่เข้ากันได้ | Intel Core รุ่นที่ 10, Intel Core รุ่นที่ 11 |
| ประเภทชิปเซ็ต | อินเทล Z590 |
| เทคโนโลยีหน่วยความจำ RAM | แรม DDR4 |
| ความเร็วหน่วยความจำ | สูงถึง 4800 MHz (OC) |
| ความจุของหน่วยความจำ | 12 GB (Note: This value from source data may refer to a specific configuration, actual max capacity depends on DIMM slots and module size) |
| จำนวนพอร์ต USB 2.0 | 2 (พอร์ต I/O ด้านหลัง) |
| ขนาดสินค้า | 11 x 10.5 x 2.5 นิ้ว |
| น้ำหนักสินค้า | 2.2 ปอนด์ |
| แพลตฟอร์ม | หน้าต่าง |
| แบตเตอรี่ที่จำเป็น | 1 Lithium Ion (for CMOS) |
8. การรับประกันและการสนับสนุน
สำหรับข้อมูลการรับประกันโดยละเอียด โปรดดูบัตรรับประกันที่แนบมากับผลิตภัณฑ์ของคุณ หรือเยี่ยมชมเว็บไซต์อย่างเป็นทางการของ ASRock website. ASRock provides technical support for its products.
8.1 การสนับสนุนด้านเทคนิค
If you encounter issues that cannot be resolved using this manual or the troubleshooting steps, please contact ASRock technical support through their official webโปรดเตรียมรุ่นผลิตภัณฑ์และหมายเลขซีเรียลให้พร้อมเมื่อติดต่อฝ่ายสนับสนุน
ASRock อย่างเป็นทางการ Webเว็บไซต์: www.asrock.com


