1. บทนำ
This manual provides detailed instructions for installing, configuring, and operating your TP-Link AC1900 Smart WiFi Router, model Archer A8. Please read this guide thoroughly to ensure proper setup and optimal performance of your device.
2. เนื้อหาบรรจุภัณฑ์
ตรวจสอบว่ามีรายการทั้งหมดอยู่ในแพ็คเกจของคุณ:
- TP-Link AC1900 Smart WiFi Router (Archer A8)
- อะแดปเตอร์แปลงไฟ
- สายเคเบิล RJ45 Ethernet
- คู่มือการติดตั้งแบบด่วน
3. ทางกายภาพมากกว่าview
ทำความคุ้นเคยกับส่วนประกอบและตัวบ่งชี้ของเราเตอร์
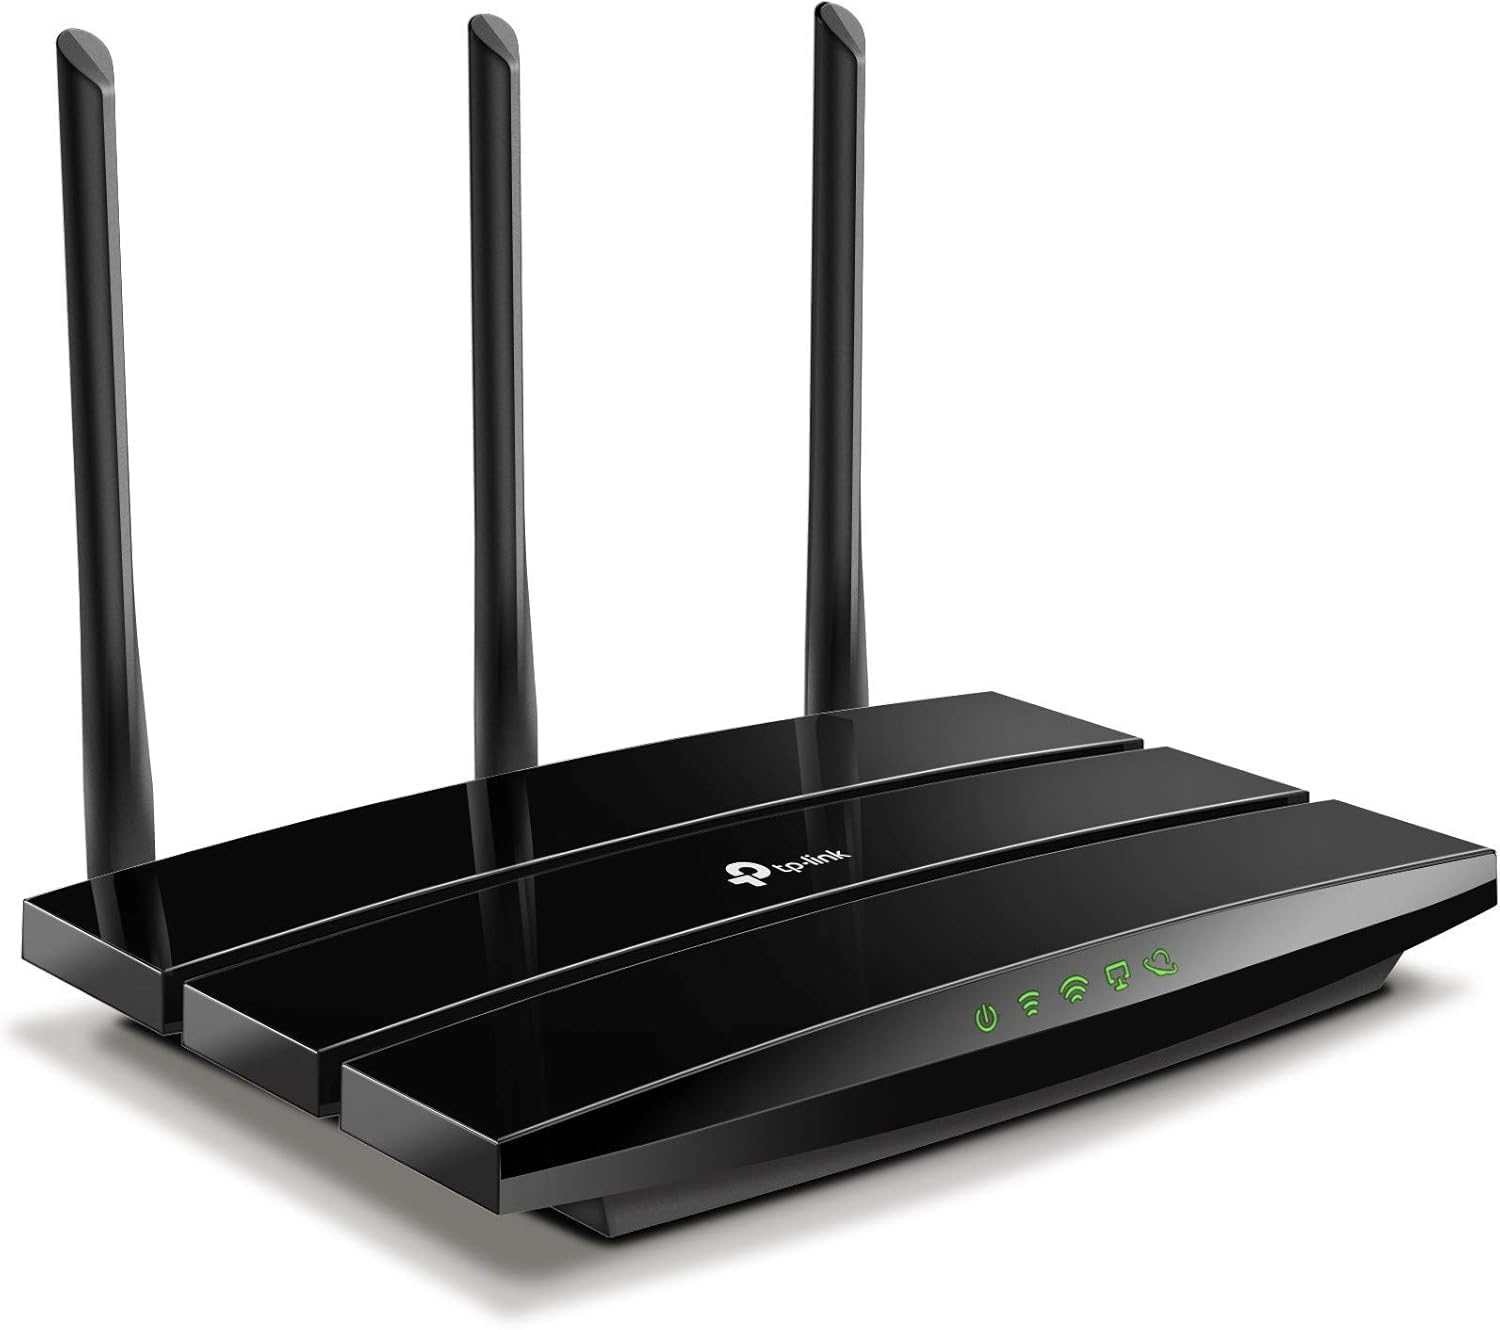
รูปที่ 3.1 : ด้านหน้า View of TP-Link Archer A8 Router. ภาพนี้แสดงภาพจากบนลงล่าง view of the TP-Link Archer A8 router, featuring its sleek black design and three external antennas. The front panel includes LED indicators for power, internet connectivity, Wi-Fi status, and Ethernet port activity.
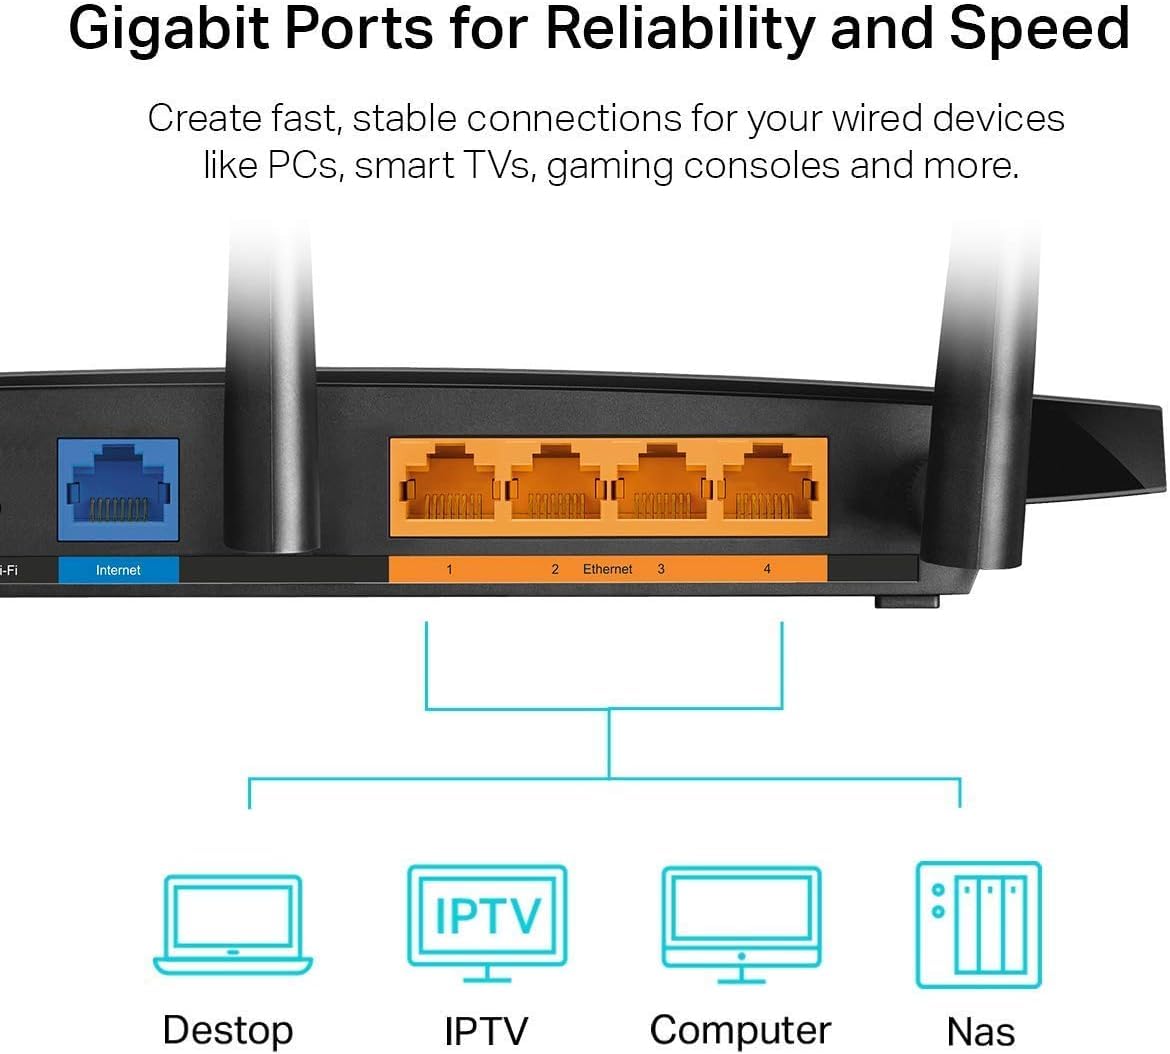
Figure 3.2: Rear Panel of TP-Link Archer A8 Router. This image shows the rear panel of the router, highlighting the Gigabit WAN port (blue) and four Gigabit LAN ports (orange). These ports are used for wired connections to your modem and other network devices.
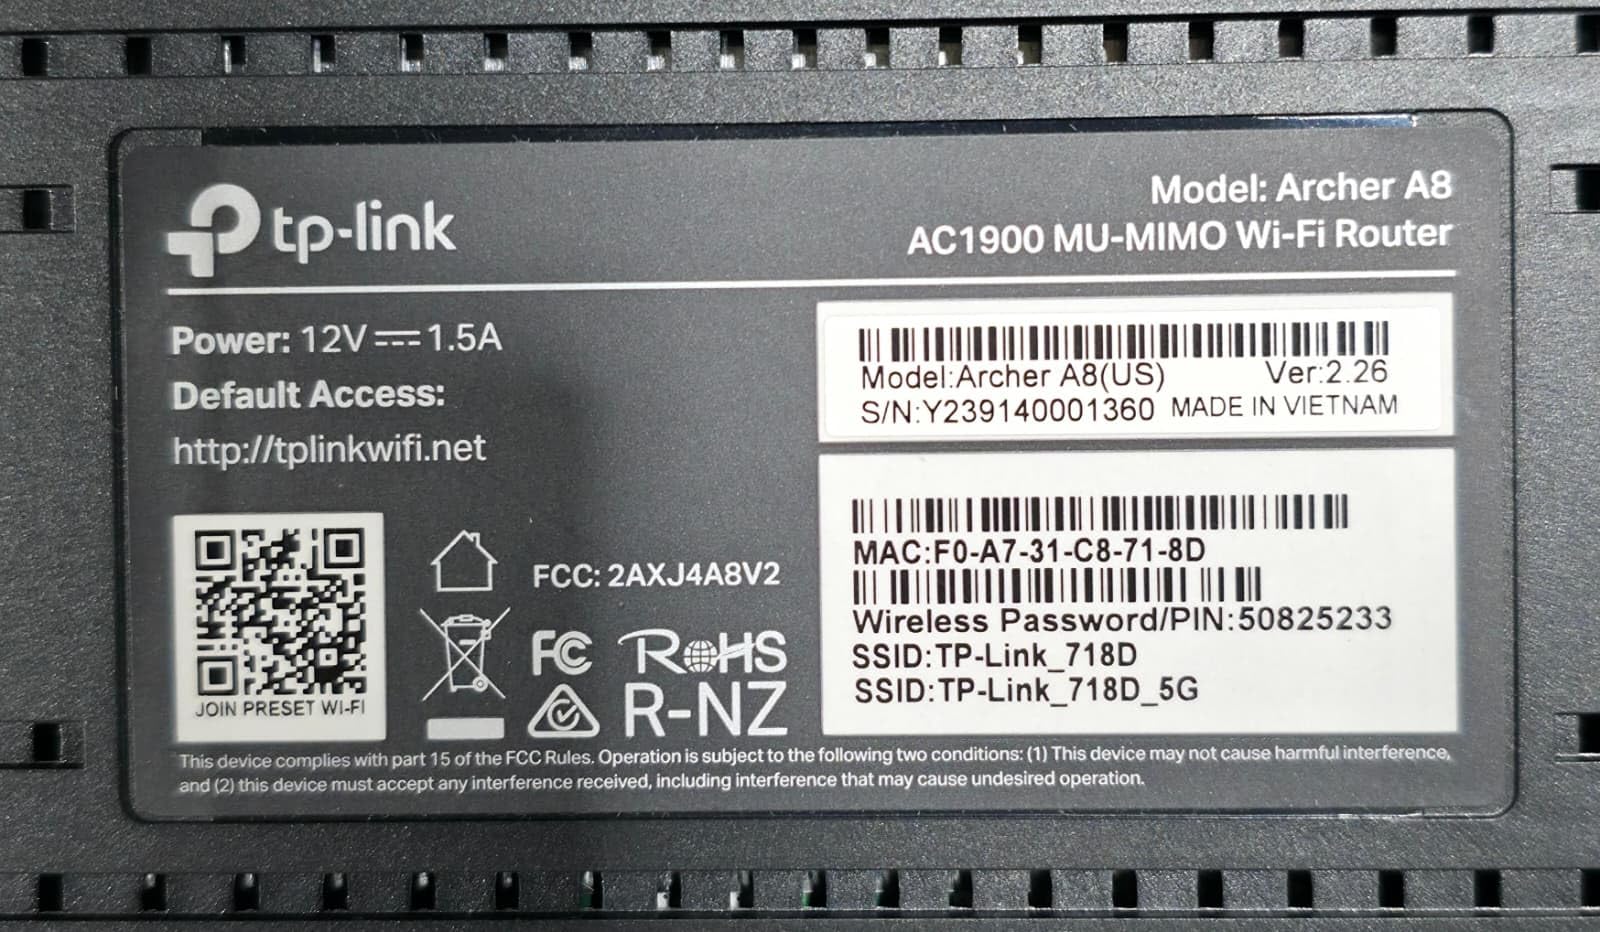
Figure 3.3: Router Bottom Label. This label provides essential information including the model (Archer A8, AC1900 MU-MIMO Wi-Fi Router), power specifications (12V===1.5A), default access URL (http://tplinkwifi.net), MAC address (F0:A7:31:C8:71:8D), serial number (Y239140001360), and default Wi-Fi network names (SSID: TP-Link_718D, TP-Link_718D_5G) with the default wireless password (50825233). It also includes FCC and RoHS compliance marks.
4. คำแนะนำในการตั้งค่า
- ปิดโมเด็มของคุณ: ถอดปลั๊กไฟออกจากโมเด็มที่มีอยู่ของคุณ
- เชื่อมต่อเราเตอร์:
- เชื่อมต่อสายเคเบิลอีเทอร์เน็ตของโมเด็มของคุณเข้ากับ พอร์ต WAN (blue) on the Archer A8 router.
- เชื่อมต่ออะแดปเตอร์จ่ายไฟเข้ากับเราเตอร์แล้วเสียบเข้ากับเต้ารับไฟฟ้า
- Power on your modem, then power on the router. Wait for the LED indicators to stabilize.
- เชื่อมต่อกับเราเตอร์:
- การเชื่อมต่อแบบไร้สาย: Connect your computer or mobile device to the router's default Wi-Fi network. The default SSIDs (e.g., TP-Link_718D, TP-Link_718D_5G) and Wireless Password (e.g., 50825233) are printed on the router's bottom label (refer to Figure 3.3).
- การเชื่อมต่อแบบมีสาย: Connect your computer to one of the router's พอร์ตแลน (orange) using an Ethernet cable.
- กำหนดค่าเราเตอร์:
- เปิด web browser and enter the default access URL: http://tplinkwifi.net.
- Follow the on-screen instructions in the Quick Setup wizard to configure your internet connection and Wi-Fi settings. You will be prompted to create a new login password for the router.
- Alternatively, use the TP-Link Tether App for mobile-based setup.
5. คู่มือการใช้งาน
5.1. อุปกรณ์เชื่อมต่อ
เมื่อตั้งค่าเราเตอร์เสร็จแล้ว คุณสามารถเชื่อมต่ออุปกรณ์ต่างๆ ได้:
- อุปกรณ์ไร้สาย: ค้นหา your Wi-Fi network name (SSID) on your device and enter the password you configured during setup.
- อุปกรณ์แบบมีสาย: Connect devices like PCs, Smart TVs, or gaming consoles to the router's Gigabit LAN ports using Ethernet cables.
5.2. Wi-Fi แบบดูอัลแบนด์
The Archer A8 operates on two frequency bands:
- ย่านความถี่ 2.4GHz: Provides wider coverage and better penetration through walls, ideal for general internet use and older devices. Offers speeds up to 600Mbps.
- ย่านความถี่ 5GHz: Offers faster speeds (up to 1300Mbps) and lower latency, suitable for bandwidth-intensive activities like 4K streaming and online gaming. Has a shorter range and is more susceptible to obstacles.
The router supports Smart Connect, which automatically assigns devices to the best available band for optimal performance.
5.3. MU-MIMO Technology
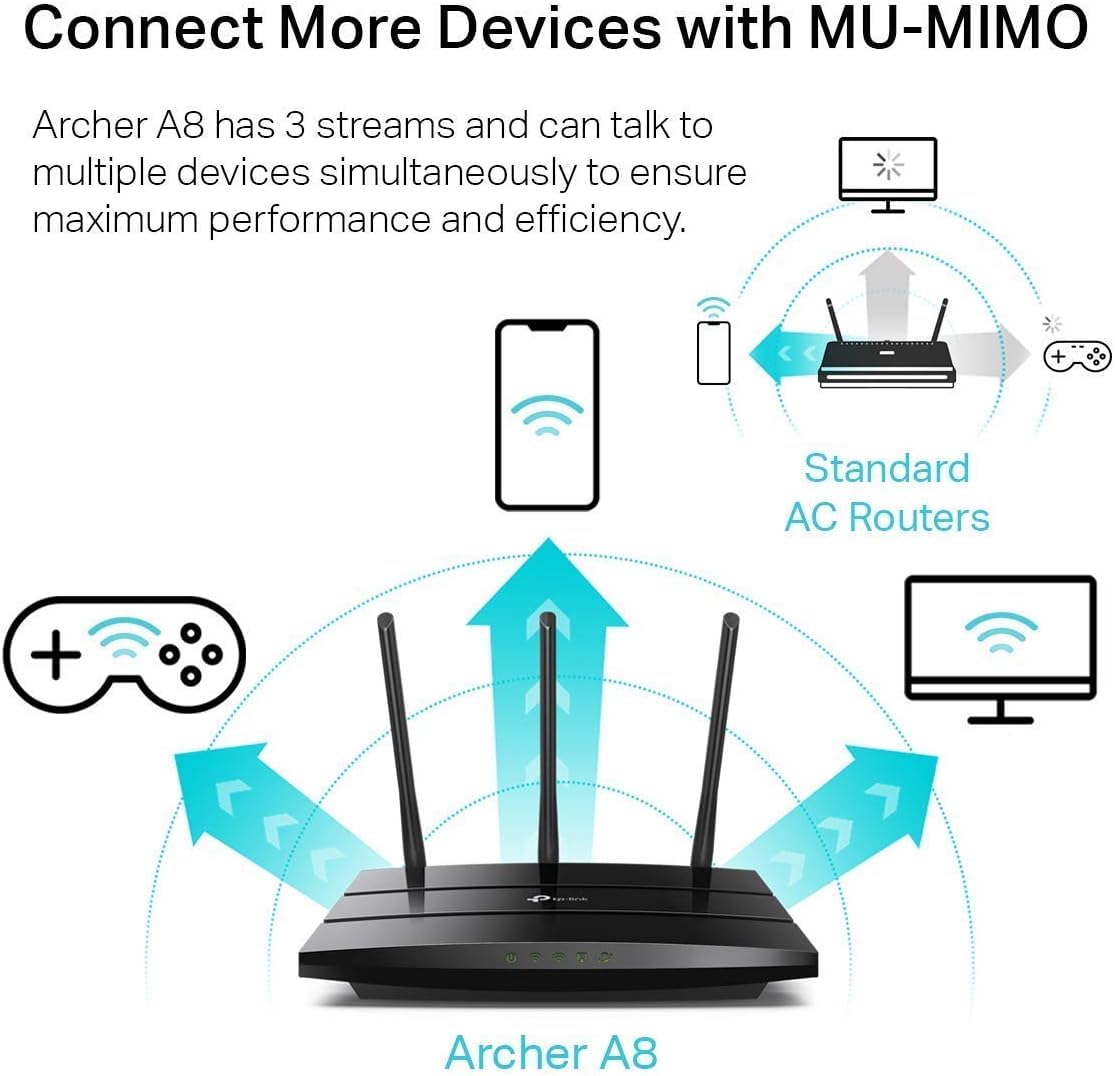
Figure 5.1: MU-MIMO Operation. This diagram illustrates how the Archer A8 router, equipped with MU-MIMO technology, can communicate with multiple devices simultaneously, unlike standard AC routers that communicate with one device at a time. This improves network efficiency and performance for all connected devices.
MU-MIMO (Multi-User, Multiple-Input, Multiple-Output) allows the Archer A8 to communicate with multiple devices simultaneously, rather than sequentially. This significantly improves network efficiency and throughput, especially in environments with many connected devices. For MU-MIMO to function, client devices must also support MU-MIMO.
5.4. Beamforming Technology
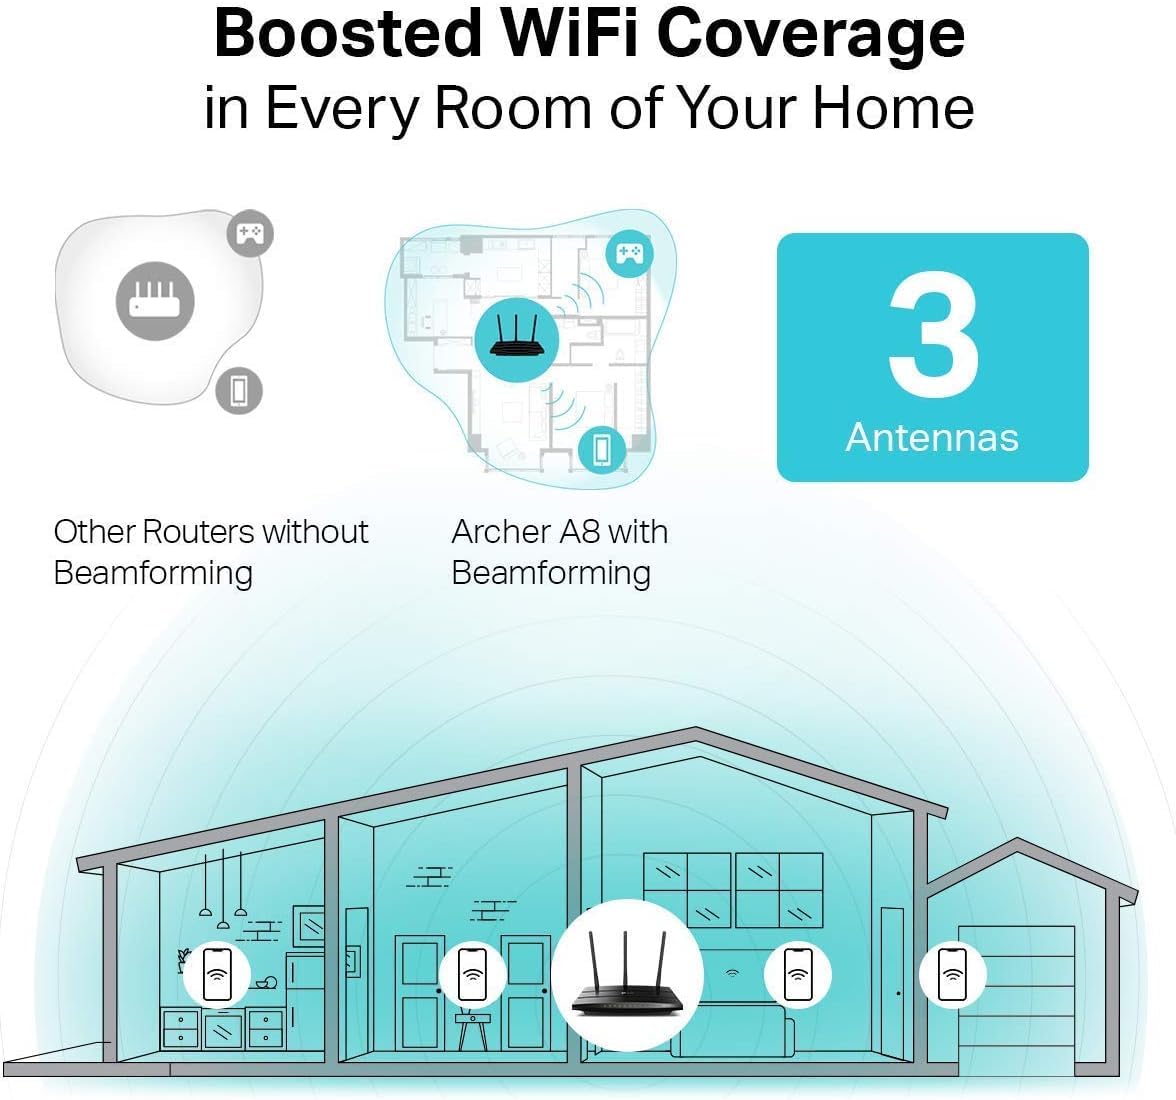
Figure 5.2: Beamforming Coverage. This image compares Wi-Fi coverage between a router without Beamforming and the Archer A8 with Beamforming. The Archer A8 directs stronger, more focused Wi-Fi signals towards connected devices, extending coverage and improving signal strength throughout your home.
Beamforming technology detects the location of your connected devices and concentrates the Wi-Fi signal directly towards them. This results in a more efficient and stronger wireless connection, extending Wi-Fi coverage and improving reliability, particularly for long-range connections.
5.5. Guest Wi-Fi Network
The router allows you to create a separate guest network, providing internet access to visitors without granting them access to your main network resources. This enhances security for your primary network.
5.6. การควบคุมโดยผู้ปกครอง
Utilize the Parental Controls feature to manage internet access for children. You can block inappropriate content and set daily time limits for online activity.
6. การบำรุงรักษา
- อัพเดตเฟิร์มแวร์: ตรวจสอบและติดตั้งการอัพเดตเฟิร์มแวร์ผ่านเราเตอร์เป็นประจำ web management interface or the TP-Link Tether App. Updates often include performance improvements, security patches, and new features.
- ตำแหน่งการวางเราเตอร์: Place the router in a central location, away from obstructions and devices that emit electromagnetic interference (e.g., microwaves, cordless phones) to maximize Wi-Fi coverage.
- การรีบูต: Periodically reboot your router (unplug and replug the power adapter) to clear its memory and refresh network connections, which can resolve minor performance issues.
- ความปลอดภัย: Use strong, unique passwords for your Wi-Fi network and router administration. Enable WPA2/WPA3 encryption for your wireless network.
7 การแก้ไขปัญหา
If you encounter issues with your router, consider the following steps:
- ไม่มีอินเทอร์เน็ต:
- ตรวจสอบว่าโมเด็มของคุณทำงานถูกต้องหรือไม่
- Ensure all cables are securely connected to the correct ports (WAN port to modem, LAN ports to devices).
- รีบูตทั้งโมเด็มและเราเตอร์ของคุณ
- ตรวจสอบการตั้งค่าอินเทอร์เน็ตของคุณในเราเตอร์ web อินเทอร์เฟซการจัดการ
- Weak Wi-Fi Signal or Dropouts:
- ย้ายเราเตอร์ไปไว้ในตำแหน่งที่อยู่ตรงกลางมากขึ้น ห่างจากสิ่งกีดขวางและแหล่งกำเนิดสัญญาณรบกวน
- ปรับเสาอากาศของเราเตอร์เพื่อให้ได้ทิศทางสัญญาณที่ดีที่สุด
- Consider using a Wi-Fi analyzer app to identify channel interference and switch to a less congested channel.
- ไม่สามารถเข้าถึงหน้าการจัดการเราเตอร์ได้:
- ตรวจสอบให้แน่ใจว่าอุปกรณ์ของคุณเชื่อมต่อกับเครือข่ายของเราเตอร์ (แบบมีสายหรือไร้สาย)
- Verify you are using the correct access URL (http://tplinkwifi.net) or IP address.
- ล้างแคชเบราว์เซอร์ของคุณหรือลองใช้เบราว์เซอร์อื่น
- ลืมรหัสผ่านเข้าสู่ระบบเราเตอร์:
- Perform a factory reset on the router. This will revert all settings to default, including the login password (which you will then set up again via the Quick Setup wizard). To factory reset, press and hold the reset button on the router (usually a small pinhole button) for about 10 seconds while the router is powered on.
8. ข้อมูลจำเพาะ
| คุณสมบัติ | รายละเอียด |
|---|---|
| ชื่อรุ่น | TP-Link AC1900 (Archer A8) |
| ไร้มาตรฐาน | IEEE 802.11ac/n/a 5 GHz, IEEE 802.11n/b/g 2.4 GHz |
| ความเร็ว Wi-Fi | AC1900 (1300 Mbps บน 5 GHz, 600 Mbps บน 2.4 GHz) |
| เสาอากาศ | เสาอากาศภายนอกแบบคงที่ 3 เสา |
| พอร์ตอีเทอร์เน็ต | พอร์ต WAN กิกะบิต 1 พอร์ต, พอร์ต LAN กิกะบิต 4 พอร์ต |
| คุณสมบัติพิเศษ | MU-MIMO, Beamforming, Smart Connect, Guest Wi-Fi, Parental Controls, WPS |
| ขนาด (กว้าง x ลึก x สูง) | 9.57 x 6.32 x 1.28 นิ้ว |
| น้ำหนักสินค้า | 14.6 ออนซ์ |
| กำลังไฟเข้า | 12V===1.5A |
| อุปกรณ์ที่รองรับ | เครื่องเล่นเกม, คอมพิวเตอร์ส่วนบุคคล, สมาร์ททีวี |
บันทึก: Maximum wireless transmission rates are physical rates derived from IEEE 802.11 specifications. Actual wireless data throughput and wireless coverage are not guaranteed and will vary due to network conditions, environmental factors, and client limitations. Use of MU-MIMO requires client devices to also support MU-MIMO.
9. การรับประกันและการสนับสนุน
TP-Link provides an industry-leading 2-year warranty for this product. For technical assistance, please contact TP-Link's 24/7 technical support.
For the most up-to-date information, support resources, and contact details, please visit the official TP-Link webเว็บไซต์.
การปฏิเสธความรับผิดทางกฎหมาย:
1. Maximum wireless transmission rates are the physical rates derived from IEEE Standard 802.11 specifications. Range and coverage specifications are based upon test results under normal usage conditions. Actual wireless transmission rate and wireless coverage are not guaranteed and will vary as a result of 1) environmental factors, including building materials, physical objects, and obstacles, 2) network conditions, including local interference, volume and density of traffic, product location, network complexity, and network overhead and 3) client limitations, including rated performance, location, connection quality, and client condition. 2. Use of MU-MIMO requires clients to also support MU-MIMO.


