1. บทนำและเรื่องอื่นๆview
The Docooler JINGSHA X99-8D3 is a high-performance ATX gaming motherboard designed for LGA2011 V3 processors. It features four-channel DDR3 memory support, an M.2 NVME slot for high-speed storage, and multiple PCI-E expansion slots, making it suitable for demanding computing tasks and gaming setups. This manual will guide you through the installation, configuration, and maintenance of your motherboard.
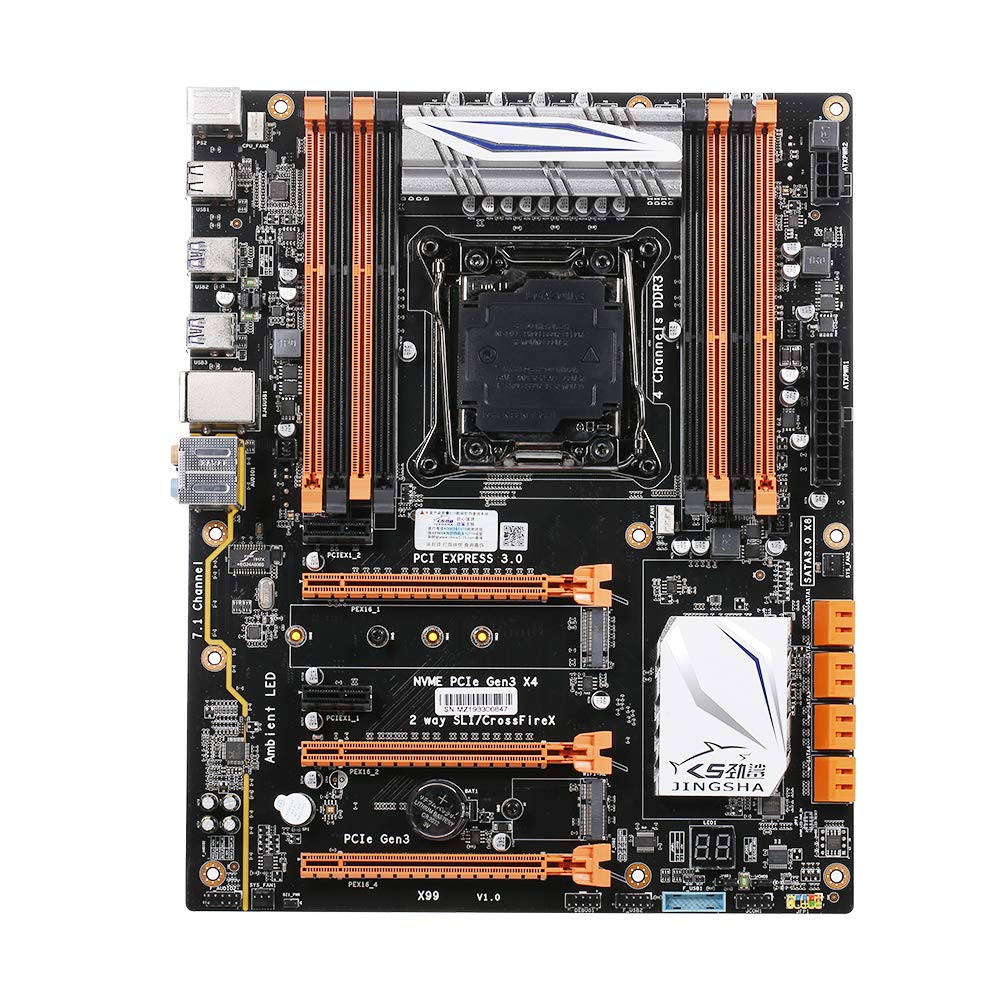
รูปที่ 1.1: จากบนลงล่าง view of the Docooler JINGSHA X99-8D3 Motherboard, showcasing its layout with CPU socket, RAM slots, and various expansion slots.
2. คุณสมบัติหลัก
- M.2 NVME Support: Equipped with an M.2 hard disk port, supporting high-speed PCI-E NVME X4 for optimal operating system and application driver performance.
- Quad-Channel DDR3 Memory: Features 8 DDR3 memory slots across 4 channels, significantly improving capacity and performance, supporting up to 256GB.
- Digital Diagnostic Card: Integrated digital diagnostic card automatically tests hardware devices to ensure proper operation and assist in troubleshooting.
- Multiple PCI-E Expansion Slots: Provides 3 PCI-E expanded slots, configurable as X16/X8 to handle various workloads and multi-GPU setups.
- โครงสร้างทนทาน: Built with a 10-layer PCB and high-quality capacitors for enhanced stability and heat resistance.

Figure 2.1: Diagram illustrating the six core technologies and features of the motherboard, including 4-channel DDR3*8, M.2 hard disk interface, digital diagnostic card, 7.1 channel audio, SATA3.0*8 interface, and Crossfire support.
3. เนื้อหาบรรจุภัณฑ์
โปรดตรวจสอบว่าสินค้าทั้งหมดที่ระบุไว้ด้านล่างนี้มีอยู่ในแพ็คเกจของคุณ:
- 1x Docooler JINGSHA X99-8D3 Motherboard
- สายเคเบิล SATA 1x
- 1x I/O Baffle (Backplate)
- 1x CPU Fan Board
- A bag of screws
4. ข้อมูลจำเพาะ
| คุณสมบัติ | ข้อมูลจำเพาะ |
|---|---|
| แบบอย่าง | X99-8D3 |
| ฟอร์มแฟกเตอร์ | เอทีเอ็กซ์ |
| Graphic Slot | PCIE3.0 16X*3 |
| การ์ดเครือข่าย | การ์ดเครือข่ายกิกะบิต |
| ช่องสัญญาณเสียง | 7.1 ช่อง |
| CPU Type Support | LGA2011 V3 (2629V3/2649V3/2669V3/2678V3/2696V3/2676V3/2673V3) |
| ชั้น PCB | 10 ชั้น |
| สล็อตหน่วยความจำ | DDR3*8 |
| ความจุหน่วยความจำสูงสุด | 256GB |
| อินเทอร์เฟซ SATA | SATA3.0*8, M.2 NVME |
| อินเทอร์เฟซ PS/2 | เมาส์ / คีย์บอร์ด |
| แหล่งจ่ายไฟ | 8 PIN*1, 24 PIN*1 |
| อินเทอร์เฟซ USB | พอร์ต USB3.0*6, USB2.0*6 |
| อินเทอร์เฟซที่ขยาย | PCIE 1X*2, M.2 WIFI*1 |
| ขนาดสินค้า | 30.2 x 24.4 ซม. (11.89 x 9.61 นิ้ว) |
| น้ำหนักสินค้า | 930.5 กรัม (32.82 ออนซ์) |

รูปที่ 4.1: รายละเอียด view of the motherboard's rear I/O panel, showing PS/2 ports, USB 2.0, USB 3.0, Gigabit Network Port, and 7.1 Audio Ports.
5. การตั้งค่าและการติดตั้ง
ก่อนเริ่มการติดตั้ง โปรดตรวจสอบให้แน่ใจว่าระบบของคุณปิดอยู่และถอดปลั๊กออกจากเต้ารับแล้ว จับเมนบอร์ดที่ขอบเพื่อหลีกเลี่ยงการเกิดไฟฟ้าสถิต
5.1 การติดตั้ง CPU
- Locate the LGA2011 V3 CPU socket on the motherboard.
- Gently push down the CPU retention lever and swing it open.
- Align the triangular mark on your CPU with the corresponding mark on the socket. Carefully place the CPU into the socket without forcing it.
- ปิดคันโยกล็อกเพื่อยึด CPU ให้แน่น
- ทาซิลิโคนระบายความร้อนบางๆ ให้ทั่วด้านบนของซีพียู
- Install the CPU cooler according to its manufacturer's instructions, ensuring proper contact and pressure.

รูปที่ 5.1: ระยะใกล้ view of the LGA2011 V3 CPU socket on the motherboard, ready for CPU installation.
5.2 Installing RAM Modules
- คลายคลิปที่ปลายทั้งสองด้านของช่องเสียบหน่วยความจำ DDR3
- Align the notch on the RAM module with the key in the memory slot.
- กดลงบนปลายทั้งสองด้านของโมดูล RAM ให้แน่นจนกระทั่งคลิปล็อกเข้าที่ เพื่อยึดโมดูลให้แน่น
- For optimal performance, install RAM modules in matching pairs across the four channels as indicated in the motherboard manual or silkscreen.

รูปที่ 5.2: View of the eight DDR3 RAM slots on the motherboard, showing their arrangement for quad-channel memory configuration.
5.3 Installing Storage Devices (M.2 NVME & SATA)
- M.2 NVME SSD: Locate the M.2 slot. Insert the M.2 SSD at an angle into the slot, then gently push it down and secure it with the provided screw.
- ไดรฟ์ SATA: Connect your SATA SSDs or HDDs to the SATA 3.0 ports using SATA data cables. Ensure the power supply SATA power connectors are also attached to the drives.

Figure 5.3: Close-up of the M.2 interface on the motherboard, highlighting its position and the PCI-E Gen3 X4 connection for high-speed data transfer.
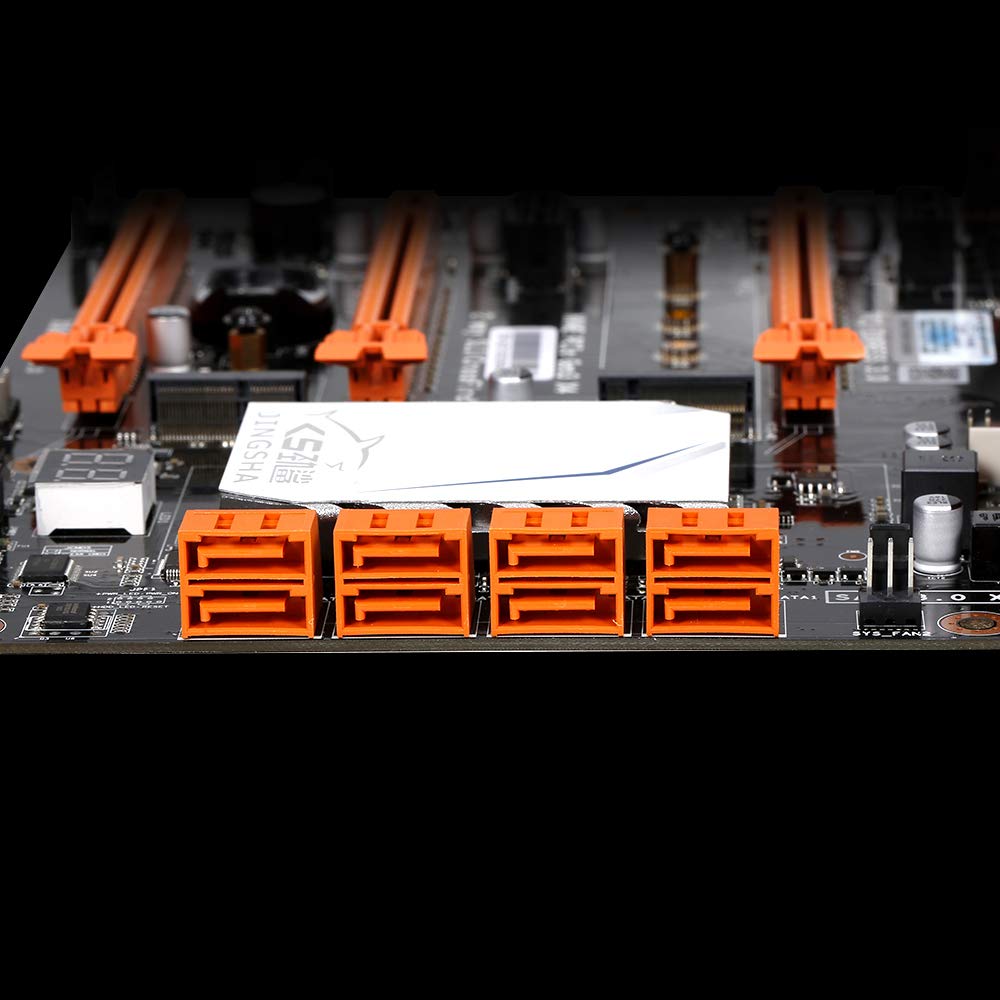
รูปที่ 5.4: View of the eight orange SATA 3.0 ports on the motherboard, providing ample connectivity for storage devices.
5.4 การเชื่อมต่อแหล่งจ่ายไฟ
- เชื่อมต่อขั้วต่อไฟ ATX 24 พินจากหน่วยจ่ายไฟ (PSU) ของคุณเข้ากับพอร์ตที่ตรงกันบนเมนบอร์ด
- Connect the 8-pin CPU power connector (EPS12V) from your PSU to the 8-pin port near the CPU socket.
5.5 การติดตั้งการ์ดขยาย (PCIe)
- Locate the desired PCI-E 3.0 x16 or x1 slots.
- ถอดฝาครอบช่องขยายที่สอดคล้องกันออกจากเคสพีซีของคุณ
- Align the expansion card with the slot and press down firmly until it is fully seated. Secure the card with a screw to the case.

รูปที่ 5.5: มุม view of the motherboard, highlighting the three PCI Express 3.0 x16 slots and the smaller PCIe x1 slots, ready for graphics cards and other expansion cards.
6. การใช้งานเมนบอร์ด
6.1 การบูตครั้งแรกและการตั้งค่า BIOS
- หลังจากประกอบส่วนประกอบทั้งหมดแล้ว ให้เชื่อมต่อจอภาพ คีย์บอร์ด และเมาส์ของคุณ
- Power on your system. During the initial boot sequence, repeatedly press the เดล or F2 key (common for JINGSHA motherboards) to enter the BIOS/UEFI setup utility.
- ใน BIOS ให้ตรวจสอบว่าส่วนประกอบที่ติดตั้งทั้งหมด (CPU, RAM, หน่วยเก็บข้อมูล) ถูกตรวจพบอย่างถูกต้องหรือไม่
- ตั้งค่าลำดับการบูตเพื่อจัดลำดับความสำคัญของสื่อการติดตั้งระบบปฏิบัติการของคุณ (ไดรฟ์ USB หรือ DVD)
- บันทึกการเปลี่ยนแปลงและออกจาก BIOS ระบบจะรีสตาร์ท
6.2 การติดตั้งระบบปฏิบัติการ
Follow the instructions provided with your operating system (e.g., Windows, Linux) to complete the installation process. Ensure you install all necessary drivers for the motherboard's chipsets, network, audio, and other components from the manufacturer's website or included driver disc.
7. การบำรุงรักษา
การบำรุงรักษาอย่างถูกต้องจะช่วยให้เมนบอร์ดของคุณมีอายุการใช้งานยาวนานและทำงานได้เสถียร
- การกำจัดฝุ่น: ทำความสะอาดฝุ่นออกจากเมนบอร์ดและส่วนประกอบต่างๆ เป็นประจำโดยใช้ลมอัด ตรวจสอบให้แน่ใจว่าได้ปิดเครื่องและถอดปลั๊กออกก่อนทำความสะอาด
- อัปเดต BIOS: Periodically check the Docooler or JINGSHA official website for BIOS updates. BIOS updates can improve compatibility, stability, and performance. Follow update instructions carefully to avoid damaging the motherboard.
- การอัปเดตไดรเวอร์: หมั่นอัปเดตไดรเวอร์ระบบของคุณอยู่เสมอ เพื่อให้มั่นใจได้ถึงประสิทธิภาพสูงสุดและความเข้ากันได้กับซอฟต์แวร์และฮาร์ดแวร์ใหม่ๆ
- สภาพแวดล้อม : Operate the motherboard in a well-ventilated environment with stable temperature and humidity to prevent overheating and component degradation.
8 การแก้ไขปัญหา
หัวข้อนี้จะกล่าวถึงปัญหาทั่วไปที่คุณอาจพบเจอ
8.1 ไม่มีไฟ / เปิดเครื่องไม่ติด
- Ensure the 24-pin ATX and 8-pin CPU power connectors are securely plugged into the motherboard.
- Check if the power supply unit (PSU) is switched on and connected to a working power outlet.
- Verify that the front panel power button cable is correctly connected to the motherboard's header.
8.2 ไม่มีการแสดงผล
- Ensure your graphics card (if dedicated) is properly seated in its PCI-E slot and has all necessary power cables connected.
- Check that your monitor cable is securely connected to the graphics card or motherboard (if integrated graphics are used, though X99 typically requires a dedicated GPU).
- Try reseating your RAM modules. Incorrectly seated RAM is a common cause of no display.
8.3 POST Code Display (Digital Diagnostic Card)
The motherboard is equipped with a digital diagnostic card (POST code display) that shows a two-digit code during boot-up. Refer to the motherboard's detailed technical documentation (often available on the manufacturer's website) for a list of POST codes and their meanings. This can help pinpoint the exact component causing a boot failure.

รูปที่ 8.1: ระยะใกล้ view showing the integrated digital diagnostic card (POST code display) on the motherboard, which assists in identifying hardware issues during boot.
9. การรับประกันและการสนับสนุน
For warranty information and technical support, please refer to the documentation provided with your purchase or visit the official Docooler or JINGSHA webไซต์นี้ โปรดเก็บหลักฐานการซื้อไว้เพื่อใช้ยืนยันการรับประกัน


