การแนะนำ
ขอขอบคุณที่เลือกใช้ขาตั้งแล็ปท็อปอลูมิเนียมปรับระดับได้ Besign LSX3 คู่มือนี้ให้คำแนะนำโดยละเอียดเกี่ยวกับการประกอบ การใช้งาน และการบำรุงรักษาขาตั้งแล็ปท็อปใหม่ของคุณอย่างถูกต้อง โปรดอ่านคู่มือนี้อย่างละเอียดก่อนใช้งานเพื่อให้มั่นใจได้ถึงประสิทธิภาพสูงสุดและอายุการใช้งานที่ยาวนานของผลิตภัณฑ์
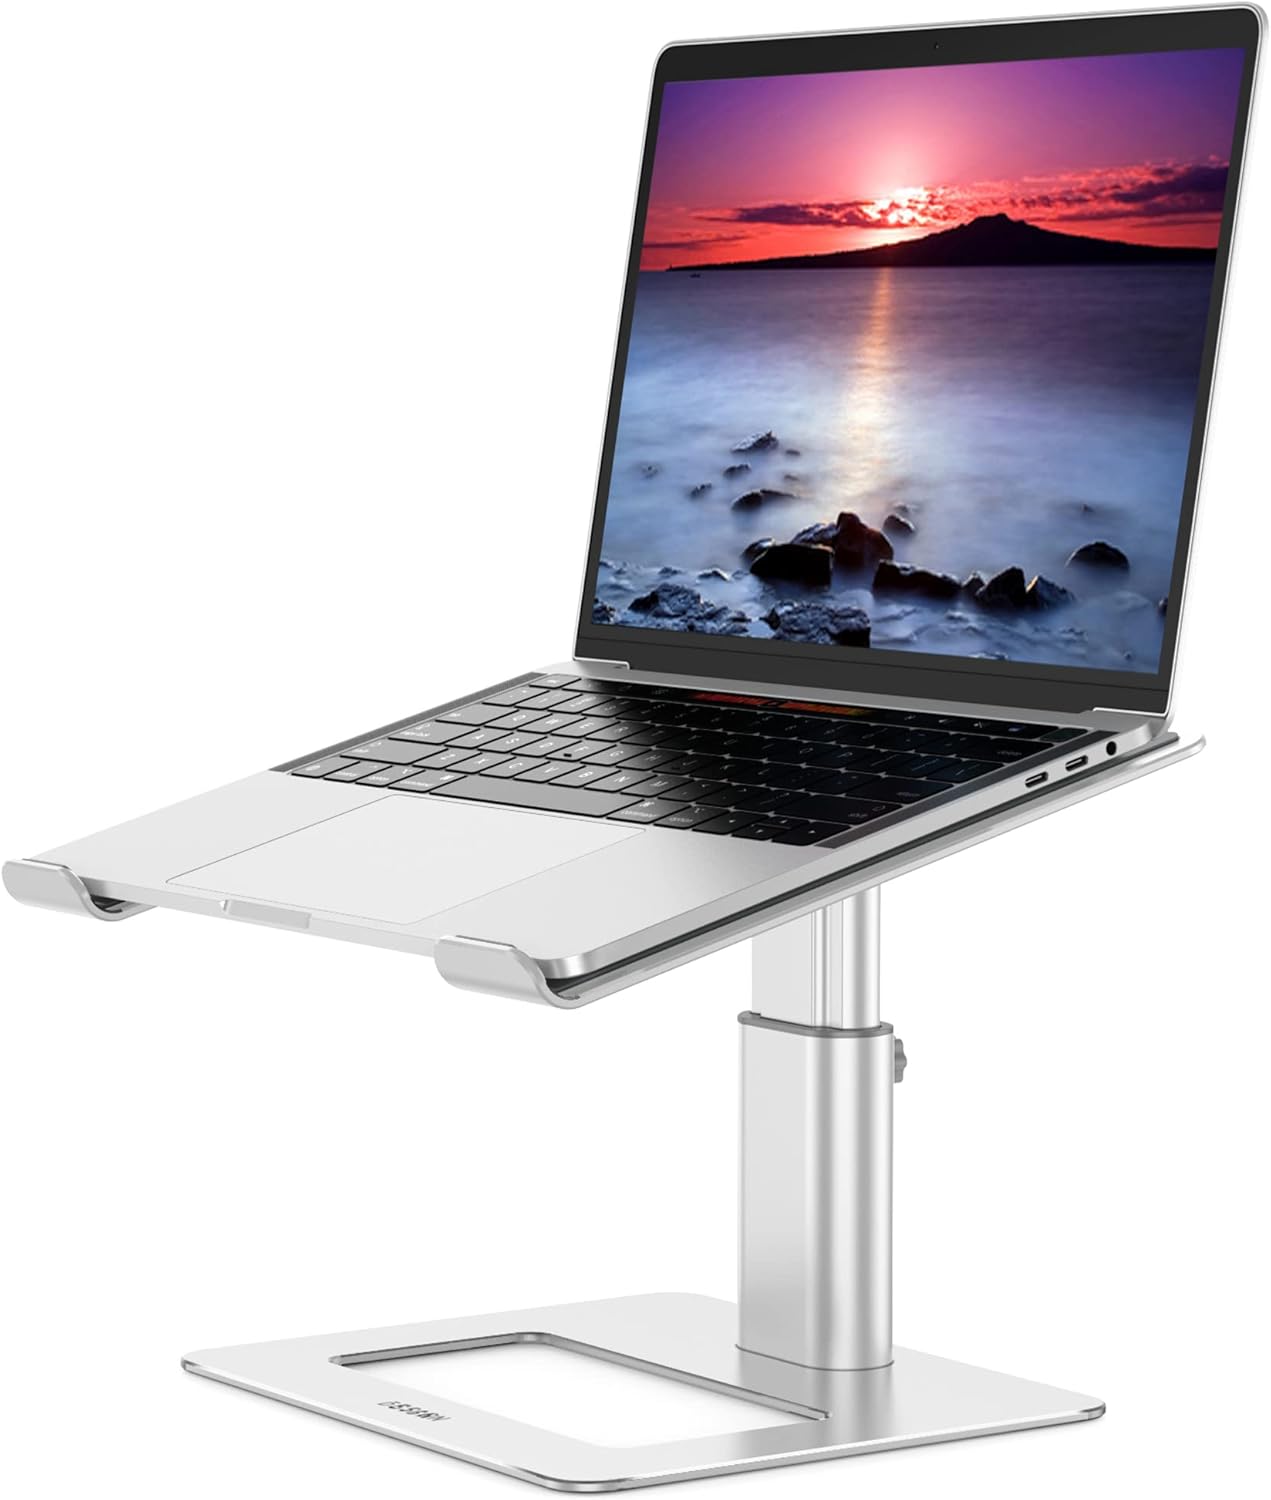
ภาพ: ขาตั้งแล็ปท็อปอลูมิเนียมปรับระดับได้ Besign LSX3 แสดงภาพแล็ปท็อปที่วางอยู่ในตำแหน่งยกสูง
คุณสมบัติผลิตภัณฑ์
- ความเข้ากันได้กว้าง: รองรับแล็ปท็อปทุกขนาดตั้งแต่ 10 นิ้วถึง 14 นิ้ว
- การออกแบบตามหลักสรีรศาสตร์: สามารถปรับความสูงและมุมได้ เพื่อลดความเมื่อยล้าของคอและไหล่
- มั่นคงและปลอดภัย: ผลิตจากอลูมิเนียมอัลลอยคุณภาพสูง รองรับน้ำหนักได้สูงสุด 4 กก. (8.8 ปอนด์) มีแผ่นยางรองเพื่อยึดแล็ปท็อปและป้องกันรอยขีดข่วน
- การกระจายความร้อน: ดีไซน์แบบเปิดโล่งทำจากอลูมิเนียมช่วยระบายอากาศ ป้องกันไม่ให้แล็ปท็อปร้อนเกินไป
- การจัดการพื้นที่: ช่วยให้สามารถจัดเก็บอุปกรณ์ต่อพ่วง เช่น คีย์บอร์ดและเมาส์ไว้ใต้แท่นวางได้
- ปรับความสูง: สามารถปรับความสูงได้ตั้งแต่ 125 มม. (4.9 นิ้ว) ถึง 195 มม. (7.65 นิ้ว) โดยใช้สกรูปรับด้วยมือที่ให้มาในชุด
เนื้อหาแพ็คเกจ
โปรดตรวจสอบให้แน่ใจว่ามีชิ้นส่วนครบทุกชิ้นก่อนดำเนินการประกอบ:
- แผ่นรองด้านบนของขาตั้งแล็ปท็อป (ส่วนที่ 1)
- เสาปรับระดับได้ (ตอนที่ 2)
- แผ่นฐาน (ส่วนที่ 3)
- สกรูยึด (4x)
- ประแจมือ (สำหรับประกอบ)
- สกรูมือ (สำหรับปรับความสูง)
คำแนะนำการตั้งค่า
ทำตามขั้นตอนต่อไปนี้เพื่อประกอบขาตั้งแล็ปท็อป Besign LSX3 ของคุณ:
- ขั้นตอนที่ 1: ติดตั้งเสาค้ำเข้ากับแผ่นฐาน
จัดตำแหน่งรูสกรูทั้งสี่รูที่ด้านล่างของเสาปรับระดับ (ส่วนที่ 2) ให้ตรงกับรูที่ตรงกันบนแผ่นฐาน (ส่วนที่ 3) ยึดให้แน่นโดยใช้สกรูยึดสองตัวที่ให้มาและประแจมือ

ภาพ: ภาพประกอบแสดงการจัดแนวของเสา опор กับแผ่นฐาน
- ขั้นตอนที่ 2: ยึดเสาค้ำเข้ากับแผ่นฐานให้แน่น
ขันสกรูให้แน่นเพื่อให้ฐานมั่นคง

ภาพ: ภาพประกอบแสดงการขันสกรูเพื่อยึดเสาค้ำเข้ากับแผ่นฐาน
- ขั้นตอนที่ 3: ติดตั้งแผ่นรองด้านบนของขาตั้งแล็ปท็อป
จัดตำแหน่งรูสกรูทั้งสี่รูที่ด้านบนของเสาปรับระดับ (ส่วนที่ 2) ให้ตรงกับรูที่ตรงกันบนแผ่นด้านบนของขาตั้งแล็ปท็อป (ส่วนที่ 1) ยึดให้แน่นโดยใช้สกรูยึดที่เหลืออีกสองตัวและประแจมือ

ภาพ: ภาพประกอบแสดงการจัดวางแผ่นด้านบนของขาตั้งแล็ปท็อปให้ตรงกับเสารองรับ
- ขั้นตอนที่ 4: ยึดแผ่นรองด้านบนของขาตั้งแล็ปท็อปให้แน่น
ขันสกรูให้แน่นเพื่อให้แผ่นด้านบนมั่นคง

ภาพ: ภาพประกอบแสดงการขันสกรูเพื่อยึดแผ่นด้านบนเข้ากับเสารองรับ

ภาพ: แผนภาพแสดงขั้นตอนการประกอบขาตั้งแล็ปท็อป Besign LSX3 อย่างละเอียด โดยระบุส่วนที่ 1 (แผ่นด้านบน), ส่วนที่ 2 (เสาปรับระดับได้) และส่วนที่ 3 (แผ่นฐาน) พร้อมทั้งสกรูและประแจ
คำแนะนำการใช้งาน
การปรับความสูง
ขาตั้ง Besign LSX3 สามารถปรับความสูงได้เพื่อให้ใช้งานได้อย่างถูกหลักสรีรศาสตร์ viewมุมเอียง ความสูงสามารถปรับได้ระหว่าง 125 มม. (4.9 นิ้ว) และ 195 มม. (7.65 นิ้ว)
- ขั้นตอนที่ 1: คลายสกรูปรับด้วยมือ
หาตำแหน่งสกรูปรับด้วยมือที่ด้านข้างของเสาปรับระดับ (ส่วนที่ 2) หมุนสกรูทวนเข็มนาฬิกาเพื่อคลายออก

ภาพ: ภาพประกอบแสดงการหมุนสกรูแบบแมนนวลทวนเข็มนาฬิกาเพื่อคลายออกสำหรับการปรับความสูง
- ขั้นตอนที่ 2: ปรับความสูง
ค่อยๆ ดึงหรือดันแผ่นรองด้านบนของขาตั้งแล็ปท็อป (ส่วนที่ 1) ให้ได้ความสูงตามต้องการ ขาตั้งมีความสูงต่ำสุดที่ 125 มม. และความสูงสูงสุดที่ 195 มม.

ภาพ: ภาพประกอบแสดงการปรับขาตั้งแล็ปท็อปให้ได้ความสูงตามต้องการ
- ขั้นตอนที่ 3: ล็อกความสูง
เมื่อปรับความสูงได้ตามต้องการแล้ว ให้หมุนสกรูตามเข็มนาฬิกาเพื่อขันให้แน่นและล็อคขาตั้งให้เข้าที่อย่างปลอดภัย

ภาพ: ภาพประกอบแสดงการหมุนสกรูตามเข็มนาฬิกาเพื่อล็อคขาตั้งที่ความสูงที่เลือกไว้

ภาพ: การเปรียบเทียบท่าทางการใช้งานแล็ปท็อปที่ถูกต้องและไม่ถูกต้องตามหลักสรีรศาสตร์ โดยเน้นถึงประโยชน์ของขาตั้งแล็ปท็อปแบบปรับได้ที่มีต่อสุขภาพของคอและไหล่
การจัดวางและการใช้งานแล็ปท็อป
วางแล็ปท็อปของคุณลงบนแผ่นรองด้านบนอย่างมั่นคง โดยตรวจสอบให้แน่ใจว่าแล็ปท็อปวางอยู่บนแผ่นยางป้องกัน ขาตั้งนี้ออกแบบมาเพื่อรองรับแล็ปท็อปขนาด 10 ถึง 14 นิ้ว

ภาพ: แผนภาพแสดงให้เห็นถึงความเข้ากันได้อย่างกว้างขวางของขาตั้ง ซึ่งแสดงให้เห็นว่าสามารถรองรับแล็ปท็อปขนาดตั้งแต่ 10 นิ้วถึง 15.6 นิ้วได้
หมายเหตุ: แม้ว่าภาพจะแสดงให้เห็นว่าใช้งานได้กับแล็ปท็อปขนาดสูงสุด 15.6 นิ้ว แต่ข้อมูลจำเพาะของผลิตภัณฑ์ยืนยันว่าใช้งานได้ดีที่สุดกับแล็ปท็อปขนาดระหว่าง 10 ถึง 14 นิ้ว
การระบายความร้อนและการจัดการพื้นที่
ดีไซน์แบบเปิดโล่งของแท่นวางช่วยให้มีการไหลเวียนของอากาศรอบๆ แล็ปท็อปอย่างเป็นธรรมชาติ ช่วยระบายความร้อนและป้องกันความร้อนสูงเกินไป พื้นที่ใต้แล็ปท็อปที่ยกสูงขึ้นสามารถใช้เก็บอุปกรณ์เสริม เช่น คีย์บอร์ด เมาส์ หรืออุปกรณ์สำนักงานอื่นๆ ช่วยให้พื้นที่ทำงานของคุณเป็นระเบียบเรียบร้อย
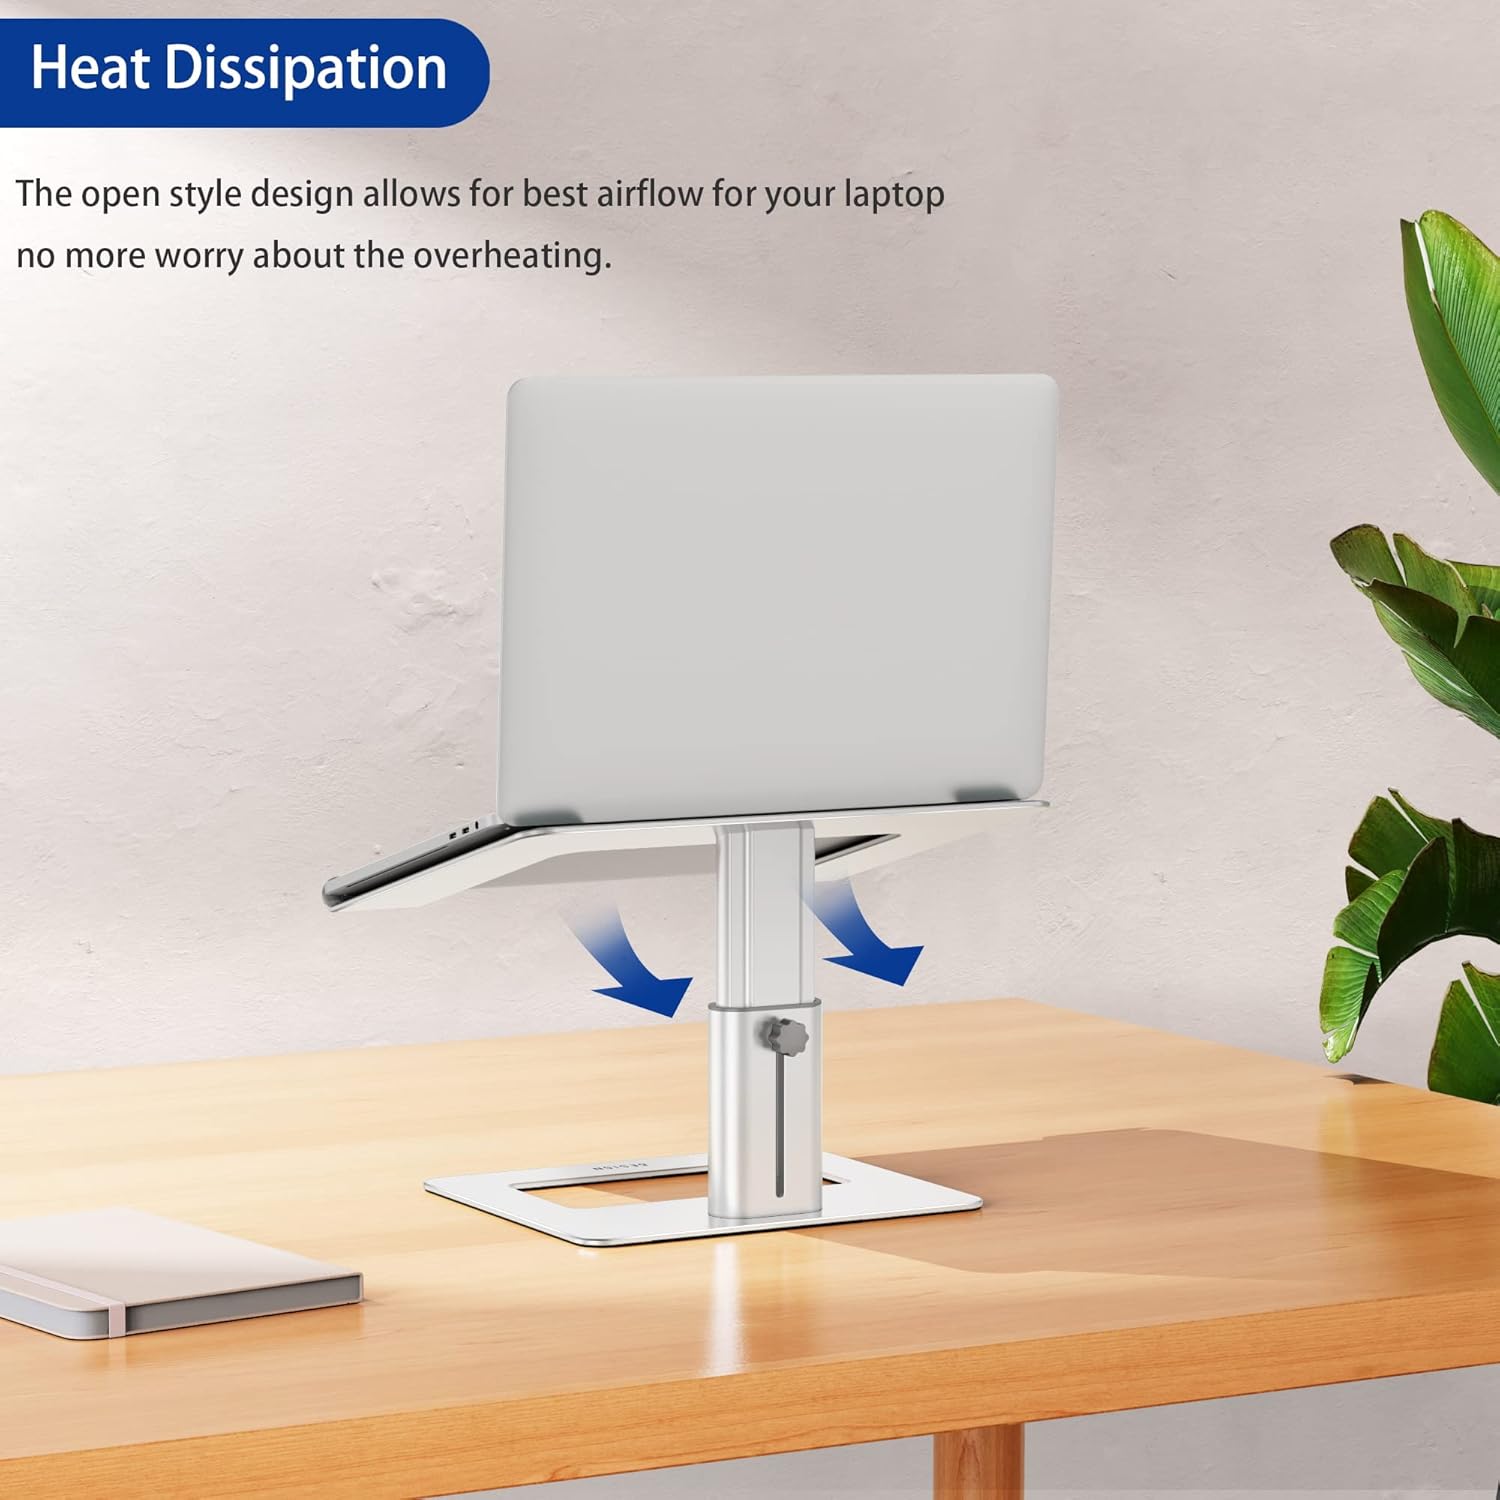
ภาพ: แล็ปท็อปวางอยู่บนแท่นวาง โดยมีลูกศรชี้ทิศทางการไหลของอากาศอยู่ด้านล่าง แสดงให้เห็นถึงคุณสมบัติการระบายความร้อน

ภาพ: แล็ปท็อปวางอยู่บนแท่นวาง โดยมีแป้นพิมพ์และเมาส์จัดเก็บอย่างเป็นระเบียบในช่องด้านล่าง แสดงให้เห็นถึงประโยชน์ของการจัดการพื้นที่
การซ่อมบำรุง
เพื่อให้ขาตั้งแล็ปท็อป Besign LSX3 ของคุณใช้งานได้ยาวนานและดูดีอยู่เสมอ โปรดปฏิบัติตามคำแนะนำในการบำรุงรักษาอย่างง่ายเหล่านี้:
- การทำความสะอาด: เช็ดขาตั้งด้วยผ้านุ่มๆamp ใช้ผ้าเช็ดทำความสะอาดเพื่อขจัดฝุ่นและคราบสกปรก หลีกเลี่ยงการใช้สารทำความสะอาดที่มีฤทธิ์กัดกร่อนหรือตัวทำละลาย เพราะอาจทำให้พื้นผิวอะลูมิเนียมหรือแผ่นยางเสียหายได้
- การตรวจสอบ: ตรวจสอบสกรูและข้อต่อทั้งหมดเป็นระยะเพื่อให้แน่ใจว่ายังแน่นอยู่ หากจำเป็นให้ขันให้แน่นอีกครั้งโดยใช้ประแจมือที่ให้มา
- พื้นที่จัดเก็บ: หากต้องเก็บขาตั้งไว้เป็นเวลานาน ควรทำความสะอาดและทำให้แห้งสนิท เก็บไว้ในที่แห้งและเย็น หลีกเลี่ยงแสงแดดโดยตรง
การแก้ไขปัญหา
หากคุณพบปัญหาใดๆ กับขาตั้งแล็ปท็อป Besign LSX3 โปรดดูวิธีแก้ไขปัญหาทั่วไปต่อไปนี้:
- ขาตั้งรู้สึกโยกเยกหลังจากประกอบเสร็จ:
ตรวจสอบให้แน่ใจว่าสกรูยึดทั้งสี่ตัว (สองตัวสำหรับฐาน สองตัวสำหรับแผ่นด้านบน) ขันแน่นสนิทแล้วโดยใช้ประแจมือ ตรวจสอบให้แน่ใจว่าสกรูปรับความสูงแบบมือหมุนนั้นขันแน่นดีแล้วเช่นกัน
- แล็ปท็อปเลื่อนบนแท่นวาง:
ตรวจสอบให้แน่ใจว่าแผ่นยางรองด้านบนสะอาดและปราศจากสิ่งสกปรก วางแล็ปท็อปให้ถูกที่ในบริเวณที่กำหนดไว้บนแผ่นยางรอง ขาตั้งนี้ออกแบบมาสำหรับแล็ปท็อปขนาด 10 ถึง 14 นิ้ว การใช้แล็ปท็อปที่มีขนาดนอกช่วงนี้อาจส่งผลต่อความเสถียร
- ความยากในการปรับความสูง:
ตรวจสอบให้แน่ใจว่าได้คลายสกรูแบบแมนนวลบนเสาปรับระดับออกอย่างเพียงพอแล้วก่อนที่จะพยายามปรับความสูง หากขันแน่นเกินไป เสาจะไม่สามารถเคลื่อนที่ได้อย่างอิสระ อย่าฝืนปรับ
ข้อมูลจำเพาะ
| คุณสมบัติ | รายละเอียด |
|---|---|
| หมายเลขรุ่น | LSX3 ภาษาไทย |
| ยี่ห้อ | การออกแบบ |
| วัสดุ | โลหะผสมอลูมิเนียม, ยางซิลิโคน |
| สี | เงิน |
| อุปกรณ์ที่รองรับ | แล็ปท็อปขนาด 10-14 นิ้ว |
| ช่วงความสูงที่สามารถปรับได้ | 125 มม. (4.9 นิ้ว) ถึง 195 มม. (7.65 นิ้ว) |
| ความจุในการรับน้ำหนักสูงสุด | 4 กก. (8.8 ปอนด์) |
| ขนาดผลิตภัณฑ์ (ฐาน) | 225 มม. (8.8 นิ้ว) x 190 มม. (7.4 นิ้ว) |
| ขนาดของผลิตภัณฑ์ (แผ่นด้านบน) | 290 มม. (11.4 นิ้ว) x 245 มม. (9.6 นิ้ว) |
| จำเป็นต้องประกอบ | ใช่ |

ภาพ: แผนภาพแสดงรายละเอียดขนาดของขาตั้งแล็ปท็อป Besign LSX3 รวมถึงความกว้างของฐาน ความกว้างของแผ่นด้านบน และช่วงความสูงที่ปรับได้
การรับประกันและการสนับสนุน
สำหรับข้อมูลการรับประกันหรือการสนับสนุนทางเทคนิค โปรดดูที่บรรจุภัณฑ์ของผลิตภัณฑ์หรือติดต่อฝ่ายบริการลูกค้าของ Besign ผ่านช่องทางอย่างเป็นทางการ webโปรดติดต่อเว็บไซต์หรือร้านค้าปลีกที่คุณซื้อผลิตภัณฑ์ โปรดเตรียมหมายเลขรุ่น (LSX3) และรายละเอียดการซื้อให้พร้อมเมื่อติดต่อฝ่ายสนับสนุน


