1. สินค้าหมดview
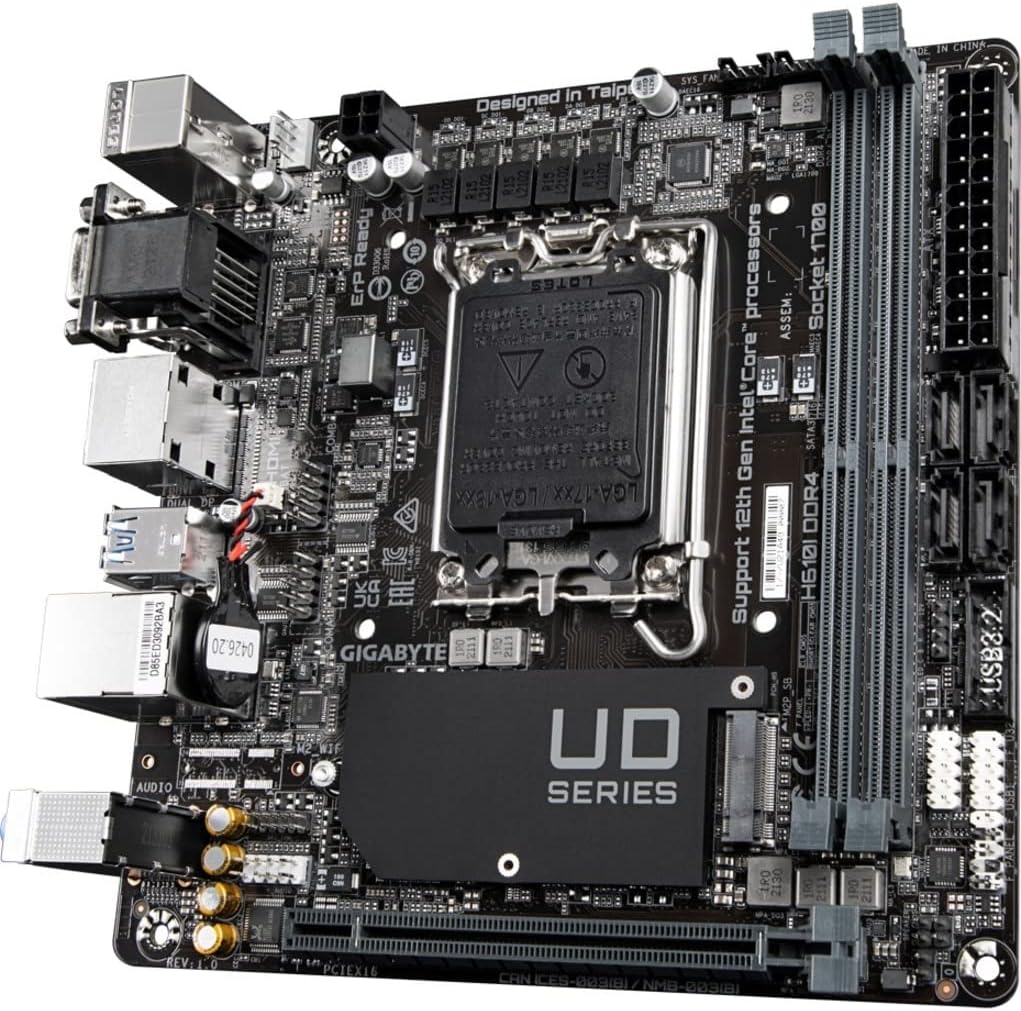
The GIGABYTE H610I DDR4 is a Mini-ITX motherboard designed to support 12th Generation Intel Core Series Processors. It offers a robust platform for building compact yet powerful systems, suitable for various applications from gaming to everyday computing. This motherboard integrates essential features for reliable performance and connectivity.
คุณสมบัติหลัก:
- ซ็อกเก็ต Intel LGA 1700: รองรับโปรเซสเซอร์ Intel Core Series รุ่นที่ 12
- รองรับ DDR4: Features Dual Channel Non-ECC Unbuffered DDR4 memory support with 2 DIMM slots.
- การออกแบบพลังการสั่งการ: Equipped with a 4+1+1 Hybrid Digital VRM Design for stable power delivery.
- การเชื่อมต่อขั้นสูง: Includes PCIe 4.0 support, a Single NVMe PCIe 3.0 x4 M.2 slot, and USB 3.2 Gen1 ports.
- เครือข่ายที่รวดเร็ว: Integrated Intel GbE LAN Chip for reliable wired network connections.
- เสียงไดนามิก: Features High Quality Audio Capacitors and Audio Noise Guard for enhanced sound experience.


2. การตั้งค่าและการติดตั้ง
Follow these steps for proper installation of your GIGABYTE H610I DDR4 motherboard and its components.
2.1 การติดตั้ง CPU
- ค้นหาซ็อกเก็ต CPU LGA 1700 บนเมนบอร์ด
- เปิดคันโยกซ็อกเก็ต CPU และถอดฝาครอบป้องกันออก
- Carefully align your 12th Gen Intel Core processor with the socket, ensuring the notches on the CPU match the keys on the socket.
- วาง CPU ลงในซ็อกเก็ตอย่างเบามือโดยไม่ต้องออกแรงมาก
- ปิดคันโยกซ็อกเก็ต CPU เพื่อยึดโปรเซสเซอร์

2.2 การติดตั้งหน่วยความจำ DDR4
- Locate the two DDR4 DIMM slots on the motherboard.
- เปิดคลิปที่ปลายทั้งสองด้านของช่อง DIMM
- จัดตำแหน่งรอยบากบนโมดูลหน่วยความจำ DDR4 ให้ตรงกับคีย์ในช่อง DIMM
- ใส่โมดูลหน่วยความจำให้แน่นเข้าไปในช่องจนกระทั่งคลิปล็อคเข้าที่
2.3 Installing NVMe M.2 SSD
- Locate the single NVMe PCIe 3.0 x4 M.2 slot.
- ถอดสกรู M.2 และสแตนด์ออฟออกจากเมนบอร์ด
- ใส่ M.2 SSD เข้าไปในช่องที่มุม
- Gently push down the M.2 SSD and secure it with the screw and standoff.
2.4 การต่อสายไฟ
- เชื่อมต่อขั้วต่อไฟหลัก ATX 24 พินจากแหล่งจ่ายไฟของคุณเข้ากับส่วนหัวที่สอดคล้องกันบนเมนบอร์ด
- Connect the 8-pin CPU power connector (or 4-pin if applicable) to the CPU power header.

2.5 แผงด้านหน้าและการเชื่อมต่ออุปกรณ์ต่อพ่วง
Connect your case's front panel headers (power button, reset button, USB, audio) to the corresponding pins on the motherboard. Refer to your case manual for specific pin layouts. Connect peripherals such as USB devices, display cables, and network cables to the rear I/O ports.
3. คู่มือการใช้งาน
3.1 การบูตเครื่องครั้งแรกและการตั้งค่า BIOS/UEFI
- หลังจากประกอบส่วนประกอบทั้งหมดแล้ว ให้เชื่อมต่อจอภาพ คีย์บอร์ด และเมาส์ของคุณ
- Power on your system. During the boot process, press the เดล กดแป้นซ้ำๆ เพื่อเข้าสู่ยูทิลิตี้การตั้งค่า BIOS/UEFI
- In the BIOS/UEFI, you can configure boot order, system time, and other advanced settings. Save changes and exit to continue booting into your operating system installer.
3.2 การติดตั้งไดรเวอร์
After installing your operating system, install the necessary drivers for the motherboard components. These typically include chipset drivers, LAN drivers, audio drivers, and any other peripheral drivers. Drivers can usually be found on the GIGABYTE official webไซต์สำหรับรุ่นเมนบอร์ดเฉพาะของคุณ
4. การบำรุงรักษา
4.1 การทำความสะอาด
ทำความสะอาดภายในคอมพิวเตอร์เป็นประจำเพื่อป้องกันการสะสมของฝุ่น ซึ่งอาจทำให้เกิดความร้อนสูงเกินไปและประสิทธิภาพลดลง ใช้ลมอัดเพื่อกำจัดฝุ่นออกจากพัดลม ฮีตซิงก์ และส่วนประกอบอื่นๆ ตรวจสอบให้แน่ใจว่าได้ปิดเครื่องและถอดปลั๊กออกก่อนทำความสะอาด
อัพเดต BIOS/UEFI 4.2
ตรวจสอบ GIGABYTE เป็นระยะ website for BIOS/UEFI updates. Updates can improve system stability, add support for new hardware, or fix bugs. Follow the instructions provided by GIGABYTE carefully when performing a BIOS/UEFI update to avoid system damage.
5 การแก้ไขปัญหา
ส่วนนี้จะกล่าวถึงปัญหาทั่วไปที่คุณอาจพบเจอเกี่ยวกับเมนบอร์ดของคุณ
5.1 ไม่มีการแสดงผล
- ตรวจสอบการเชื่อมต่อจอภาพ: Ensure your monitor is correctly connected to the graphics card or motherboard's integrated graphics port and is powered on.
- Verify RAM Installation: Reseat the DDR4 memory modules firmly in their slots. Incorrectly seated RAM is a common cause of no display.
- พลังซีพียู: Confirm the 8-pin (or 4-pin) CPU power connector is securely plugged into the motherboard.
- การ์ดจอ : If using a dedicated graphics card, ensure it is properly seated in the PCIe slot and has all necessary power cables connected.
- Bent CPU Pins: Carefully inspect the CPU socket for any bent pins. If found, contact GIGABYTE support.
5.2 System Unresponsive / Does Not Boot
- แหล่งจ่ายไฟ: Ensure the power supply is connected to the motherboard (24-pin ATX and CPU power) and is switched on.
- ล้าง CMOS: Try clearing the CMOS (Complementary Metal-Oxide-Semiconductor) settings. This can usually be done by removing the CMOS battery for a few minutes or using a dedicated jumper on the motherboard.
- Minimal Boot Configuration: Disconnect all non-essential peripherals and components (e.g., extra storage drives, expansion cards) and attempt to boot with only the CPU, one RAM stick, and the graphics card (if no integrated graphics).
5.3 RAM Slot Malfunction
- If one of the two DDR4 RAM slots is not functioning, try testing each RAM stick individually in each slot to isolate the faulty component (RAM stick or motherboard slot).
- Ensure the RAM is compatible with the motherboard's specifications (DDR4, Non-ECC Unbuffered).
6. ข้อมูลจำเพาะทางเทคนิค
| คุณสมบัติ | ข้อมูลจำเพาะ |
|---|---|
| ยี่ห้อ | กิกะไบต์ |
| ชื่อรุ่น | H610I DDR4 |
| ซ็อคเก็ตซีพียู | แอลจีเอ 1700 |
| โปรเซสเซอร์ที่เข้ากันได้ | โปรเซสเซอร์ Intel Core ซีรีส์ เจนเนอเรชั่นที่ 12 |
| ประเภทชิปเซ็ต | อินเทล H610 |
| เทคโนโลยีหน่วยความจำ RAM | DDR4 (Dual Channel Non-ECC Unbuffered) |
| สล็อตหน่วยความจำ | 2 DIMM |
| ความเร็วสัญญาณนาฬิกาหน่วยความจำ | สูงสุดถึง 3200 เมกะเฮิรตซ์ |
| สล็อต PCIe | PCIe4.0 พีซีไอXNUMX |
| สล็อต M.2 | 1 x NVMe PCIe 3.0 x4 M.2 |
| พอร์ต USB | USB 3.2 Gen1, USB 2.0 |
| แลน | ชิป Intel GbE LAN |
| เสียง | ตัวเก็บประจุเสียงคุณภาพสูงและตัวป้องกันเสียงรบกวนเสียง |
| ฟอร์มแฟกเตอร์ | มินิ-ITX |
| ขนาดสินค้า | 8.74 x 7.09 x 2.56 นิ้ว |
| น้ำหนักสินค้า | 1.3 ปอนด์ |
7. วิดีโอผลิตภัณฑ์
7.1 วิดีโอสาธิตผลิตภัณฑ์
This video provides a brief demonstration of the GIGABYTE H610I DDR4 Mini-ITX Motherboard, showcasing its physical features and design. (Duration: 0:35)
7.2 ผลิตภัณฑ์เกินview วีดีโอ
เจ้าหน้าที่คนหนึ่งview video detailing the features and benefits of the GIGABYTE H610I DDR4 Mini-ITX Motherboard. (Duration: 0:52)
8. การรับประกันและการสนับสนุน
8.1 ข้อมูลการรับประกัน
GIGABYTE products are covered by a limited warranty. The specific terms and duration of the warranty may vary by region and product type. Please refer to the warranty card included with your product or visit the official GIGABYTE webเว็บไซต์สำหรับข้อมูลการรับประกันโดยละเอียด
8.2 การสนับสนุนด้านเทคนิค
หากต้องการความช่วยเหลือด้านเทคนิค ดาวน์โหลดไดรเวอร์ หรือข้อมูลผลิตภัณฑ์เพิ่มเติม โปรดเยี่ยมชมเว็บไซต์สนับสนุนอย่างเป็นทางการของ GIGABYTE webไซต์ คุณสามารถค้นหาคำถามที่พบบ่อย คำแนะนำในการแก้ไขปัญหา และข้อมูลติดต่อฝ่ายบริการลูกค้าได้
GIGABYTE อย่างเป็นทางการ Webเว็บไซต์: www.gigabyte.com


