1. บทนำ
This manual provides detailed instructions for the installation, operation, and maintenance of your Suuwer S701 Non-Programmable Thermostat. This thermostat is designed for use with 1 Heat/1 Cool conventional single-stage heating and cooling systems. Please read this manual thoroughly before installation and operation to ensure proper function and safety.

ภาพที่ 1.1: ด้านหน้า view of the Suuwer S701 Non-Programmable Thermostat, displaying room temperature and set temperature on a blue backlit screen.
2. ข้อมูลด้านความปลอดภัย
- ควรปิดระบบทำความร้อน/ทำความเย็นที่ฟิวส์หลักหรือแผงเบรกเกอร์เสมอ ก่อนที่จะติดตั้งหรือซ่อมบำรุงเทอร์โมสตัท
- This thermostat operates on 24VAC power or 2 AAA batteries. Do not connect to line voltage (120-240V) systems.
- If you are inexperienced with electrical wiring, it is recommended to seek professional assistance for installation.
- Ensure all wiring connections are secure to prevent short circuits or damage to the system.
3. เนื้อหาบรรจุภัณฑ์
ตรวจสอบว่ามีรายการทั้งหมดอยู่ในแพ็คเกจของคุณ:
- Suuwer S701 Thermostat Unit
- คู่มือการติดตั้ง
- ฉลากสายเคเบิล
- สกรูยึด (2)
- ที่ยึดผนัง (2)

Image 3.1: Illustration of the Suuwer S701 thermostat and its included accessories.
4. ความเข้ากันได้ของระบบ
เทอร์โมสตัท Suuwer S701 ออกแบบมาสำหรับระบบ HVAC เฉพาะรุ่น โปรดตรวจสอบอีกครั้งview โปรดตรวจสอบข้อมูลความเข้ากันได้อย่างละเอียดก่อนการติดตั้ง
4.1 Compatible Systems
- ไซส์ S ธรรมดาtage Heating & Cooling (with C-wire or without C-wire)
- Gas Fireplace (24 Volts)
- Gas / Oil / Electric Furnace (Heating only)
- ระบบทำความร้อนแบบหม้อน้ำแบบแผ่รังสีเท่านั้น
- เครื่องทำความร้อนแบบใช้อากาศอัดในเตาเผาเท่านั้น
- Cooling Only (with C-wire or without C-wire)
บันทึก: Verify your existing thermostat base is wired with 2 to 5 wires. Systems with 6 to 8 wires are generally not supported by this model.
4.2 Incompatible Systems
- หลายรายการtage Heating & Cooling (e.g., 1H/2C, 2H/2C)
- HVAC Heat Pump Systems (e.g., 2H/1C, 4H/2C)
- PTACs (Packaged Terminal Air Conditioners)
- 3-wire Hydronic (Hot Water) Systems
- Dual Fuel/Hybrid Heating Systems
- บรรทัดฉบับtage Systems (120-240V electric baseboards heat)
- Mini Split Heat Pump Air Conditioners
- RV Air Conditioners (Mach and Roughneck series)
- คอนเวกเตอร์
- Radiant Ceiling Heat
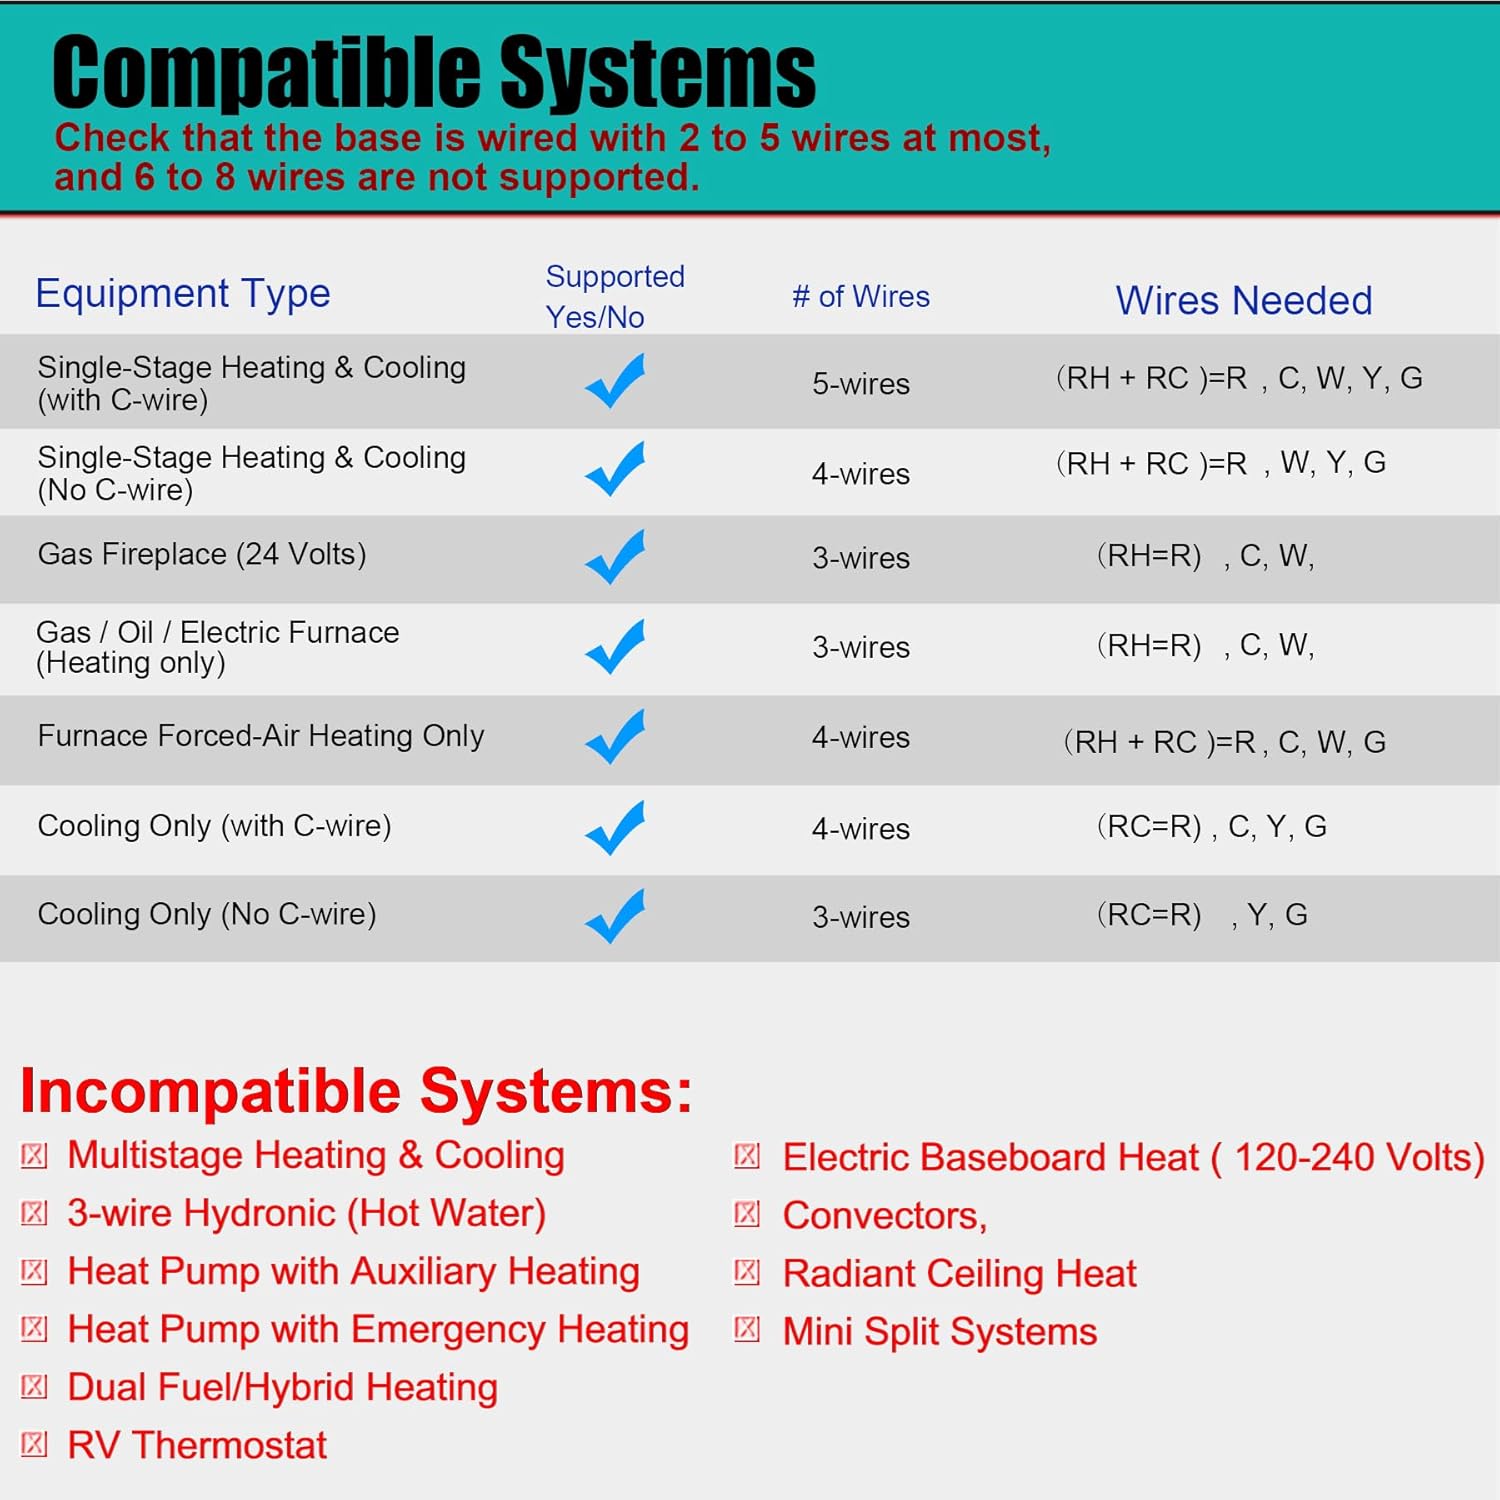
Image 4.1: Detailed compatibility chart for the Suuwer S701 thermostat.
5. การตั้งค่าและการติดตั้ง
Follow these steps for proper installation. It is recommended to take a picture of your old thermostat's wiring before disconnecting any wires.
5.1 การถอดเทอร์โมสตัทเก่าของคุณ
- ปิดไฟ: ค้นหาสวิตช์ตัดไฟหรือกล่องฟิวส์ที่ควบคุมระบบทำความร้อนและความเย็นของคุณ แล้วปิดสวิตช์นั้น
- ถอดฝาครอบออก: ถอดฝาครอบของเทอร์โมสตัทตัวเก่าออกอย่างระมัดระวัง
- Photograph wiring: Take a clear picture of the wiring connections, noting which wire is connected to each terminal.
- สายฉลาก: Use the provided cable labels to mark each wire according to its terminal designation (e.g., R, W, Y, G, C).
- Disconnect wires: ถอดสายไฟออกจากขั้วต่อของเทอร์โมสตัทตัวเก่า
- Remove old base: Unscrew and remove the old thermostat's mounting base from the wall.
5.2 การติดตั้งเทอร์โมสตัทใหม่
- Position base: Hold the new Suuwer S701 thermostat base against the wall where you want to mount it.
- Mark screw holes: Mark the positions for the mounting screws. If possible, use existing screw holes.
- เจาะรู: If new holes are needed, drill pilot holes and insert the wall anchors.
- ฐานที่มั่นคง: Pull the wires through the opening in the thermostat base and secure the base to the wall using the provided screws.
5.3 การเชื่อมต่อสายไฟ
Connect the labeled wires to the corresponding terminals on the Suuwer S701 thermostat base. Refer to the wiring diagram below and your photograph for accuracy.
- R/RC: 24VAC power (often jumpered, see diagram)
- G: เครื่องเป่าลมในร่ม (พัดลม)
- Y: 1-stagอีเย็น
- W: 1-stagความร้อน
- C: Common wire (optional for battery-powered operation, but recommended for continuous backlight)

Image 5.1: Wiring diagram and system switch setting for the Suuwer S701 thermostat.
5.4 Setting the System Switch (GAS/ELEC)
On the back of the thermostat unit, locate the small switch labeled 'GAS' and 'ELEC'.
- หากคุณมี gas or oil furnaceตั้งสวิตซ์ไปที่ แก๊ส.
- หากคุณมี electric furnaceตั้งสวิตซ์ไปที่ ไฟฟ้า.
5.5 การติดตั้งแบตเตอรี่
The thermostat can be powered by 24VAC or 2 AAA batteries. Batteries are required for operation if no C-wire is connected. Even with a C-wire, batteries provide backup power.
- Open the battery compartment on the front of the thermostat.
- ใส่แบตเตอรี่อัลคาไลน์ AAA ใหม่ 2 ก้อน โดยตรวจสอบให้แน่ใจว่าขั้วถูกต้อง (+/-)
- ปิดช่องใส่แบตเตอรี่
5.6 Attaching the Thermostat to the Base
Align the thermostat unit with the mounted base and gently push it into place until it clicks securely.
5.7 Restoring Power
Once the thermostat is securely mounted and wired, turn the power back on at the main circuit breaker or fuse box.
6. คู่มือการใช้งาน
The Suuwer S701 is a non-programmable thermostat, offering straightforward manual control of your home's temperature.

Image 6.1: Display and controls of the Suuwer S701 thermostat.
6.1 แสดงผลเกินview
The large LCD with blue backlight shows the current room temperature and the set temperature. The backlight activates for 10 seconds when any button is pressed.
- ห้อง: แสดงอุณหภูมิแวดล้อมปัจจุบัน
- ตั้งไว้ที่: Displays the desired temperature setting.
- Cool/Heat/Off: Indicates the current system mode.
- Fan ON/AUTO: ระบุโหมดพัดลมปัจจุบัน
6.2 การปรับอุณหภูมิ
ใช้ + (ขึ้น) และ - (Down) buttons on the right side of the thermostat to adjust the desired temperature setting. Each press changes the temperature by 1 degree Fahrenheit.
6.3 การเลือกโหมดระบบ
ใช้ ระบบ switch located at the bottom right of the thermostat to select the operating mode:
- เย็น: Activates the cooling system when the room temperature rises above the set temperature.
- ความร้อน: Activates the heating system when the room temperature falls below the set temperature.
- ปิด: ปิดระบบทั้งทำความร้อนและทำความเย็น
6.4 การเลือกโหมดพัดลม
ใช้ FAN switch located at the bottom left of the thermostat to select the fan operating mode:
- อัตโนมัติ: พัดลมจะทำงานเฉพาะเมื่อระบบทำความร้อนหรือความเย็นทำงานอยู่เท่านั้น ซึ่งเป็นการตั้งค่าที่พบบ่อยที่สุดและประหยัดพลังงานที่สุด
- บน: พัดลมจะทำงานอย่างต่อเนื่องไม่ว่าระบบทำความร้อนหรือทำความเย็นจะทำงานอยู่ก็ตาม
6.5 Adjusting Temperature Swing (Cycle Rate)
The temperature swing, also known as cycle rate or differential, determines how much the temperature can vary from your setpoint before the system turns on. A smaller swing results in more frequent, shorter cycles, while a larger swing results in less frequent, longer cycles.
The swing is adjustable from 0.2°F to 2°F. The factory default is 0.5°F for both heating and cooling.

Image 6.2: Thermostat display showing the temperature swing setting.
To adjust the temperature swing:
- กดปุ่มค้างไว้ FAN button for approximately 3 seconds until the display changes to show the current swing setting.
- ใช้ + (ขึ้น)หรือ - (Down) buttons to adjust the swing value.
- กดปุ่ม FAN button again to toggle between heating and cooling swing settings.
- The thermostat will automatically save the setting after a few seconds of inactivity.
7. การบำรุงรักษา
7.1 การเปลี่ยนแบตเตอรี่
When the low battery indicator (a battery icon) appears on the display, it is time to replace the batteries. Replace with two new AAA alkaline batteries. Refer to Section 5.5 for battery installation steps.
7.2 การทำความสะอาด
เช็ดภายนอกเทอร์โมสตัทด้วยผ้านุ่มๆamp ผ้า ห้ามใช้สารทำความสะอาดที่มีฤทธิ์กัดกร่อนหรือตัวทำละลาย
8 การแก้ไขปัญหา
หากคุณพบปัญหาเกี่ยวกับเทอร์โมสตัท โปรดดูปัญหาทั่วไปและวิธีแก้ไขต่อไปนี้:
| ปัญหา | สาเหตุที่เป็นไปได้ | สารละลาย |
|---|---|---|
| การแสดงผลว่างเปล่า | ไม่มีไฟเข้า แบตเตอรี่หมด หรือเบรกเกอร์ตัดวงจร | Check batteries and replace if necessary. Ensure power is on at the circuit breaker. Verify wiring connections. |
| ระบบทำความร้อน/ทำความเย็นไม่ตอบสนอง | Incorrect system mode, incorrect wiring, or system issue. | Ensure SYSTEM switch is set to HEAT or COOL. Verify wiring. Check if furnace/AC unit has power. |
| การอ่านอุณหภูมิดูเหมือนจะไม่แม่นยำ | Thermostat location, or calibration needed. | Ensure thermostat is not in direct sunlight or near heat sources. The thermostat has a room temperature calibration adjustment for +/-1-degree F. Consult the full installation manual for advanced settings. |
| Low Battery Indicator (battery icon) | แบตเตอรี่เหลือน้อย | Replace with two new AAA alkaline batteries immediately. |
| Compressor short cycling (turning on/off too frequently) | Temperature swing set too low. | Adjust the temperature swing to a higher value (e.g., 1.0°F or 1.5°F). |
สำหรับการแก้ไขปัญหาโดยละเอียดเพิ่มเติม โปรดดูที่ คู่มือการแก้ไขปัญหา (PDF).
9. ข้อมูลจำเพาะ
- แบบอย่าง: S701
- ขนาดสินค้า : ลึก 0.98 นิ้ว x กว้าง 4.72 นิ้ว x สูง 3.86 นิ้ว
- น้ำหนักสินค้า: 6.7 ออนซ์ (0.42 ปอนด์)
- สี: ไฟแบ็คไลท์สีฟ้า
- วัสดุ: พลาสติก
- ประเภทจอภาพ: จอ LCD พร้อมไฟแบ็คไลท์สีฟ้า
- ขนาดหน้าจอ: 4.5 นิ้ว
- ประเภทการควบคุม: Push Button / Button Control
- ประเภทการติดตั้ง: ติดผนัง
- แหล่งพลังงาน: 24 Volts (AC) or 2 AAA Batteries
- ช่วงการควบคุมอุณหภูมิ: 44°F ถึง 90°F
- Room Temperature Display Range: 41°F ถึง 95°F
- ความแม่นยำของอุณหภูมิ: +/-1 องศาฟาเรนไฮต์
- คุณสมบัติพิเศษ: Non-Programmable, Separate Heating and Cooling Swing (0.2°F to 2°F), Low Battery Indicator, 5 Minute Compressor Delay Protection (Selectable ON or OFF)
- ยูพีซี: 709327753278
10. การรับประกันและการสนับสนุน
10.1 ข้อมูลการรับประกัน
The Suuwer S701 Non-Programmable Thermostat comes with a รับประกัน 2 ปี ไร้กังวล นับจากวันที่ซื้อ การรับประกันนี้ครอบคลุมถึงความบกพร่องของวัสดุและฝีมือการผลิตภายใต้การใช้งานปกติ โปรดเก็บหลักฐานการซื้อไว้เพื่อขอรับสิทธิ์การรับประกัน
10.2 การสนับสนุนลูกค้า
For technical assistance, troubleshooting, or warranty inquiries, please contact Suuwer customer service. We offer 24-hour customer service to assist you.
แหล่งข้อมูลเพิ่มเติม:


