1. บทนำ
The Waveshare RS485 CAN HAT is designed to enable your Raspberry Pi to communicate with other devices over long distances using RS485 and CAN functions. This HAT is compatible with various Raspberry Pi models, including the 5, 4B, 3B+, 3B, 2B, B+, Zero, Zero W, Zero WH, and Zero 2 W.
2. คุณสมบัติ
- Standard Raspberry Pi 40PIN GPIO extension header, supporting Raspberry Pi series boards.
- CAN function: Onboard CAN controller MCP2515 via SPI interface, with onboard transceiver SIT65HVD230DR.
- RS485 function: Controlled via UART, supporting half-duplex communication and automatic TX/RX control without programming, with onboard transceiver SP3485.
- Onboard 120Ω terminal resistor for RS485 and CAN interfaces, enabled via DIP switch.
- ทีวีออนบอร์ด (Transient Voltage Suppressor) to effectively suppress surge voltage และสไปค์ชั่วคราว voltage in the circuit for RS485 transceiving, providing lightning-proof and anti-electrostatic protection.
- Reserved control header, allowing compatibility with other control boards.
3. ข้อมูลจำเพาะ
| พารามิเตอร์ | ค่า |
|---|---|
| ปฏิบัติการฉบับที่tage | 3.3โวลต์ |
| ตัวควบคุม CAN | MCP2515 |
| CAN ตัวรับส่งสัญญาณ | SIT65HVD230DR |
| ตัวรับส่งสัญญาณ RS485 | SP3485 |
| มิติ | 65 × 30 มม |
| ขนาดรูยึด | 3.0มม. |
4. การตั้งค่าและการติดตั้ง
This section guides you through the physical installation of the RS485 CAN HAT onto your Raspberry Pi. For detailed software configuration and driver installation, please refer to the official online user manual at //bit.ly/3mC64mA.
4.1 การเชื่อมต่อทางกายภาพ
- Align the 40PIN GPIO extension header of the RS485 CAN HAT with the GPIO pins on your Raspberry Pi board.
- Gently press the HAT down onto the Raspberry Pi's GPIO header, ensuring all pins are correctly seated.
- Secure the HAT using the provided RPi screws pack (2pcs) through the mounting holes.

รูปที่ 1: ด้านบน view of the Waveshare RS485 CAN HAT, showing the main components and connectors.

รูปที่ 2: ด้านล่าง view of the Waveshare RS485 CAN HAT, highlighting the 40PIN GPIO connector.
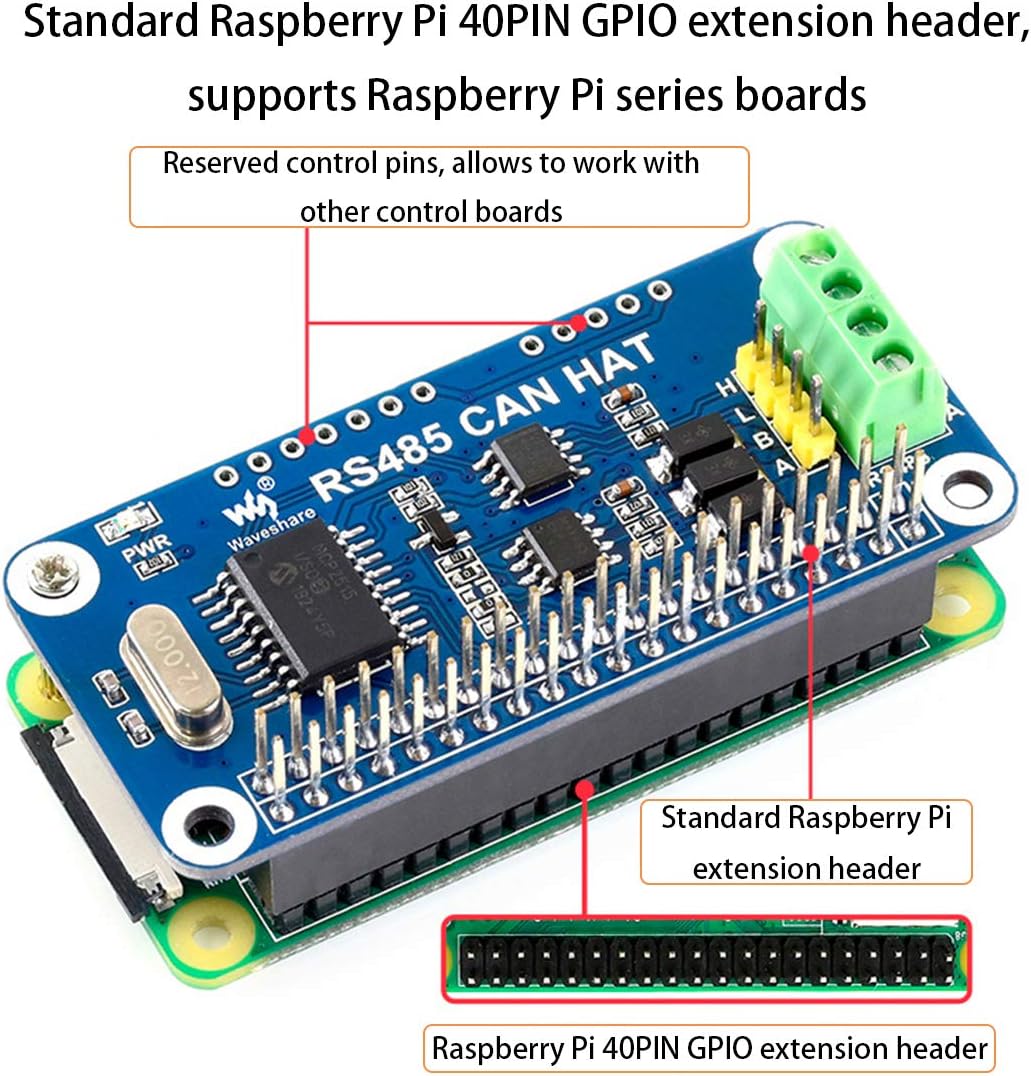
Figure 3: The RS485 CAN HAT mounted on a Raspberry Pi, illustrating the standard 40PIN GPIO extension header connection.

Figure 4: Close-up of the HAT, showing the CAN controller MCP2515, CAN transceiver SN65HVD230, and RS485 transceiver SP3485.

Figure 5: The onboard Transient Voltage Suppressor (TVS) is highlighted, which protects against surge and spike voltagใช่

Figure 6: The RS485 CAN HAT fully installed on a Raspberry Pi board.

Figure 7: Dimensions of the RS485 CAN HAT, showing its compact size.
4.2 วิดีโอการติดตั้ง
Video 1: Installation and basic setup guide for the RS485 CAN HAT on a Raspberry Pi.
Video 2: Demonstration of the RS485 CAN HAT's features and functionality.
5. คู่มือการใช้งาน
After physical installation, software configuration is required to enable the CAN and RS485 functions. The Waveshare RS485 CAN HAT comes with development resources and a manual, including examples in wiringPi/Python. Please refer to the comprehensive online user manual for detailed programming guides and exampเลส:
- คู่มือผู้ใช้แบบออนไลน์: //bit.ly/3mC64mA
This manual provides instructions for setting up the SPI interface for the CAN controller and UART for RS485 communication, along with code exampมาเริ่มกันเลยดีกว่า
6 การแก้ไขปัญหา
6.1 ปัญหาการส่งข้อมูล
คำถาม: I cannot send or receive data.
คำตอบ:
- Ensure that the baud rates on both communicating devices are identical.
- The fixed frame ID in the routine is set to 0X123. Please configure the sending and receiving CAN ID of the other end of your CAN communication to be 0x123.
6.2 Ubuntu config.txt Configuration
คำถาม: How do I configure the config.txt file when Ubuntu is installed on the Raspberry Pi?
คำตอบ:
- For mainstream Ubuntu systems, the config.txt file is typically located in the
/boot/firmwareโฟลเดอร์ - Alternatively, you can use a card reader to access the Raspberry Pi's SD card on a computer (or another host that can recognize the SD card) and modify the config.txt file โดยตรง.
7. เนื้อหาแพ็คเกจ
รายการต่อไปนี้รวมอยู่ในแพ็คเกจผลิตภัณฑ์ของคุณ:
- RS485 CAN HAT x1
- RPi screws pack (2pcs) x1
8. ข้อมูลเพิ่มเติม
For easy testing and enhanced functionality, we recommend the isolated interface converter USB TO RS485 Converter (ASIN: B081MB6PN2).


