1. บทนำ
This manual provides detailed instructions for the installation, operation, and maintenance of your Antec NX210 Mid-Tower ATX Computer Cabinet. Please read this manual thoroughly before beginning assembly or use to ensure proper functionality and safety.
The Antec NX210 is designed to accommodate ATX, Micro-ATX, and ITX motherboards, offering ample space for components and efficient cooling with pre-installed ARGB fans.
2. ข้อมูลด้านความปลอดภัย
ปฏิบัติตามข้อควรระวังด้านความปลอดภัยต่อไปนี้ระหว่างการติดตั้งและการใช้งาน:
- Always disconnect the power supply from the wall outlet before installing or removing any components to prevent electric shock.
- ควรจับต้องชิ้นส่วนต่างๆ อย่างระมัดระวังเพื่อหลีกเลี่ยงความเสียหายจากไฟฟ้าสถิต พิจารณาใช้สายรัดข้อมือป้องกันไฟฟ้าสถิต
- Keep the cabinet away from direct sunlight, heat sources, and moisture.
- ตรวจสอบให้แน่ใจว่ามีการระบายอากาศที่เหมาะสมเพื่อป้องกันความร้อนสูงเกินไป อย่าปิดกั้นช่องระบายอากาศ
- เก็บชิ้นส่วนและเครื่องมือขนาดเล็กให้พ้นมือเด็ก
3. เนื้อหาบรรจุภัณฑ์
ตรวจสอบว่ามีรายการทั้งหมดอยู่ในแพ็คเกจ:
- Antec NX210 Mid-Tower ATX Computer Cabinet
- 4 x 120mm ARGB Fans (3 pre-installed in front, 1 pre-installed in rear)
- Accessory Box (screws, cable ties, etc.)
- คู่มือการใช้งาน (เอกสารนี้)
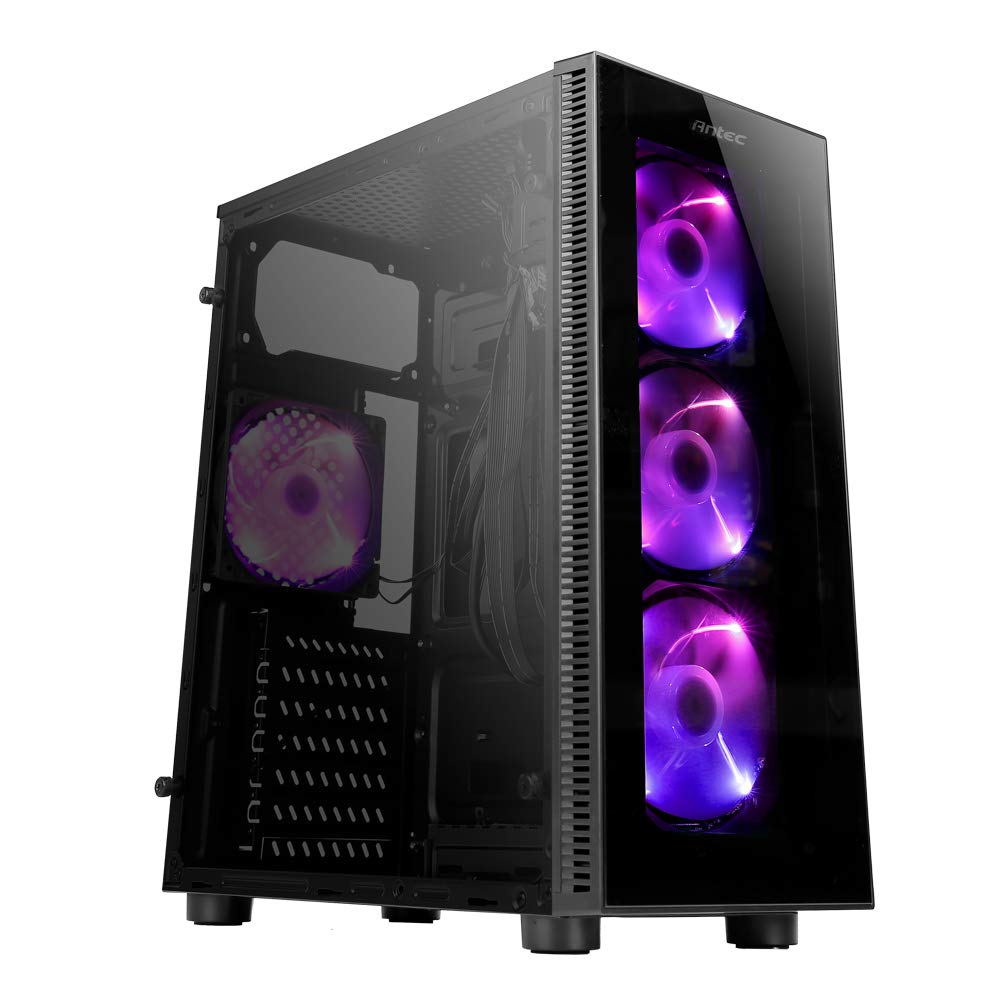
Image: Antec NX210 Mid-Tower ATX Computer Cabinet, showcasing its tempered glass side panel and front ARGB fans.
4. Product Features and Layout
4.1 ภายนอก Views

ภาพ: ด้านหน้าและด้านหลัง views of the Antec NX210 cabinet, highlighting the tempered glass front panel with ARGB fans and the rear I/O panel layout.

Image: Left side (tempered glass) and right side (solid panel) views of the Antec NX210 cabinet.
4.2 Top I/O Panel
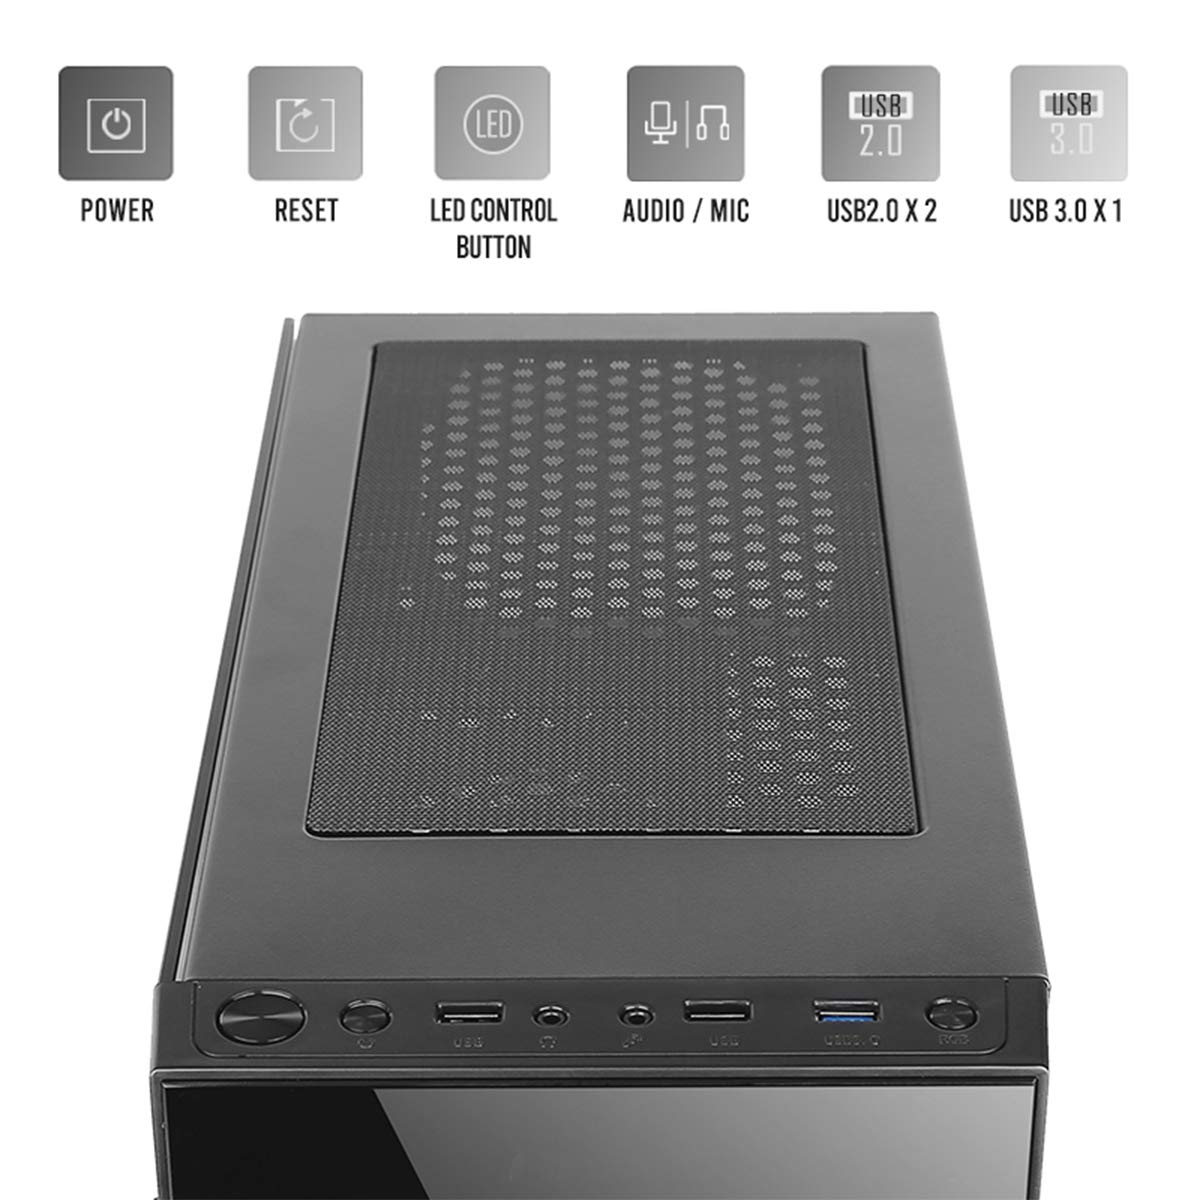
Image: Close-up of the top I/O panel, showing the Power button, Reset button, LED Control button, Audio/Mic jacks, 2x USB 2.0 ports, and 1x USB 3.0 port.
- ปุ่มเปิด/ปิด: เพื่อเปิดหรือปิดระบบ
- ปุ่มรีเซ็ต: เพื่อรีสตาร์ทระบบ
- ปุ่มควบคุม LED: To cycle through ARGB lighting effects for the pre-installed fans.
- Audio / Mic Jacks: สำหรับการเชื่อมต่อหูฟังและไมโครโฟน
- พอร์ต USB 2.0 (x2): สำหรับเชื่อมต่ออุปกรณ์ USB 2.0
- พอร์ต USB 3.0 (x1): For connecting USB 3.0 devices, offering faster data transfer speeds.
4.3 โครงสร้างภายในและการรองรับส่วนประกอบ

Image: Diagram illustrating the internal layout of the Antec NX210, indicating locations for motherboard, SSDs, HDDs, GPU, CPU cooler, and PSU.
- รองรับเมนบอร์ด: Up to ATX (also supports Micro-ATX, ITX).
- 2.5" SSD Support: 3 drive bays.
- 3.5" HDD Support: 1 drive bay.
- การรองรับการ์ดกราฟิก: Up to 310mm in length.
- รองรับพัดลมระบายความร้อน CPU: Up to 155mm in height.
- รองรับมหาวิทยาลัยสงขลานครินทร์: Up to 220mm in length (top-mounted).
4.4 ระบบทำความเย็น

Image: Diagram showing fan and radiator mounting options for the Antec NX210, including pre-installed fans.
- พัดลมที่ติดตั้งไว้ล่วงหน้า: 4 x 120mm ARGB fans (3 in front, 1 in rear).
- Front Fan Support: 3 x 120 มม.
- Rear Fan Support: 1 x 120 มม.
- รองรับหม้อน้ำ: Front up to 240mm, Rear up to 120mm.
5. การตั้งค่าและการติดตั้ง
Follow these general steps for installing components into your Antec NX210 cabinet. Specific component manuals should be consulted for detailed installation instructions.
5.1 การเตรียมคณะรัฐมนตรี
- Place the cabinet on a stable, flat surface.
- Remove the tempered glass side panel by unscrewing the thumbscrews at the rear and carefully pulling the panel away.
- Remove the right-side metal panel by unscrewing the thumbscrews at the rear.
5.2 การติดตั้งเมนบอร์ด
- Install the I/O shield into the rear opening of the cabinet.
- Align your motherboard with the standoffs inside the cabinet. Ensure the standoffs match your motherboard's form factor (ATX, Micro-ATX, ITX).
- ยึดเมนบอร์ดด้วยสกรูที่ให้มา
5.3 การติดตั้งหน่วยจ่ายไฟ (PSU)
- The Antec NX210 supports a top-mounted ATX PS2 power supply.
- Slide the PSU into the designated top compartment from the rear of the cabinet.
- Secure the PSU with screws from the rear of the cabinet.
5.4 การติดตั้งอุปกรณ์จัดเก็บข้อมูล (HDD/SSD)
- ฮาร์ดดิสก์ขนาด 3.5 นิ้ว: หาช่องใส่ฮาร์ดไดรฟ์ขนาด 3.5 นิ้ว เลื่อนฮาร์ดไดรฟ์เข้าไปในช่อง และขันสกรูให้แน่น
- SSD ขนาด 2.5 นิ้ว: Locate the 2.5" SSD mounting points behind the motherboard tray. Secure the SSDs with screws.
5.5 การติดตั้งการ์ดจอ (GPU)
- Remove the necessary PCIe slot covers from the rear of the cabinet.
- Insert the graphics card into the appropriate PCIe slot on the motherboard.
- ยึดการ์ดจอด้วยสกรูให้แน่น
5.6 การจัดการสายเคเบิล
ใช้ช่องเจาะและจุดยึดสายเคเบิลด้านหลังถาดเมนบอร์ดเพื่อจัดระเบียบสายเคเบิล ซึ่งจะช่วยเพิ่มการไหลเวียนของอากาศและทำให้ดูสวยงามยิ่งขึ้น
5.7 การเชื่อมต่อสายเคเบิลแผงด้านหน้า
Connect the front panel cables (Power SW, Reset SW, HDD LED, Power LED, USB 2.0, USB 3.0, HD Audio) to the corresponding headers on your motherboard. Refer to your motherboard manual for exact pin layouts.
6. คู่มือการใช้งาน
6.1 การเปิดเครื่อง
After all components are installed and cables connected, close both side panels. Connect the power cable to the PSU and a wall outlet. Press the Power button on the top I/O panel to turn on your system.
6.2 การควบคุมพัดลม ARGB
The pre-installed ARGB fans are connected to an internal controller. Use the ปุ่มควบคุม LED on the top I/O panel to cycle through various lighting modes and effects. The fans will display a default lighting effect upon initial power-up.
7. การบำรุงรักษา
Regular maintenance helps ensure optimal performance and longevity of your computer cabinet.
- ตัวกรองฝุ่น: The Antec NX210 features a dust filter on the top panel. Regularly remove and clean this filter to prevent dust buildup and maintain good airflow.
- การทำความสะอาดภายใน: Periodically open the side panels and use compressed air to remove dust from internal components and fan blades. Ensure the system is powered off and unplugged before cleaning.
- การทำความสะอาดภายนอก: เช็ดพื้นผิวภายนอกด้วยผ้านุ่ม damp ผ้า หลีกเลี่ยงน้ำยาทำความสะอาดหรือตัวทำละลายที่มีฤทธิ์กัดกร่อน
8 การแก้ไขปัญหา
หากคุณพบปัญหา โปรดพิจารณาขั้นตอนการแก้ไขปัญหาพื้นฐานต่อไปนี้:
- ไม่มีไฟฟ้า:
- ตรวจสอบให้แน่ใจว่า PSU เชื่อมต่อกับเต้ารับที่ผนังอย่างถูกต้องและสวิตช์ไฟบน PSU อยู่ในตำแหน่ง "เปิด"
- Verify that the front panel Power button cable is correctly connected to the motherboard header.
- ตรวจสอบการเชื่อมต่อสายไฟภายในทั้งหมด (ขั้วต่อ ATX 24 พิน, ขั้วต่อ CPU 8 พิน, ขั้วต่อไฟ PCIe สำหรับการ์ดจอ)
- Fans Not Spinning / ARGB Not Working:
- ตรวจสอบให้แน่ใจว่าสายไฟของพัดลมทุกเส้นเชื่อมต่อกับเมนบอร์ดหรือตัวควบคุมพัดลมอย่างแน่นหนาแล้ว
- Verify ARGB cables are correctly connected to the internal controller and the controller is powered.
- Try pressing the LED Control Button on the top I/O panel to cycle effects.
- พอร์ต USB ไม่ทำงาน:
- Check that the USB 2.0 and USB 3.0 front panel cables are correctly connected to the corresponding headers on your motherboard.
For more complex issues, consult the manuals for your individual components or seek professional assistance.
9. ข้อมูลจำเพาะ

Image: Diagram showing the physical dimensions of the Antec NX210 cabinet.
| คุณสมบัติ | รายละเอียด |
|---|---|
| แบบอย่าง | NX210 |
| ประเภทเคส | มิดทาวเวอร์ |
| ขนาด (กว้าง x ยาว x สูง) | 43.99 x 38.99 x 21.01 ซม. (ประมาณ 395 x 210 x 445 มม.) |
| วัสดุ | SPCC, กระจกนิรภัย |
| การรองรับเมนบอร์ด | ATX, Micro ATX, ITX |
| ช่องเสียบขยาย | 7 |
| ช่องไดรฟ์ | ฮาร์ดดิสก์ 1 x 3.5 นิ้ว, SSD 3 x 2.5 นิ้ว |
| พอร์ต I / O ด้านหน้า | Power, Reset, LED Control Button, MIC/Audio, 2 x USB 2.0, 1 x USB 3.0 |
| พัดลมที่ติดตั้งล่วงหน้า | 4 x 120mm ARGB fans (3 front, 1 rear) |
| ฐานรองพัดลม (ด้านหน้า) | 3 x 120มม. |
| การรองรับพัดลม (ด้านหลัง) | 1 x 120มม. |
| ขาตั้งหม้อน้ำ (ด้านหน้า) | สูงถึง 240มม. |
| ขาตั้งหม้อน้ำ (ด้านหลัง) | สูงถึง 120มม. |
| ความยาวสูงสุดของ GPU | 310มม. |
| ความสูงสูงสุดของตัวระบายความร้อนซีพียู | 155มม. |
| การสนับสนุนแหล่งจ่ายไฟ | ATX PS2 (Top Mounted), Max length 220mm |
| แผ่นกรองฝุ่น | สูงสุด |
| น้ำหนักสินค้า | 4.8 กก. |
10. การรับประกันและการสนับสนุน
The Antec NX210 Computer Cabinet comes with a รับประกัน 1 ปี นับจากวันที่ซื้อ โปรดเก็บหลักฐานการซื้อไว้เพื่อใช้ในการเคลมประกัน
For technical support or warranty inquiries, please contact Antec customer service or your local distributor.
ผู้ผลิต: Antec Inc. 8F, No 107, Jhouzih St, Neihu District, Taipei City 114, Taiwan
ผู้นำเข้า (อินเดีย): Acro Engineering Company, Khasra No 522/1, Village Jonapur, Delhi - 110 030
คุณสามารถค้นหาข้อมูลเพิ่มเติมและทรัพยากรสนับสนุนได้ที่เว็บไซต์อย่างเป็นทางการ Antec Store on Amazon.


