1. บทนำ
This manual provides comprehensive instructions for the setup, operation, and maintenance of your TechniSat TECHNISTAR S5 HD+ digital satellite receiver. Please read this manual thoroughly before using the device to ensure proper functionality and to maximize your viewing experience. The TECHNISTAR S5 HD+ is designed for receiving digital satellite television in HDTV quality, offering features such as integrated HD+ decryption, PVRReady for recording, and Timeshift functionality.
2. ข้อมูลด้านความปลอดภัย
คำเตือน: เพื่อลดความเสี่ยงจากไฟฟ้าช็อต ห้ามเปิดอุปกรณ์asinก. ส่งต่อการบริการทั้งหมดไปยังเจ้าหน้าที่บริการที่มีคุณสมบัติเหมาะสม
- ตรวจสอบให้แน่ใจว่าวางอุปกรณ์ไว้บนพื้นผิวที่มั่นคงและระดับ
- อย่าให้อุปกรณ์โดนฝนหรือความชื้น
- ควรหลีกเลี่ยงการวางอุปกรณ์ไว้ใกล้แหล่งความร้อน เช่น เครื่องทำความร้อน ช่องระบายความร้อน เตา หรืออุปกรณ์อื่นๆ (รวมถึง) ampเครื่องให้ความร้อน) ที่ผลิตความร้อน
- ใช้เฉพาะอุปกรณ์เสริม/สิ่งที่แนบตามที่ผู้ผลิตกำหนดเท่านั้น
- ถอดปลั๊กอุปกรณ์ในระหว่างที่มีพายุฝนฟ้าคะนองหรือเมื่อไม่ได้ใช้งานเป็นเวลานาน
- รักษาช่องระบายอากาศให้ชัดเจนเพื่อป้องกันความร้อนสูงเกินไป
3. เนื้อหาบรรจุภัณฑ์
ตรวจสอบว่ามีรายการทั้งหมดอยู่ในแพ็คเกจ:
- 1 x TechniSat TECHNISTAR S5 HD+ Receiver
- 1 x รีโมทคอนโทรล
- 1 x หน่วยจ่ายไฟ
- 1 x คู่มือผู้ใช้ (เอกสารนี้)
- แบตเตอรี่ AAA 2 ก้อน (สำหรับรีโมทคอนโทรล)
4. สินค้าหมดview
4.1 แผงด้านหน้า
The front panel of the TECHNISTAR S5 HD+ features essential controls and indicators.

ภาพที่ 4.1: ด้านหน้า view of the TechniSat TECHNISTAR S5 HD+ satellite receiver. It shows the display, power button, channel up/down buttons, and the HD+ logo.
- แสดง: แสดงหมายเลขช่องหรือเวลา
- ปุ่มเปิด/ปิด: Turns the device on/off or to standby.
- Channel Buttons (V / ^): Navigates through channels.
- HD+ Logo: Indicates HD+ compatibility.
4.2 แผงด้านหลังและการเชื่อมต่อ
The rear panel provides all necessary ports for connecting the receiver to your television, satellite dish, and other devices.

ภาพที่ 4.2: หลัง view of the TechniSat TECHNISTAR S5 HD+ satellite receiver, illustrating the various connection ports. These include Smartcard (Conax), CI+ slot, Ethernet, LNB (Sat-Eingang), USB, HDMI Out, A/V Out, S/PDIF Out, and Power input.
- Smartcard (Conax): Slot for Conax smartcards.
- สล็อต CI+: Common Interface Plus slot for CI+ modules (e.g., for HD+ or Sky).
- อีเธอร์เน็ต: For network connection and UPnP streaming.
- LNB (Sat-Eingang): Input for the satellite dish cable (F-connector).
- ยูเอสบี: For connecting external storage devices (USB stick or hard drive) for PVRReady and Timeshift functions.
- HDMI ออก: High-Definition Multimedia Interface output for connecting to your TV.
- ช่องต่อภาพและเสียงออก: Analog audio/video output (requires specific TechniSat adapter, optional).
- S/PDIF Out: Digital audio output (electrical).
- พลัง: Input for the external power supply unit.
5. การตั้งค่า
5.1 การเชื่อมต่อเครื่องรับ
- การเชื่อมต่อดาวเทียม: Connect your satellite dish cable to the "LNB (Sat-Eingang)" port on the rear panel.
- การเชื่อมต่อทีวี: Connect the receiver to your TV using an HDMI cable. Insert one end into the "HDMI Out" port on the receiver and the other into an available HDMI input on your TV.
- การเชื่อมต่อไฟฟ้า: Connect the power supply unit to the "Power" input on the receiver, then plug the power adapter into a wall outlet.
- การเชื่อมต่อเสริม:
- ที่เก็บข้อมูล USB: For recording and Timeshift, connect a USB stick or external hard drive to the "USB" port.
- เครือข่าย: For UPnP and other network features, connect an Ethernet cable to the "Ethernet" port.
- CI+ Module: If you have a CI+ module (e.g., for HD+ or Sky), insert it into the "CI+ Slot".
5.2 First Installation (AutoInstall)
Upon first power-on, the receiver will guide you through an automatic installation process. This "AutoInstall" feature simplifies the initial setup, including channel search and basic settings.
- เปิดทีวีของคุณและเลือกอินพุต HDMI ที่ถูกต้อง
- Power on the TECHNISTAR S5 HD+.
- Follow the on-screen instructions to select your language, country, and perform a channel scan. The receiver will automatically search for available satellite channels.
- The ISIPRO feature will assist with automatic station search and updates.

ภาพที่ 5.2: TechniSat Comfort Services, highlighting features like SFI (Electronic Program Guide), ISIPRO (Program List Manager), AutoInstall (Easy First Installation), Password-protected User Profiles, and ISI Mode (Simplified Menus with Large Font).
6. การใช้งานเครื่องรับสัญญาณ
6.1 ฟังก์ชั่นพื้นฐาน
Use the provided remote control to navigate menus and control the receiver.
ภาพที่ 6.1: The TechniSat remote control alongside a smartphone displaying the TechniSat Connect app interface, demonstrating both traditional and modern control methods.
- การเลือกช่อง: Use the number buttons or the CH+/CH- buttons to change channels.
- การควบคุมระดับเสียง: Use the VOL+/VOL- buttons.
- การนำทางเมนู: Use the directional arrows and OK button to navigate through the on-screen menus.
- SFI (Service Information): Access the electronic program guide (EPG) to view กำหนดการและข้อมูลโปรแกรม
- ISIPRO: This feature automatically manages and updates your channel list, ensuring you always have the latest channel lineup.
- ISI Mode: A simplified menu mode with larger fonts, useful for users who prefer a less complex interface or as a child safety feature.
6.2 Recording (PVRReady) and Timeshift
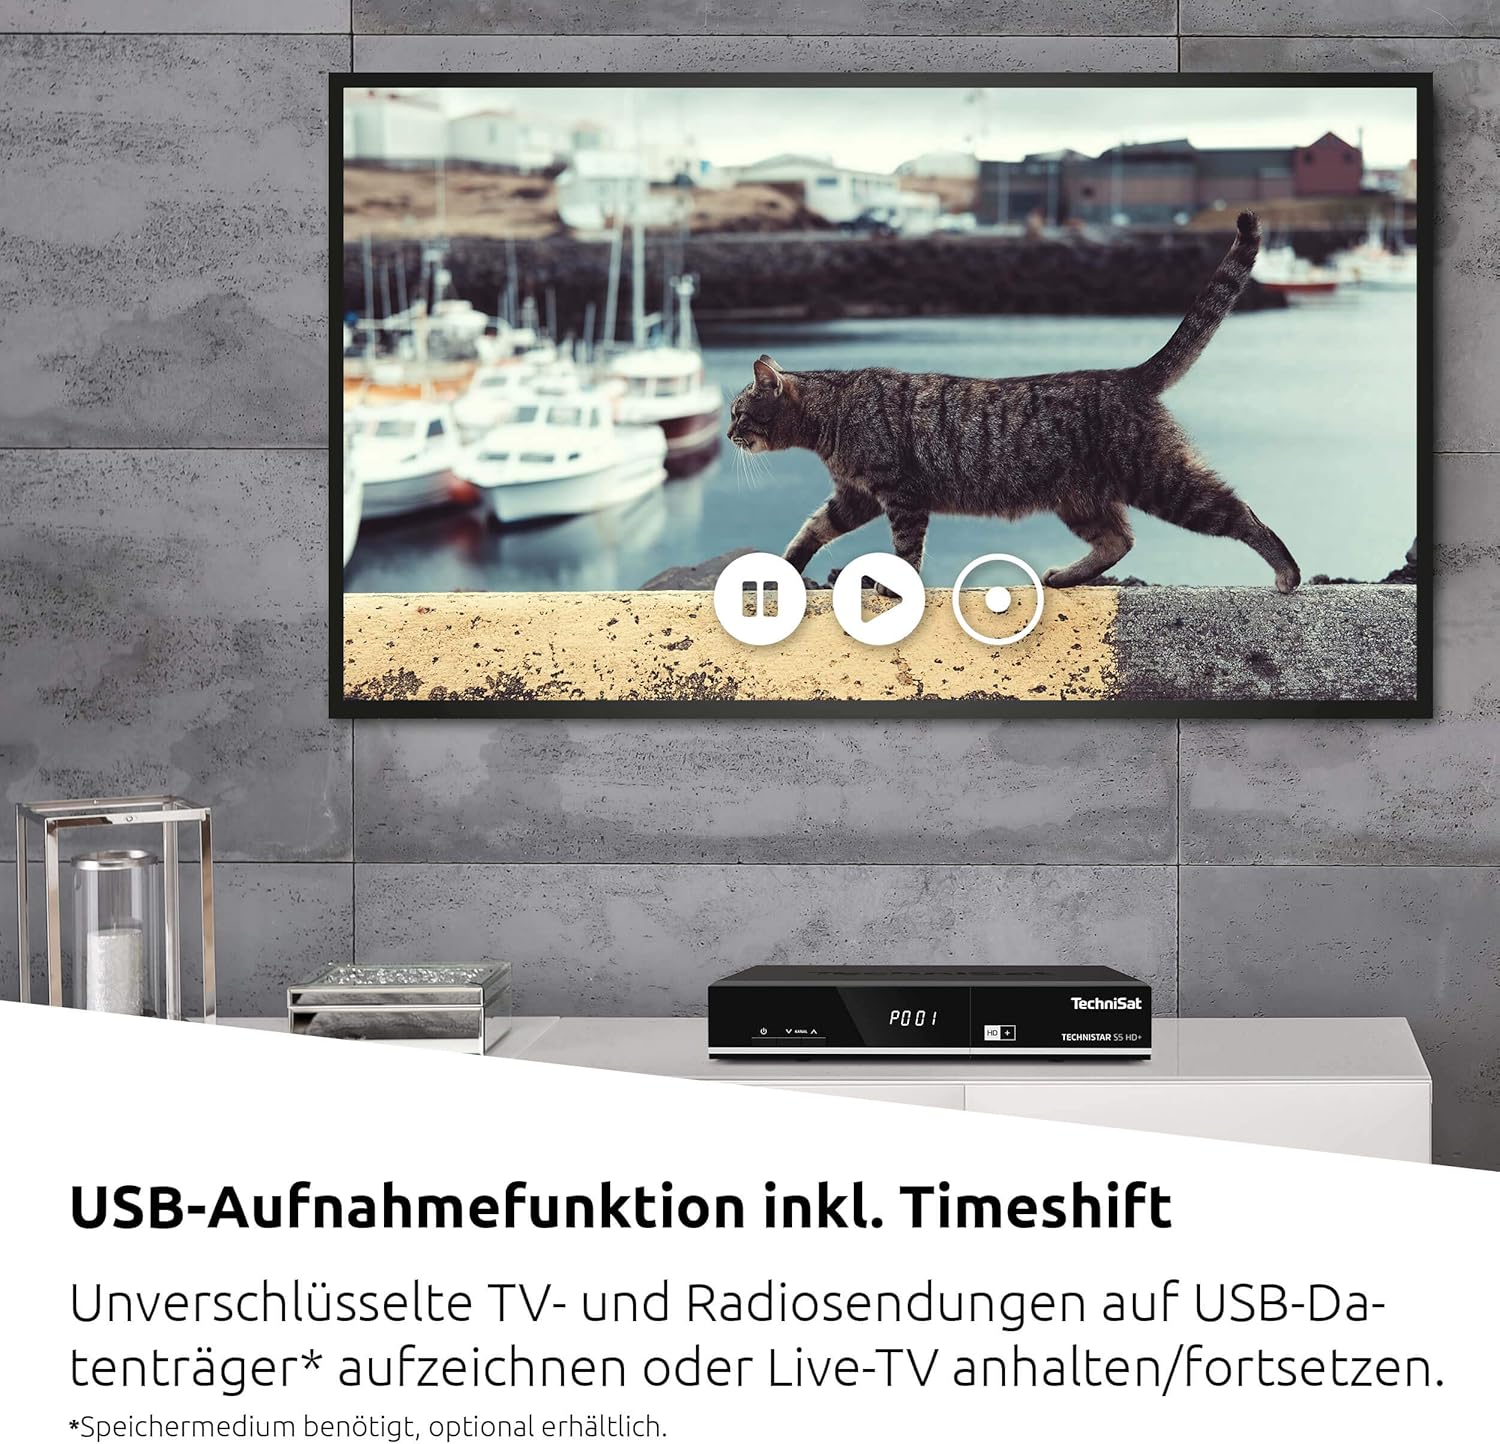
The TECHNISTAR S5 HD+ supports recording of unencrypted digital TV and radio programs to an external USB storage device (PVRReady). It also features Timeshift, allowing you to pause and resume live television.

ภาพที่ 6.2: A television screen displaying a paused live broadcast, demonstrating the Timeshift function. The on-screen controls for play, pause, and rewind are visible.
- ในการบันทึก: Connect a USB storage device (formatted as FAT32 or NTFS). While watching a program, press the "Record" button on your remote control.
- เปลี่ยนเวลา: Press the "Pause" button during live TV to temporarily pause the broadcast. Press "Play" to resume from where you left off.
- การเล่นซ้ำ: Access recorded programs through the receiver's menu.
6.3 HD+ Features
The TECHNISTAR S5 HD+ includes an integrated decryption system for HD+.
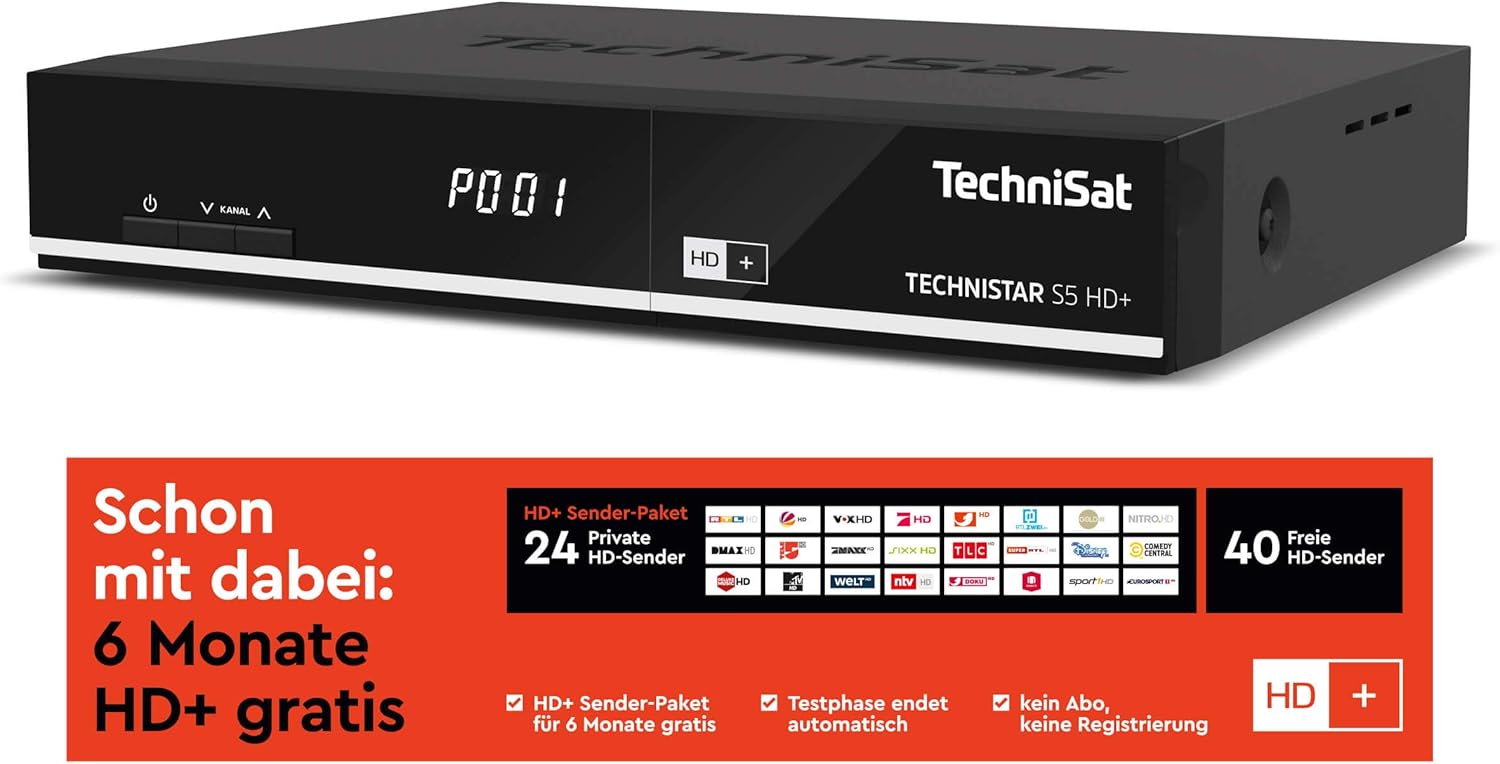
ภาพที่ 6.3: Information regarding the HD+ channel package, indicating 6 months of free HD+ access, 24 private HD channels, and 40 free HD channels. It also states that the test phase ends automatically with no registration required.
- The device comes with 6 months of free HD+ access for 23 HD quality channels.
- Additional pay-TV offers, such as Sky, can be accessed via the CI+ interface with a compatible CI+ module and subscription.
6.4 TechniSat Connect App
The TechniSat Connect app can be used as a universal remote control for your receiver, offering convenient control from your smartphone or tablet.
- Download the TechniSat Connect app from your device's app store.
- Ensure your smartphone/tablet and the receiver are connected to the same local network.
- Follow the app's instructions to pair it with your TECHNISTAR S5 HD+.
7. การบำรุงรักษา
- การทำความสะอาด: ถอดปลั๊กไฟก่อนทำความสะอาด ใช้ผ้าแห้งนุ่มๆ เช็ดทำความสะอาดภายนอกเครื่องรับสัญญาณ ห้ามใช้น้ำยาทำความสะอาดหรือสเปรย์กระป๋อง
- การระบายอากาศ : Ensure that the ventilation slots on the device are not blocked to prevent overheating.
- การอัปเดตซอฟต์แวร์: ตรวจสอบ TechniSat เป็นระยะ website or the receiver's menu for available software updates to ensure optimal performance and access to new features.
8 การแก้ไขปัญหา
If you encounter issues with your TECHNISTAR S5 HD+, refer to the following common solutions:
- ไม่มีภาพ/เสียง:
- Check all cable connections (HDMI, LNB, power).
- ตรวจสอบให้แน่ใจว่าทีวีของคุณตั้งค่าอินพุต HDMI ถูกต้องแล้ว
- Verify the receiver is powered on and not in standby mode.
- ไม่มีสัญญาณดาวเทียม:
- Check the LNB cable connection.
- Ensure your satellite dish is correctly aligned.
- Perform a new channel scan via the receiver's menu.
- รีโมทคอนโทรลไม่ทำงาน:
- ตรวจสอบและเปลี่ยนแบตเตอรี่ (AAA 2 ก้อน)
- ตรวจสอบให้แน่ใจว่าไม่มีสิ่งกีดขวางระหว่างรีโมทและเครื่องรับ
- ปัญหาการบันทึก:
- Ensure the USB storage device is properly connected and has sufficient free space.
- Verify the USB device is formatted correctly (FAT32 or NTFS).
- Note that only unencrypted programs can be recorded.
For more detailed troubleshooting or persistent issues, please consult the full online manual on the TechniSat webไซต์หรือติดต่อฝ่ายสนับสนุนลูกค้า
9. ข้อมูลจำเพาะ
| ยี่ห้อ | เทคนิแซท |
| หมายเลขรุ่น | 0000/4716 |
| สี | เป็นกลาง (สีดำ) |
| เทคโนโลยีการเชื่อมต่อ | อีเทอร์เน็ต, HDMI, USB |
| พอร์ต USB รวม | 1 |
| พอร์ต HDMI ทั้งหมด | 1 |
| โหมดเอาต์พุตเสียง | ล้อมรอบ |
| เล่มที่tage | 5 โวลต์ |
| ช่วงความถี่ | 950 เมกะเฮิรตซ์ - 2150 เมกะเฮิรตซ์ |
| น้ำหนักสินค้า | 600 กรัม |
| ส่วนประกอบที่รวมอยู่ | รีโมทคอนโทรล |
| แบตเตอรี่ | 2 AAA (รวม) |
| รับประกันการอัปเดตซอฟต์แวร์จนถึง | ไม่มีข้อมูล |
| ความพร้อมของอะไหล่ | ไม่มีข้อมูล |
10. การรับประกันและการสนับสนุน
For detailed information regarding warranty terms, software updates, and spare parts availability, please refer to the official TechniSat website or contact TechniSat customer support directly. Keep your proof of purchase for warranty claims.
TechniSat Official Webเว็บไซต์: www.technisat.com


