การแนะนำ
This manual provides instructions for the safe and efficient operation of your Suteck Automatic Digital Yogurt Maker. Please read thoroughly before first use to ensure proper function and longevity of the appliance.
คำแนะนำเพื่อความปลอดภัย
- อ่านคำแนะนำทั้งหมดอย่างละเอียดก่อนใช้เครื่องใช้ไฟฟ้า
- Do not immerse the main unit of the yogurt maker in water or any other liquid.
- เก็บอุปกรณ์ให้พ้นจากมือเด็กและสัตว์เลี้ยง
- Use the yogurt maker only on a stable, flat, and heat-resistant surface.
- ถอดปลั๊กเครื่องออกจากเต้ารับไฟฟ้าทุกครั้งเมื่อไม่ได้ใช้งานและก่อนทำความสะอาด
- Do not operate the appliance if the power cord or plug is damaged. Contact customer service for repair.
- This appliance is designed for household use only. Do not use it for commercial purposes.
- ตรวจสอบให้แน่ใจว่ามีการระบายอากาศที่เหมาะสมรอบๆ เครื่องในระหว่างการทำงาน
ส่วนประกอบของผลิตภัณฑ์
The Suteck Yogurt Maker includes the following parts:
- Yogurt Maker Main Unit (Stainless Steel Design)
- ฝาใส
- 8 Glass Jars (6 oz each)
- คู่มือการใช้งาน (เอกสารนี้)

Image: The Suteck Yogurt Maker main unit with its transparent lid, containing eight glass jars filled with various yogurts and fruit toppings. A bowl of yogurt with strawberries and a separate glass of yogurt with berries are also shown.
การตั้งค่า
- แกะส่วนประกอบทั้งหมดออกและนำวัสดุบรรจุภัณฑ์ออก
- Wash the glass jars and the transparent lid with warm, soapy water. Rinse thoroughly and dry completely.
- เช็ดภายนอกตัวเครื่องหลักด้วยผ้าamp ผ้า. อย่าจุ่มตัวเครื่องลงในน้ำ
- Place the yogurt maker on a clean, dry, and stable surface, away from direct heat sources or drafts.

Image: A visual representation of the Suteck Yogurt Maker and its individual components, including the stainless steel base, clear lid, and eight glass jars.
คำแนะนำการใช้งาน: การทำโยเกิร์ต
- เตรียมส่วนผสมโยเกิร์ต: Add yogurt starter or a small amount of plain yogurt (containing live active cultures) to milk. Mix thoroughly until well combined. The specific ratio and type of milk may vary based on your desired yogurt consistency and starter culture instructions.
- เติมลงในโหล: Pour the prepared milk mixture evenly into the 8 clean glass jars. Do not overfill; leave a small space at the top.
- วางขวดโหลลงในเครื่อง: Carefully place the filled glass jars (without their lids) into the yogurt maker's base. Ensure they are seated properly. Cover the yogurt maker with its transparent lid.
- ตั้งอุณหภูมิและเวลา:
- Plug in the appliance. The display will show "---".
- กดปุ่ม การทำงาน button. The "Temp" light will flash green, and the "Time" light will be solid green. A default temperature (e.g., 108°F) will appear on the display.
- ใช้ + และ - buttons to adjust the desired fermentation temperature. The temperature range is 68°F to 131°F (20°C to 55°C).
- กดปุ่ม เริ่ม/ยกเลิก button to confirm the temperature setting. The "Temp" light will become solid green, and the "Time" light will flash green.
- ใช้ + และ - buttons to set the desired fermentation time. The time range is 1 to 48 hours.
- กดปุ่ม เริ่ม/ยกเลิก button again to confirm the time and initiate the fermentation process.
- The "Temp" and "Time" indicator lights will turn red, signifying that the yogurt maker is actively operating. The display will show the countdown timer.
- เสร็จสิ้น: Once the set fermentation time has elapsed, the yogurt maker will emit an audible beep, and the display will show "0". The "Temp" and "Time" indicator lights will turn green.
- Cool and Enjoy: Carefully remove the jars from the yogurt maker. Place the lids on the jars and refrigerate for at least 4 hours before serving. This cooling period helps to thicken the yogurt and halts the fermentation process.

Image: Step 1 of yogurt making, showing a pitcher of milk and a spoon adding yogurt starter powder, with empty glass jars nearby.

Image: Step 2 of yogurt making, illustrating milk being poured from a pitcher into the glass jars.

Image: A step-by-step visual guide demonstrating how to set the temperature and time on the yogurt maker's digital control panel.

Image: Step 4 of yogurt making, showing a person enjoying a jar of homemade yogurt with fruit.
เคล็ดลับสำหรับผลลัพธ์ที่ดีที่สุด:
- For thicker yogurt, consider using whole milk or adding a small amount of powdered milk to your mixture.
- Ensure your starter culture is fresh and active for optimal fermentation.
- Some users find that adding warm water to the basin around the jars can assist with more even heat distribution, although the unit is designed for uniform heating.
การบำรุงรักษาและการทำความสะอาด
- ถอดปลั๊ก: Always unplug the yogurt maker from the power outlet before cleaning any part of the appliance.
- Clean Jars and Lid: The glass jars and transparent lid are dishwasher safe. Alternatively, they can be washed by hand with warm, soapy water. Rinse thoroughly and dry completely before storage or next use.
- ทำความสะอาดยูนิตหลัก: เช็ดภายนอกตัวเครื่องหลักด้วยผ้านุ่มๆamp cloth. Do not use abrasive cleaners, harsh chemicals, or scouring pads, as these can damage the finish. Never immerse the main unit in water or any other liquid.
- พื้นที่จัดเก็บ: Ensure all parts are clean and completely dry before storing the appliance. Store in a cool, dry place, away from direct sunlight.

Image: Two panels illustrating cleaning methods: glass jars placed in a dishwasher rack, and a hand washing a glass jar under running water.
การแก้ไขปัญหา
| ปัญหา | สาเหตุที่เป็นไปได้ | สารละลาย |
|---|---|---|
| Yogurt is too thin/liquid. | Insufficient fermentation time, low fermentation temperature, inactive starter culture, or low-fat milk. | Increase fermentation time, ensure correct temperature setting, use fresh and active starter, or try whole milk/add powdered milk for future batches. |
| โยเกิร์ตเปรี้ยวเกินไป | Fermented for too long or at too high a temperature. | Reduce fermentation time or lower the temperature for subsequent batches. |
| เครื่องไม่เปิดขึ้น | เสียบปลั๊กไม่ถูกต้อง ไฟดับtage, or faulty power outlet. | Check power connection, ensure the appliance is fully plugged in, and test the power outlet with another device. |
| Temperature/Time setting is difficult or auto-starts. | The control panel requires quick input within a short timeframe (approx. 5 seconds) to prevent auto-start with default settings. | After pressing "Function", quickly adjust the temperature with the +/- buttons and press "Start/Cancel". Then, quickly adjust the time with the +/- buttons and press "Start/Cancel" again to confirm. Practice the sequence to become familiar with the timing. |
ข้อมูลจำเพาะ
- ยี่ห้อ: ซูเท็ก
- แบบอย่าง: ส.น.เจ.159บี
- ความจุ: 8 x 6 oz (48 oz total) glass jars
- ช่วงอุณหภูมิ: 68°F - 131°F (20°C - 55°C)
- ช่วงจับเวลา: 1 - 48 ชั่วโมง
- พลัง: 25วัตต์
- วัสดุ: สแตนเลส, แก้ว
- ขนาดสินค้า : Approximately 14.5" (Length) x 7.5" (Height) x 5.7" (Width)
- น้ำหนักสินค้า: 4.4 ปอนด์
- คุณสมบัติพิเศษ: Automatic Shut-Off, Digital Display, Constant Temperature Control
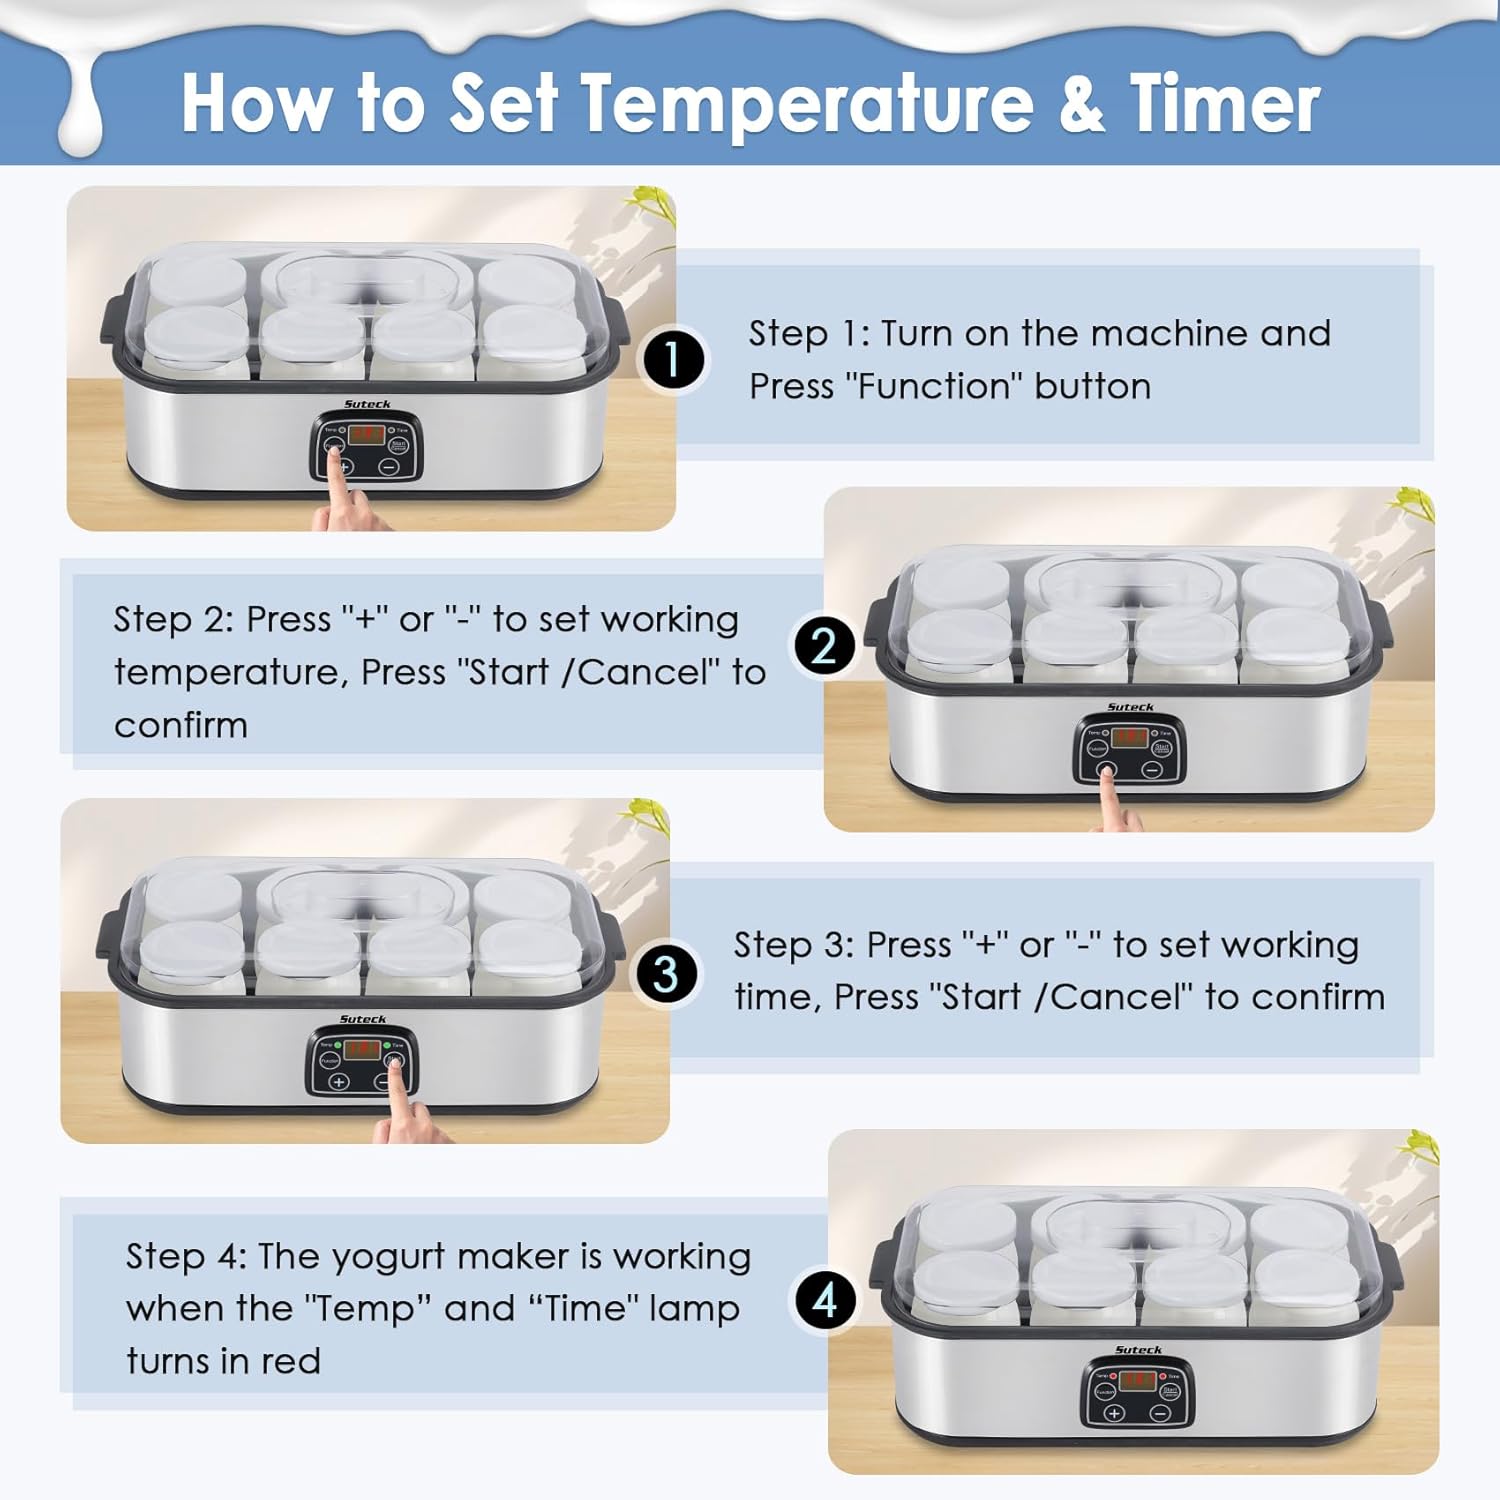
Image: The Suteck Yogurt Maker with key specifications highlighted, including its approximate dimensions (14.5 inches length, 7.5 inches height) and capacity (8 x 6 oz glass jars).
การรับประกันและการสนับสนุน
For warranty information or technical support regarding your Suteck Yogurt Maker, please refer to the original purchase documentation or contact Suteck customer service directly. Specific warranty terms and conditions may vary.
For additional assistance and product information, you may visit the Suteck Store on Amazon.


