1. บทนำ
This manual provides essential information for the setup, operation, maintenance, and troubleshooting of your Artillery Sidewinder X1 3D Printer. Please read this manual thoroughly before operating the device to ensure proper use and to prevent damage.

Figure 1.1: The Artillery Sidewinder X1 3D Printer, showcasing การออกแบบและเป็นampพิมพ์.
2. คุณสมบัติหลัก
- Ultra-Quiet Stepper Driver: Designed for reduced heat dissipation and higher torque, contributing to quieter operation.
- Synchronized Dual Z System: Ensures consistent and parallel movement of the X-carriage relative to the build plate, even if one Z-stepper encounters an issue.
- เครื่องอัดรีดแบบขับตรง (Direct Drive Extruder): Enhances reliability, particularly when printing with flexible filaments.
- AC Heating Platform: Provides rapid heating of the build plate. The lattice glass surface offers excellent adhesion when heated and allows for easy removal of prints once cooled.
- การป้องกันไฟฟ้าดับ: Enables the printer to resume printing from the last recorded position after a power interruption.
- Filament Runout Sensor: Automatically pauses printing and prompts for filament feeding when the material runs out.
- หน้าจอสัมผัสแบบเต็ม: Provides clear instructions and intuitive control.

Figure 2.1: Visual representation of the Artillery Sidewinder X1's key features, including quiet operation, heated bed, and various sensors.
3. อะไรอยู่ในกล่อง
Upon unboxing, verify that all components listed below are present and undamaged:
- 1 x Artillery Sidewinder X1 3D Printer
- ชุดเครื่องมือประกอบ 1 ชุด
- 1 x คู่มือการใช้งานการประกอบ
- 1 x Assembly Guide (likely a quick start guide or visual aid)

รูปที่ 3.1: รายละเอียด view of the included assembly tool kit, showing various tools and spare parts.
4. การติดตั้งและการประกอบ
The Artillery Sidewinder X1 comes 95% pre-assembled. Follow the included Assembly Instruction Manual for detailed steps. Key assembly points include:
- การแกะกล่อง: นำส่วนประกอบทั้งหมดออกจากบรรจุภัณฑ์อย่างระมัดระวัง
- การติดตั้งโครงเครน: Secure the gantry to the base unit. Ensure all connections are firm.
- ผู้ถือเส้นใย: Attach the filament spool holder to the top of the gantry.
- การเชื่อมต่อสายเคเบิล: Connect all necessary cables, paying attention to proper routing to avoid interference with moving parts.
- การเชื่อมต่อไฟฟ้า: Connect the power supply unit. Ensure the correct voltage (110V) is selected if applicable.
4.1 การปรับระดับเบื้องต้น
Accurate bed leveling is crucial for successful prints. The Sidewinder X1 features large leveling knobs for easier adjustment.
- Heat the build plate to your typical printing temperature (e.g., 60°C for PLA) before leveling.
- Use the touch screen to move the nozzle to each corner and the center of the build plate.
- Adjust the leveling knobs until a piece of paper can slide with slight friction between the nozzle and the build plate.

Figure 4.1: Components facilitating setup and operation, including the direct drive extruder, large leveling knob, synchronized dual Z system, and inductive endstop sensors.
5. คู่มือการใช้งาน
5.1 การโหลดเส้นใย
To load filament, gently press the extruder arm and insert the filament into the direct drive extruder until it catches. Use the touch screen controls to extrude a small amount of filament to ensure it is flowing correctly through the nozzle.
5.2 Printing from SD Card/USB Stick
The Sidewinder X1 supports printing directly from a TF Card or USB Stick.
- Prepare your 3D model using a slicing software (e.g., Cura, PrusaSlicer, Simplify3D) and save the G-code file to your TF Card or USB Stick.
- Insert the storage device into the designated slot on the printer.
- Navigate the full touch screen interface to select your desired G-code file และเริ่มการพิมพ์
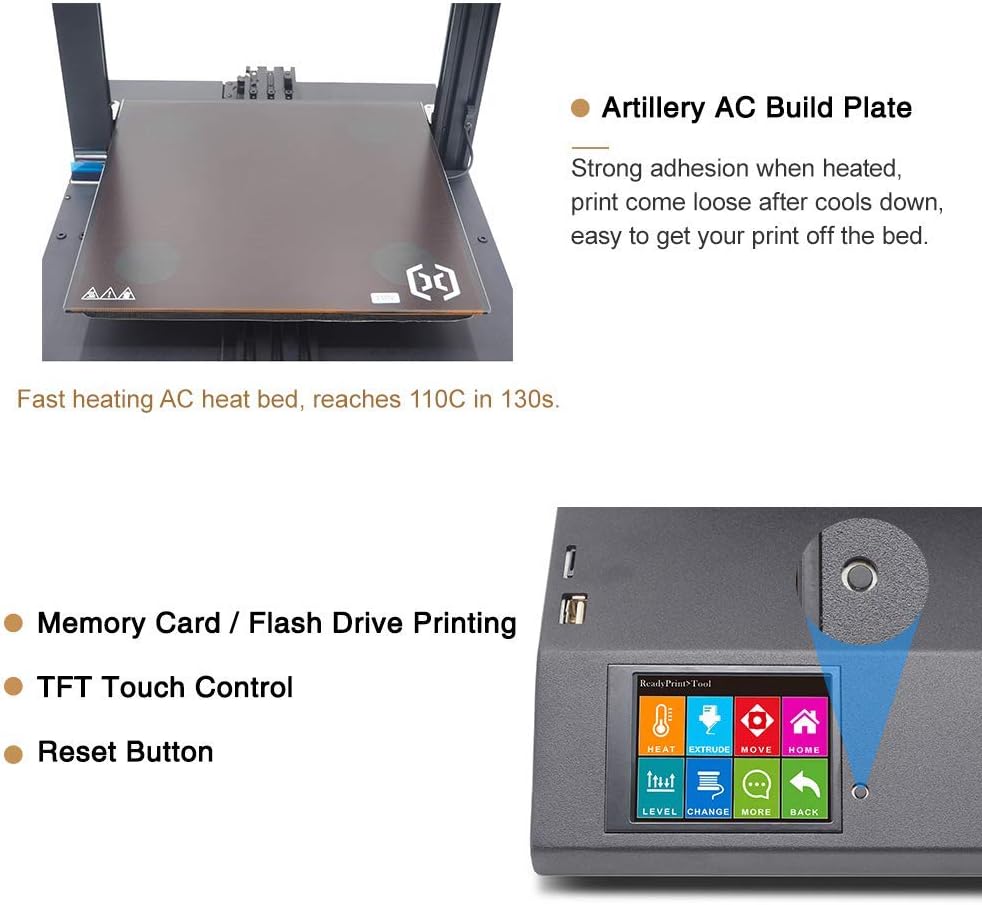
Figure 5.1: The Artillery AC Build Plate, known for its strong adhesion when heated, and the intuitive TFT Touch Control screen with a reset button for easy operation.
6. การบำรุงรักษา
การบำรุงรักษาอย่างสม่ำเสมอจะช่วยให้เครื่องพิมพ์ 3 มิติของคุณทำงานได้อย่างมีประสิทธิภาพสูงสุดและมีอายุการใช้งานยาวนาน
- ทำความสะอาดแผ่นสร้าง: After each print, allow the build plate to cool completely before removing the print. Clean the surface with isopropyl alcohol to remove any residue.
- การทำความสะอาดหัวฉีด: Periodically check the nozzle for clogs. Use the included needle or a brass brush to clean any filament buildup.
- การหล่อลื่น: Apply a small amount of lubricant to the Z-axis lead screws and smooth rods every few months or as needed.
- ความตึงของสายพาน: ตรวจสอบให้แน่ใจว่าสายพานแกน X และ Y ได้รับความตึงอย่างเหมาะสม ควรตึงแต่ไม่แน่นเกินไป
- อัพเดตเฟิร์มแวร์: ตรวจสอบข้อมูลปืนใหญ่อย่างเป็นทางการ webเว็บไซต์สำหรับอัพเดตเฟิร์มแวร์ที่มีอยู่เพื่อปรับปรุงประสิทธิภาพหรือเพิ่มคุณสมบัติใหม่
7 การแก้ไขปัญหา
หัวข้อนี้จะกล่าวถึงปัญหาทั่วไปที่คุณอาจพบเจอ
7.1 ปัญหาการพิมพ์ที่พบบ่อย
- การยึดเกาะชั้นแรกไม่ดี:
- Ensure the build plate is properly leveled.
- Verify the correct bed temperature for your filament type.
- Clean the build plate surface thoroughly.
- เส้นใยไม่ไหลออกมา:
- Check for a clogged nozzle.
- Ensure the filament is loaded correctly and the extruder gear is gripping it.
- Verify the hotend temperature is appropriate for the filament.
- การเลื่อนเลเยอร์:
- ตรวจสอบความตึงของสายพานในแกน X และแกน Y
- ตรวจสอบให้แน่ใจว่าเครื่องพิมพ์วางอยู่บนพื้นผิวที่มั่นคง
- Reduce print speed if necessary.
7.2 การกู้คืนจากไฟฟ้าดับ
The Sidewinder X1 features power failure recovery. If power is interrupted during a print, the printer will attempt to resume from the last position once power is restored.

Figure 7.1: The printer's power failure detection system, which allows it to resume printing after a power outage, preventing print job ruin.
8. ข้อมูลจำเพาะทางเทคนิค
| พารามิเตอร์ | ค่า |
|---|---|
| ความละเอียดของเลเยอร์ | 0.1มม. |
| กรอบรูป | การอัดขึ้นรูปอลูมิเนียม |
| XYZ Positioning Accuracy | 0.05มม., 0.05มม., 0.1มม. |
| การพิมพ์ Filament | PLA, ABS, TPU, วัสดุยืดหยุ่น |
| เส้นผ่านศูนย์กลางเส้นใย | 1.75มม. |
| เส้นผ่านศูนย์กลางหัวฉีด | 0.4มม. |
| ความเร็วการพิมพ์สูงสุด | 150 มม./วินาที |
| ความเร็วสูงสุดในการเดินทาง | 250มม./วินาที |
| สร้างปริมาณ | 300x300x400 มม. |
| ประเภทเครื่องอัดรีด | เครื่องอัดรีดไดรฟ์ตรง |
| Maximum Build Plate Temperature | 130 องศาเซลเซียส |
| ความต้องการพลังงาน | 110โวลต์ |
| การเชื่อมต่อ | USB, TF Card, USB Stick |
| บอร์ดควบคุม | MKS Gen L |
| ประเภทหัวฉีด | ภูเขาไฟ |
| ขนาดเครื่องจักร | 550x405x640 mm (550x405x870 mm with spool holder) |
| น้ำหนักสินค้า | 17.3 กิโลกรัม (38.1 ปอนด์) |
| รองรับ File รูปแบบ | slicer, prusaslicer, cura, kisslicer, ideamaker, slic3r, simplify3d |

Figure 8.1: A visual summary of the Artillery Sidewinder X1's technical specifications and dimensions.
9. การสนับสนุนและการรับประกัน
For any assistance, questions, or warranty inquiries, please contact Artillery customer support. You can typically find contact information on the official Artillery webไซต์หรือผ่านร้านค้าปลีกที่ซื้อผลิตภัณฑ์
As per the product description, for help or questions, contact "Rxlife" (the seller) by clicking "Ask a question" behind "sold by".


