การแนะนำ
This manual provides detailed instructions for the setup, operation, and maintenance of your PROMETHEAN PRM-35 Short-Throw DLP Home Theater Projector. Please read this manual thoroughly before using the projector to ensure proper operation and to extend the life of your device. Keep this manual for future reference.
ข้อมูลด้านความปลอดภัย
ปฏิบัติตามข้อควรระวังด้านความปลอดภัยต่อไปนี้เพื่อป้องกันไฟไหม้ ไฟฟ้าช็อต หรือการบาดเจ็บ:
- อย่าปิดกั้นช่องระบายอากาศ ตรวจสอบให้แน่ใจว่ามีพื้นที่ว่างรอบโปรเจ็กเตอร์เพียงพอเพื่อให้มีการไหลเวียนของอากาศที่ดี
- อย่าให้โปรเจ็กเตอร์โดนฝนหรือความชื้น
- ห้ามเปิดโปรเจคเตอร์asinก. ส่งต่อการบริการทั้งหมดไปยังเจ้าหน้าที่บริการที่มีคุณสมบัติเหมาะสม
- หลีกเลี่ยงการมองเข้าไปในเลนส์โปรเจ็กเตอร์โดยตรงเมื่อเลนส์amp is on, as the bright light can damage your eyes.
- Use only the power cord supplied with the projector or a suitable replacement.
- ถอดปลั๊กโปรเจคเตอร์ออกจากเต้าเสียบไฟก่อนทำความสะอาดหรือเมื่อไม่ได้ใช้งานเป็นเวลานาน
เนื้อหาแพ็คเกจ
ตรวจสอบว่ามีรายการทั้งหมดอยู่ในแพ็คเกจของคุณ:
- PROMETHEAN PRM-35 Projector
- สายไฟ
- รีโมทคอนโทรล
- สาย HDMI (อาจแตกต่างกันไปตามภูมิภาค/ชุด)
- คู่มือการใช้งาน (เอกสารนี้)

Image: The PROMETHEAN PRM-35 projector shown alongside its remote control, power cord, and an HDMI cable, illustrating the typical package contents.
สินค้าเกินview
ด้านหน้า View

ภาพ: ด้านหน้า view of the PROMETHEAN PRM-35 projector, highlighting the lens, brand logo, and various certifications.
The front of the projector features the main projection lens, which includes manual focus and digital zoom capabilities. The PROMETHEAN logo and other product identifiers are also visible.
หลัง View (Connectivity Ports)
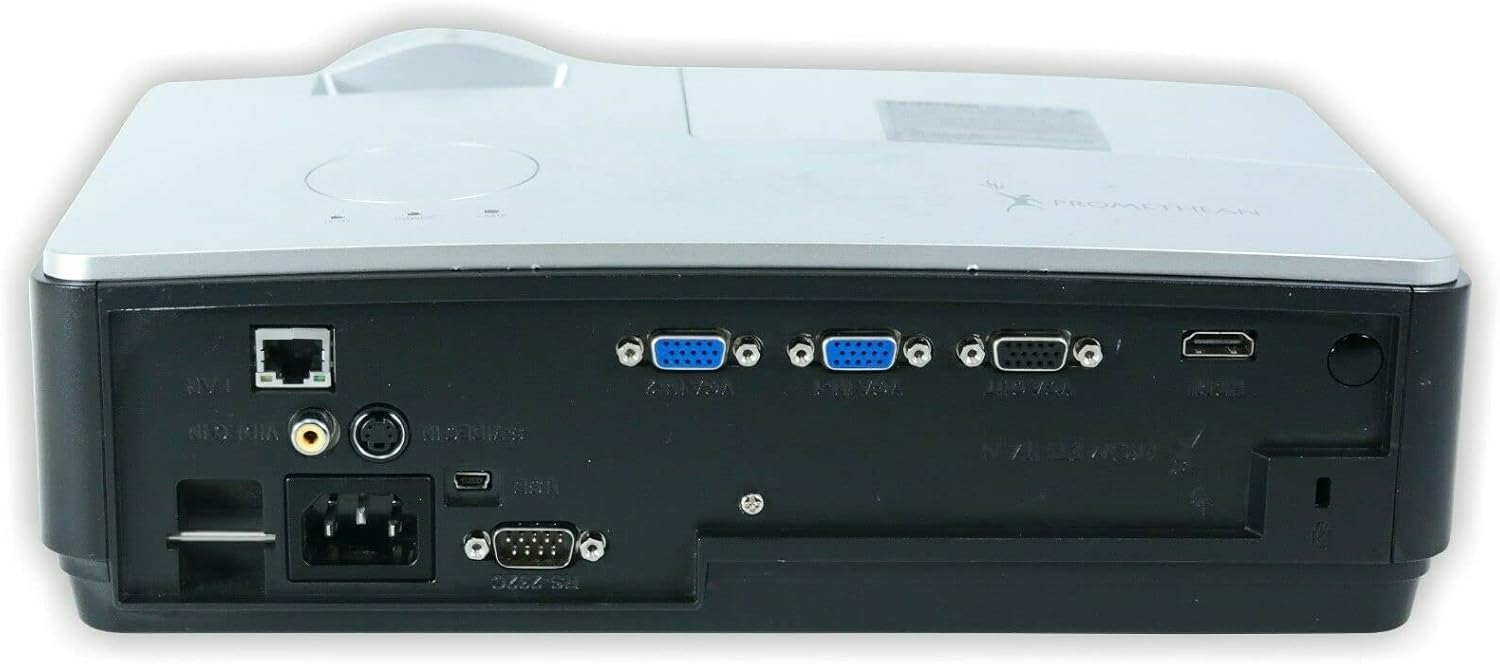
ภาพ: ด้านหลัง view of the PROMETHEAN PRM-35 projector, displaying a variety of input and output ports including HDMI, VGA, USB, S-Video, and network connections.
The rear panel provides all the necessary input and output ports for connecting to various devices. These include HDMI, VGA, S-Video, USB Mini Type-A, RS232, RJ-45 (LAN), and audio jacks.
ด้านข้าง Views (Ventilation)

ภาพ: ด้านข้าง view of the PROMETHEAN PRM-35 projector, showing the ventilation grilles for heat dissipation.

ภาพ: อีกด้านหนึ่ง view of the PROMETHEAN PRM-35 projector, also featuring ventilation grilles.
Both sides of the projector feature ventilation grilles to ensure proper airflow and prevent overheating. It is crucial to keep these vents unobstructed during operation.
สูงสุด View
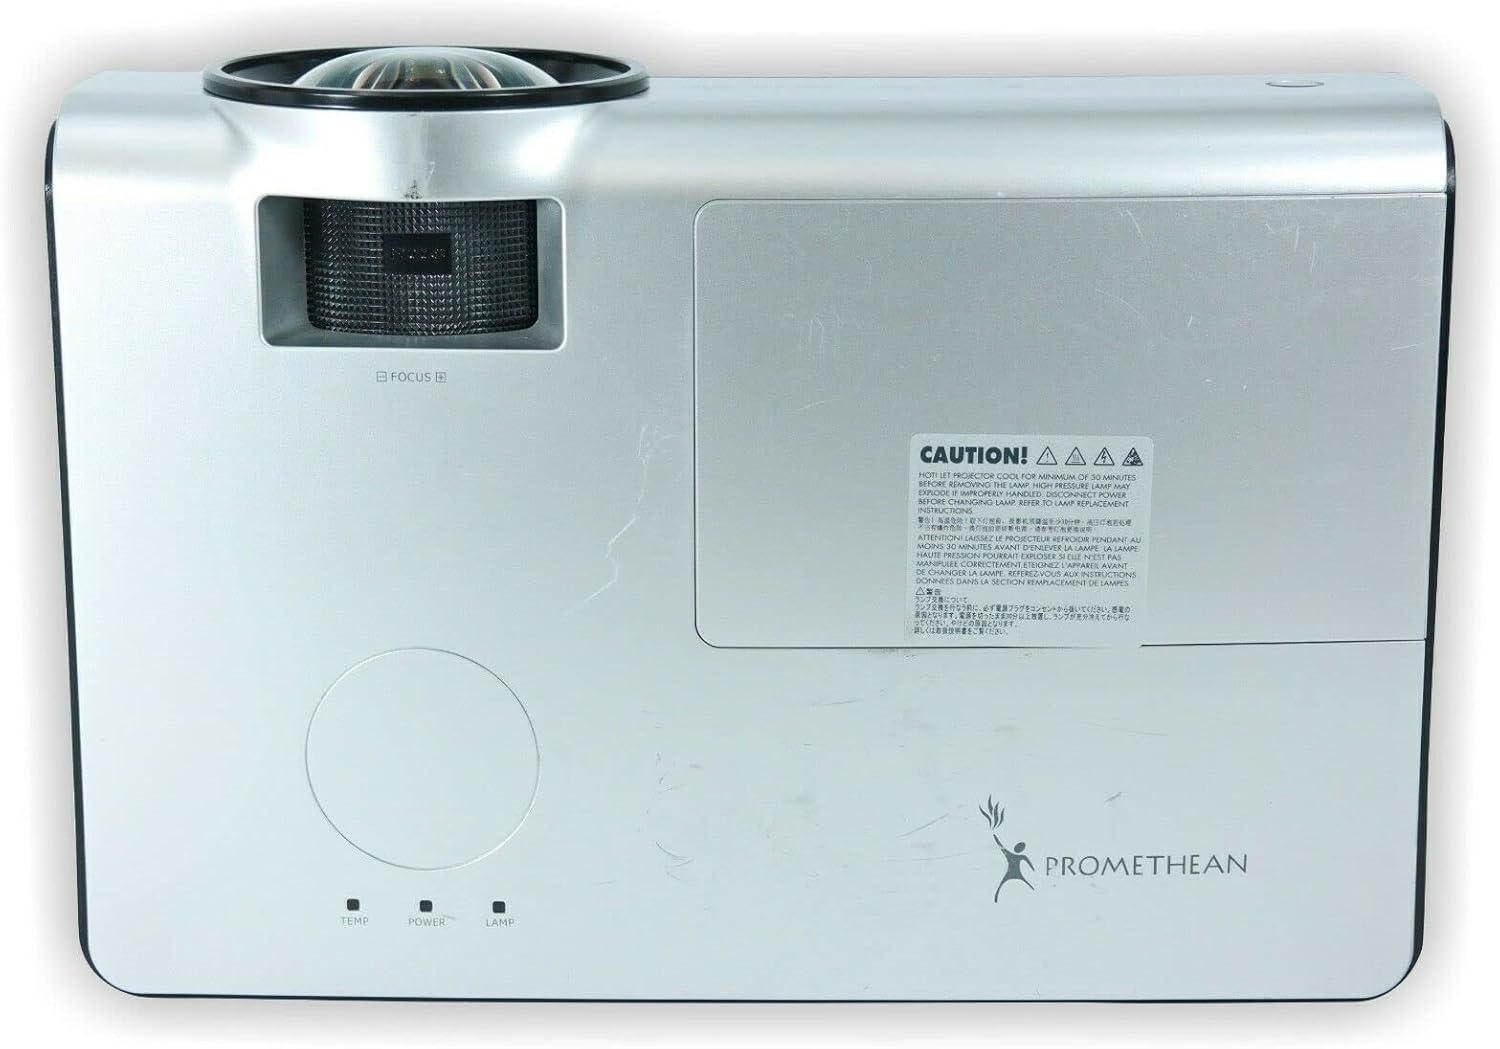
ภาพ: ด้านบน view of the PROMETHEAN PRM-35 projector, showing the control panel area and lamp ฝาครอบการเข้าถึง
The top panel includes indicator lights for temperature, power, and lamp status, along with a caution label regarding lamp ความร้อน.
ด้านล่าง View

ภาพ: ด้านล่าง view of the PROMETHEAN PRM-35 projector, showing mounting points and regulatory labels.
The bottom of the projector features mounting points for ceiling or table top projection, along with product information and regulatory compliance labels.
การตั้งค่า
1 การวาง
Position the projector on a stable, flat surface or mount it securely. For short-throw projection, place the projector close to the screen. Ensure there is adequate space around the projector for ventilation.
- Table Top Projection: วางโปรเจ็กเตอร์บนโต๊ะด้านหน้าจอภาพ
- Ceiling Projection: Use a compatible ceiling mount (sold separately) and ensure the projector is securely fastened.
- การยื่นออกด้านหลัง: If your screen supports it, the projector can be placed behind the screen. Adjust settings in the projector menu for rear projection.
2. กำลังเชื่อมต่อกับพลังงาน
- Connect the power cord to the projector's power input port on the rear panel.
- เสียบปลายอีกด้านของสายไฟเข้ากับเต้ารับไฟฟ้าที่มีสายดิน
- ไฟแสดงสถานะการทำงานของโปรเจ็กเตอร์ควรจะสว่างขึ้น
3. การเชื่อมต่อแหล่งอินพุต
The PRM-35 offers multiple connectivity options:
- ช่องต่อ HDMI: For high-definition digital video and audio. Connect an HDMI cable from your source device (e.g., Blu-ray player, game console, PC) to the HDMI port on the projector.
- VGA: For analog video connection from computers. Connect a VGA cable from your PC to one of the VGA/SVGA D-Sub ports.
- เอส-วิดีโอ: สำหรับวิดีโอความละเอียดมาตรฐาน
- USB Mini Type-A: For certain data or control functions.
- RS232 (DB-9pin): For serial control of the projector.
- RJ-45 (LAN): For network connectivity and control (e.g., Crestron RoomView).
- เสียง: Use the headphone jack for audio output or connect external speakers if desired.
4. Focus and Digital Zoom Adjustment
Once the projector is powered on and displaying an image:
- จุดสนใจ: Rotate the focus ring around the projector lens until the image appears sharp and clear on the screen.
- ซูมดิจิตอล: Use the remote control or projector's on-screen display (OSD) menu to adjust the digital zoom. This feature allows you to enlarge or reduce the image size without moving the projector.
การใช้งานโปรเจ็กเตอร์
การเปิด/ปิดเครื่อง
- เปิดเครื่อง: กดปุ่ม พลัง button on the projector's control panel or the remote control. The power indicator light will change to solid green.
- หมดแรง: กดปุ่ม พลัง button again. A confirmation message may appear. Press พลัง a second time to confirm shutdown. The projector will enter a cooling cycle before fully powering off. Do not unplug the projector during the cooling cycle.
Menu Navigation (OSD)
Use the buttons on the projector's control panel or the remote control to navigate the On-Screen Display (OSD) menu:
- ใช้ เมนู button to open or close the OSD.
- ใช้ ลูกศร ปุ่ม (ขึ้นลงซ้ายขวา) to navigate through menu options.
- กดปุ่ม เข้า or OK ปุ่มสำหรับเลือกตัวเลือกหรือยืนยันการตั้งค่า
- ใช้ ทางออก or กลับ ปุ่มเพื่อกลับไปยังเมนูก่อนหน้าหรือออกจาก OSD
การเลือกแหล่งที่มาของข้อมูล
หากต้องการสลับระหว่างอุปกรณ์ที่เชื่อมต่ออยู่:
- กดปุ่ม แหล่งที่มา or ป้อนข้อมูล button on the remote control or projector.
- รายชื่อแหล่งข้อมูลขาเข้าที่ใช้งานได้จะปรากฏบนหน้าจอ
- ใช้ ลูกศร buttons to highlight the desired source and press เข้า or OK.
การปรับรูปภาพ
Access the Picture menu in the OSD to fine-tune image quality:
- ความสว่าง: ปรับความสว่างหรือความมืดโดยรวมของภาพ
- ตัดกัน: Controls the difference between the lightest and darkest areas.
- สี: ปรับความเข้มของสี
- โทนสี: Fine-tunes the color balance (primarily for NTSC video sources).
- ความคมชัด: ช่วยปรับความคมชัดหรือลดความคมชัดของขอบวัตถุในภาพ
- อัตราส่วนภาพ: Selects the display format (e.g., 16:10, 16:9, 4:3). The native aspect ratio is 16:10.
การตั้งค่าเสียง
The PRM-35 has built-in speakers. Adjust audio settings via the OSD:
- ปริมาณ: Controls the output level of the built-in speakers.
- ปิดเสียง: Temporarily silences the audio.
3D Modes (PC 3D Ready)
The projector supports PC 3D Ready functionality. To experience 3D content:
- Ensure your PC's graphics card and software support 3D output.
- Use compatible 3D glasses (sold separately).
- Refer to your PC's 3D software instructions for specific setup.
การซ่อมบำรุง
การบำรุงรักษาอย่างสม่ำเสมอจะช่วยให้โปรเจคเตอร์ของคุณทำงานได้อย่างมีประสิทธิภาพสูงสุดและมีอายุการใช้งานยาวนานขึ้น
การทำความสะอาดโปรเจคเตอร์
- ภายนอก: ใช้ผ้านุ่มไม่เป็นขุย งampened with a mild, non-abrasive cleaner. Do not spray cleaner directly onto the projector.
- เลนส์: Use a professional lens cleaning kit or a soft, dry microfiber cloth specifically designed for optical lenses. Avoid touching the lens with your fingers.
- ช่องระบายอากาศ: Periodically check and gently clean the ventilation grilles to prevent dust buildup, which can impede airflow. Use a soft brush or compressed air (held upright to prevent propellant discharge).
Lamp อายุการใช้งานและการเปลี่ยนทดแทน
The PRM-35 projector lamp has a long lifespan, up to 6000 hours. When the lamp ถึงจุดสิ้นสุดของชีวิต lamp indicator light on the projector will illuminate or flash, and a message may appear on the screen.
Note: This projector features a filter-free design, eliminating the need for filter replacement or cleaning, which reduces maintenance time and cost.
สำหรับลamp replacement, it is recommended to contact qualified service personnel or refer to the detailed lamp replacement guide available from Promethean support.
พื้นที่จัดเก็บ
If storing the projector for an extended period:
- Power off the projector correctly and allow it to cool down completely.
- ถอดสายเคเบิลทั้งหมด
- เก็บโปรเจคเตอร์ไว้ในที่แห้งและเย็น หลีกเลี่ยงแสงแดดโดยตรงและอุณหภูมิที่สูงหรือต่ำเกินไป
- ควรบรรจุในบรรจุภัณฑ์เดิมหรือใช้กล่องป้องกันเพื่อป้องกันฝุ่นและความเสียหาย
การแก้ไขปัญหา
This section addresses common issues you might encounter with your PRM-35 projector.
| ปัญหา | สาเหตุที่เป็นไปได้ | สารละลาย |
|---|---|---|
| ไม่มีภาพบนหน้าจอ |
|
|
| ภาพเบลอ |
|
|
| โปรเจ็กเตอร์ร้อนเกินไปหรือปิดเครื่อง |
|
|
| รีโมตคอนโทรลไม่ทำงาน |
|
|
ข้อมูลจำเพาะ
| คุณสมบัติ | รายละเอียด |
|---|---|
| ยี่ห้อ | พรอมเธียน |
| แบบอย่าง | พีอาร์เอ็ม-35 |
| ประเภทจอภาพ | ดีแอลพี |
| ความละเอียดดั้งเดิม | ขนาด 1280x800 |
| ความสว่างของภาพ | 2500 ANSI Lumens |
| อัตราส่วนคอนทราสต์ | 2000:1 น. |
| อัตราส่วนภาพ | 16:10 (เนทิฟ) |
| โหมดวิดีโอที่รองรับ | 720p, 1080i, 1080p |
| โหมด 3D | PC 3D Ready |
| ระยะการขว้าง | โยนสั้น |
| การเชื่อมต่อ | HDMI, VGA, USB Mini Type-A, RS232, S-Video, RJ-45 (LAN), Headphone Jack |
| คุณสมบัติพิเศษ | Portable, Short Throw, 3D-Ready, Closed Captioning, Crestron RoomView, Built-in Speakers, Filter-free design |
| น้ำหนักสินค้า | 6 ปอนด์ (ประมาณ) |
| ขนาดสินค้า | 11 x 12 x 4 นิ้ว (โดยประมาณ) |
| Lamp ชีวิต | นานถึง 6000 ชั่วโมง |
| ความเข้ากันได้ | PC and MAC computers |
การรับประกันและการสนับสนุน
For information regarding the warranty coverage for your PROMETHEAN PRM-35 projector, please refer to the warranty card included with your purchase or visit the official PROMETHEAN webไซต์ เงื่อนไขการรับประกันอาจแตกต่างกันไปตามภูมิภาคและผู้ค้าปลีก
For technical support, service, or to purchase replacement parts, please contact PROMETHEAN customer support through their official channels. You may need your product model number (PRM-35) and serial number when contacting support.
Official PROMETHEAN Webเว็บไซต์: www.prometheanworld.com (This is a placeholder link, please refer to actual manufacturer web(เว็บไซต์สำหรับขอรับการสนับสนุน)


