1. บทนำ
คู่มือผู้ใช้นี้ให้คำแนะนำอย่างละเอียดเกี่ยวกับการติดตั้ง การใช้งาน และการบำรุงรักษาเครื่องเล่นแผ่นเสียงระบบสายพานขับ Reloop RP-1000 MK2 ระดับมืออาชีพ โปรดอ่านคู่มือนี้อย่างละเอียดก่อนใช้งานผลิตภัณฑ์ เพื่อให้มั่นใจว่าผลิตภัณฑ์ทำงานได้อย่างถูกต้องและป้องกันความเสียหาย
เครื่องเล่นแผ่นเสียง Reloop RP-1000 MK2 ออกแบบมาสำหรับทั้งดีเจมือใหม่และผู้ที่ชื่นชอบเครื่องเสียงไฮไฟ โดยให้คุณภาพเสียงที่ยอดเยี่ยมด้วยกลไกขับเคลื่อนด้วยสายพาน การออกแบบนี้ช่วยแยกแผ่นเสียงออกจากแรงสั่นสะเทือนของมอเตอร์ได้อย่างมีประสิทธิภาพ ทำให้ได้เสียงที่คมชัดและปราศจากความผิดเพี้ยน รุ่น MK2 มาพร้อมโครงสร้างแผงด้านบนที่ได้รับการปรับปรุง ปุ่มโลหะที่ดีขึ้น และระบบหัวอ่าน Ortofon OM Black ที่ติดตั้งไว้ล่วงหน้าเพื่อการเล่นได้ทันที
2. คำแนะนำด้านความปลอดภัย
เพื่อให้การใช้งานเครื่องเล่นแผ่นเสียงเป็นไปอย่างปลอดภัยและยืดอายุการใช้งาน โปรดปฏิบัติตามคำแนะนำด้านความปลอดภัยต่อไปนี้:
- แหล่งจ่ายไฟ: เชื่อมต่ออุปกรณ์เข้ากับเต้ารับไฟฟ้ากระแสสลับที่มีแรงดันไฟฟ้าที่ถูกต้องเท่านั้นtagตามที่ระบุไว้บนผลิตภัณฑ์ โปรดตรวจสอบให้แน่ใจว่าสายไฟไม่ถูกหนีบหรือถูกเหยียบ
- ความชื้น: อย่าวางเครื่องไว้ในที่ที่มีฝน ความชื้น หรือความชื้นสูงเกินไป อย่าวางสิ่งของที่บรรจุของเหลว เช่น แจกัน ไว้บนเครื่อง
- การระบายอากาศ : ตรวจสอบให้แน่ใจว่ามีการระบายอากาศรอบ ๆ เครื่องอย่างเพียงพอ อย่าปิดกั้นช่องระบายอากาศ
- แหล่งความร้อน: เก็บเครื่องให้ห่างจากแหล่งความร้อน เช่น หม้อน้ำ เครื่องทำความร้อน เตา หรืออุปกรณ์อื่นๆ (รวมถึง ampเครื่องให้ความร้อน) ที่ผลิตความร้อน
- การทำความสะอาด: เช็ดทำความสะอาดด้วยผ้าแห้งเท่านั้น หลีกเลี่ยงการใช้น้ำยาทำความสะอาดหรือสเปรย์กระป๋อง
- การบริการ: ห้ามซ่อมแซมเครื่องด้วยตนเอง โปรดส่งต่อเครื่องให้ช่างผู้ชำนาญการเป็นผู้ดำเนินการซ่อมแซม การซ่อมแซมเป็นสิ่งจำเป็นเมื่อเครื่องได้รับความเสียหายในลักษณะใดๆ เช่น สายไฟหรือปลั๊กชำรุด มีของเหลวหกหรือมีวัตถุตกลงไปในเครื่อง เครื่องโดนฝนหรือความชื้น เครื่องทำงานผิดปกติ หรือเครื่องตกหล่น
- การจัดวาง: วางเครื่องเล่นแผ่นเสียงบนพื้นผิวที่มั่นคงและเรียบ เพื่อป้องกันการสั่นสะเทือนและเพื่อให้การติดตามร่องแผ่นเสียงเป็นไปอย่างถูกต้อง
3. เนื้อหาบรรจุภัณฑ์
โปรดตรวจสอบว่ารายการทั้งหมดที่ระบุไว้ด้านล่างรวมอยู่ในแพ็คเกจของคุณหรือไม่:
- แผ่นเสียงจานเสียง
- ระบบหัวอ่านแผ่นเสียง OM Black (จาก Ortofon)
- เฮดเชล
- สลิปแมท
- น้ำหนักถ่วง
- สายไฟ
- คู่มือการใช้งาน (เอกสารฉบับนี้)
หากมีสินค้าใดสูญหายหรือเสียหาย โปรดติดต่อผู้ค้าปลีกหรือฝ่ายบริการลูกค้าของ Reloop ทันที
4. สินค้าหมดview
ทำความรู้จักกับส่วนประกอบหลักของเครื่องเล่นแผ่นเสียง Reloop RP-1000 MK2 ของคุณให้ดี

รูปที่ 4.1: มุม view ของเครื่องเล่นแผ่นเสียง Reloop RP-1000 MK2 ที่จัดแสดงasing จานหมุน แขนจับแผ่นเสียง และแผงควบคุม
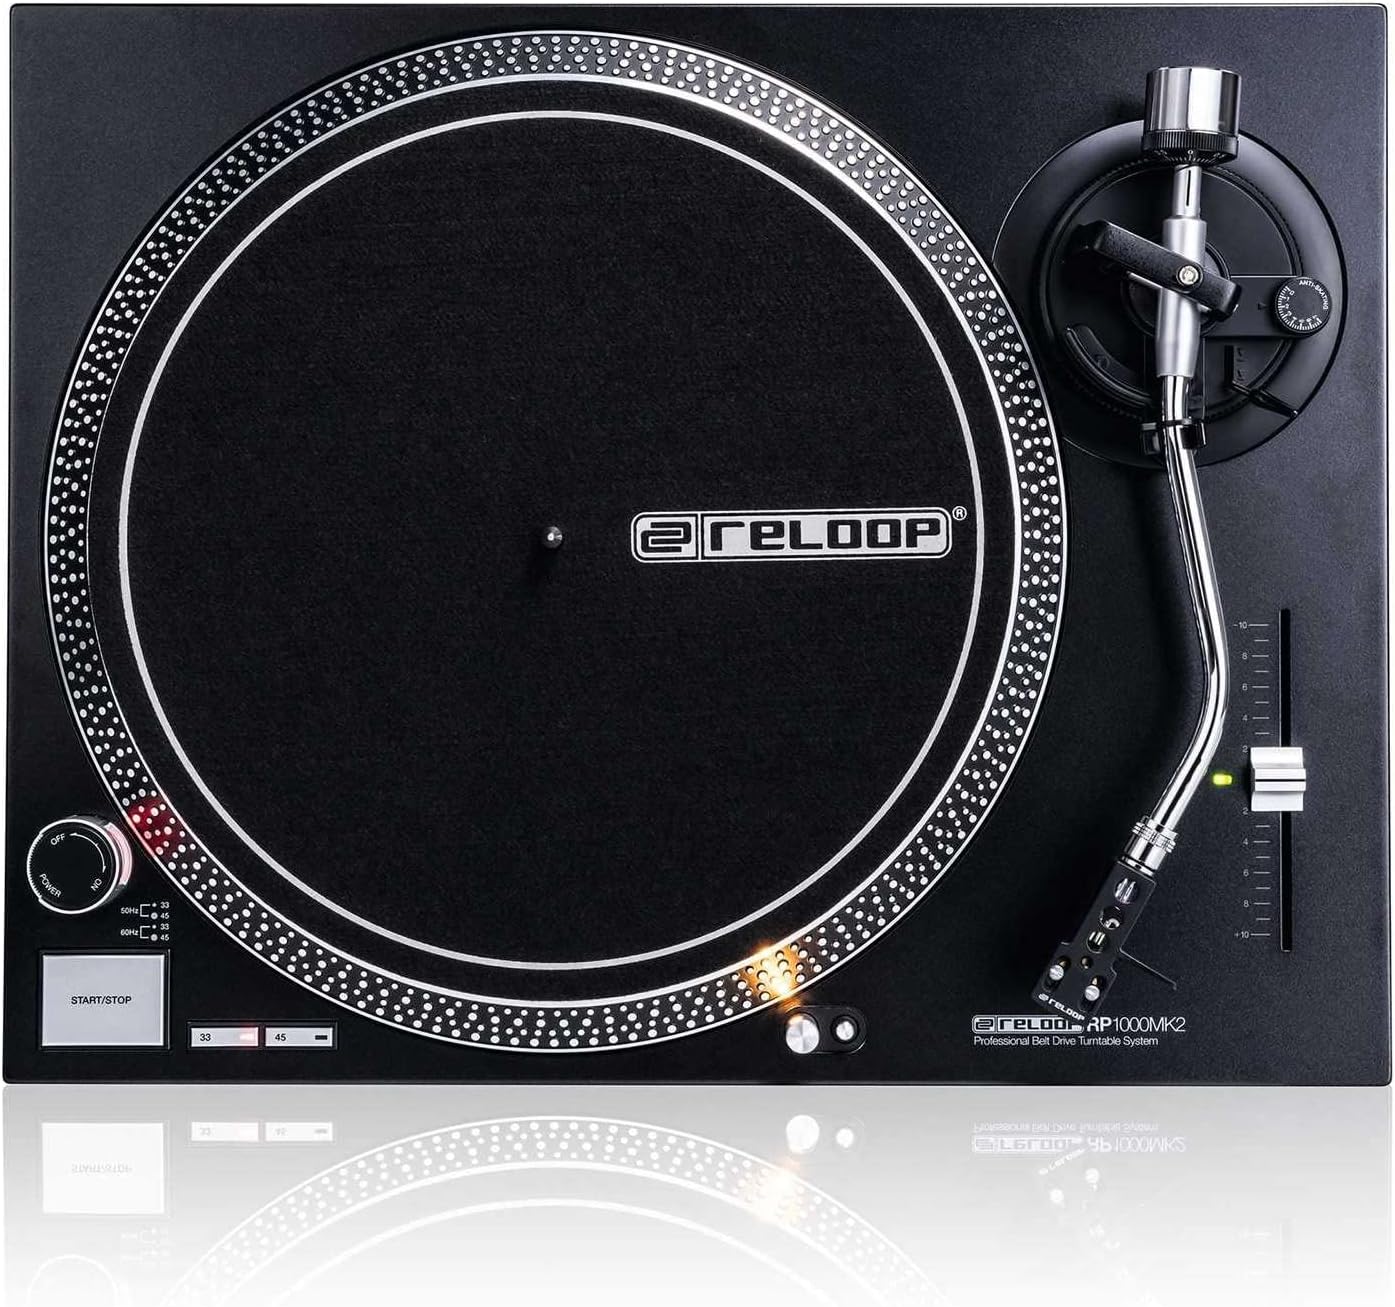
รูปที่ 4.2: จากบนลงล่าง view โดยเน้นส่วนประกอบต่างๆ เช่น จานหมุน แผ่นรองกันลื่นที่มีโลโก้ Reloop แขนจับแผ่นเสียงรูปตัว S และตัวเลื่อนควบคุมระดับเสียง

รูปที่ 4.3: รายละเอียด view ประกอบด้วยโทนอาร์มรูปตัว S, เฮดเชลล์ และระบบหัวอ่าน Ortofon OM Black ที่ติดตั้งไว้ล่วงหน้า

รูปที่ 4.4: ภาพระยะใกล้ของปุ่มเปิด/ปิด ปุ่มเริ่ม/หยุด และปุ่มเลือกความเร็ว (33/45 รอบต่อนาที)
ส่วนประกอบหลัก:
- แผ่นเสียง: จานหมุนทำจากอะลูมิเนียมหล่อขึ้นรูปด้วยความแม่นยำสูง เพื่อการหมุนที่เสถียร
- โทนอาร์ม: แขนโทนอาร์มรูปตัว S ที่สมดุลทางสถิต พร้อมระบบยกไฮดรอลิกและกลไกป้องกันการลื่นไถล
- ตลับหมึก: ชุดหัวอ่านแผ่นเสียง OM Black คุณภาพสูงจาก Ortofon ติดตั้งมาพร้อมกับเฮดเชลล์เรียบร้อยแล้ว
- การควบคุมระดับเสียง: แถบเลื่อนปรับได้ที่มีช่วงการปรับ +/-10% สำหรับการปรับความเร็วอย่างละเอียด
- ปุ่มเลือกความเร็ว: ปุ่มสำหรับเลือกความเร็วในการเล่น 33 1/3 รอบต่อนาที และ 45 รอบต่อนาที
- ปุ่มเริ่ม/หยุด: ควบคุมการหมุนของจานหมุน
- ไฟเป้าหมาย: ไฟส่องเป้าหมายอะลูมิเนียมแบบยืดหดได้ สำหรับส่องสว่างตำแหน่งเข็มในสภาพแวดล้อมที่มืด
- ฐานรองเท้าที่ช่วยดูดซับแรงกระแทก: ปรับปรุงการแยกตัวจากแรงสั่นสะเทือนที่ไม่พึงประสงค์
5. การตั้งค่า
5.1 การแกะและการจัดวาง
- นำส่วนประกอบทั้งหมดออกจากบรรจุภัณฑ์อย่างระมัดระวัง เก็บบรรจุภัณฑ์ไว้เพื่อการขนส่งหรือจัดเก็บในอนาคต
- วางเครื่องเล่นแผ่นเสียงบนพื้นผิวเรียบ มั่นคง และได้ระดับ โดยให้ห่างจากแสงแดดโดยตรง แหล่งความร้อน และสนามแม่เหล็กแรงสูง
- ตรวจสอบให้แน่ใจว่ามีพื้นที่ว่างรอบๆ เครื่องเพียงพอสำหรับการระบายอากาศ
5.2 การติดตั้งจานหมุนและสายพาน
- วางจานลงบนแกนกลาง ตรวจสอบให้แน่ใจว่าวางแน่นสนิทดีแล้ว
- หาตำแหน่งของสายพานขับเคลื่อน ค่อยๆ ดึงสายพานให้ตึงรอบขอบด้านในของจานหมุน แล้วเกี่ยวเข้ากับรอกมอเตอร์ ซึ่งสามารถมองเห็นได้ผ่านช่องเปิดช่องใดช่องหนึ่งของจานหมุน
- วางแผ่นรองกันลื่นที่ทำจากสักหลาดไว้บนจานหมุน
5.3 การตั้งค่าโทนอาร์ม
ชุดหัวอ่านแผ่นเสียง OM Black ติดตั้งไว้ล่วงหน้าในเฮดเชลล์แล้ว โปรดทำตามขั้นตอนต่อไปนี้เพื่อปรับสมดุลโทนอาร์ม:
- ติดตั้งเฮดเชลล์พร้อมตลับเข็มที่ติดตั้งไว้แล้วเข้ากับส่วนหน้าของโทนอาร์ม ยึดให้แน่นโดยหมุนแหวนล็อคตามเข็มนาฬิกา
- วางตุ้มถ่วงน้ำหนักไว้ที่ด้านหลังของแขนโทนอาร์ม แล้วหมุนจนกระทั่งอยู่ตรงกลางโดยประมาณ
- ปล่อยโทนอาร์ม clamp และลดระดับการยกแขนโทนอาร์มลง
- ค่อยๆ ปรับตุ้มถ่วงน้ำหนักโดยหมุนไปข้างหน้าหรือข้างหลังจนกว่าแขนโทนอาร์มจะสมดุลอย่างสมบูรณ์และลอยอยู่ในแนวนอน
- เมื่อปรับสมดุลแล้ว ให้จับตุ้มถ่วงให้มั่นคง และหมุนเฉพาะวงแหวนที่มีตัวเลขอยู่ด้านหน้าของตุ้มถ่วงไปที่ '0' (ศูนย์)
- หมุนตุ้มถ่วงทั้งหมด (รวมถึงวงแหวนที่มีตัวเลข) ทวนเข็มนาฬิกาเพื่อตั้งค่าแรงกดหัวเข็มที่แนะนำสำหรับหัวเข็ม Ortofon OM Black ซึ่งโดยทั่วไปจะอยู่ระหว่าง 1.5 ถึง 2.0 กรัม โปรดดูข้อมูลจำเพาะของผู้ผลิตหัวเข็มสำหรับแรงกดหัวเข็มที่แนะนำอย่างแม่นยำ
- ตั้งค่าแป้นหมุนป้องกันการลื่นไถลให้มีค่าเท่ากับแรงกดหัวเข็มของคุณ
- คืนแขนโทนอาร์มกลับไปที่ตำแหน่งพักและล็อคให้แน่นด้วยตัวล็อคamp.
5.4 การเชื่อมต่อเสียงและพลังงาน
- เชื่อมต่อสายสัญญาณเสียง RCA จากช่องเอาต์พุตของเครื่องเล่นแผ่นเสียงเข้ากับช่องอินพุต PHONO ของเครื่องรับสัญญาณของคุณ ampเครื่องขยายเสียงหรือมิกเซอร์ ตรวจสอบให้แน่ใจว่าได้เชื่อมต่อสายสัญญาณด้านซ้าย (สีขาว) และด้านขวา (สีแดง) อย่างถูกต้อง
- เชื่อมต่อสายดินจากเครื่องเล่นแผ่นเสียงเข้ากับขั้วต่อสายดินบนอุปกรณ์ของคุณ ampใช้เครื่องขยายเสียงหรือมิกเซอร์เพื่อลดเสียงฮัม
- เสียบสายไฟเข้ากับช่องเสียบสายไฟของเครื่องเล่นแผ่นเสียง จากนั้นเสียบเข้ากับเต้ารับไฟฟ้ากระแสสลับที่เหมาะสม
6. คู่มือการใช้งาน
6.1 การทำงานพื้นฐาน
- เปิดเครื่อง: หมุนปุ่มเปิด/ปิดตามเข็มนาฬิกาไปที่ตำแหน่ง "เปิด" จานหมุนจะไม่เริ่มหมุนจนกว่าจะกดปุ่มเริ่ม/หยุด
- เลือกความเร็ว: กดปุ่ม "33" หรือ "45" เพื่อเลือกความเร็วในการเล่นที่ต้องการตามแผ่นเสียงที่คุณกำลังเล่น ไฟ LED ที่เกี่ยวข้องจะสว่างขึ้น
- บันทึกสถานที่: วางแผ่นเสียงลงบนแท่นหมุนอย่างระมัดระวัง
- จานเริ่มต้น: กดปุ่ม START/STOP จานหมุนจะเริ่มหมุน
- การปรับตำแหน่งแขนโทนอาร์ม: ปล่อยโทนอาร์ม clampใช้คันโยกยกโทนอาร์มเพื่อยกโทนอาร์มขึ้น ค่อยๆ เลื่อนโทนอาร์มไปยังแทร็กที่ต้องการบนแผ่นเสียง
- แขนโทนอาร์มส่วนล่าง: ค่อยๆ ลดคันโยกยกโทนอาร์มลง เพื่อให้เข็มลงบนร่องแผ่นเสียง
- กำลังเล่น: ขณะนี้เสียงจะเล่นผ่านระบบเสียงที่เชื่อมต่อของคุณแล้ว
- หยุดการเล่น: เมื่อเล่นแผ่นเสียงจบ หรือเมื่อต้องการหยุด ให้ใช้คันโยกยกแขนโทนอาร์มเพื่อยกแขนโทนอาร์มขึ้น แล้ววางกลับไปที่ตำแหน่งพัก จากนั้นล็อคให้แน่นด้วยตัวล็อคampกดปุ่ม START/STOP เพื่อหยุดการหมุนของแผ่นเสียง
- หมดแรง: เมื่อไม่ใช้งาน ให้หมุนปุ่มเปิด/ปิดทวนเข็มนาฬิกาไปที่ตำแหน่ง "ปิด"
6.2 การใช้การควบคุมระดับเสียง
แถบเลื่อนควบคุมระดับเสียงช่วยให้คุณปรับความเร็วในการเล่นได้อย่างละเอียดทีละ +/- 10% เลื่อนแถบเลื่อนขึ้นหรือลงเพื่อเพิ่มหรือลดความเร็ว จุดกึ่งกลางแสดงถึงการปรับระดับเสียง 0% (ความเร็วปกติ)
6.3 ไฟส่องเป้าหมาย
กดปุ่มไฟเป้าหมายอะลูมิเนียมเพื่อยืดไฟออกมา ส่องสว่างตำแหน่งเข็ม ซึ่งมีประโยชน์อย่างยิ่งในสภาพแสงน้อย กดอีกครั้งเพื่อหดไฟกลับ
7. การบำรุงรักษา
7.1 การทำความสะอาดหน่วย
- ถอดสายไฟออกก่อนทำความสะอาดทุกครั้ง
- ใช้ผ้าแห้งนุ่มๆ ที่ไม่มีขนเช็ดทำความสะอาดพื้นผิวของเครื่องเล่นแผ่นเสียง
- สำหรับรอยฝังแน่น ให้เช็ดออกเล็กน้อยamp สามารถใช้ผ้าเช็ดทำความสะอาดได้ แล้วตามด้วยผ้าแห้งทันที หลีกเลี่ยงน้ำยาทำความสะอาดที่มีฤทธิ์กัดกร่อนหรือตัวทำละลาย
7.2 การดูแลรักษาสไตลัส
- หัวเข็ม (สไตลัส) เป็นชิ้นส่วนที่บอบบาง โปรดใช้งานด้วยความระมัดระวังเป็นอย่างยิ่ง
- ทำความสะอาดสไตลัสเป็นประจำโดยใช้แปรงขนนุ่มที่ออกแบบมาสำหรับทำความสะอาดสไตลัสโดยเฉพาะ โดยปัดเบา ๆ จากด้านหลังไปด้านหน้า
- หัวเข็มที่สึกหรอหรือสกปรกอาจทำให้แผ่นเสียงเสียหายและลดคุณภาพเสียงได้ ควรเปลี่ยนหัวเข็มเมื่อพบร่องรอยการสึกหรอ (เช่น เสียงผิดเพี้ยน เสียงกระโดด)
7.3 การเปลี่ยนสายพาน
สายพานเป็นชิ้นส่วนที่สึกหรอได้ หากคุณสังเกตเห็นว่าความเร็วไม่สม่ำเสมอหรือจานหมุนไม่หมุน สายพานอาจต้องเปลี่ยน โปรดติดต่อฝ่ายสนับสนุนของ Reloop หรือศูนย์บริการที่ได้รับอนุญาตเพื่อขอรับสายพานทดแทนและคำแนะนำ
7.4 การดูแลรักษาฝาครอบกันฝุ่น (ถ้ามี)
หากเครื่องเล่นแผ่นเสียงของคุณมีฝาครอบกันฝุ่น ให้ทำความสะอาดด้วยผ้าเนื้อนุ่มและแห้งamp ใช้ผ้าเช็ดทำความสะอาด หลีกเลี่ยงการใช้ผ้าแห้งเพราะอาจทำให้พื้นผิวอะคริลิกเป็นรอยได้ ห้ามใช้สารเคมีรุนแรง
8 การแก้ไขปัญหา
ก่อนติดต่อฝ่ายสนับสนุน โปรดดูปัญหาที่พบบ่อยและวิธีแก้ไขต่อไปนี้:
| ปัญหา | สาเหตุที่เป็นไปได้ | สารละลาย |
|---|---|---|
| ไม่มีไฟ / จานหมุนไม่หมุน | ไม่ได้เสียบสายไฟ; ปิดสวิตช์ไฟ; ไม่ได้ติดตั้งสายพานหรือสายพานชำรุด | ตรวจสอบให้แน่ใจว่าเสียบสายไฟแน่นสนิทแล้ว เปิดสวิตช์ไฟ ตรวจสอบว่าสายพานขับเคลื่อนติดตั้งรอบจานหมุนและรอกมอเตอร์อย่างถูกต้องหรือไม่ เปลี่ยนสายพานหากชำรุด |
| ไม่มีเสียงหรือมีเสียงเบามาก | สาย RCA ไม่ได้เชื่อมต่ออย่างถูกต้อง; Ampอินพุตของแอมพลิฟายเออร์/มิกเซอร์ไม่ถูกต้อง; เข็มเข็มชำรุดหรือสกปรก; หัวเข็มไม่ได้ติดตั้งอย่างถูกต้อง | ตรวจสอบการเชื่อมต่อ RCA ampเครื่องขยายเสียง/มิกเซอร์ (อินพุต PHONO) ตรวจสอบให้แน่ใจว่าได้ต่อสายดินแล้ว ทำความสะอาดหัวเข็ม ใส่หัวเข็มกลับเข้าไปในเฮดเชลล์ |
| เสียงผิดเพี้ยน / เสียงกระตุก | หัวเข็มสกปรกหรือสึกหรอ; แรงกดหัวเข็มไม่ถูกต้อง; ระบบป้องกันการลื่นไถลไม่ถูกต้อง; แท่นหมุนไม่ตรงระดับ; แผ่นเสียงสกปรกหรือเสียหาย | ทำความสะอาดหรือเปลี่ยนหัวเข็ม ปรับแรงกดหัวเข็มและระบบป้องกันการลื่นไถล ตรวจสอบให้แน่ใจว่าเครื่องเล่นแผ่นเสียงวางอยู่บนพื้นผิวที่เรียบ ทำความสะอาดแผ่นเสียง |
| ความเร็วไม่สม่ำเสมอ | สายพานสึกหรอหรือยืดตัว; ปัญหาจากมอเตอร์ | ตรวจสอบสายพานขับเคลื่อนว่าสึกหรอหรือไม่ และเปลี่ยนหากจำเป็น หากปัญหายังคงอยู่ โปรดติดต่อฝ่ายบริการ |
9. ข้อมูลจำเพาะ
| คุณสมบัติ | คำอธิบาย |
|---|---|
| ชื่อรุ่น | ระบบเครื่องเล่นแผ่นเสียงแบบสายพานขับเคลื่อนระดับมืออาชีพ RP-1000 MK2 |
| ประเภทไดรฟ์ | สายพานไดรฟ์ |
| ระบบมอเตอร์ | ระบบมอเตอร์ขับเคลื่อนด้วยสายพานอันทรงพลังช่วยดูดซับแรงสั่นสะเทือนและเสียงรบกวนที่ไม่พึงประสงค์ |
| แผ่นเสียง | จานหมุนทำจากอะลูมิเนียมหล่อขึ้นรูปด้วยความแม่นยำสูง ออกแบบมาให้หมุนได้อย่างมั่นคง |
| ความเร็ว | ปรับความเร็วได้ 2 ระดับ (33 1/3 และ 45 รอบต่อนาที) |
| การควบคุมระดับเสียง | ช่วงปรับได้ +/-10% |
| โทนอาร์ม | แขนโทนอาร์มรูปตัว S ที่สมดุลทางสถิต พร้อมระบบยกไฮดรอลิกและระบบป้องกันการลื่นไถล |
| การก่อสร้าง | แผงด้านบนทำจากโลหะที่ออกแบบใหม่ ปุ่มสัมผัส โครงสร้างตัวเรือนเสริมความแข็งแรง และปรับปรุงประสิทธิภาพให้ดียิ่งขึ้นampคุณสมบัติเด่น ได้แก่ ขาตั้งที่ช่วยดูดซับแรงกระแทก |
| ขนาด (กว้าง x ลึก x สูง) | 17.72 x 13.86 x 5.67 นิ้ว (ประมาณ 45 x 35.2 x 14.4 ซม.) |
| น้ำหนัก | 16.06 ปอนด์ (ประมาณ 7.3 กก.) |
| การเชื่อมต่อ | เอาต์พุต RCA แบบอนาล็อก, ขั้วต่อกราวด์ |
| แหล่งพลังงาน | ใช้ไฟฟ้าแบบมีสาย 220 โวลต์ (ตรวจสอบแรงดันไฟฟ้าในพื้นที่ของคุณ)tagข้อกำหนดอี) |
10. การรับประกันและการสนับสนุน
10.1 ข้อมูลการรับประกัน
ผลิตภัณฑ์ของ Reloop ผลิตขึ้นตามมาตรฐานคุณภาพสูงสุด ผลิตภัณฑ์นี้มาพร้อมกับการรับประกันจากผู้ผลิต โปรดดูรายละเอียดในบัตรรับประกันที่อยู่ในบรรจุภัณฑ์ หรือเยี่ยมชมเว็บไซต์อย่างเป็นทางการของ Reloop webเว็บไซต์สำหรับข้อกำหนดและเงื่อนไขการรับประกันโดยละเอียดที่ใช้บังคับกับภูมิภาคของคุณ
เก็บหลักฐานการซื้อของคุณไว้ (ใบเสร็จรับเงินหรือใบแจ้งหนี้) เนื่องจากจะต้องใช้หลักฐานนี้ในการเรียกร้องการรับประกันใดๆ
10.2 การสนับสนุนลูกค้า
หากคุณพบปัญหาใดๆ ที่ไม่ได้กล่าวถึงในส่วนการแก้ไขปัญหา หรือต้องการความช่วยเหลือเพิ่มเติม โปรดติดต่อฝ่ายบริการลูกค้าของ Reloop หรือตัวแทนจำหน่ายที่ได้รับอนุญาตของคุณ โดยปกติแล้ว คุณสามารถค้นหาข้อมูลการติดต่อได้ในเว็บไซต์อย่างเป็นทางการของ Reloop webไซต์หรือบนบรรจุภัณฑ์ผลิตภัณฑ์ของคุณ
สำหรับข้อมูลล่าสุด คำถามที่พบบ่อย และแหล่งข้อมูลสนับสนุน โปรดเยี่ยมชมเว็บไซต์อย่างเป็นทางการของ Reloop webเว็บไซต์: www.reoop.com


