1. บทนำ
Thank you for choosing the Antec P101S Silent Performance Mid-Tower PC Case. This manual provides essential information for the proper installation, operation, and maintenance of your new computer case. Please read this manual thoroughly before beginning assembly to ensure optimal performance and longevity of your system.
The Antec P101S is engineered for quiet computing, featuring sound-dampening panels and efficient cooling solutions, making it ideal for users who prioritize a silent and high-performance computing environment.
2. คุณสมบัติหลัก
- การทำงานเงียบ: Equipped with sound-dampening top, front, and side panels for quiet computing.
- Extensive Drive Bays: Supports 11 drive bays, including 1 x 5.25" ODD bay, 8 x 3.5" HDD/2.5" SSD removable bays, and 2 x dedicated 2.5" SSD bays.
- ระบบระบายความร้อนขั้นสูง: Includes 4 pre-installed 120/140mm cooling fans (3 front, 1 rear). Supports up to 4 fan mounts with a maximum of 360mm radiator support for enhanced cooling.
- แผง I/O ที่ใช้งานสะดวก: Features power/reset buttons, a fan speed controller (High/Stop/Low), Audio/Mic ports, 2 x USB 2.0, and 2 x USB 3.0 ports with white LED lighting.
- ความเข้ากันได้ของเมนบอร์ดที่กว้างขวาง: Supports E-ATX, ATX, Micro-ATX, and ITX motherboards.
- ระยะห่างระหว่างชิ้นส่วนที่กว้างขวาง: Accommodates CPU coolers up to 180mm, graphics cards up to 450mm, and PSUs up to 290mm in length.
3. เนื้อหาบรรจุภัณฑ์
โปรดตรวจสอบว่าสินค้าทั้งหมดมีอยู่ในแพ็คเกจของคุณ:
- Antec P101S Mid-Tower PC Case
- 3 x 120mm Front Fans (Pre-installed)
- 1 x 140mm Rear Fan (Pre-installed)
- Accessory Box (screws, cable ties, user manual)
4. ส่วนประกอบเกินview
Familiarize yourself with the various parts of your Antec P101S case.

Figure 1: Front, Back, Left, and Right views of the Antec P101S case, illustrating its external design and panel layout.

รูปที่ 2 : ภายใน view of the Antec P101S, showing the spacious layout, drive bays, and fan mounts.

Figure 3: Close-up of the top I/O panel, highlighting the power, reset, fan speed controller, audio, USB 2.0, and USB 3.0 ports.
5. การตั้งค่าและการติดตั้ง
Follow these steps to install your components into the Antec P101S case.
5.1 การเตรียมคดี
- ถอดแผงด้านข้างออก: Unscrew the thumbscrews on the rear of the side panels and slide them backward to remove.
- ทางเข้าภายใน: The interior is now accessible for component installation.
5.2 การติดตั้งเมนบอร์ด
- ติดตั้งสแตนด์ออฟ: Ensure the correct motherboard standoffs are installed for your motherboard form factor (ATX, Micro-ATX, ITX, E-ATX).
- ตำแหน่งการวางเมนบอร์ด: จัดวางเมนบอร์ดให้ตรงกับตัวยึดและช่องเปิดของแผ่นป้องกันพอร์ต I/O อย่างระมัดระวัง
- เมนบอร์ดที่ปลอดภัย: Fasten the motherboard with the provided screws.
5.3 การติดตั้งไดรฟ์
The P101S offers versatile drive mounting options.
5.3.1 3.5" HDD / 2.5" SSD Removable Bays

Figure 4: Illustration of the various drive bay locations within the Antec P101S case.
- ถอดถาดใส่ฮาร์ดไดรฟ์ออก: Pull out an empty 3.5" drive tray from the drive cage.
- ติดตั้งไดรฟ์: For a 3.5" HDD, flex the tray and insert the drive. For a 2.5" SSD, secure it to the bottom of the tray with screws.
- ใส่ถาดกลับเข้าไปใหม่: เลื่อนถาดที่ใส่ไดรฟ์แล้วกลับเข้าไปในช่องใส่ไดรฟ์จนกระทั่งได้ยินเสียงคลิกเข้าที่
5.3.2 Dedicated 2.5" SSD Bays
Two dedicated 2.5" SSD mounts are located behind the motherboard tray.
- SSD ที่ปลอดภัย: Attach your 2.5" SSD to the dedicated mounting bracket using screws.
- ขายึด: Secure the bracket with the SSD to the chassis behind the motherboard tray.
5.3.3 5.25" ODD Bay
- Remove Front Bezel: Gently remove the 5.25" bay cover from the front bezel.
- Insert ODD: Slide your optical disc drive into the bay from the front until it aligns with the screw holes.
- Secure ODD: Fasten the ODD with screws.
5.4 การติดตั้งการ์ดจอและการ์ดขยาย
- ถอดฝาครอบสล็อต PCIe: Unscrew and remove the necessary PCIe slot covers from the rear of the case.
- ใส่การ์ด: Carefully insert your graphics card or other expansion card into the appropriate PCIe slot on the motherboard.
- บัตรที่ปลอดภัย: Fasten the card with screws.
5.5 การติดตั้งหน่วยจ่ายไฟ (PSU)
- ตำแหน่ง PSU : เลื่อนพาวเวอร์ซัพพลายเข้าไปในช่องที่กำหนดไว้ที่ด้านล่างด้านหลังของเคส
- PSU ที่ปลอดภัย: Fasten the PSU to the rear of the chassis with screws.
5.6 การจัดการสายเคเบิล
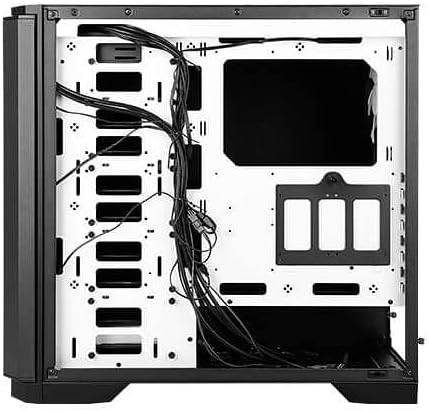
รูปที่ 5: ด้านหลัง view of the motherboard tray, showing cable routing channels and tie-down points for organized cable management.
Utilize the cable routing holes and tie-down points behind the motherboard tray to organize cables for improved airflow and aesthetics.
6. การใช้งานเคสพีซีของคุณ
6.1 เปิด/ปิดเครื่อง
Press the large power button on the top I/O panel to turn your system on or off.
6.2 การควบคุมความเร็วพัดลม
Use the fan speed controller switch on the top I/O panel to adjust the speed of the pre-installed fans:
- สูง: Maximum fan speed for optimal cooling.
- ต่ำ: Reduced fan speed for quieter operation.
- หยุด: Fans are turned off.
7. การบำรุงรักษา
7.1 การทำความสะอาดแผ่นกรองฝุ่น
Regularly clean the dust filters located at the front, top, and bottom of the case to maintain optimal airflow and prevent dust buildup. The front filter is easily removable for cleaning.
7.2 การทำความสะอาดทั่วไป
Use a soft, dry cloth to clean the exterior of the case. For stubborn marks, a slightly damp สามารถใช้ผ้าเช็ดทำความสะอาดได้ แล้วจึงเช็ดให้แห้ง หลีกเลี่ยงน้ำยาทำความสะอาดที่มีฤทธิ์กัดกร่อนหรือตัวทำละลาย
8 การแก้ไขปัญหา
- ระบบไม่เปิดเครื่อง: Double-check all power connections, including the 24-pin ATX, 8-pin CPU, and GPU power cables. Ensure the PSU switch is in the 'On' position.
- พัดลมไม่หมุน: Verify that the fan speed controller on the I/O panel is not set to 'Stop'. Check fan connections to the motherboard or fan hub.
- ความร้อนสูงเกินไป: Ensure all fans are spinning correctly and dust filters are clean. Verify proper component installation and thermal paste application.
- พอร์ต USB ไม่ทำงาน: Check the internal USB header connections from the I/O panel to the motherboard.
9. ข้อมูลจำเพาะ
| คุณสมบัติ | รายละเอียด |
|---|---|
| ชื่อรุ่น | P101S Silent |
| ประเภทเคส | หอคอยกลาง |
| ความเข้ากันได้ของเมนบอร์ด | E-ATX, ATX, ไมโคร ATX, ITX |
| ขนาด (กxยxส) | 20.74 x 9.13 x 19.92 นิ้ว |
| น้ำหนักสินค้า | 26.1 ปอนด์ |
| วัสดุ | เหล็กอัลลอยด์ |
| ช่องไดรฟ์ | 1 x 5.25" ODD, 8 x 3.5" HDD/2.5" SSD, 2 x 2.5" SSD |
| พัดลมที่ติดตั้งล่วงหน้า | 3 x 120mm Front, 1 x 140mm Rear |
| ฐานรองหม้อน้ำ | Front: Up to 360mm, Rear: Up to 140mm |
| ความสูงสูงสุดของตัวระบายความร้อนซีพียู | 180มม. |
| ความยาวสูงสุดของ GPU | 450มม. |
| ความยาวสูงสุดของ PSU | 290มม. |
| พอร์ต I / O ด้านหน้า | 2 x USB 2.0, 2 x USB 3.0, Audio/Mic, Power, Reset, Fan Speed Controller |
10. การรับประกันและการสนับสนุน
สำหรับข้อมูลการรับประกันและการสนับสนุนทางเทคนิค โปรดดูที่เว็บไซต์อย่างเป็นทางการของ Antec website or contact your local Antec distributor. Keep your proof of purchase for warranty claims.
Antec Official Webเว็บไซต์: www.antec.com


